ILIAS/Instructions/Online-test: Unterschied zwischen den Versionen
| Zeile 170: | Zeile 170: | ||
{{Diagramm|ILIAS_Online_Test_Ergebnisse_verwalten_Eng}}{{Diagramm|ILIAS/Anleitungen/Online-Test/Testergebnisse-verwalten}} | {{Diagramm|ILIAS_Online_Test_Ergebnisse_verwalten_Eng}}{{Diagramm|ILIAS/Anleitungen/Online-Test/Testergebnisse-verwalten}} | ||
===8.2. Reviewing statistics=== | ===8.2. Reviewing statistics=== | ||
In addition to aggregated results (e.g. grade point average), the “Statistics” tab also provides individual data for each participant. | |||
You can export the displayed results to Excel or CSV format (comma-separated values).{{Diagramm|ILIAS_Online_Test_Teststatistiken_Eng}}{{Diagramm|ILIAS/Anleitungen/Online-Test/Statistiken}} | |||
{{Diagramm|ILIAS_Online_Test_Teststatistiken_Eng}}{{Diagramm|ILIAS/Anleitungen/Online-Test/Statistiken}} | |||
===8.3. Exporting a result file=== | ===8.3. Exporting a result file=== | ||
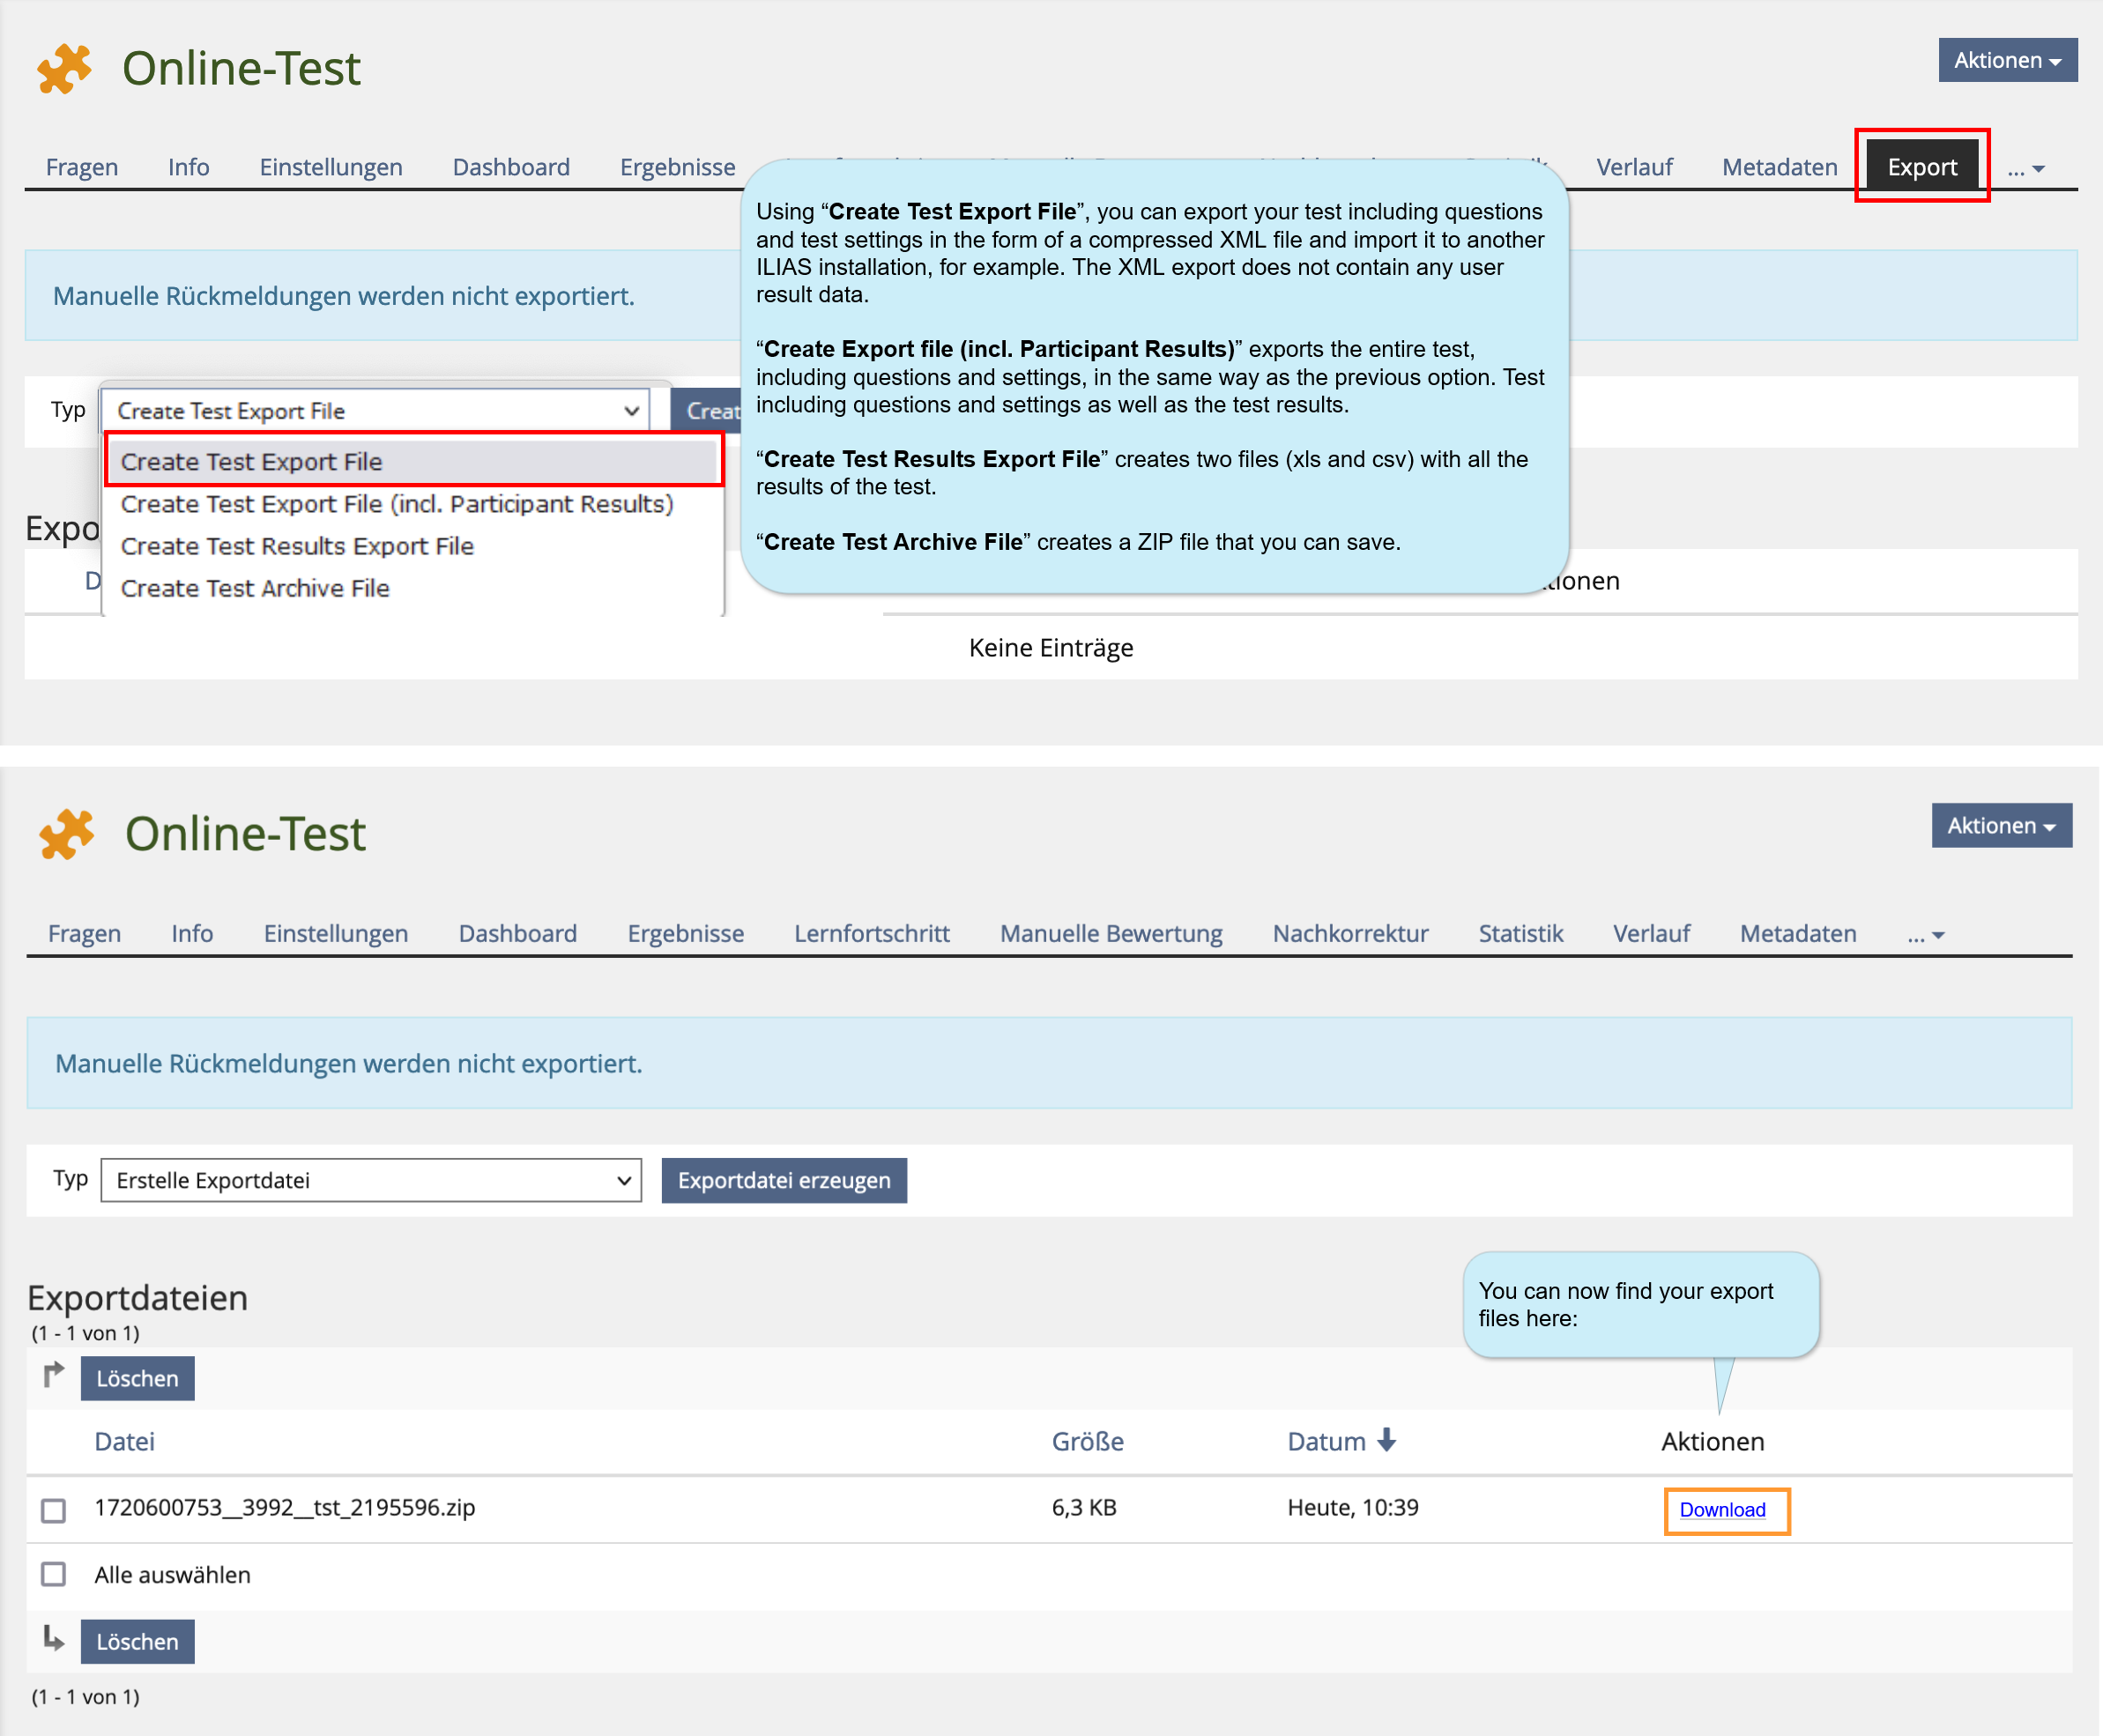
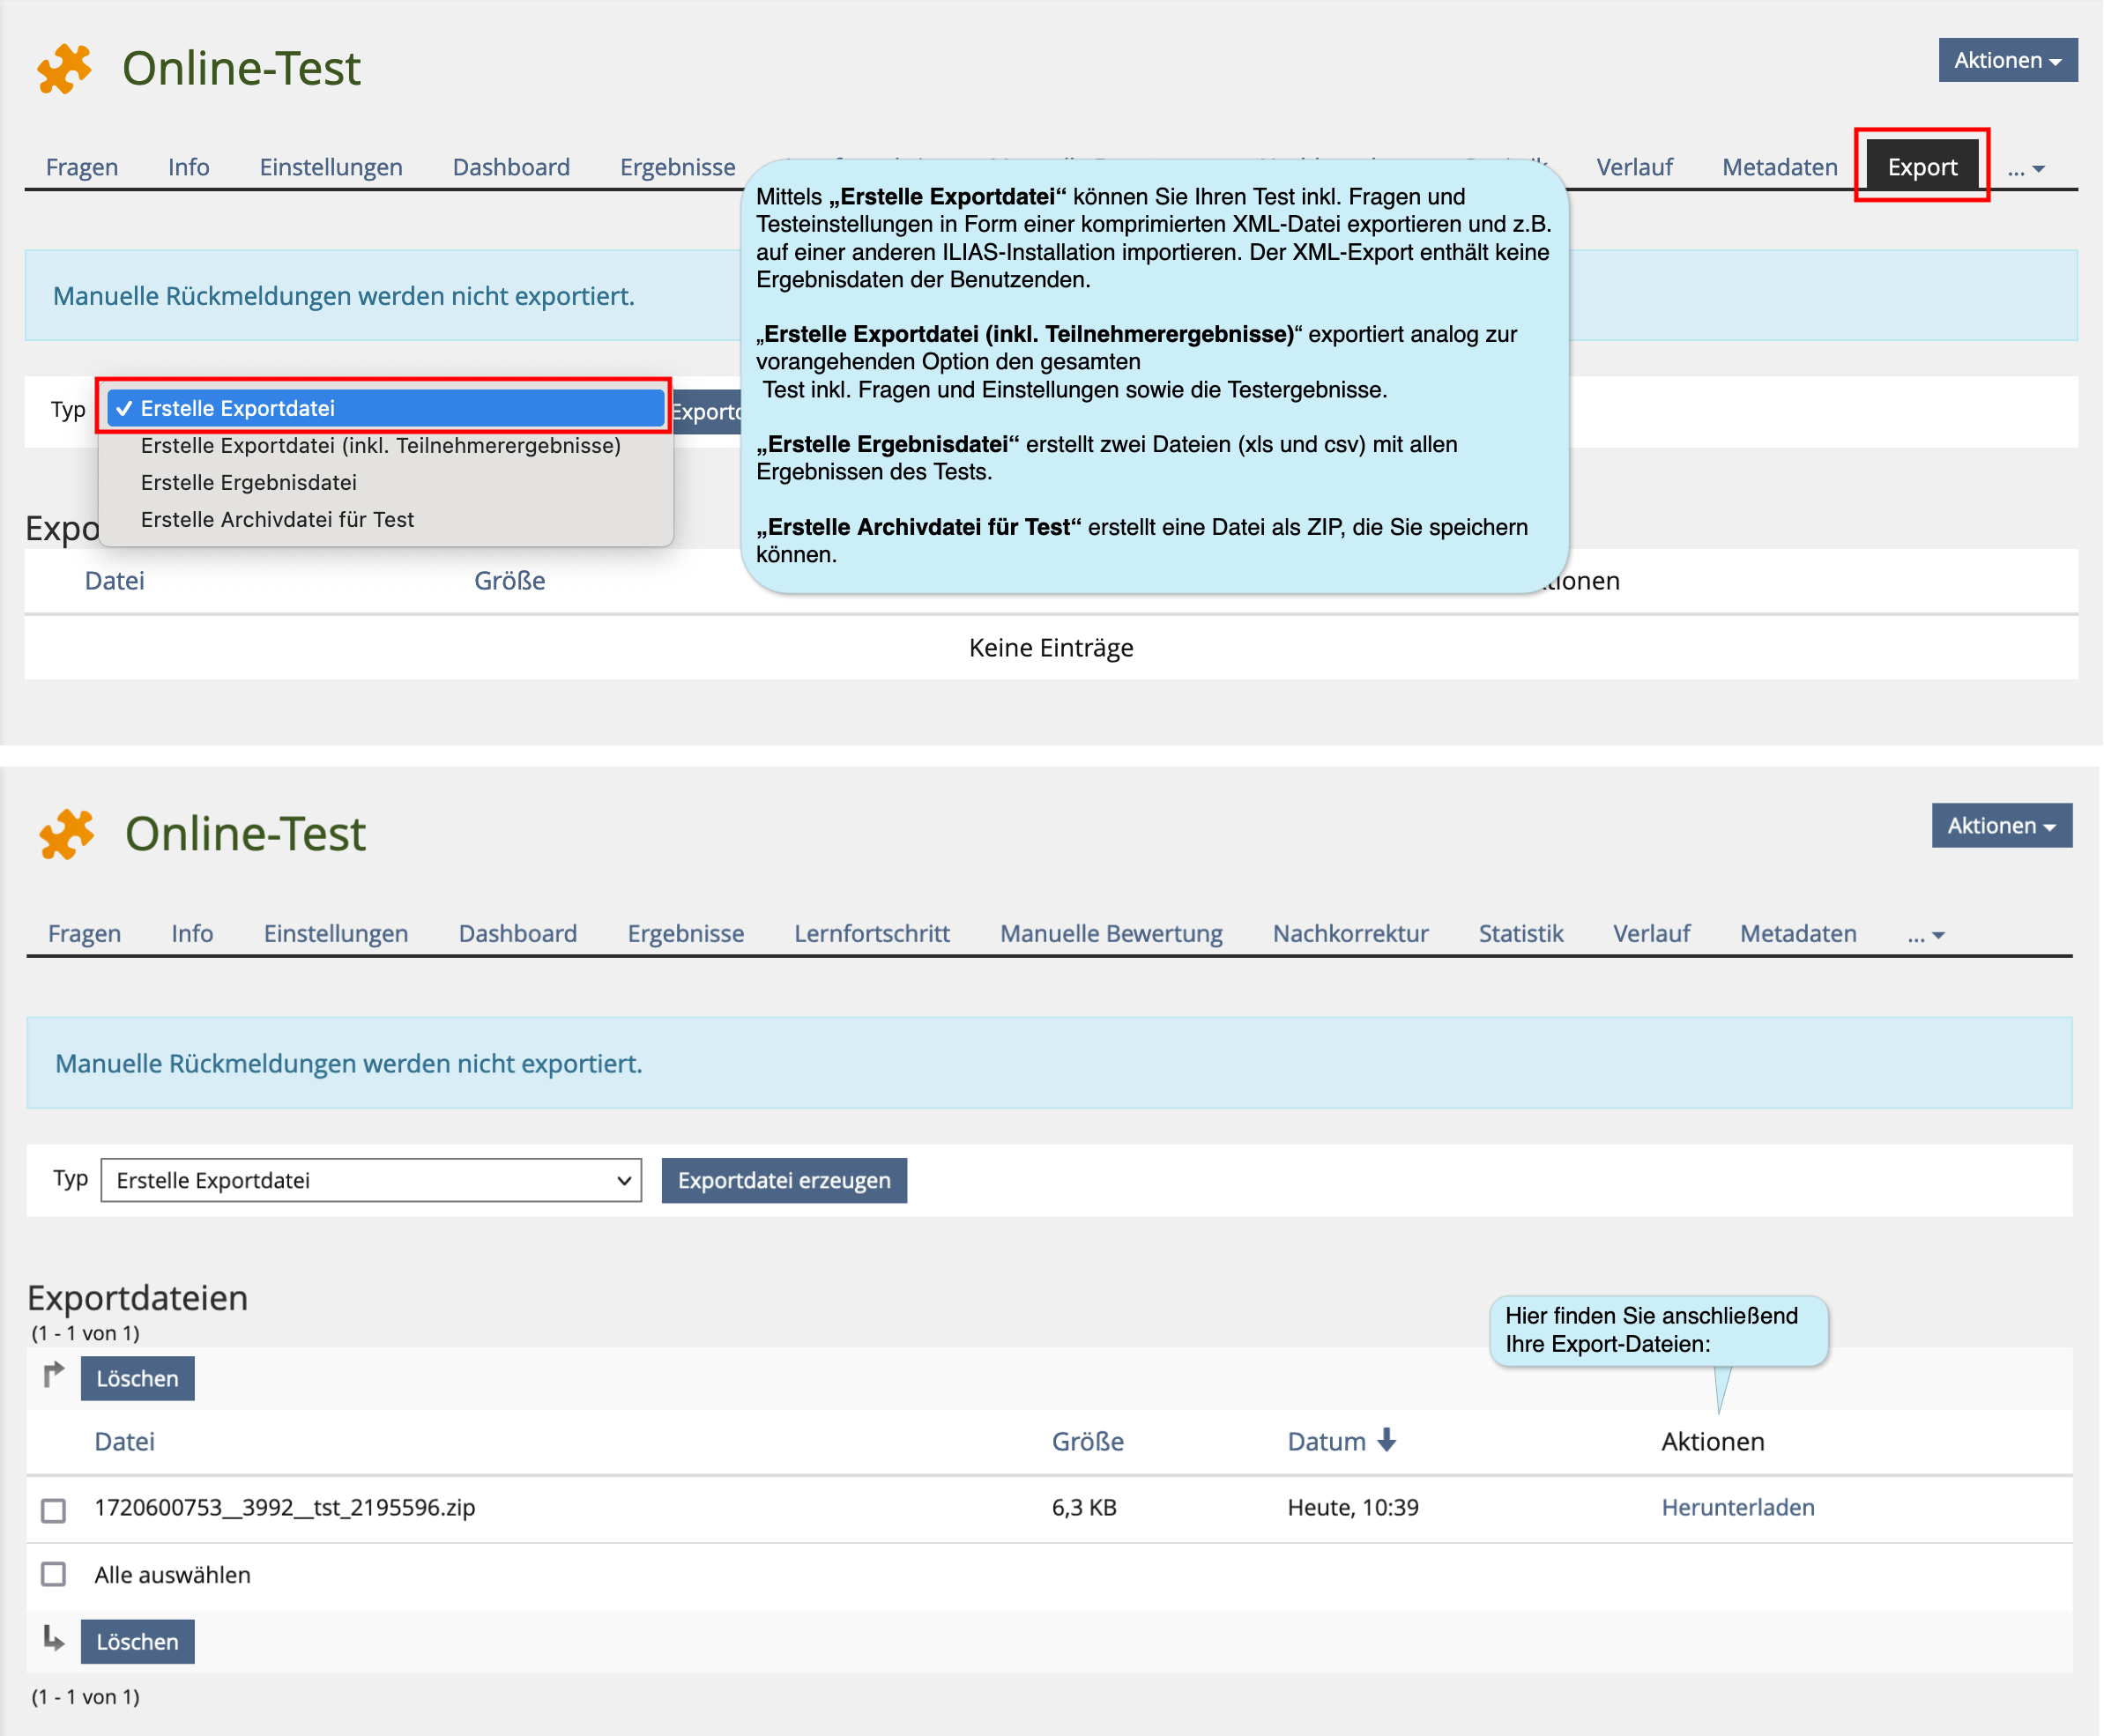
In the “Export” tab, you have the option of creating export files and then downloading them. | |||
{{Diagramm|ILIAS_Online_Test_Testergebnisse_exportieren_Eng}}{{Diagramm|ILIAS/Anleitungen/Online-Test/Ergebnisdatei-export}} | {{Diagramm|ILIAS_Online_Test_Testergebnisse_exportieren_Eng}}{{Diagramm|ILIAS/Anleitungen/Online-Test/Ergebnisdatei-export}} | ||
==9. Test as precondition before accessing further course materials== | ==9. Test as precondition before accessing further course materials== | ||
Version vom 28. August 2024, 13:49 Uhr
1. Scenarios of use
In this guide, you will learn how to assess learning outcomes using the object test on the ILIAS learning and teaching platform. There are essentially two scenarios of use for which this guide is intended:
1.1. Performance assessment within ongoing ILIAS courses
- To assess the learning progress or prior knowledge of the participants in your course
- As a precondition for accessing further materials
- As part of the coursework
1.2. Self-assessment for learners to practice
- For applying and consolidating the content learned
- To assess individual learning levels in relation to performance expectations (e.g. in preparation for an exam)
Recommendations for self-assessment
- Self- assessment tests should be carried out anonymously without registering names.
- Allowing several test runs can contribute to learning outcomes.
- Optionally, the participants can request clues to solutions during the test (e.g. for a point reduction).
- Self- assessment questions should be comparable to the final exam questions, providing participants with orientation for their grade-relevant performance.
| Hinweis zu Online-Klausuren |
|---|
| Wenn Sie einen Test für eine Online-Klausur erstellen möchten, dann nutzen Sie bitte diese Anleitung |
2. The test object
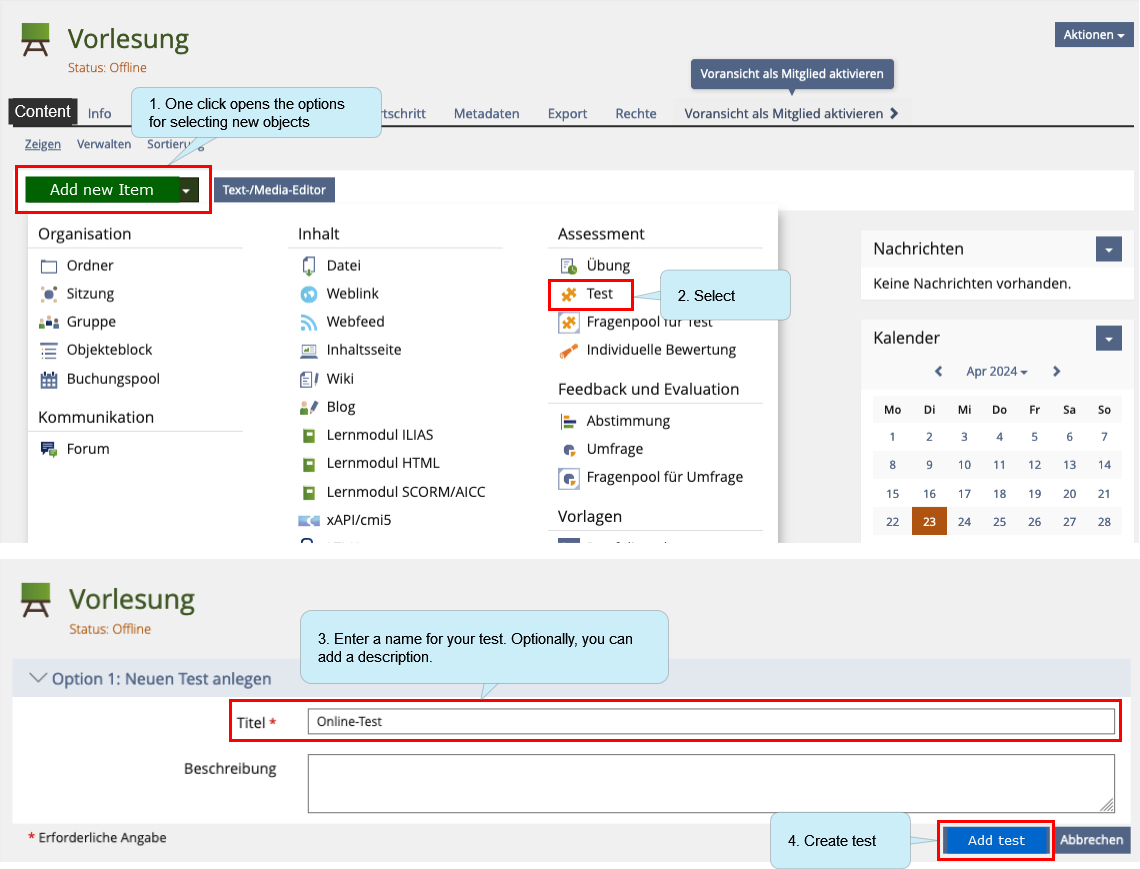
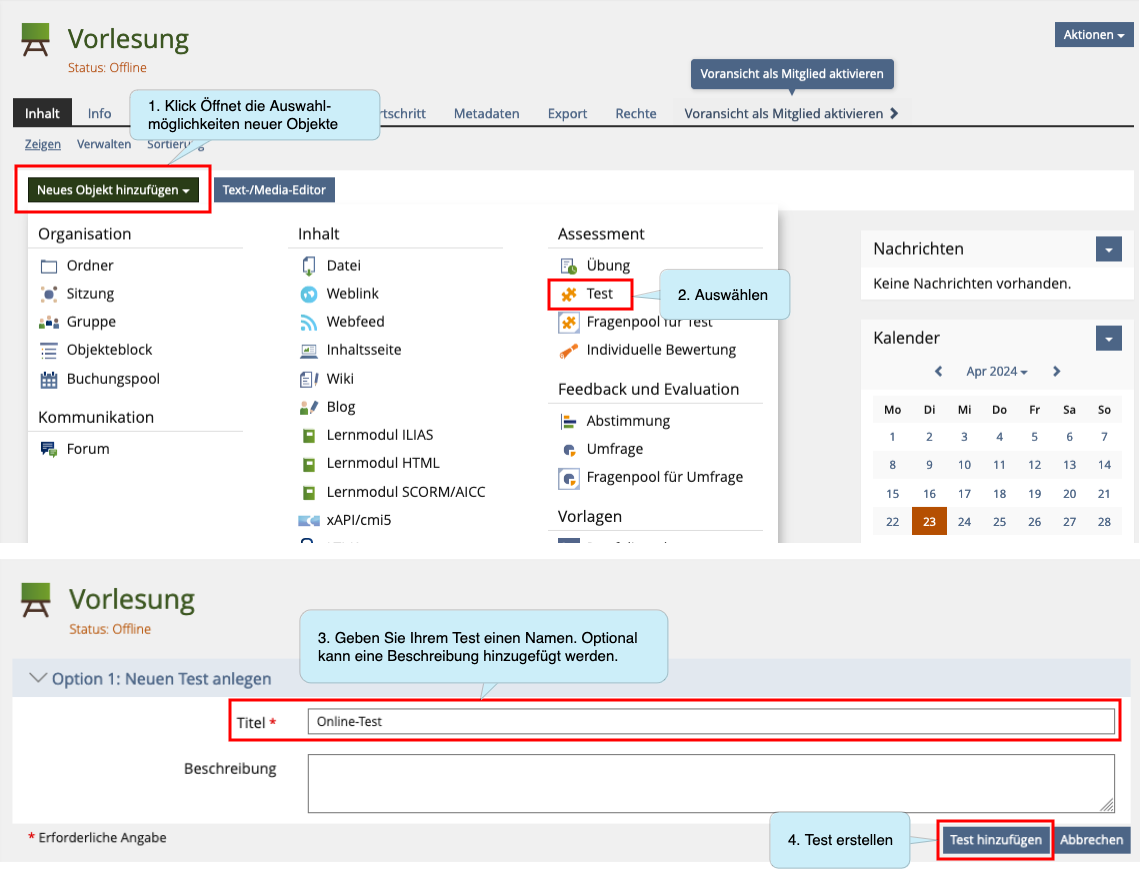
2.1. Adding the test object
2.2. 'General Settings'
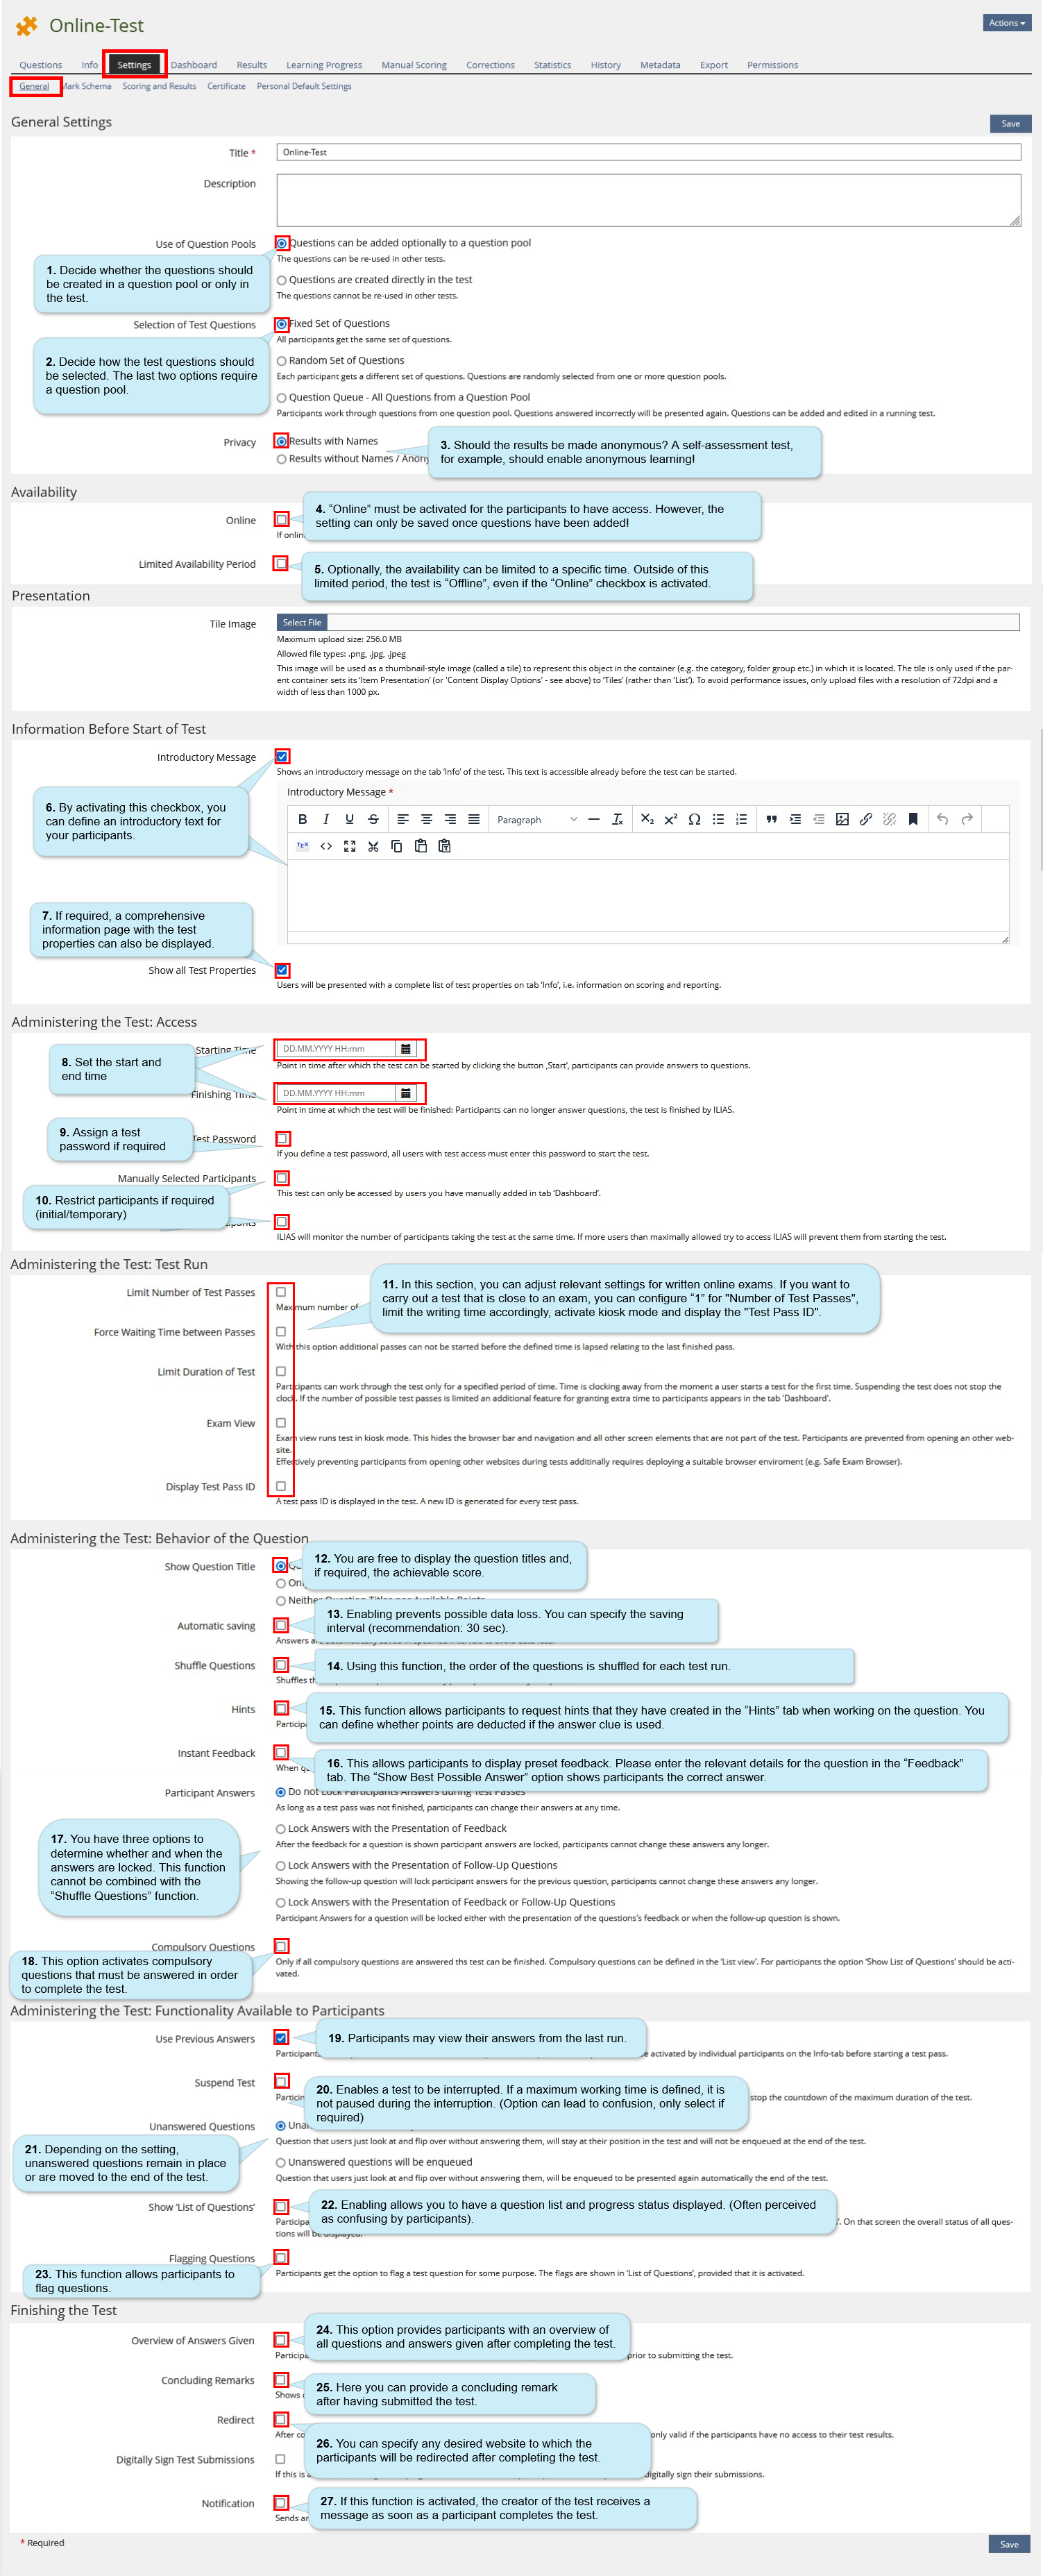
In the following step, you can make basic settings. To do this, open the “General settings” tab.
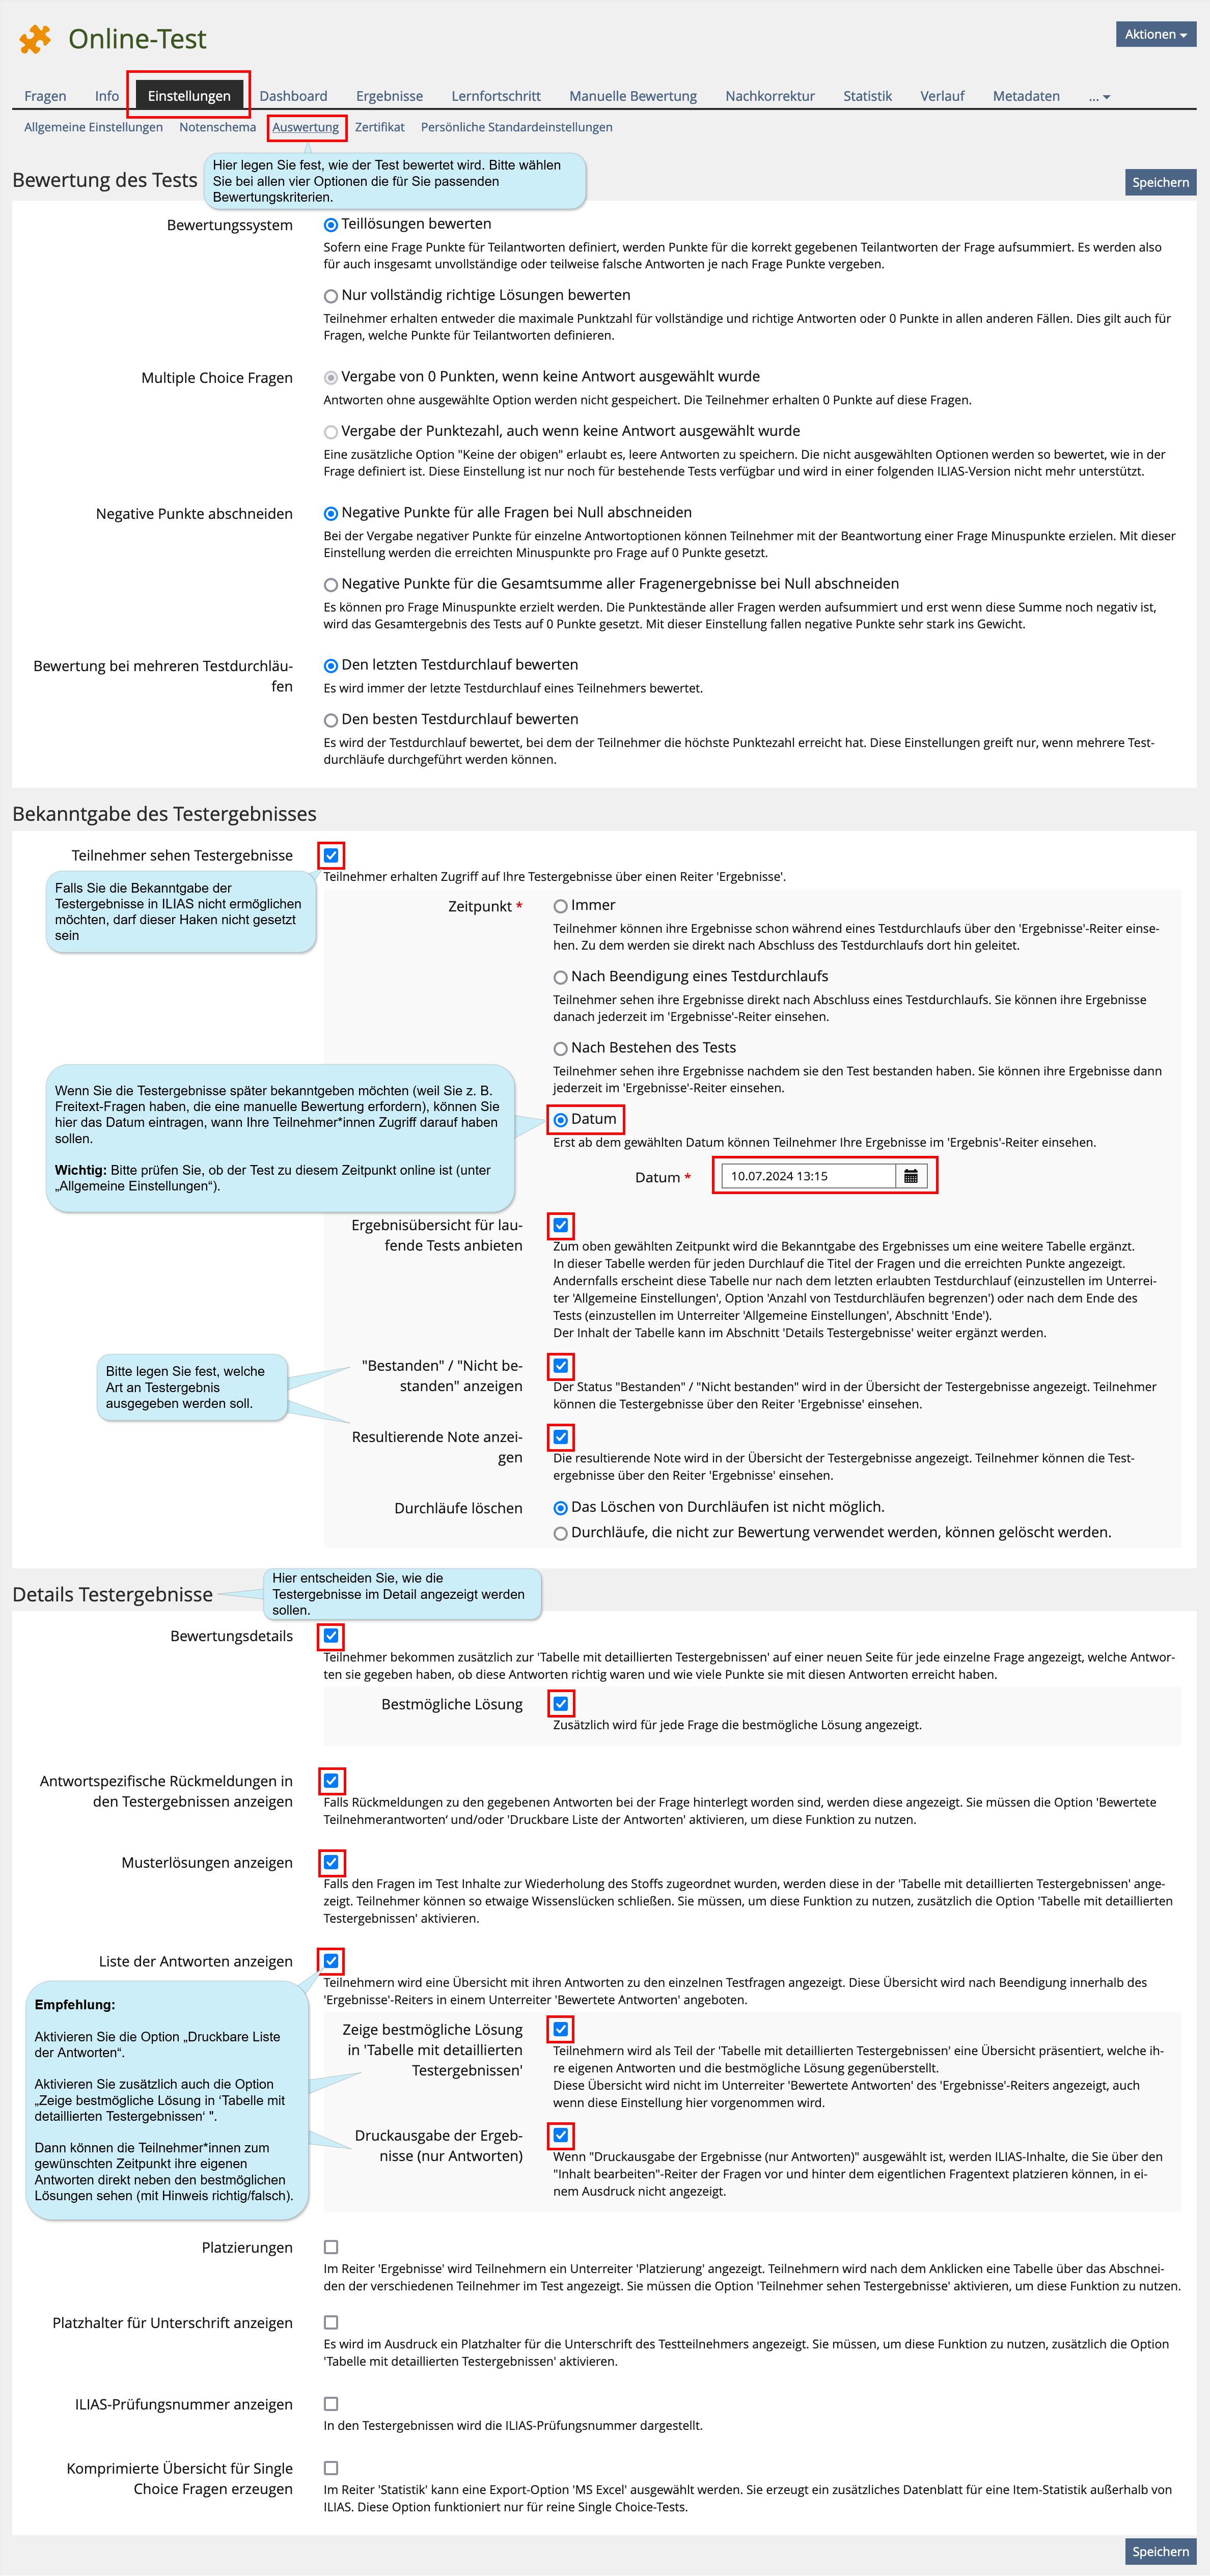
2.3. 'Scoring and Results'
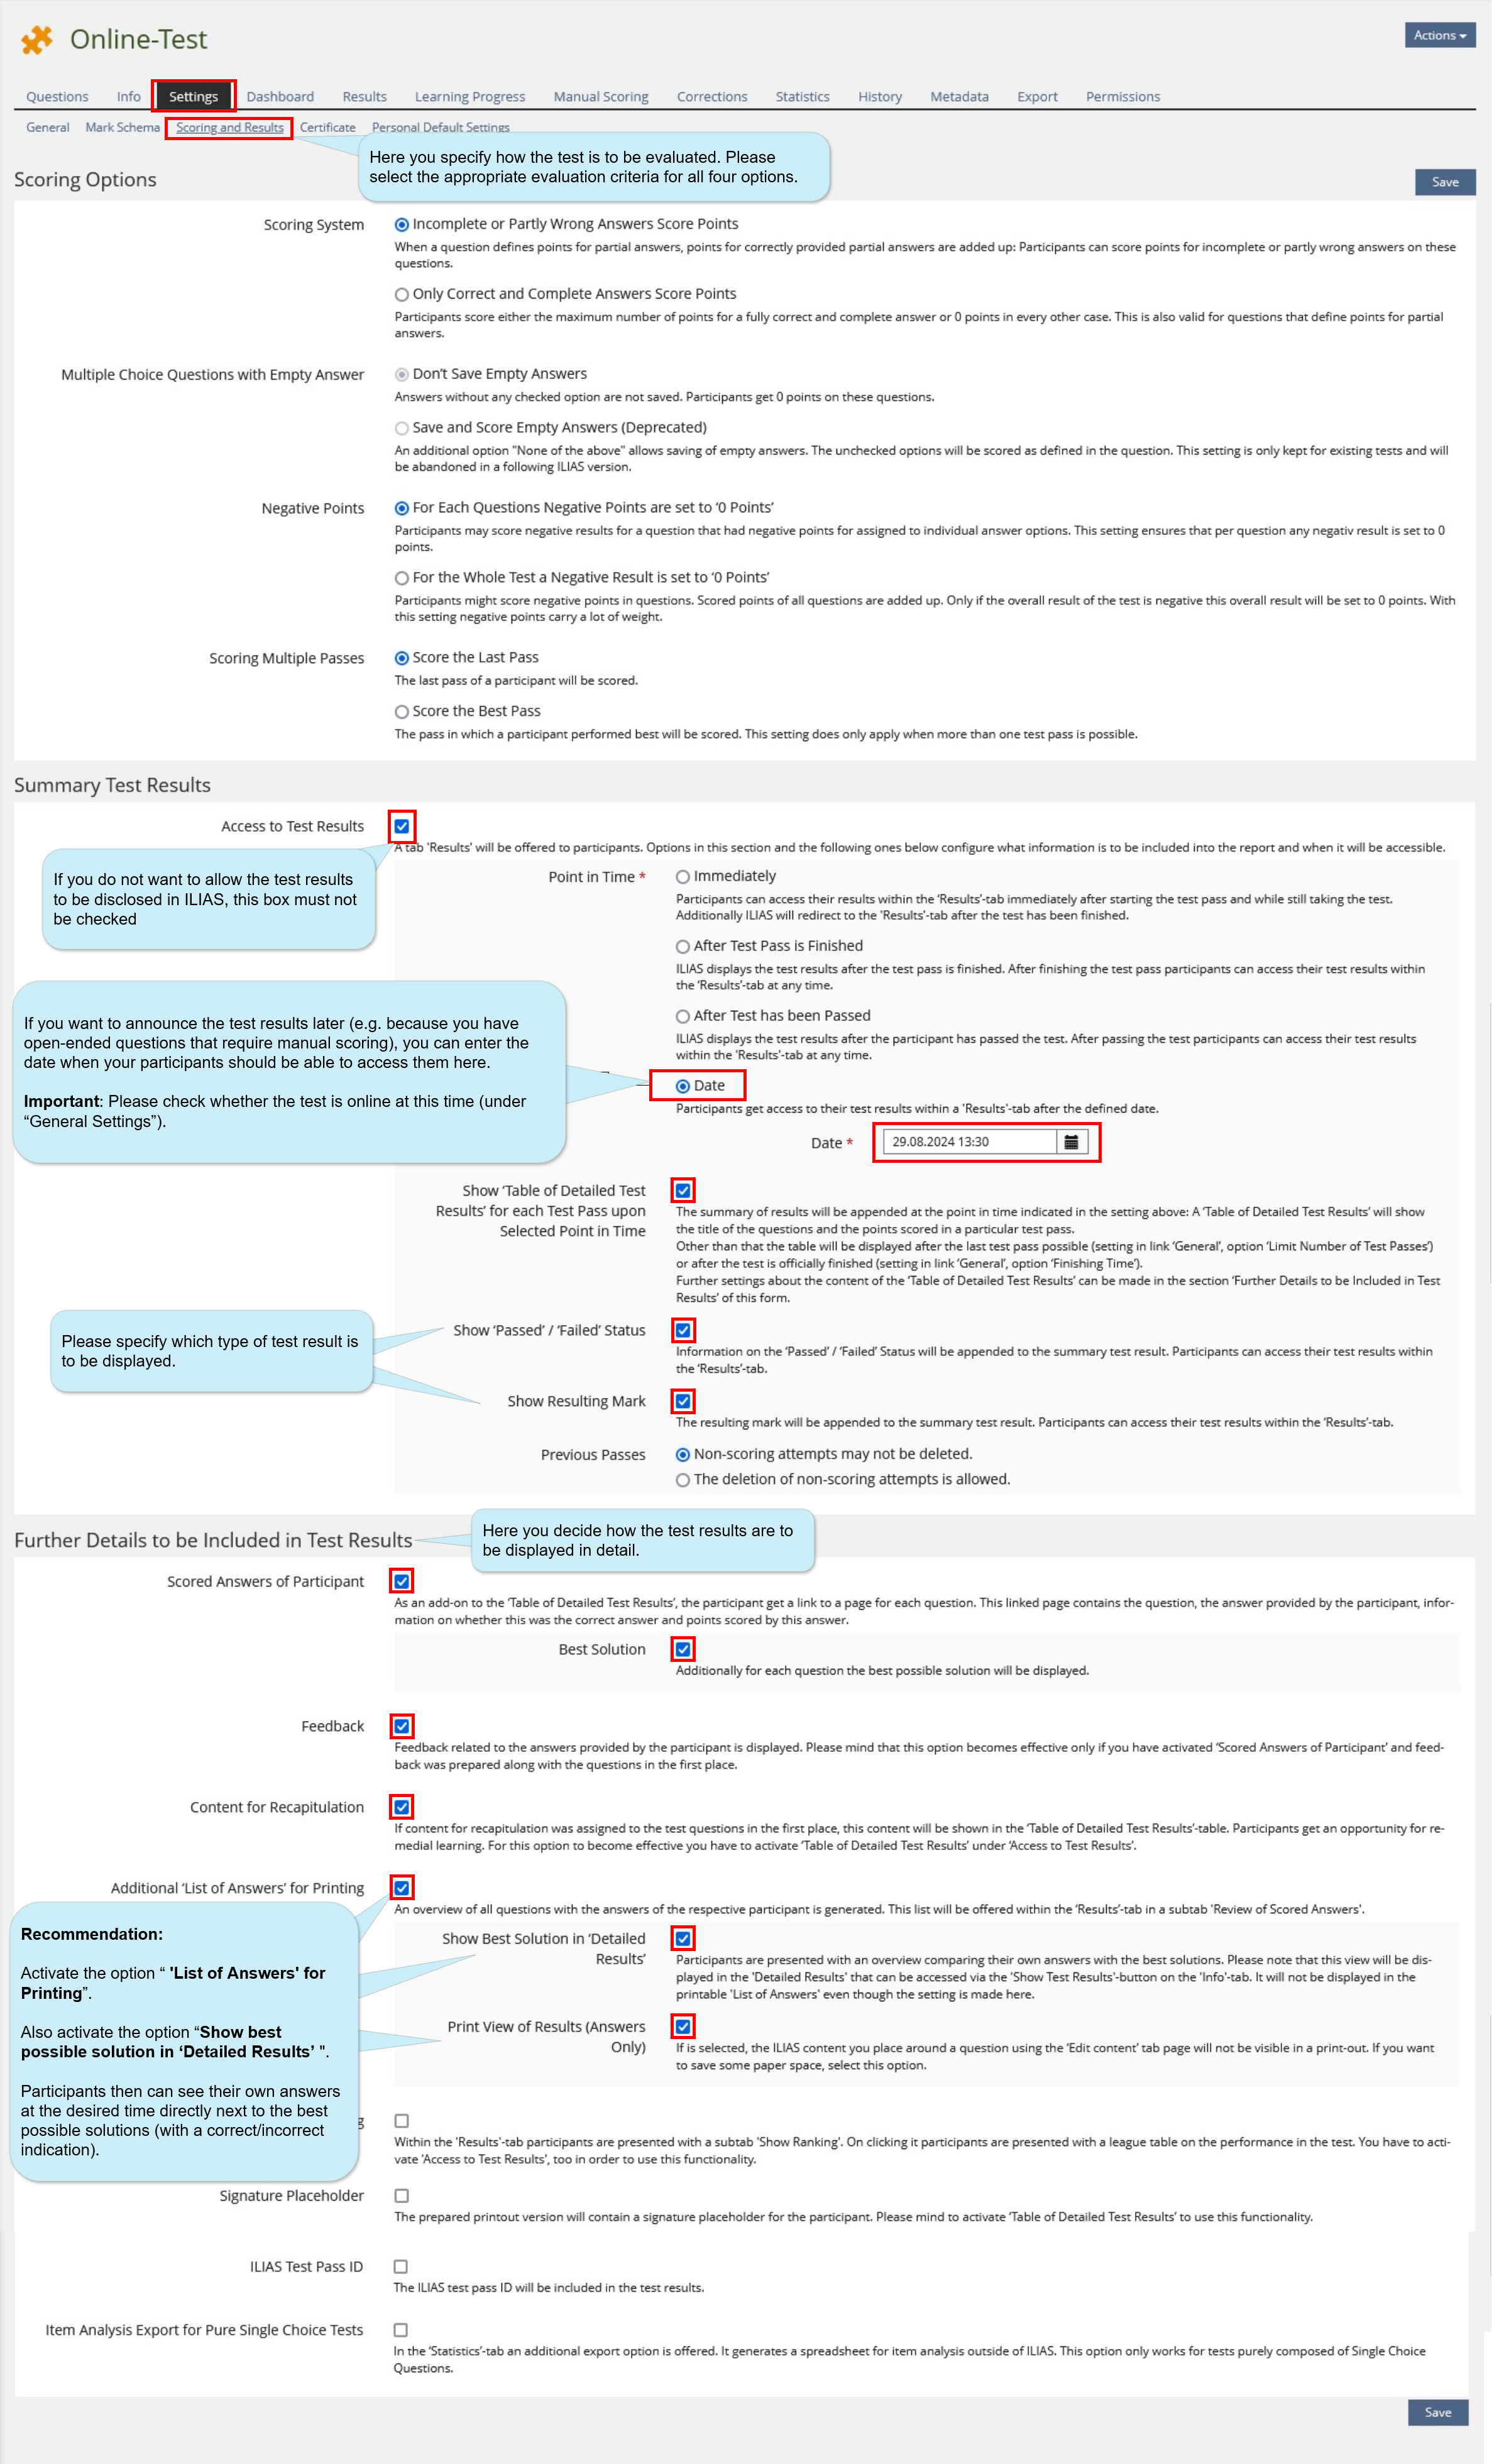
Under “Settings” in the “Scoring and Results” tab, you can set the method of evaluating the test.
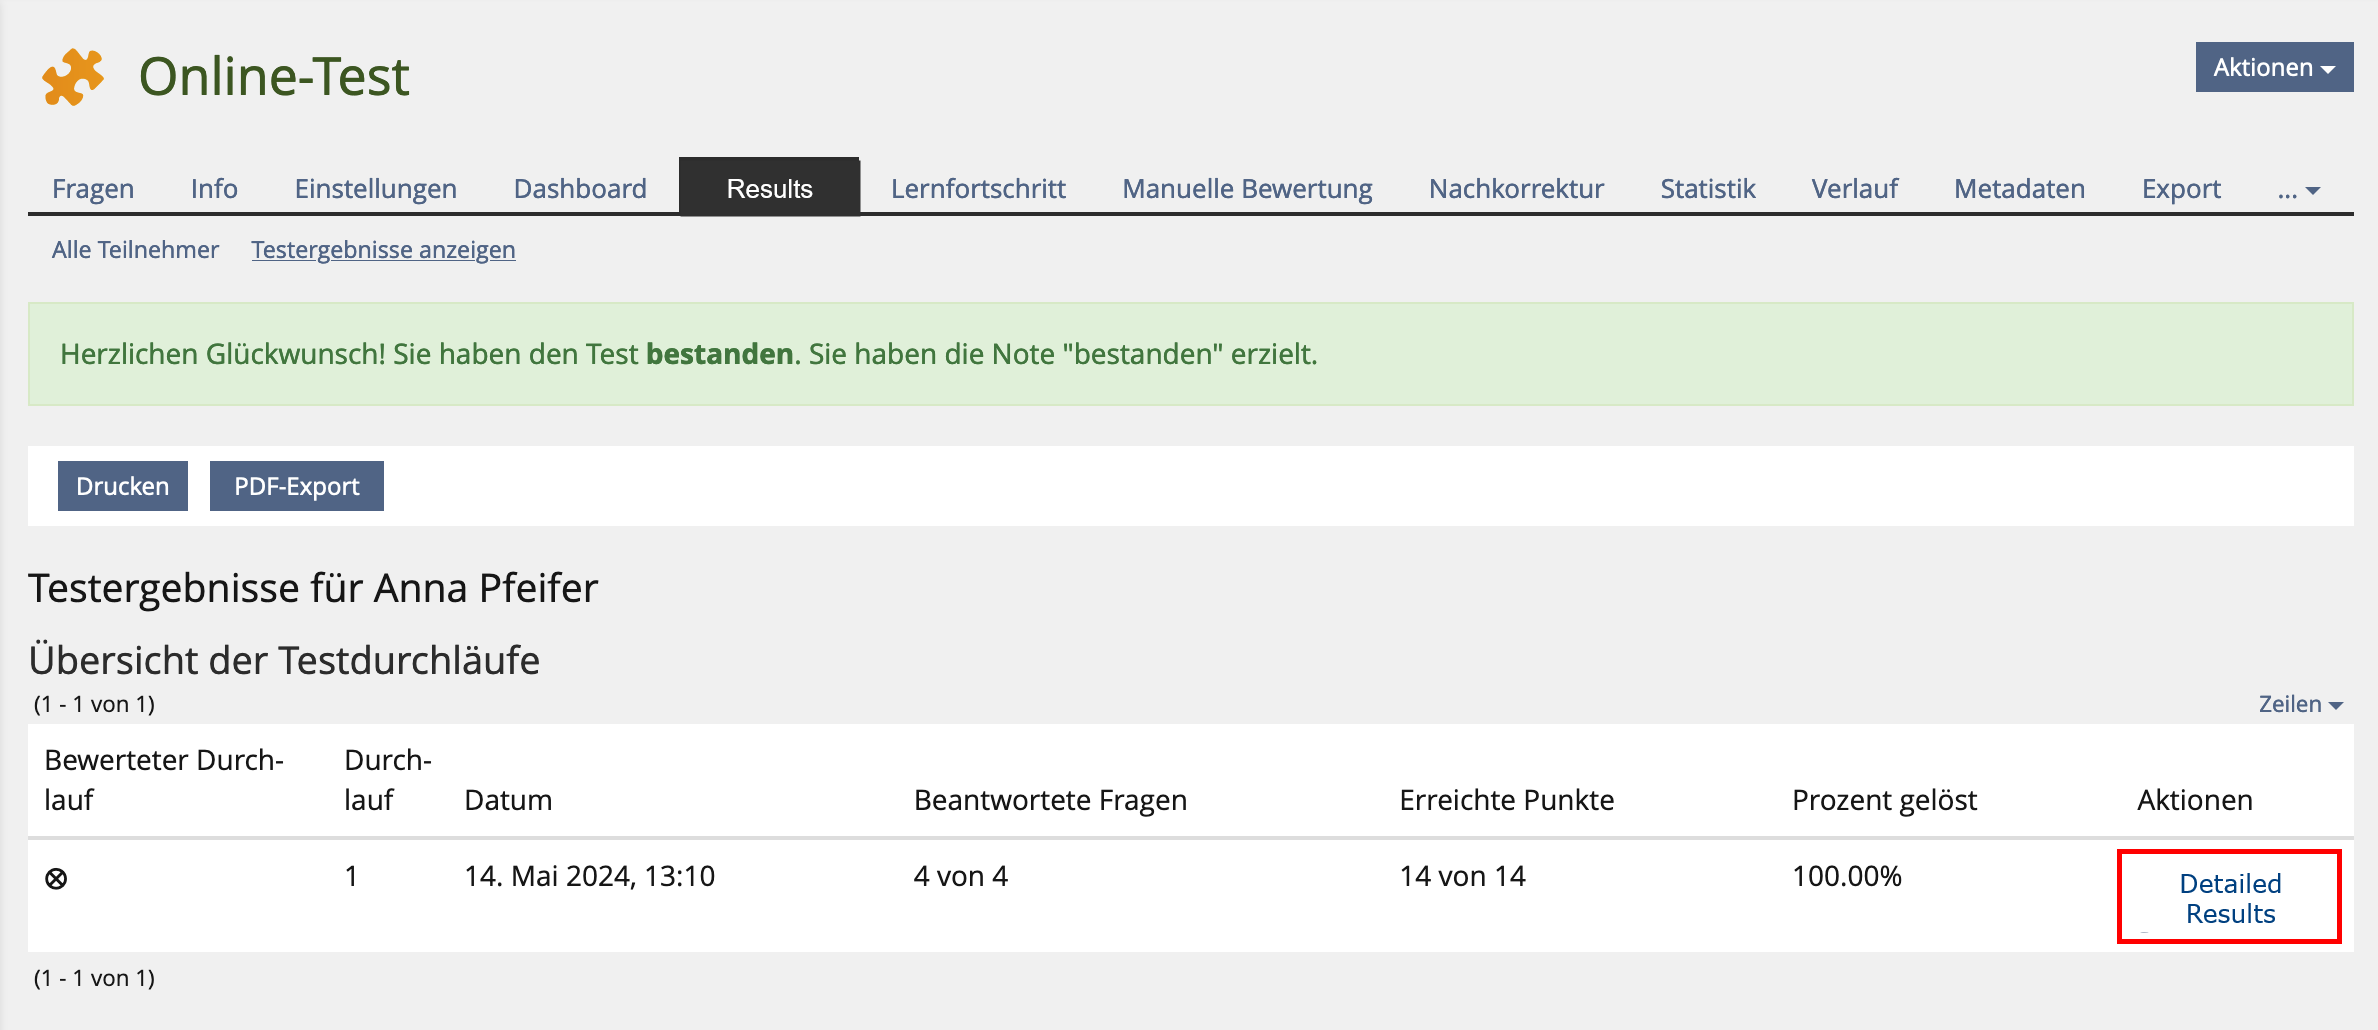
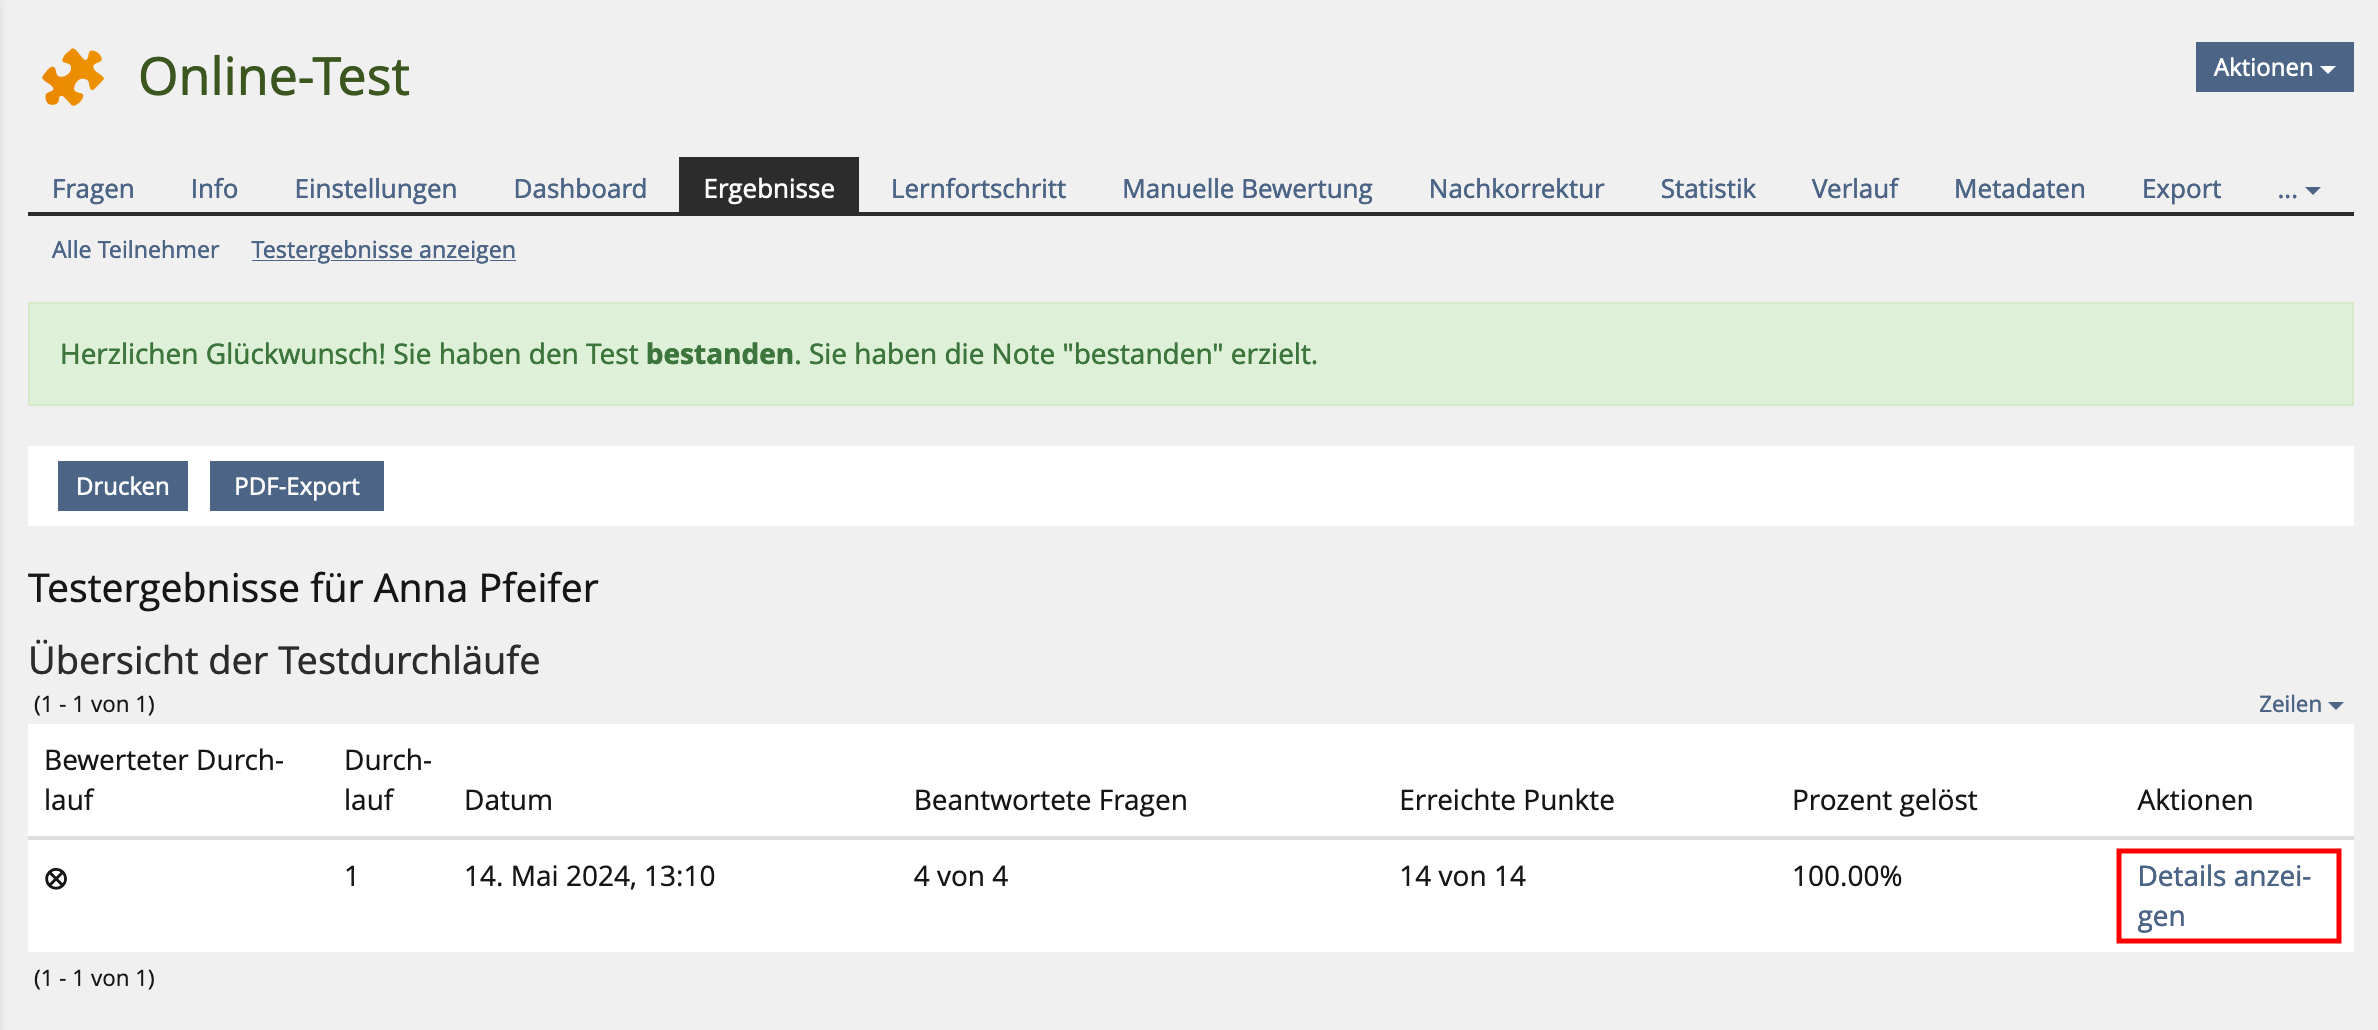
Depending on how you have configured the settings for the announcement of the test results, participants can see their own test results. This example displays test results cantaining “Detailed Results”:
2.4. 'Personal Default Settings'
The “Personal Default Settings” tab allows you to save your settings so that you can use them in further tests without any effort.
3. Creating and administering questions
3.1. Available question types
You can find an introduction to the different question types for online tests here: Question types in ILIAS
3.2. Open question
For open questions, use the question type “Essay question”.
Please note:
- The Essay Question is ideal for relatively short answers (up to around 5 sentences).
- The Essay question can also be used for longer answers. However, we recommend creating several individual questions with shorter answer texts instead of one Essay question with a longer answer text. (Background: It is not possible to make comments or notes on individual text segments during correction, but only to provide final feedback on the entire answer. With a shorter answer text, this feedback is therefore more specific).
- For longer answers or essays that need to be subdivided and formatted and then corrected directly in the text, the "long text essay task" object is more suitable. To do this, you need to add a new object (“long text task”) outside the online test. We will be happy to advise you on this (lias-support@uni-konstanz.de).
3.3. Adding questions
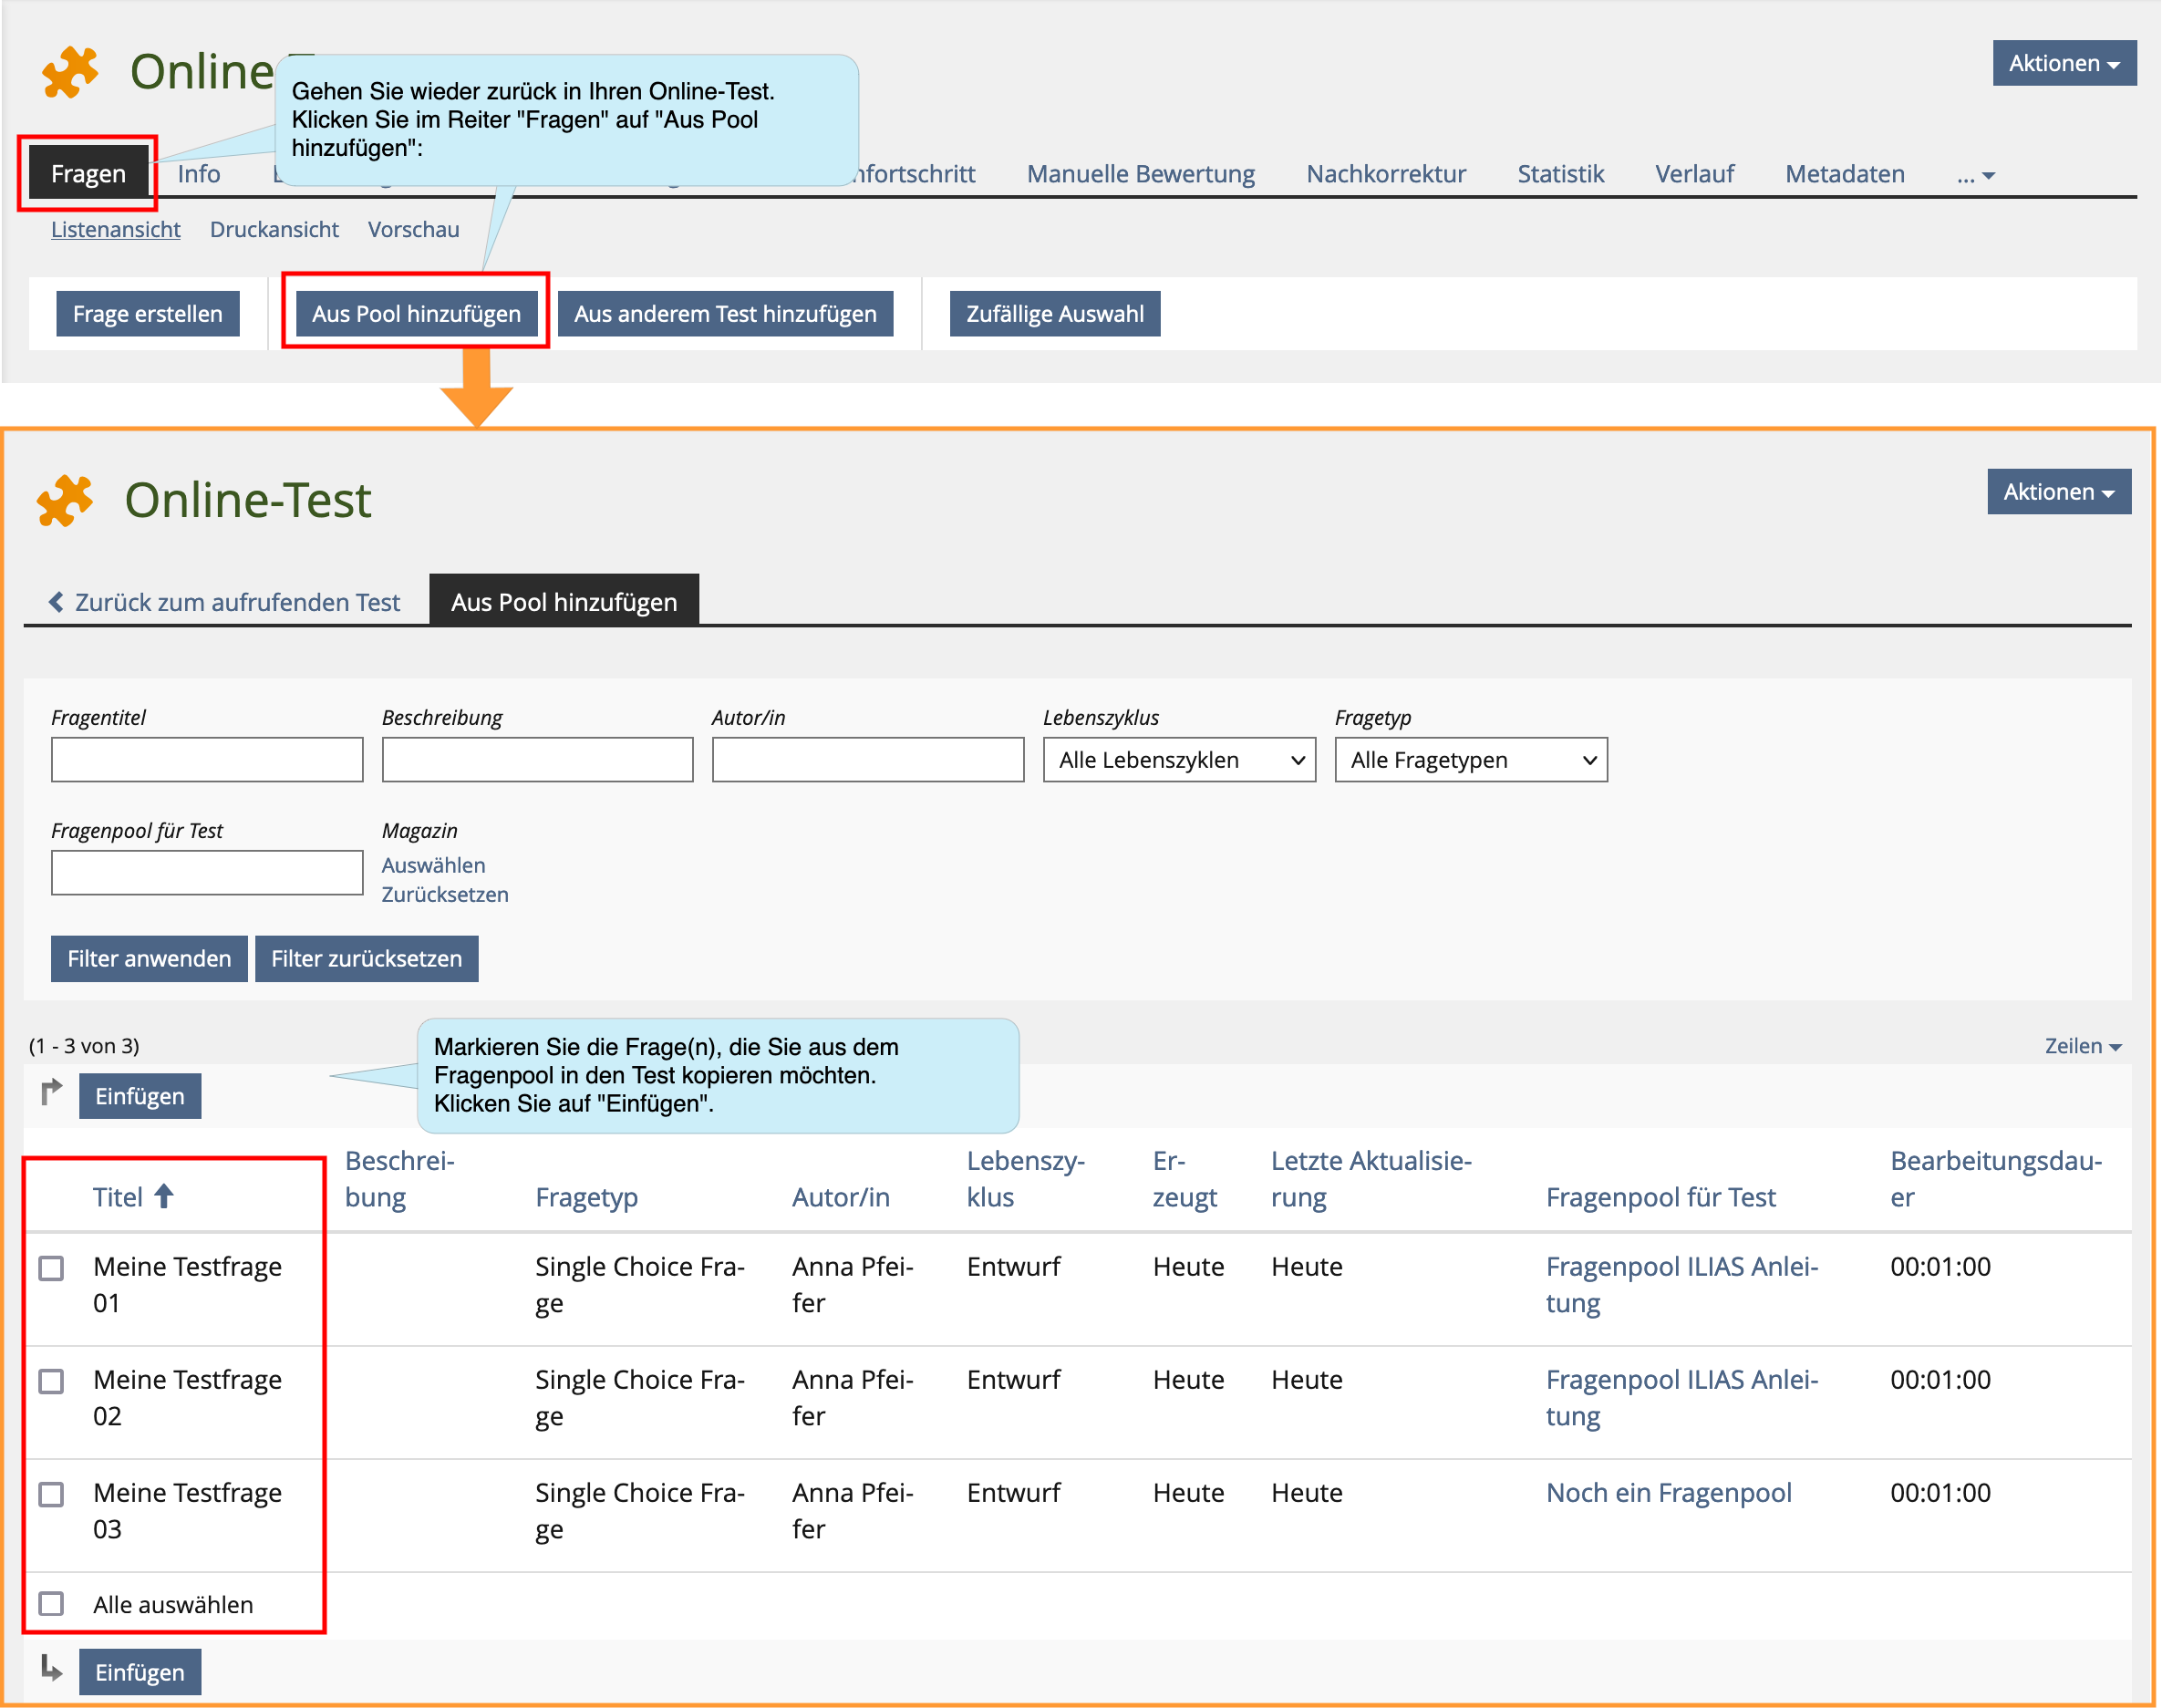
There are three options how to add questions to your test:
- Create questions directly in the test
- Collect and manage questions in one or more question pools and include them in the test according to certain criteria
- Insert questions from another (already existing) test
3.3.1. Creating questions in the test
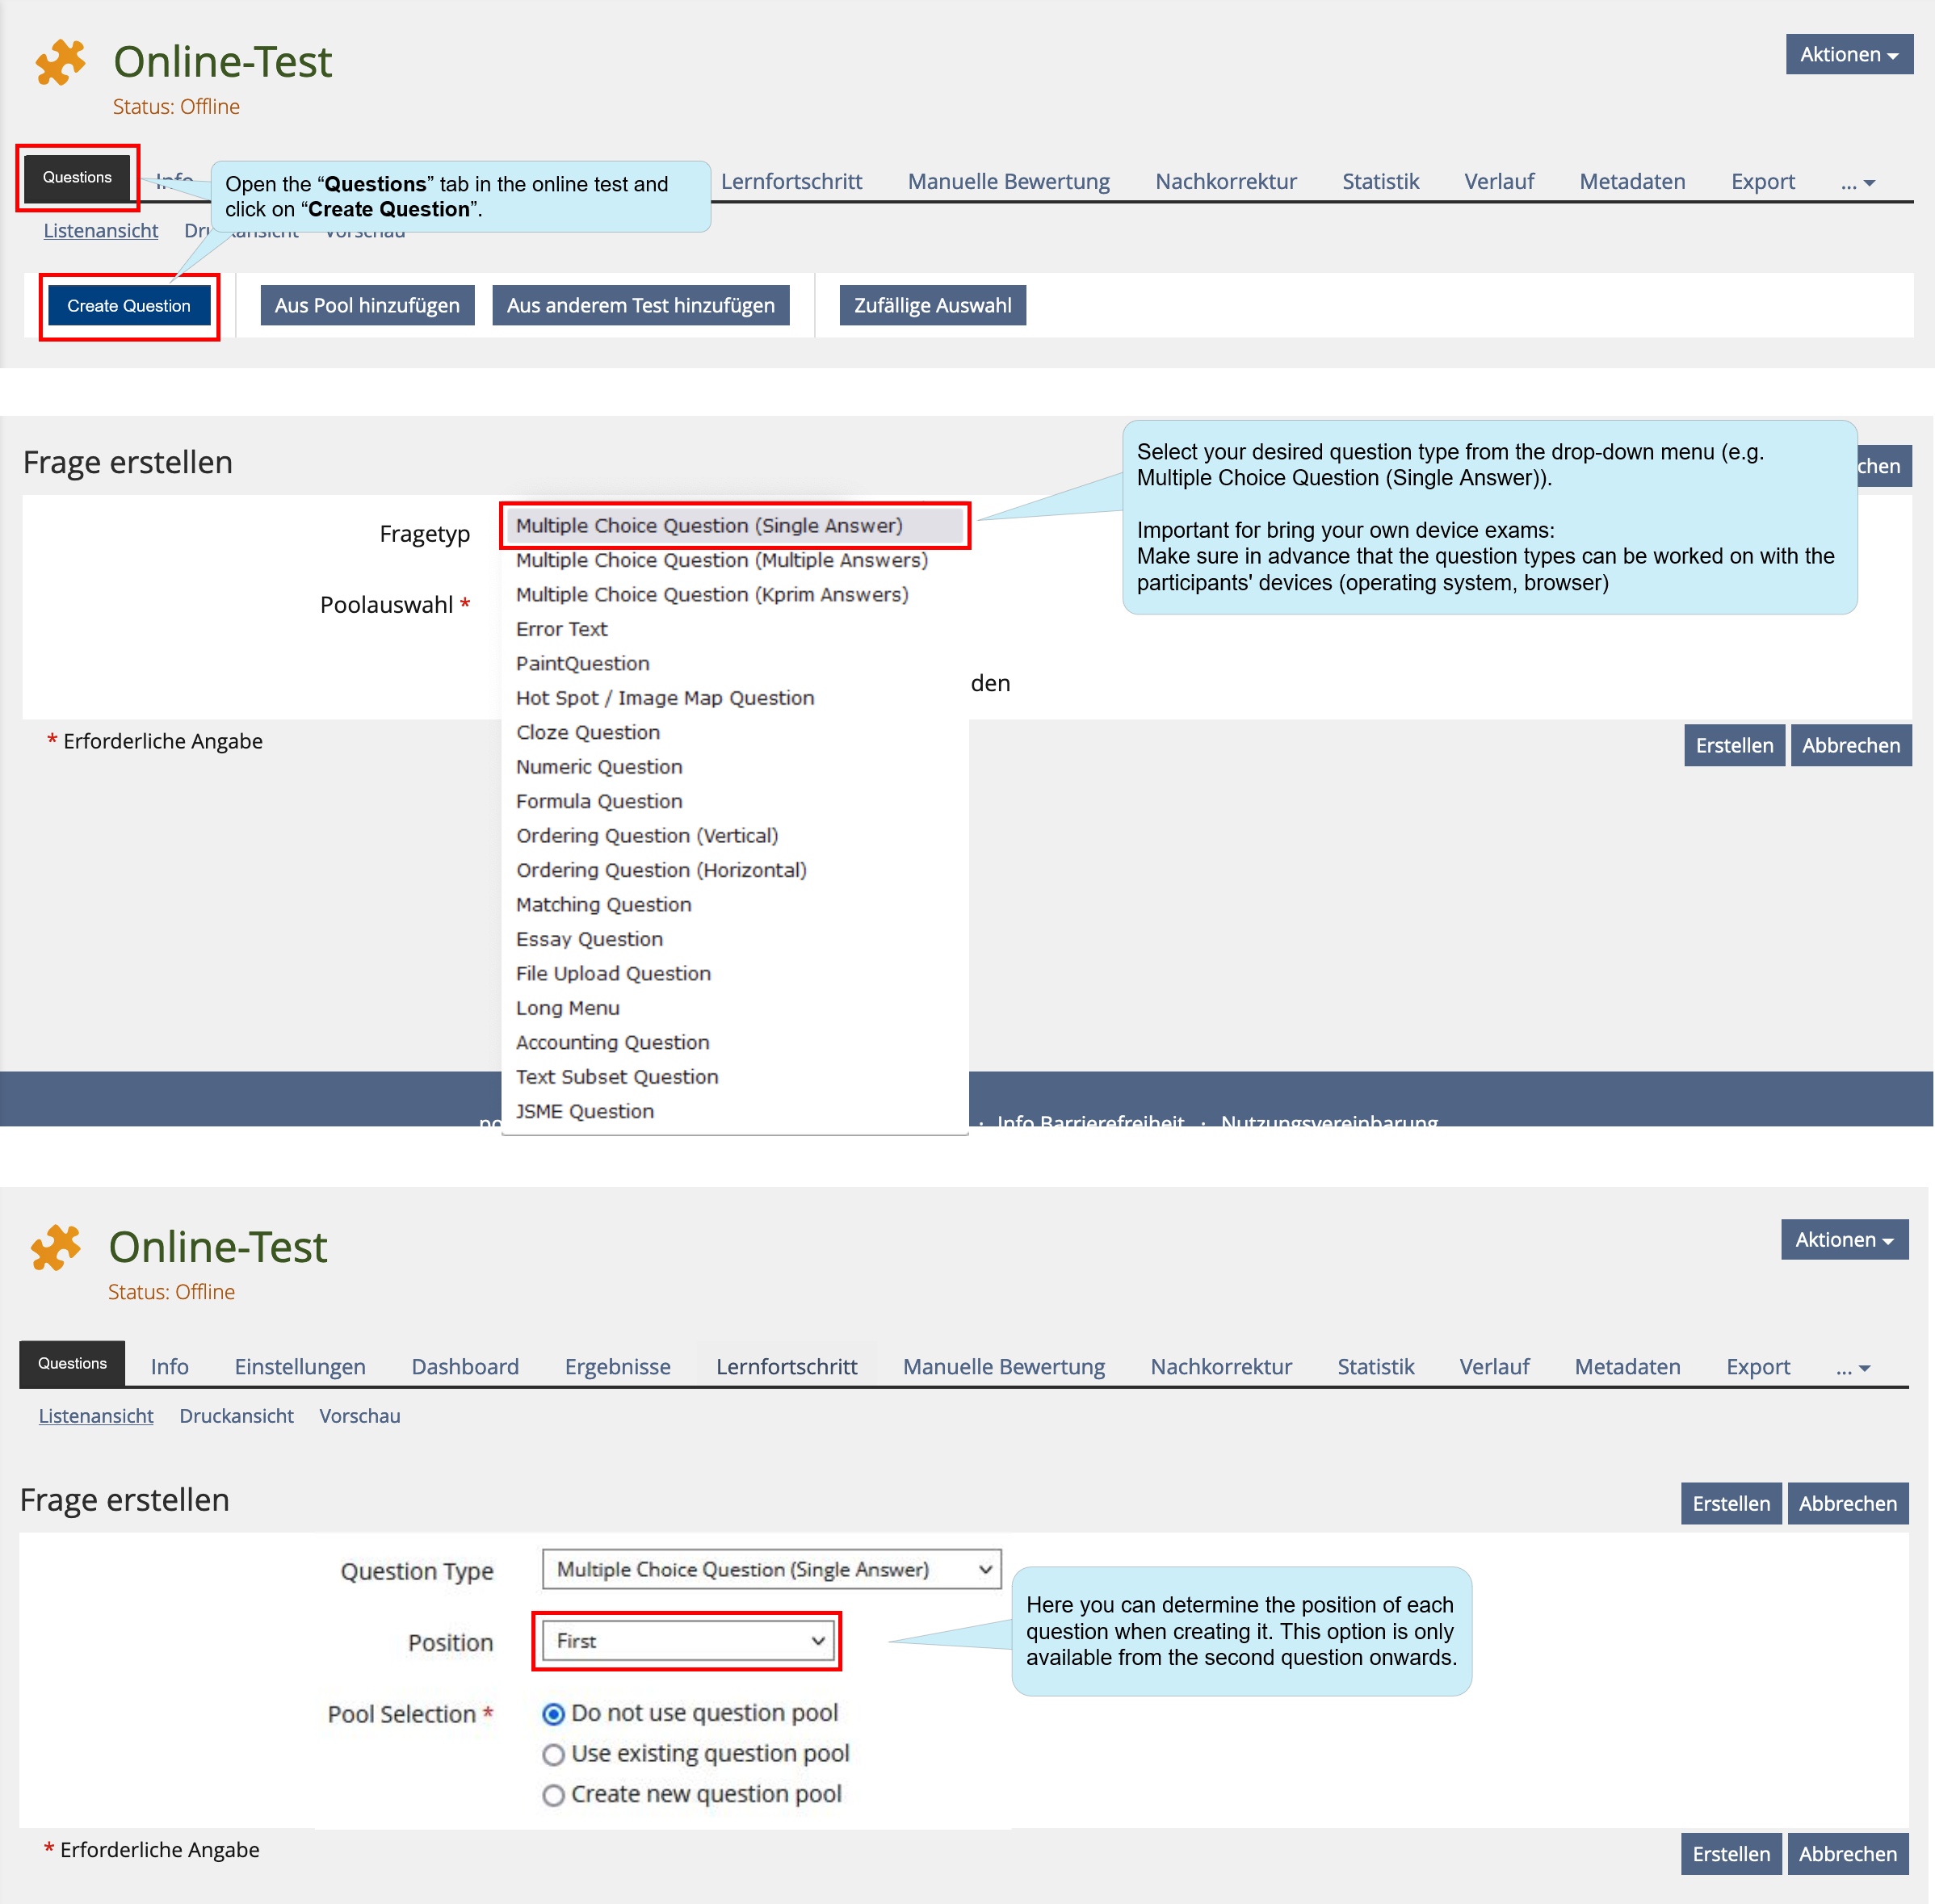
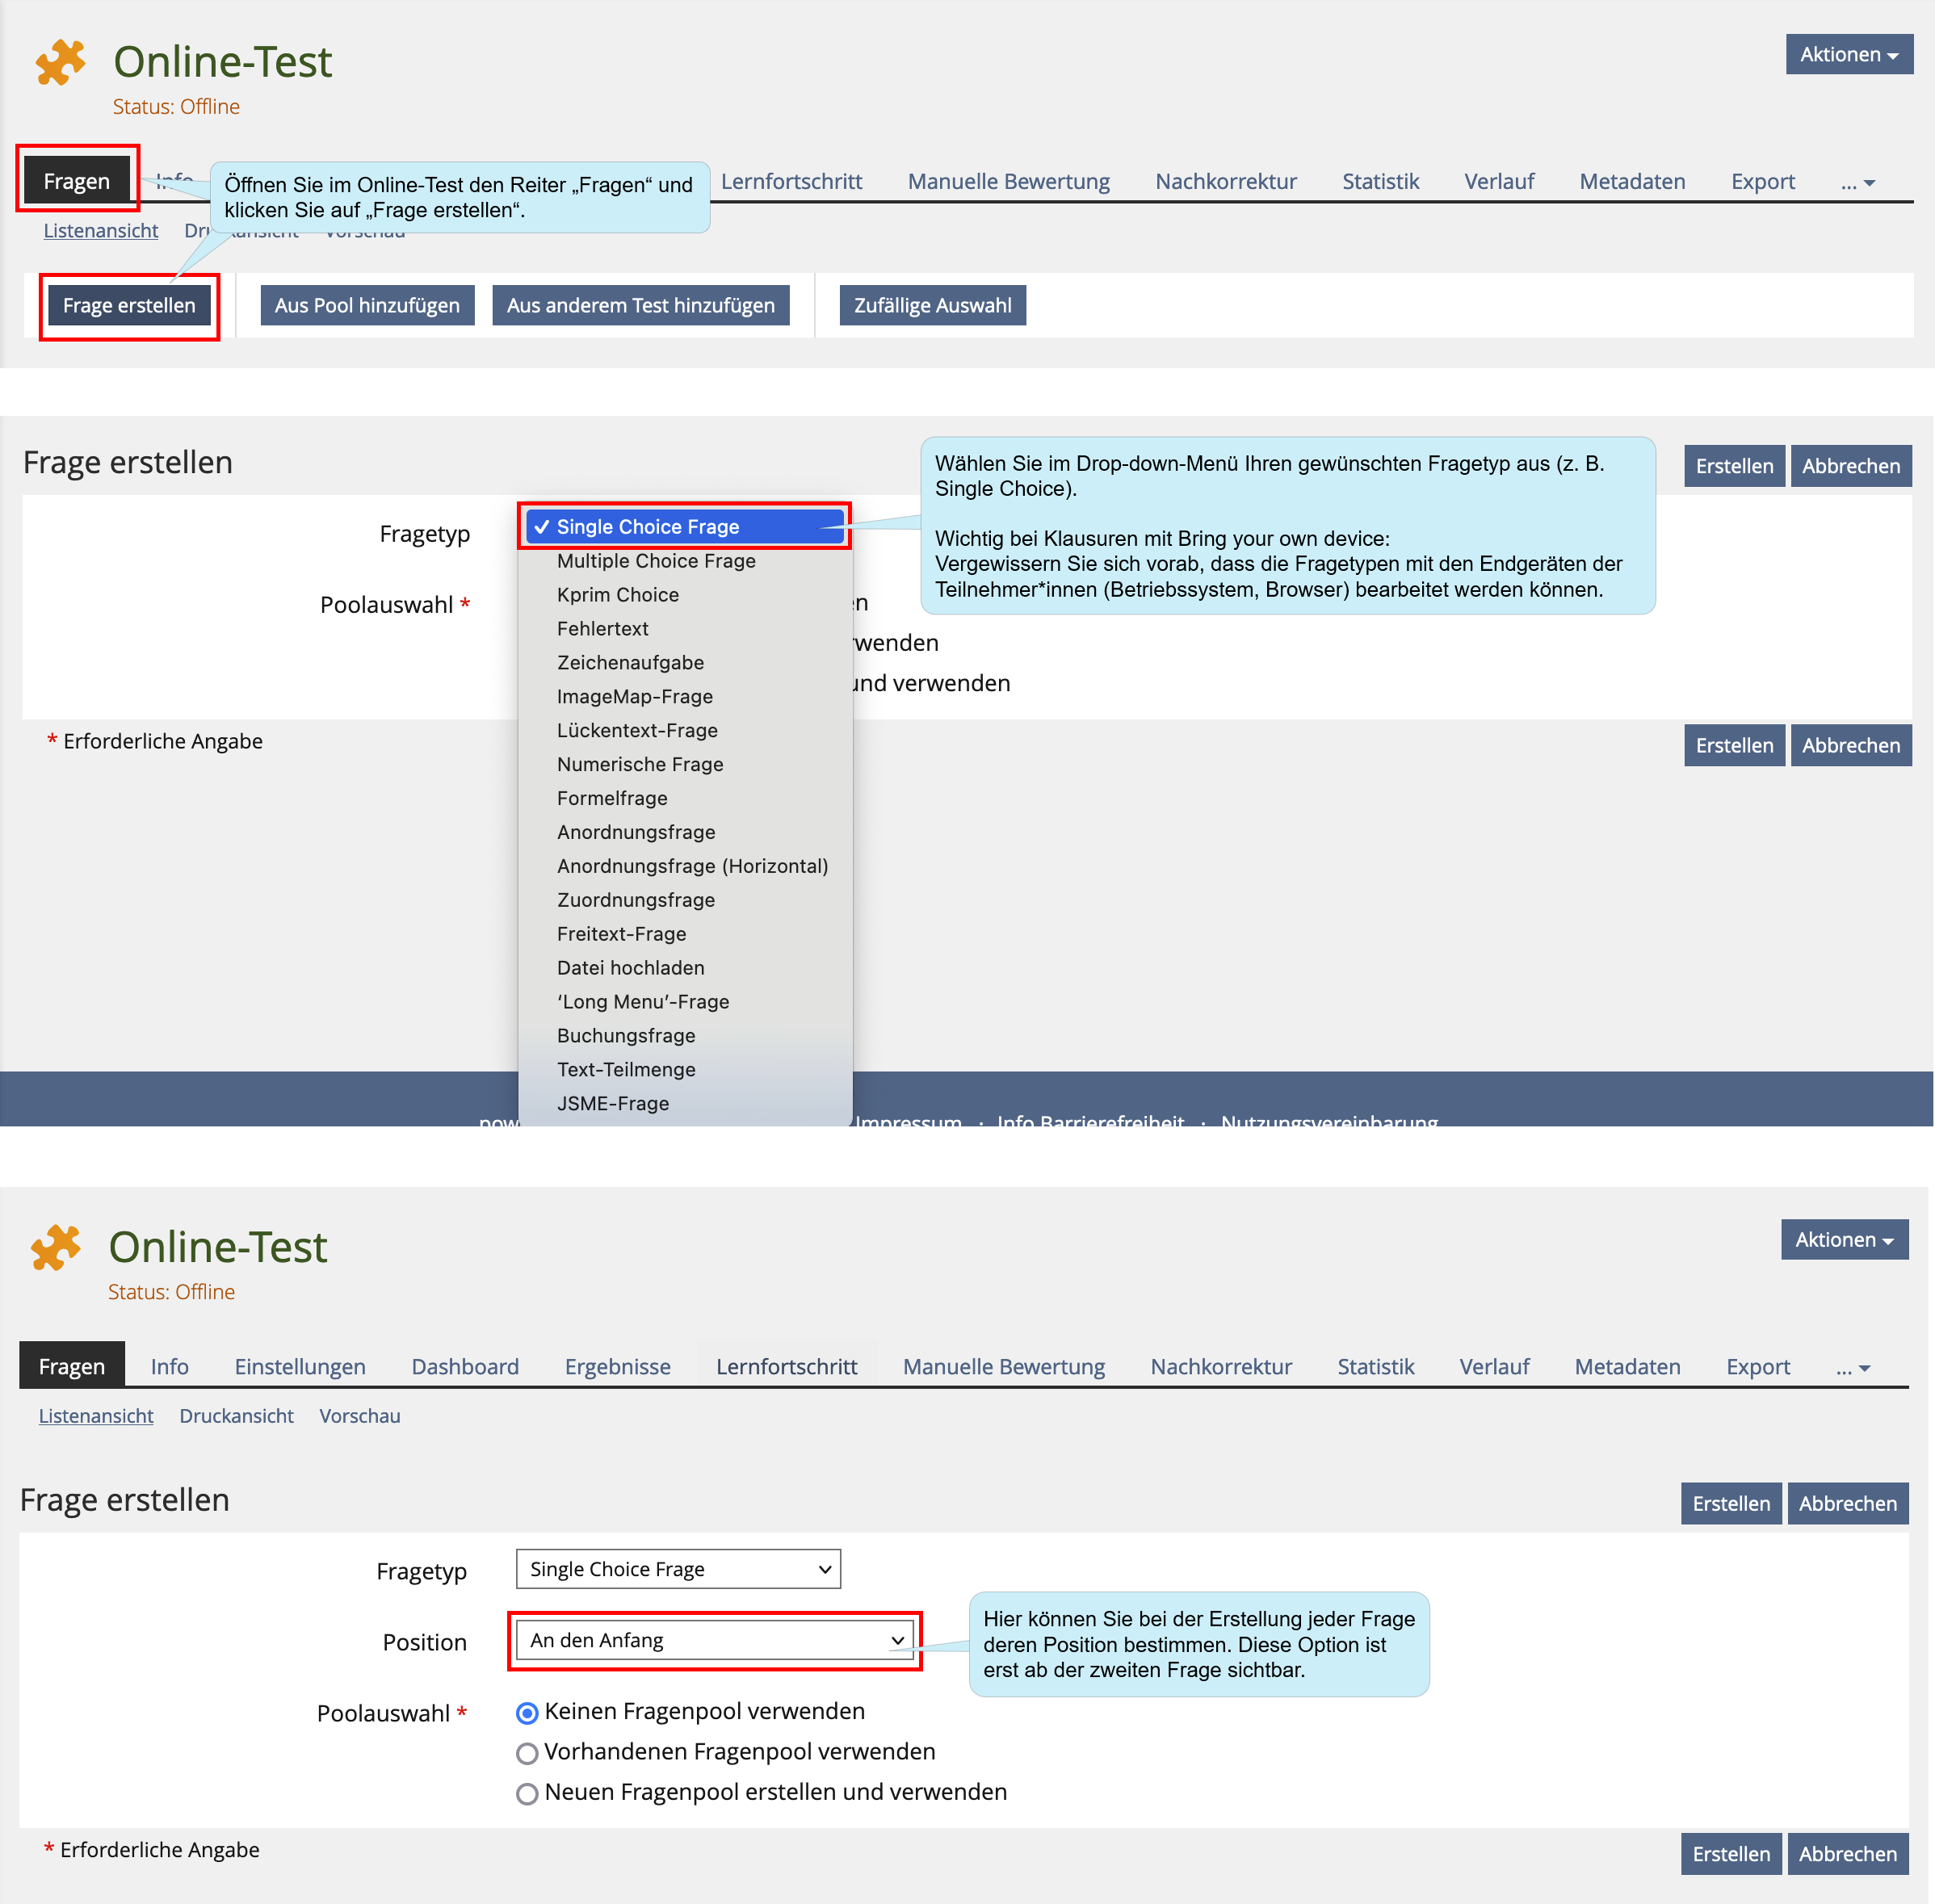
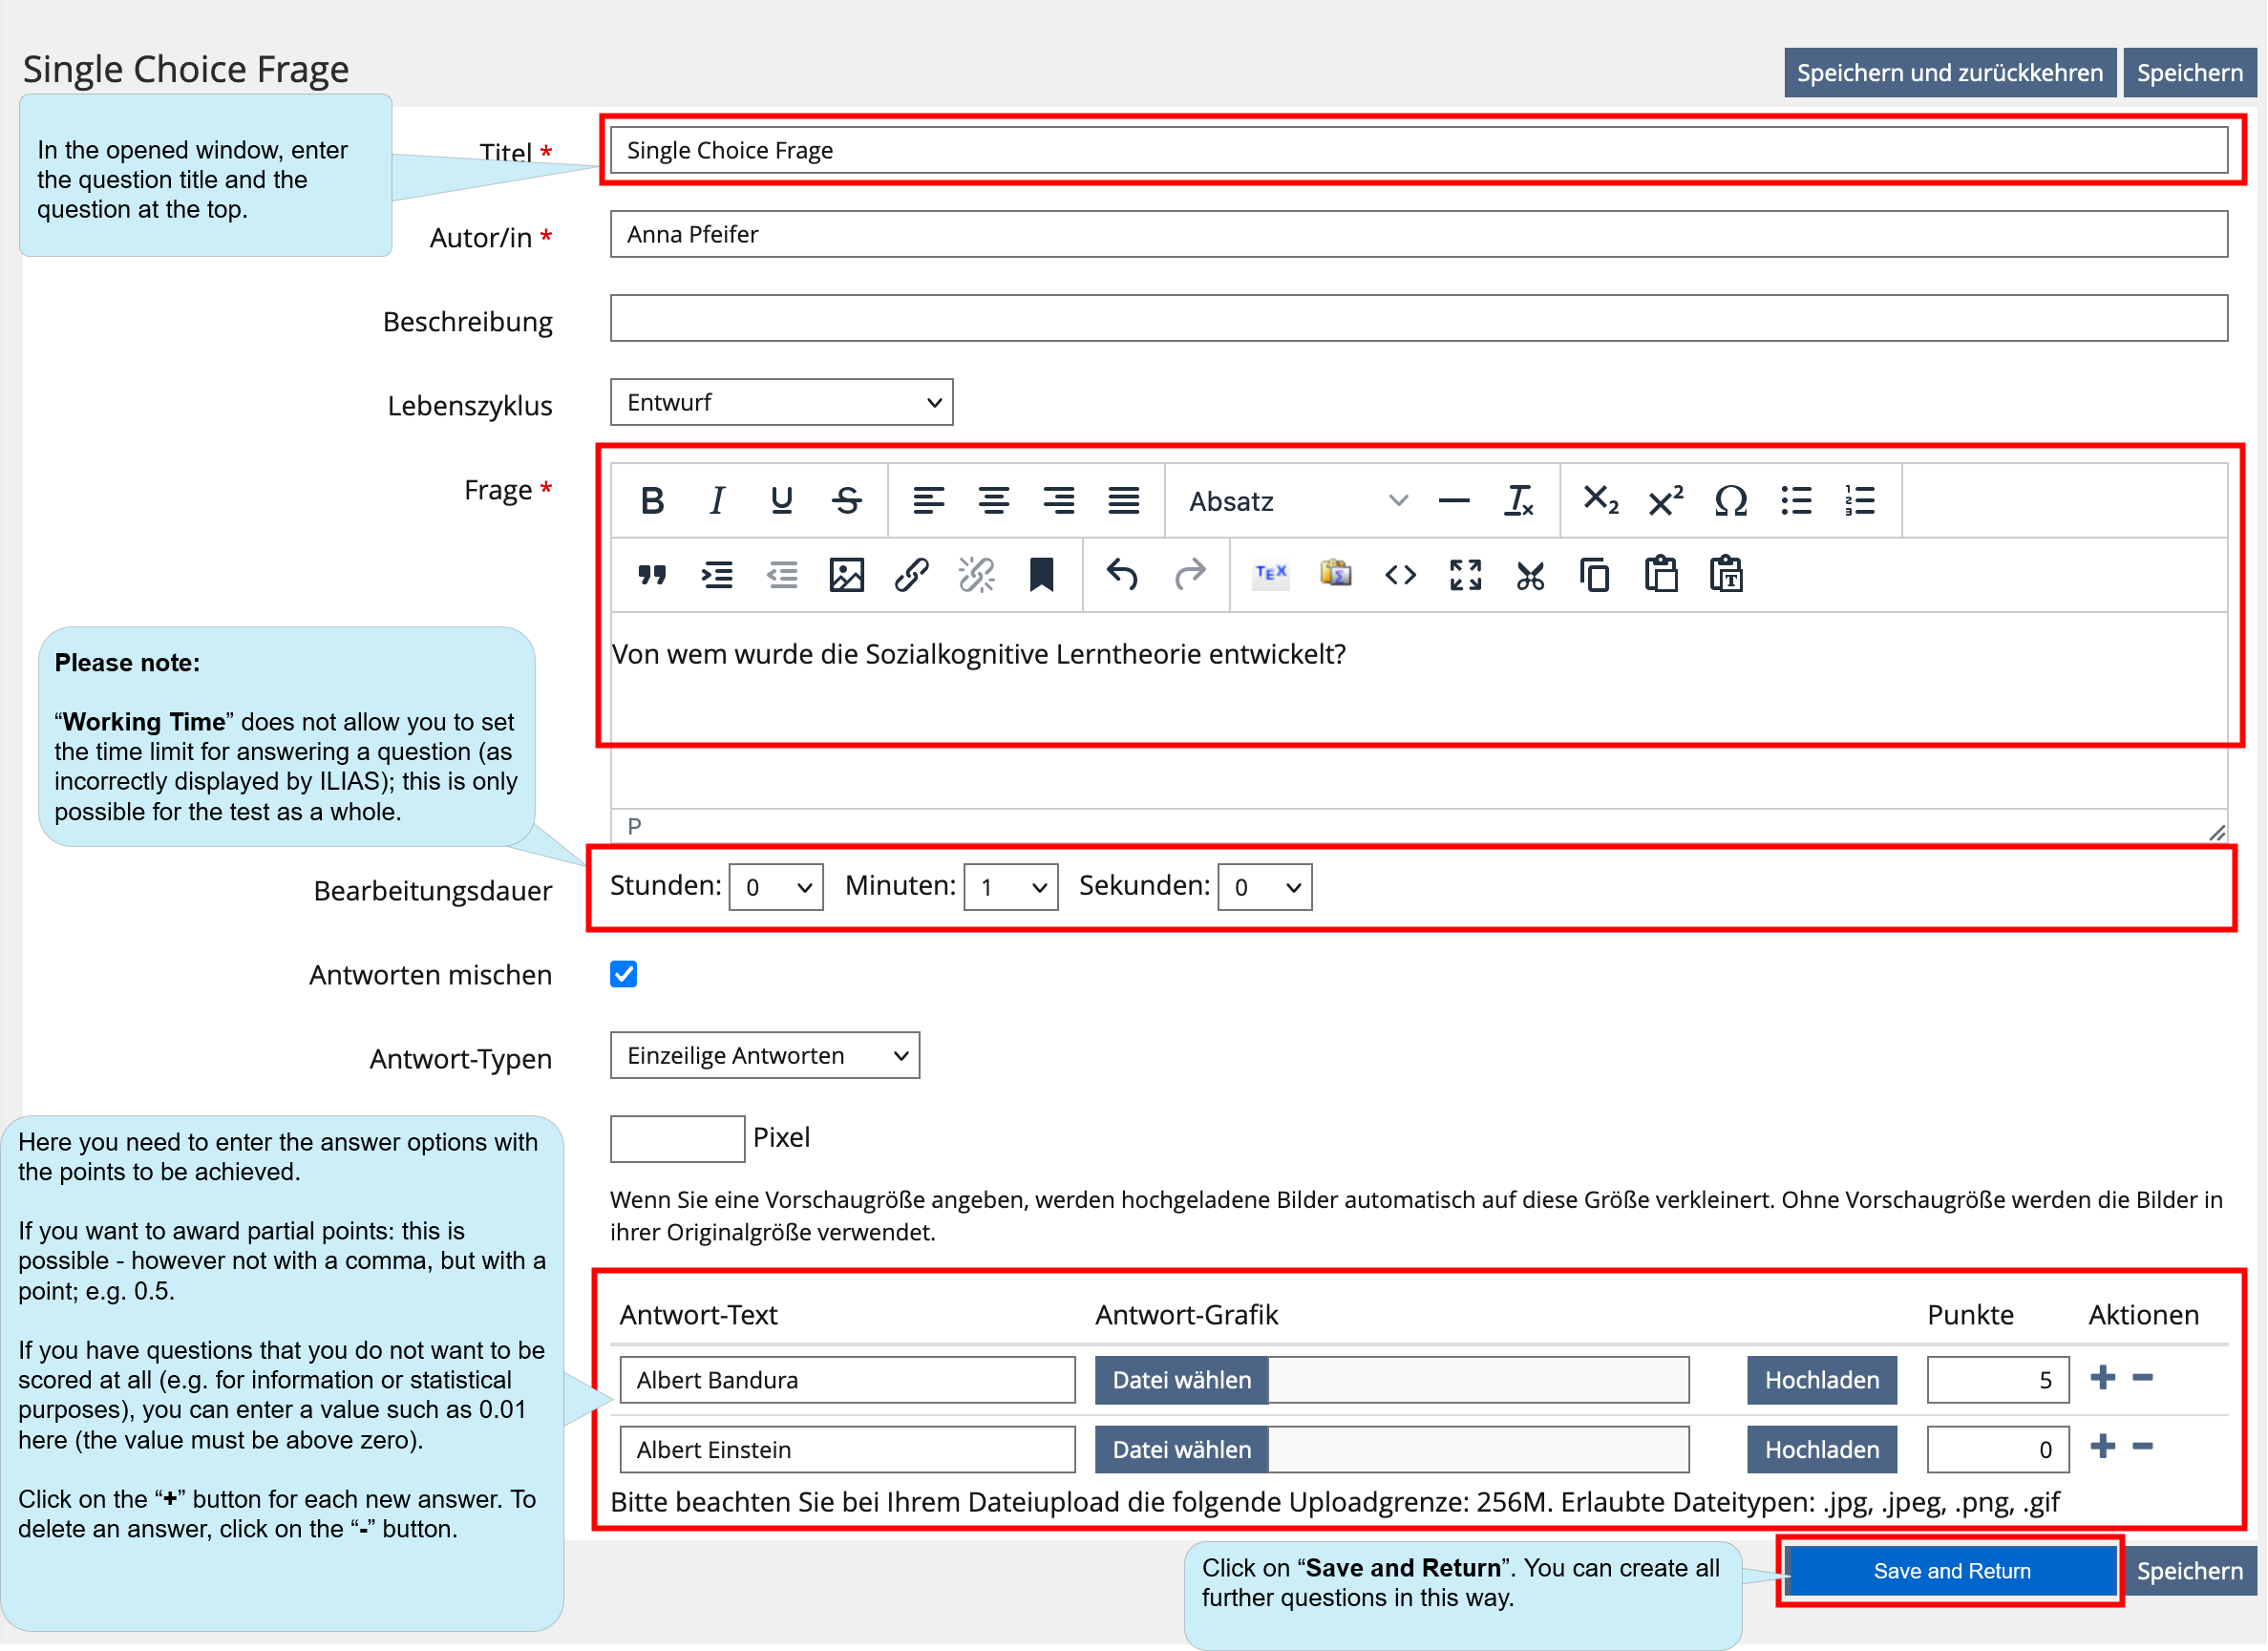
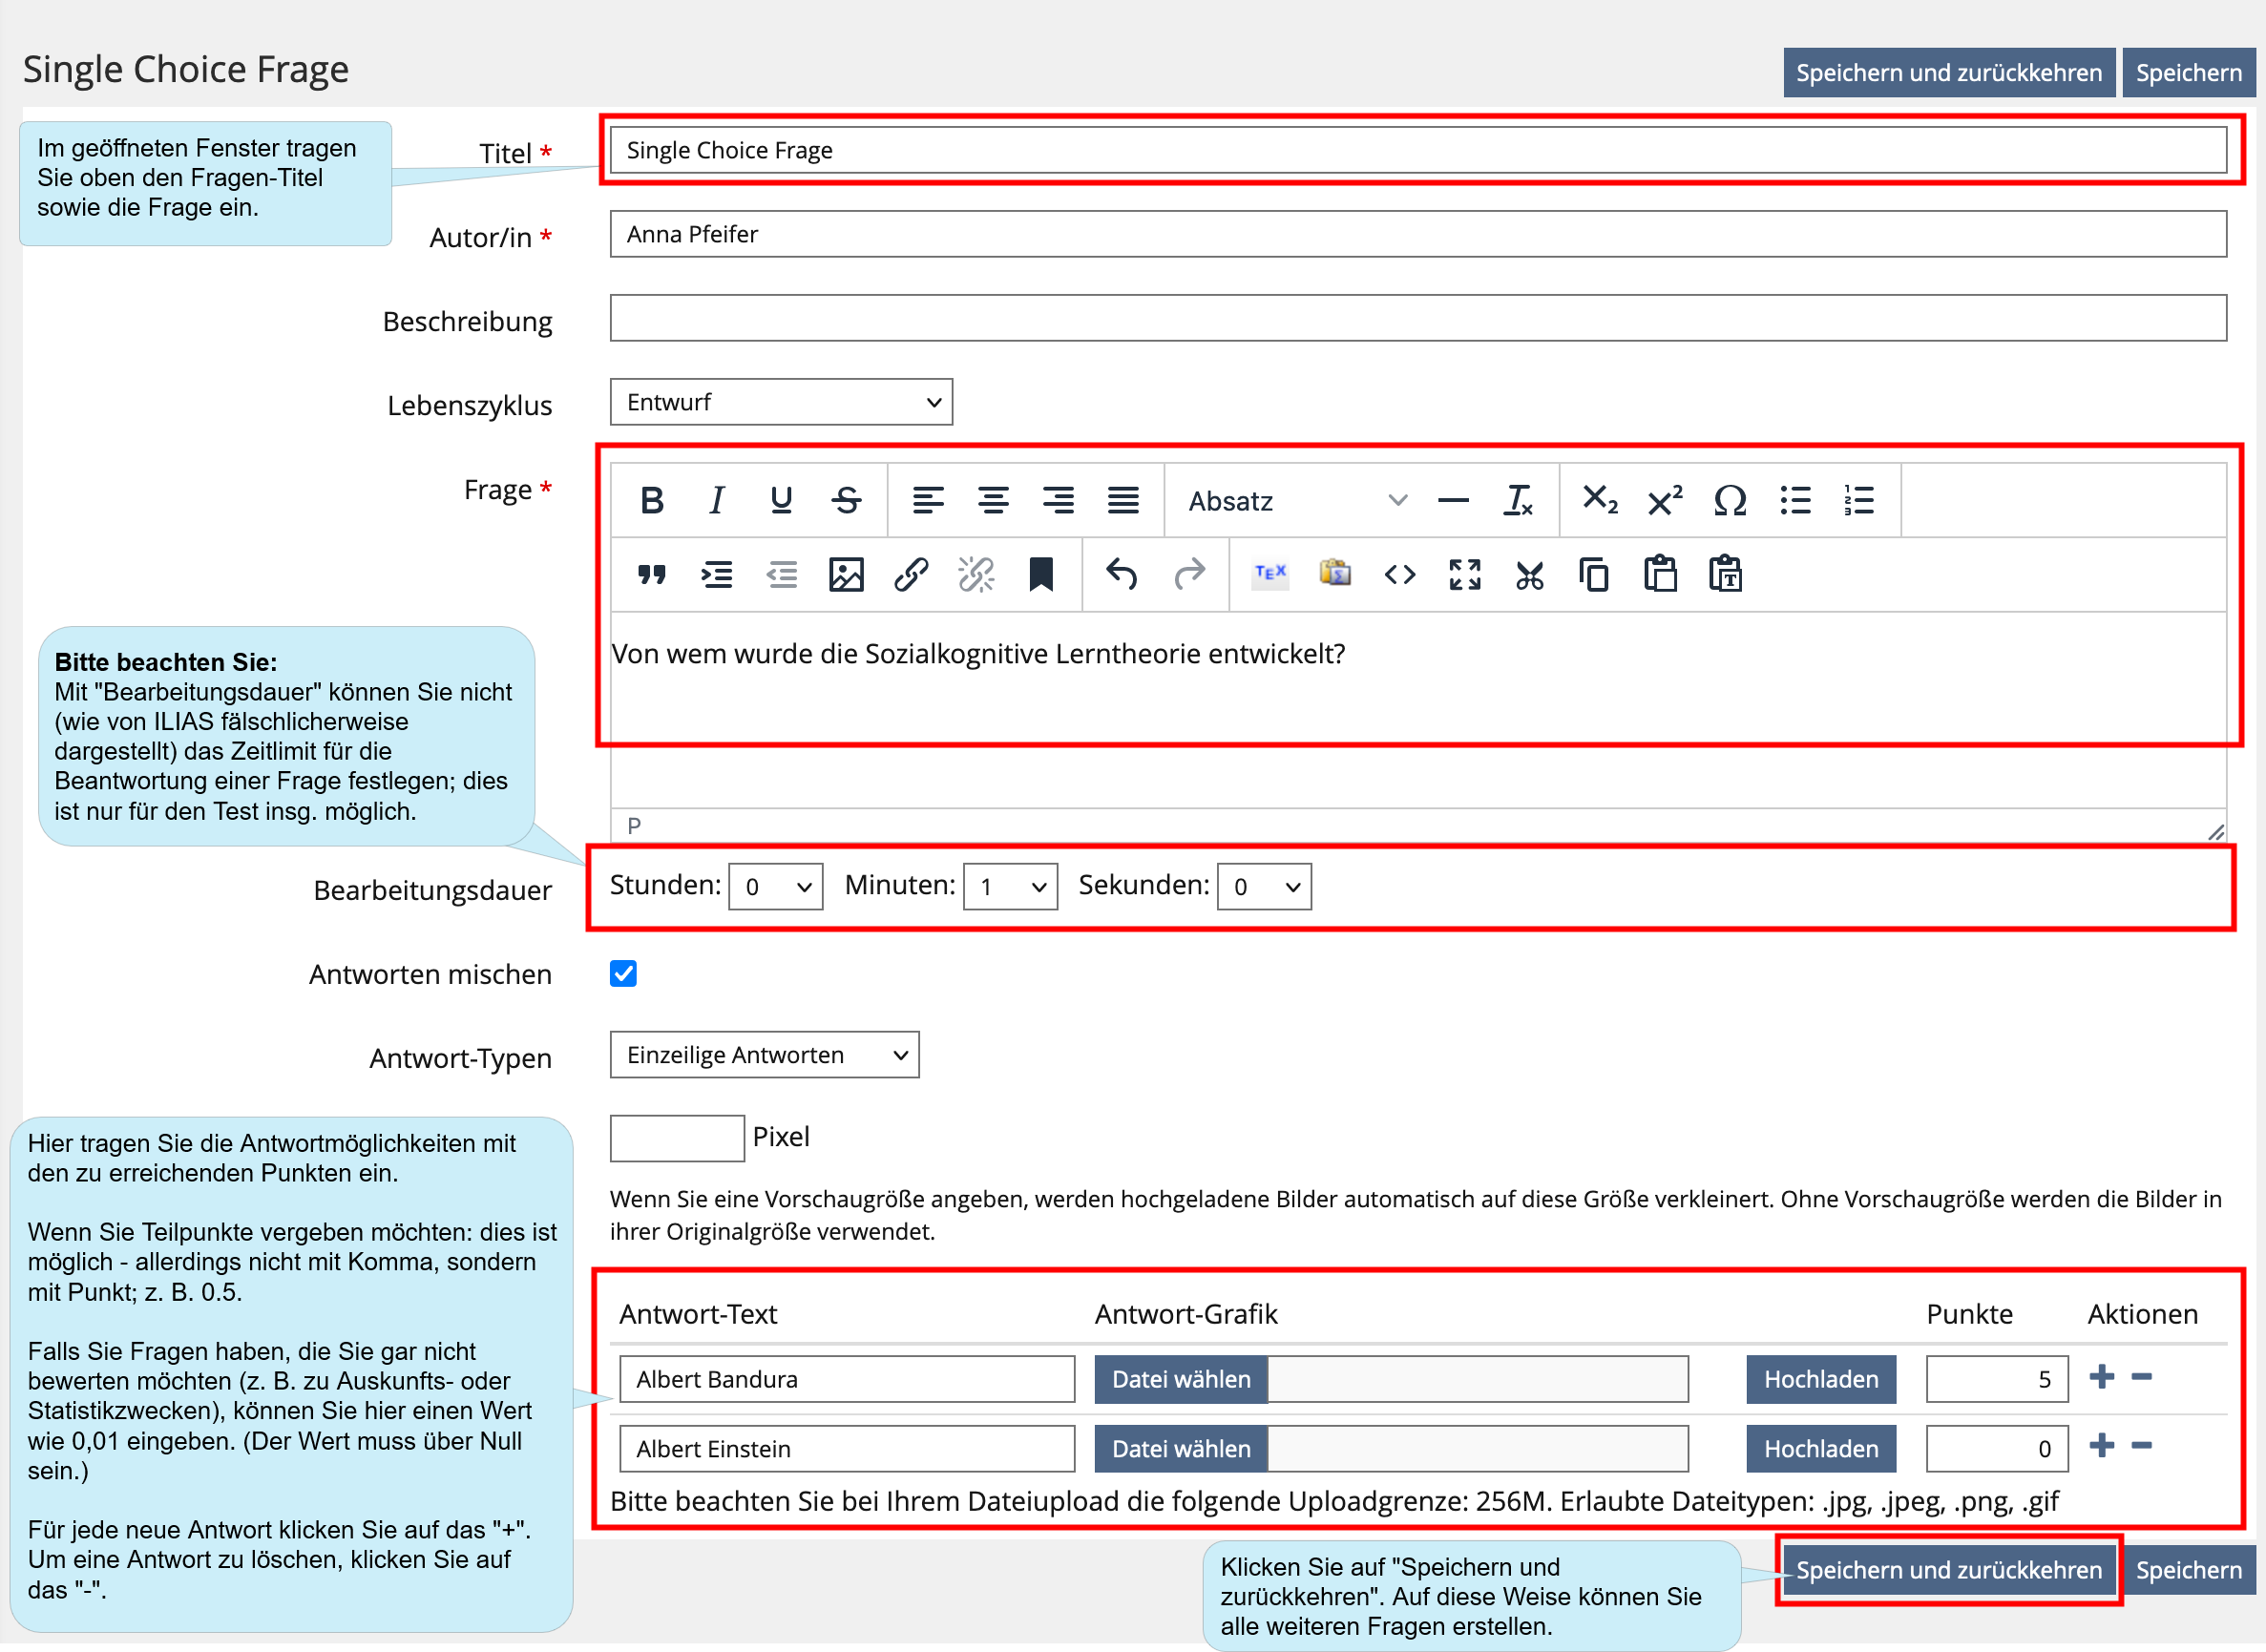
This is how you add questions to your test:
Empfehlung: Die Reihenfolge der Fragen können Sie jederzeit ändern (siehe Abschnitt 3.5. Fragen verwalten).
Please note:
Minus points are permissible and common practice in order to avoid or minimize random hits. However, the final score for a question may never be less than 0 points - it is not permitted to carry over minus points beyond the actual question. This is a preset in the standard settings of your test.
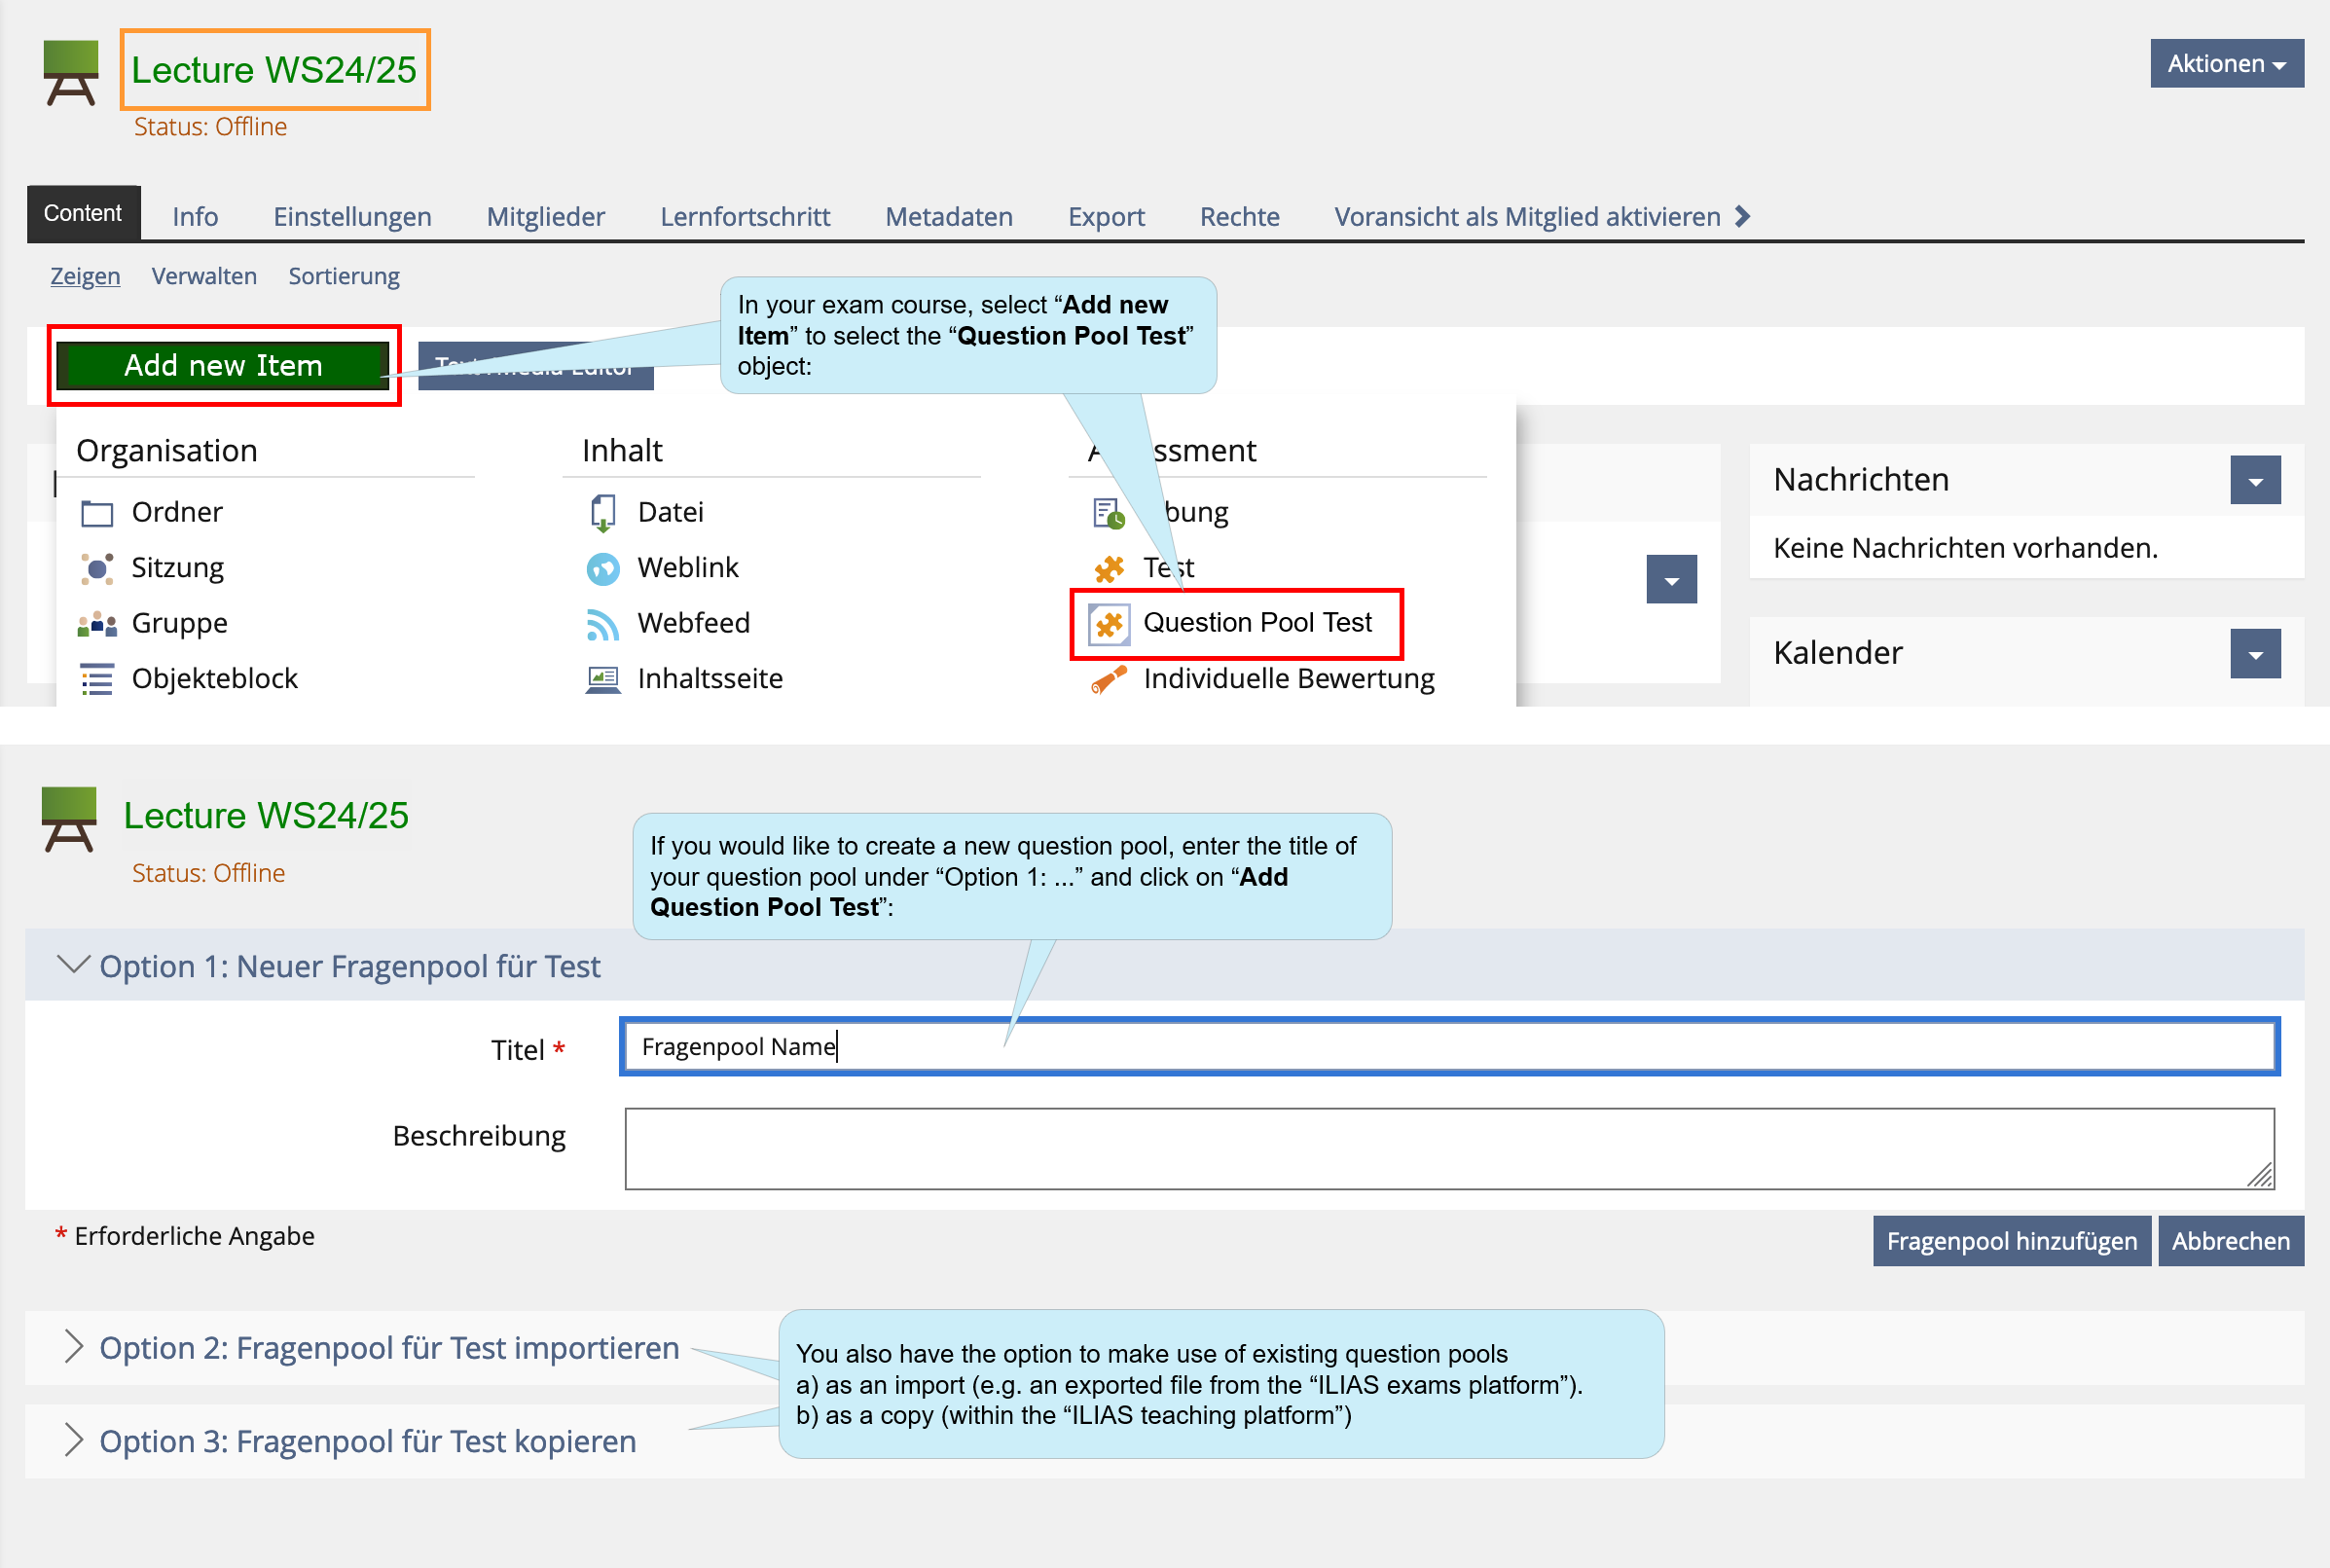
3.3.2. Creating questions pools
Benefits of question pools:
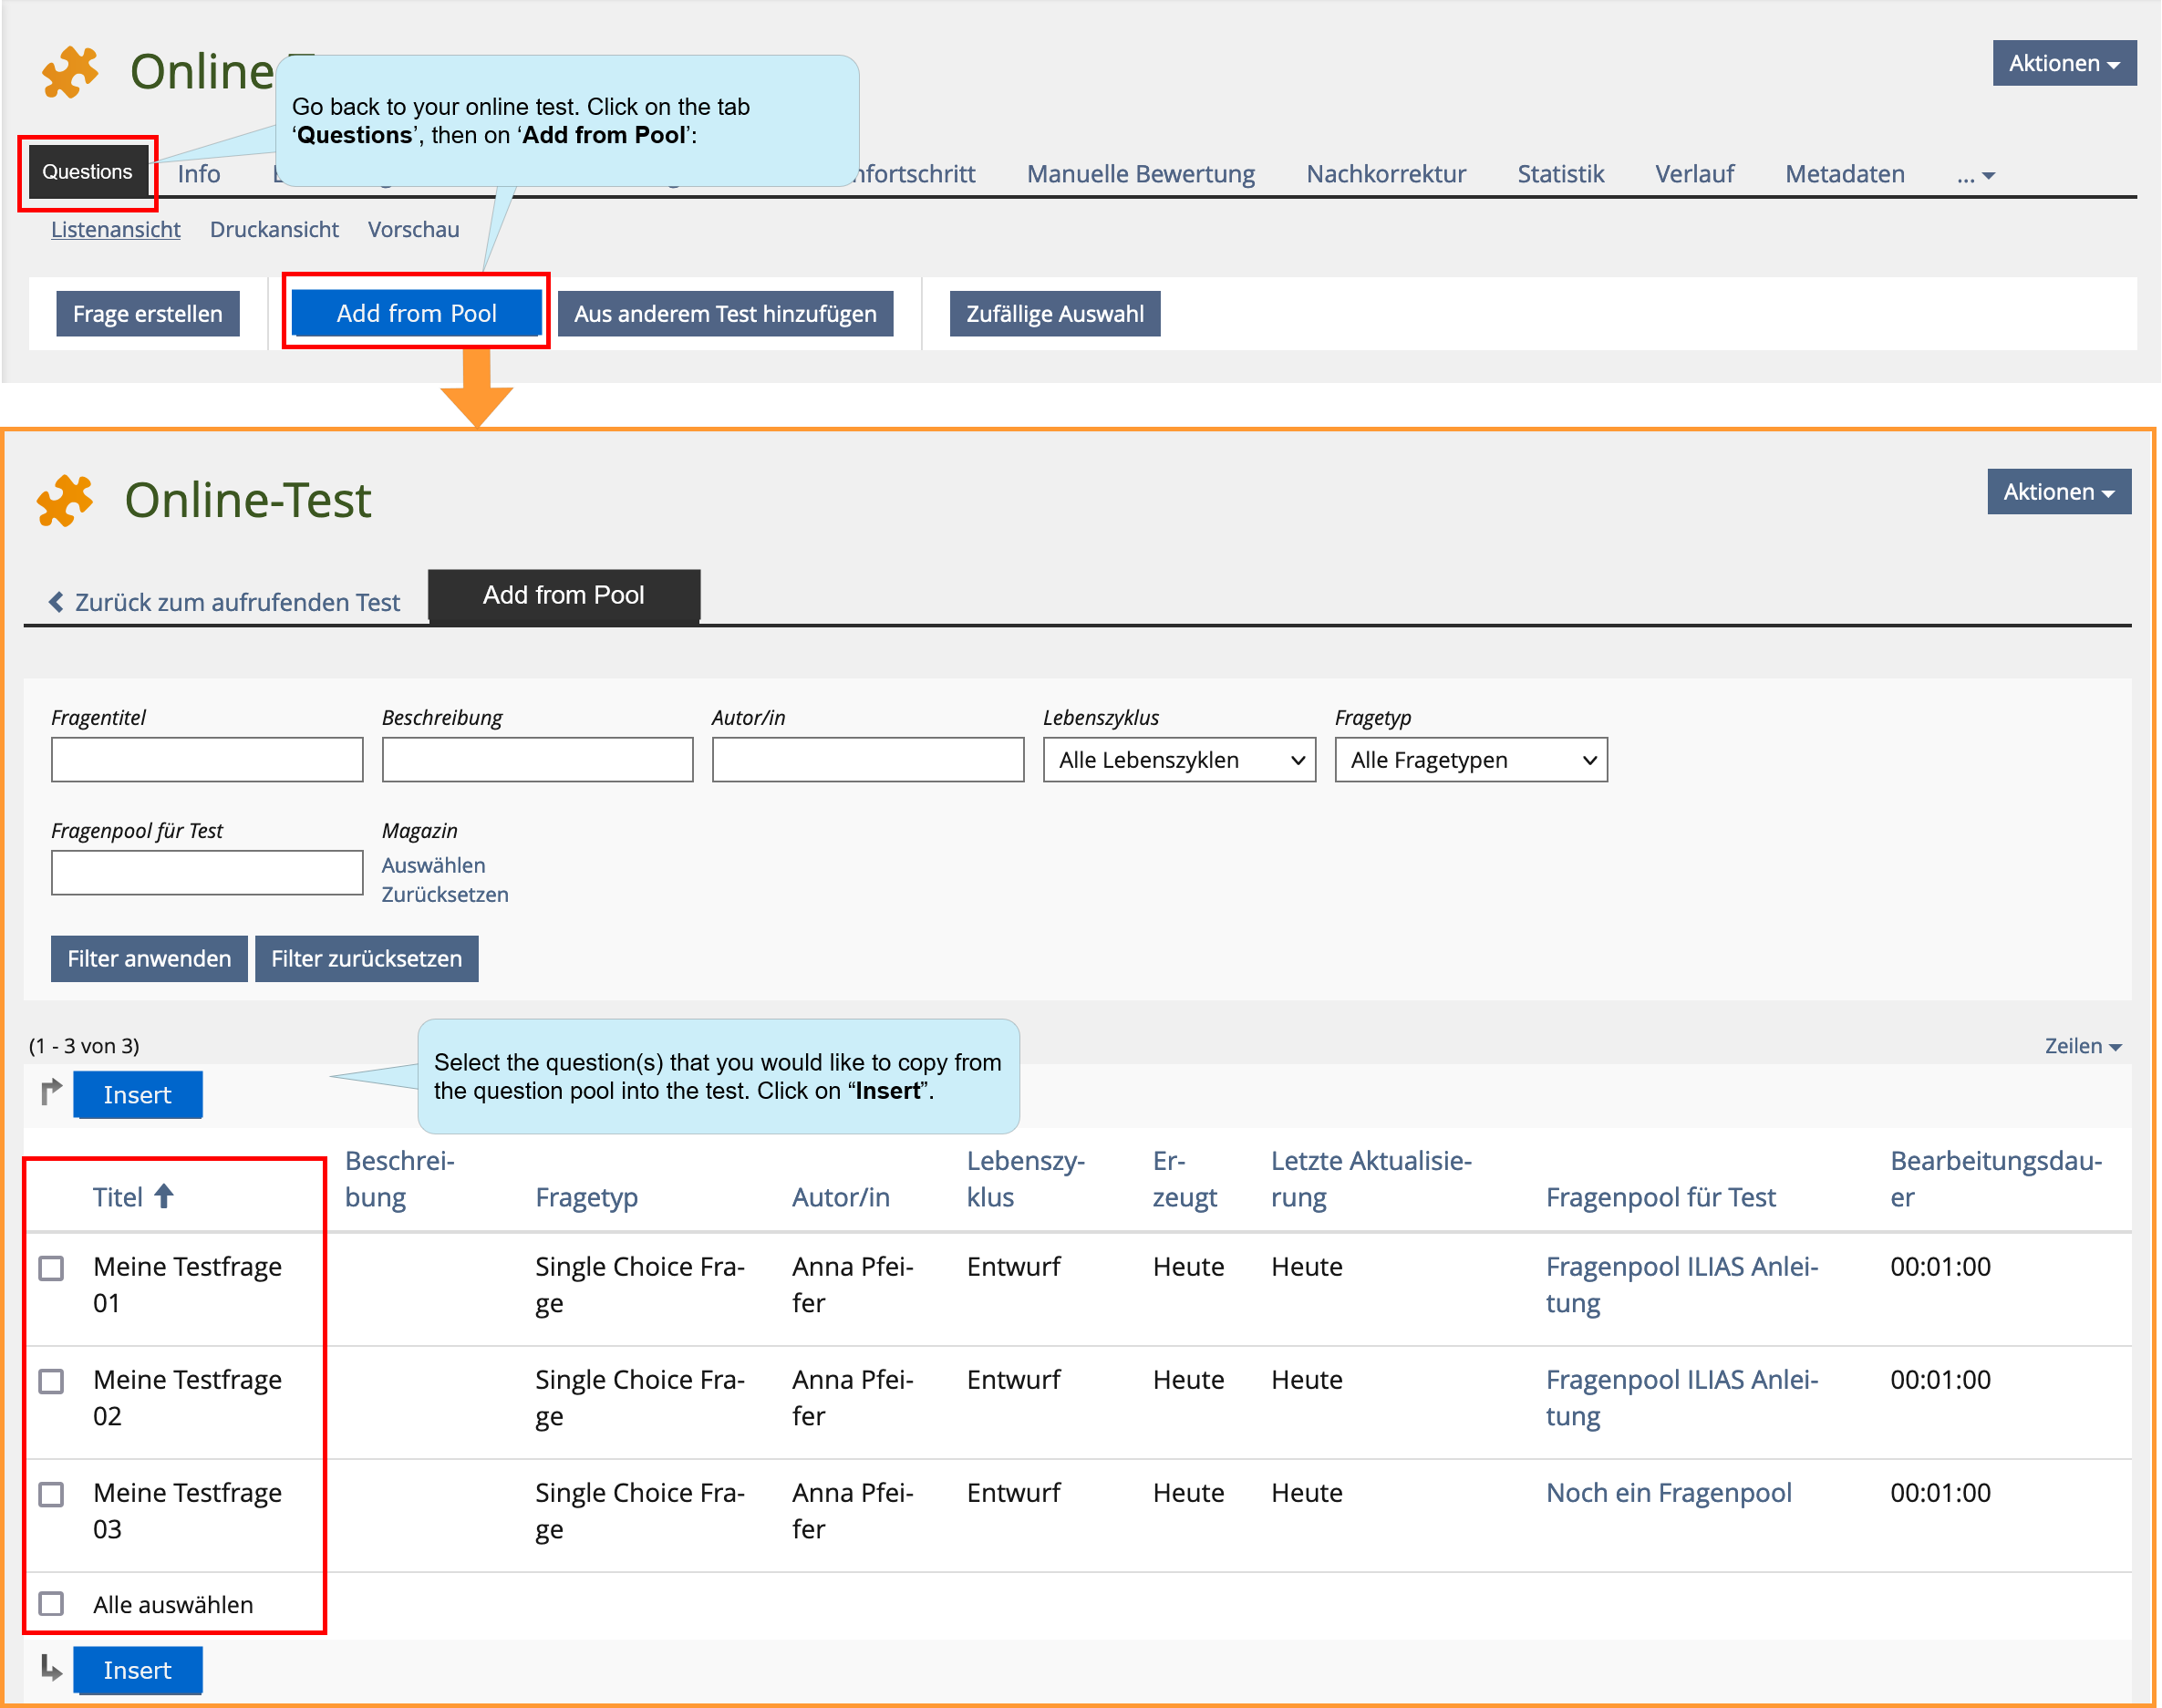
- You can collect and manage any number of questions in one or more question pools over the long run - e.g. according to content criteria. In the written test, you can draw questions from any number of question pools. You can reuse the questions in question pools in numerous tests.
- You have the option of categorizing questions with taxonomies. For example, you can create a thematic taxonomy and then add subordinate nodes “easy”, “medium”, “difficult”.
- You can add comments to individual questions. This makes it easier to edit question pools collaboratively.
Question pools are not visible to the participants.
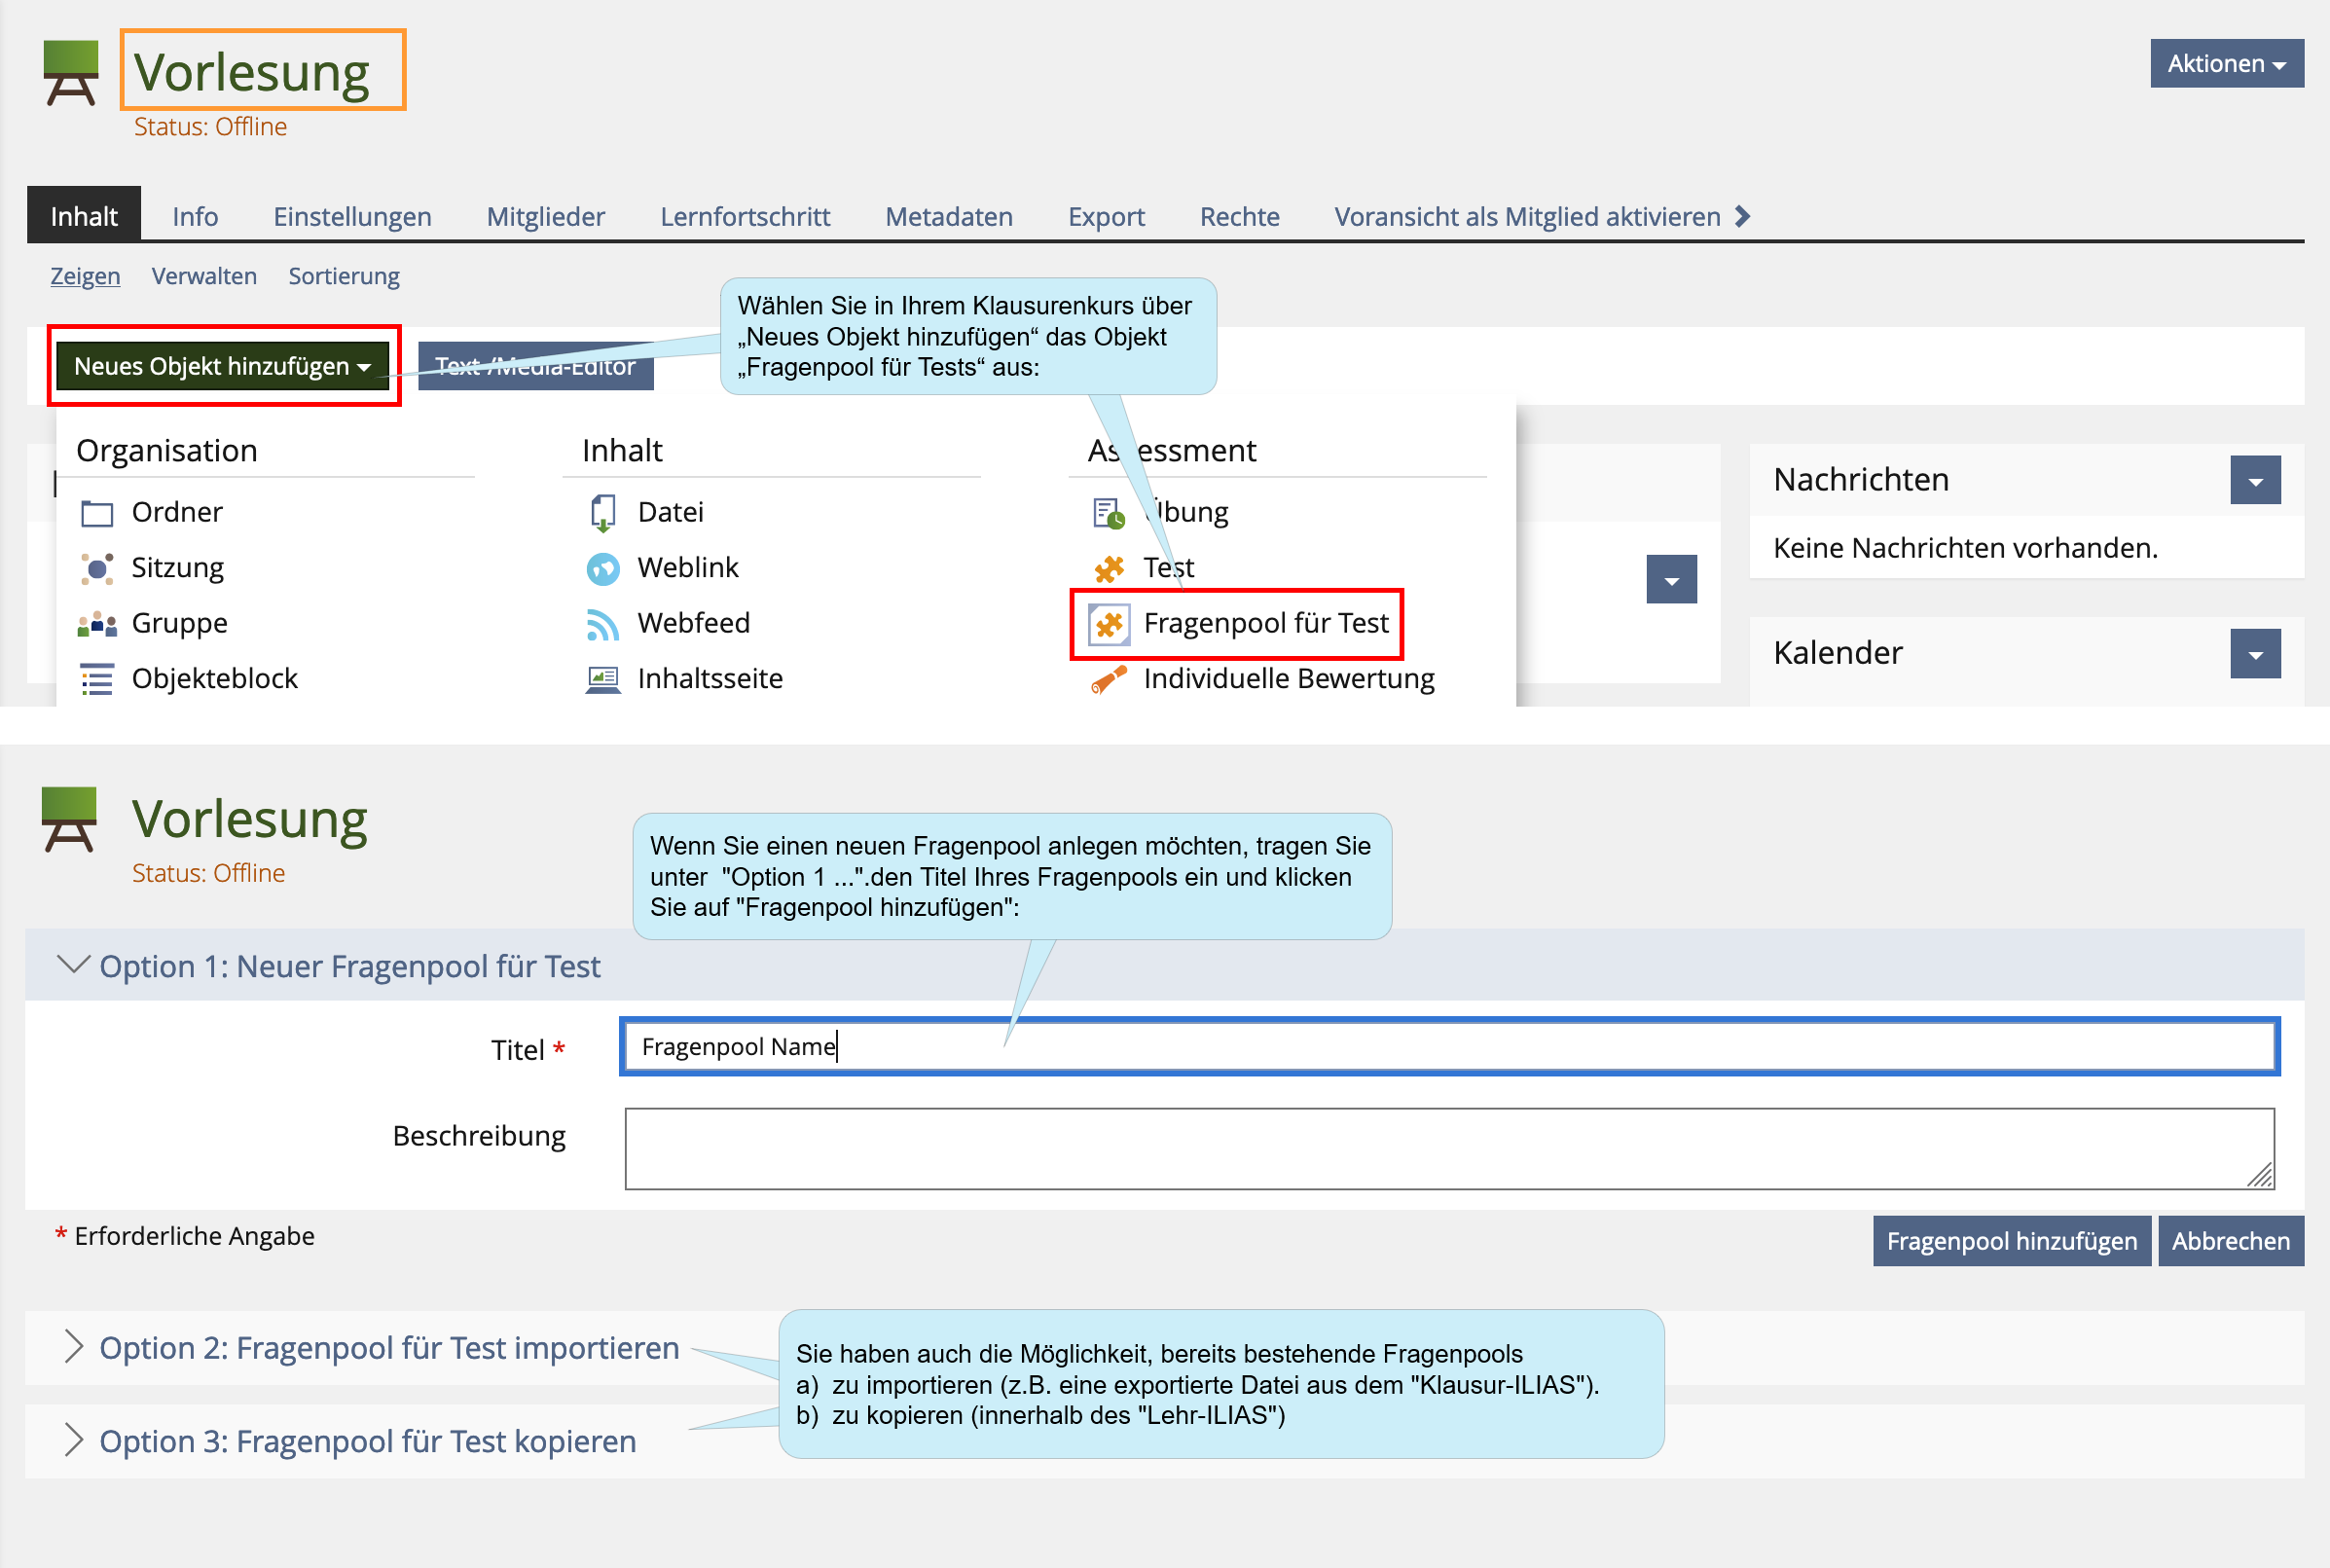
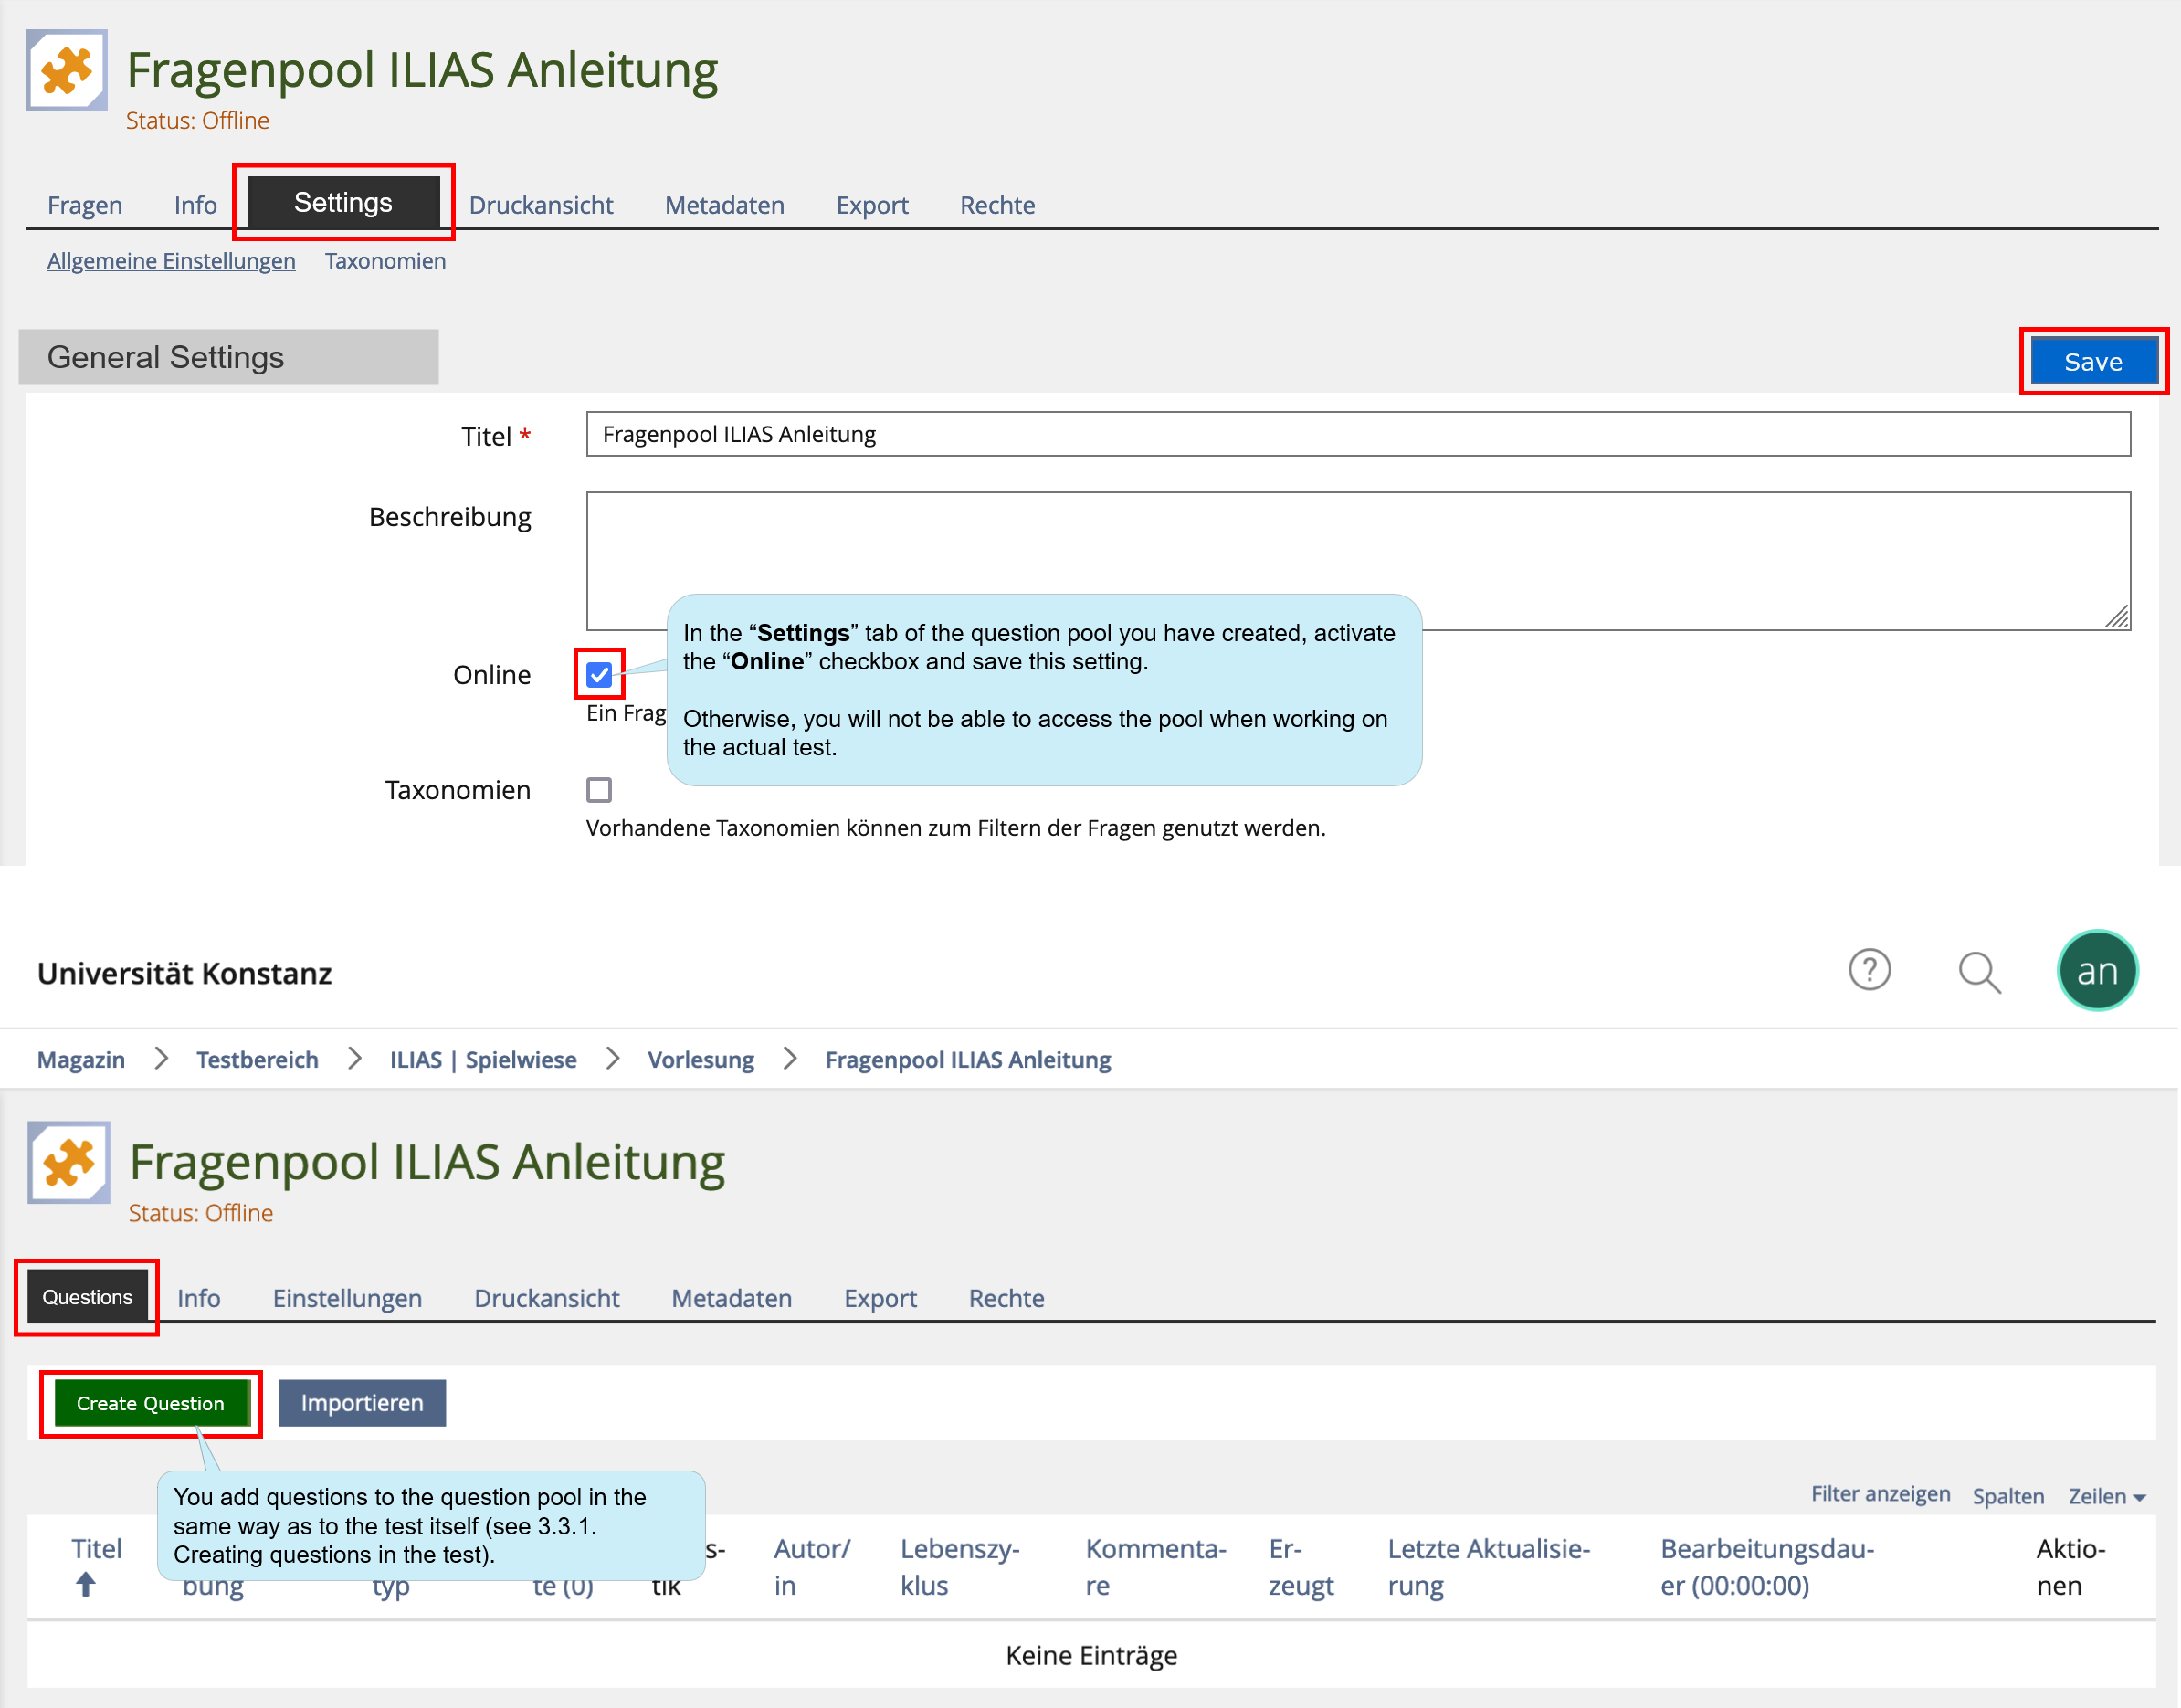
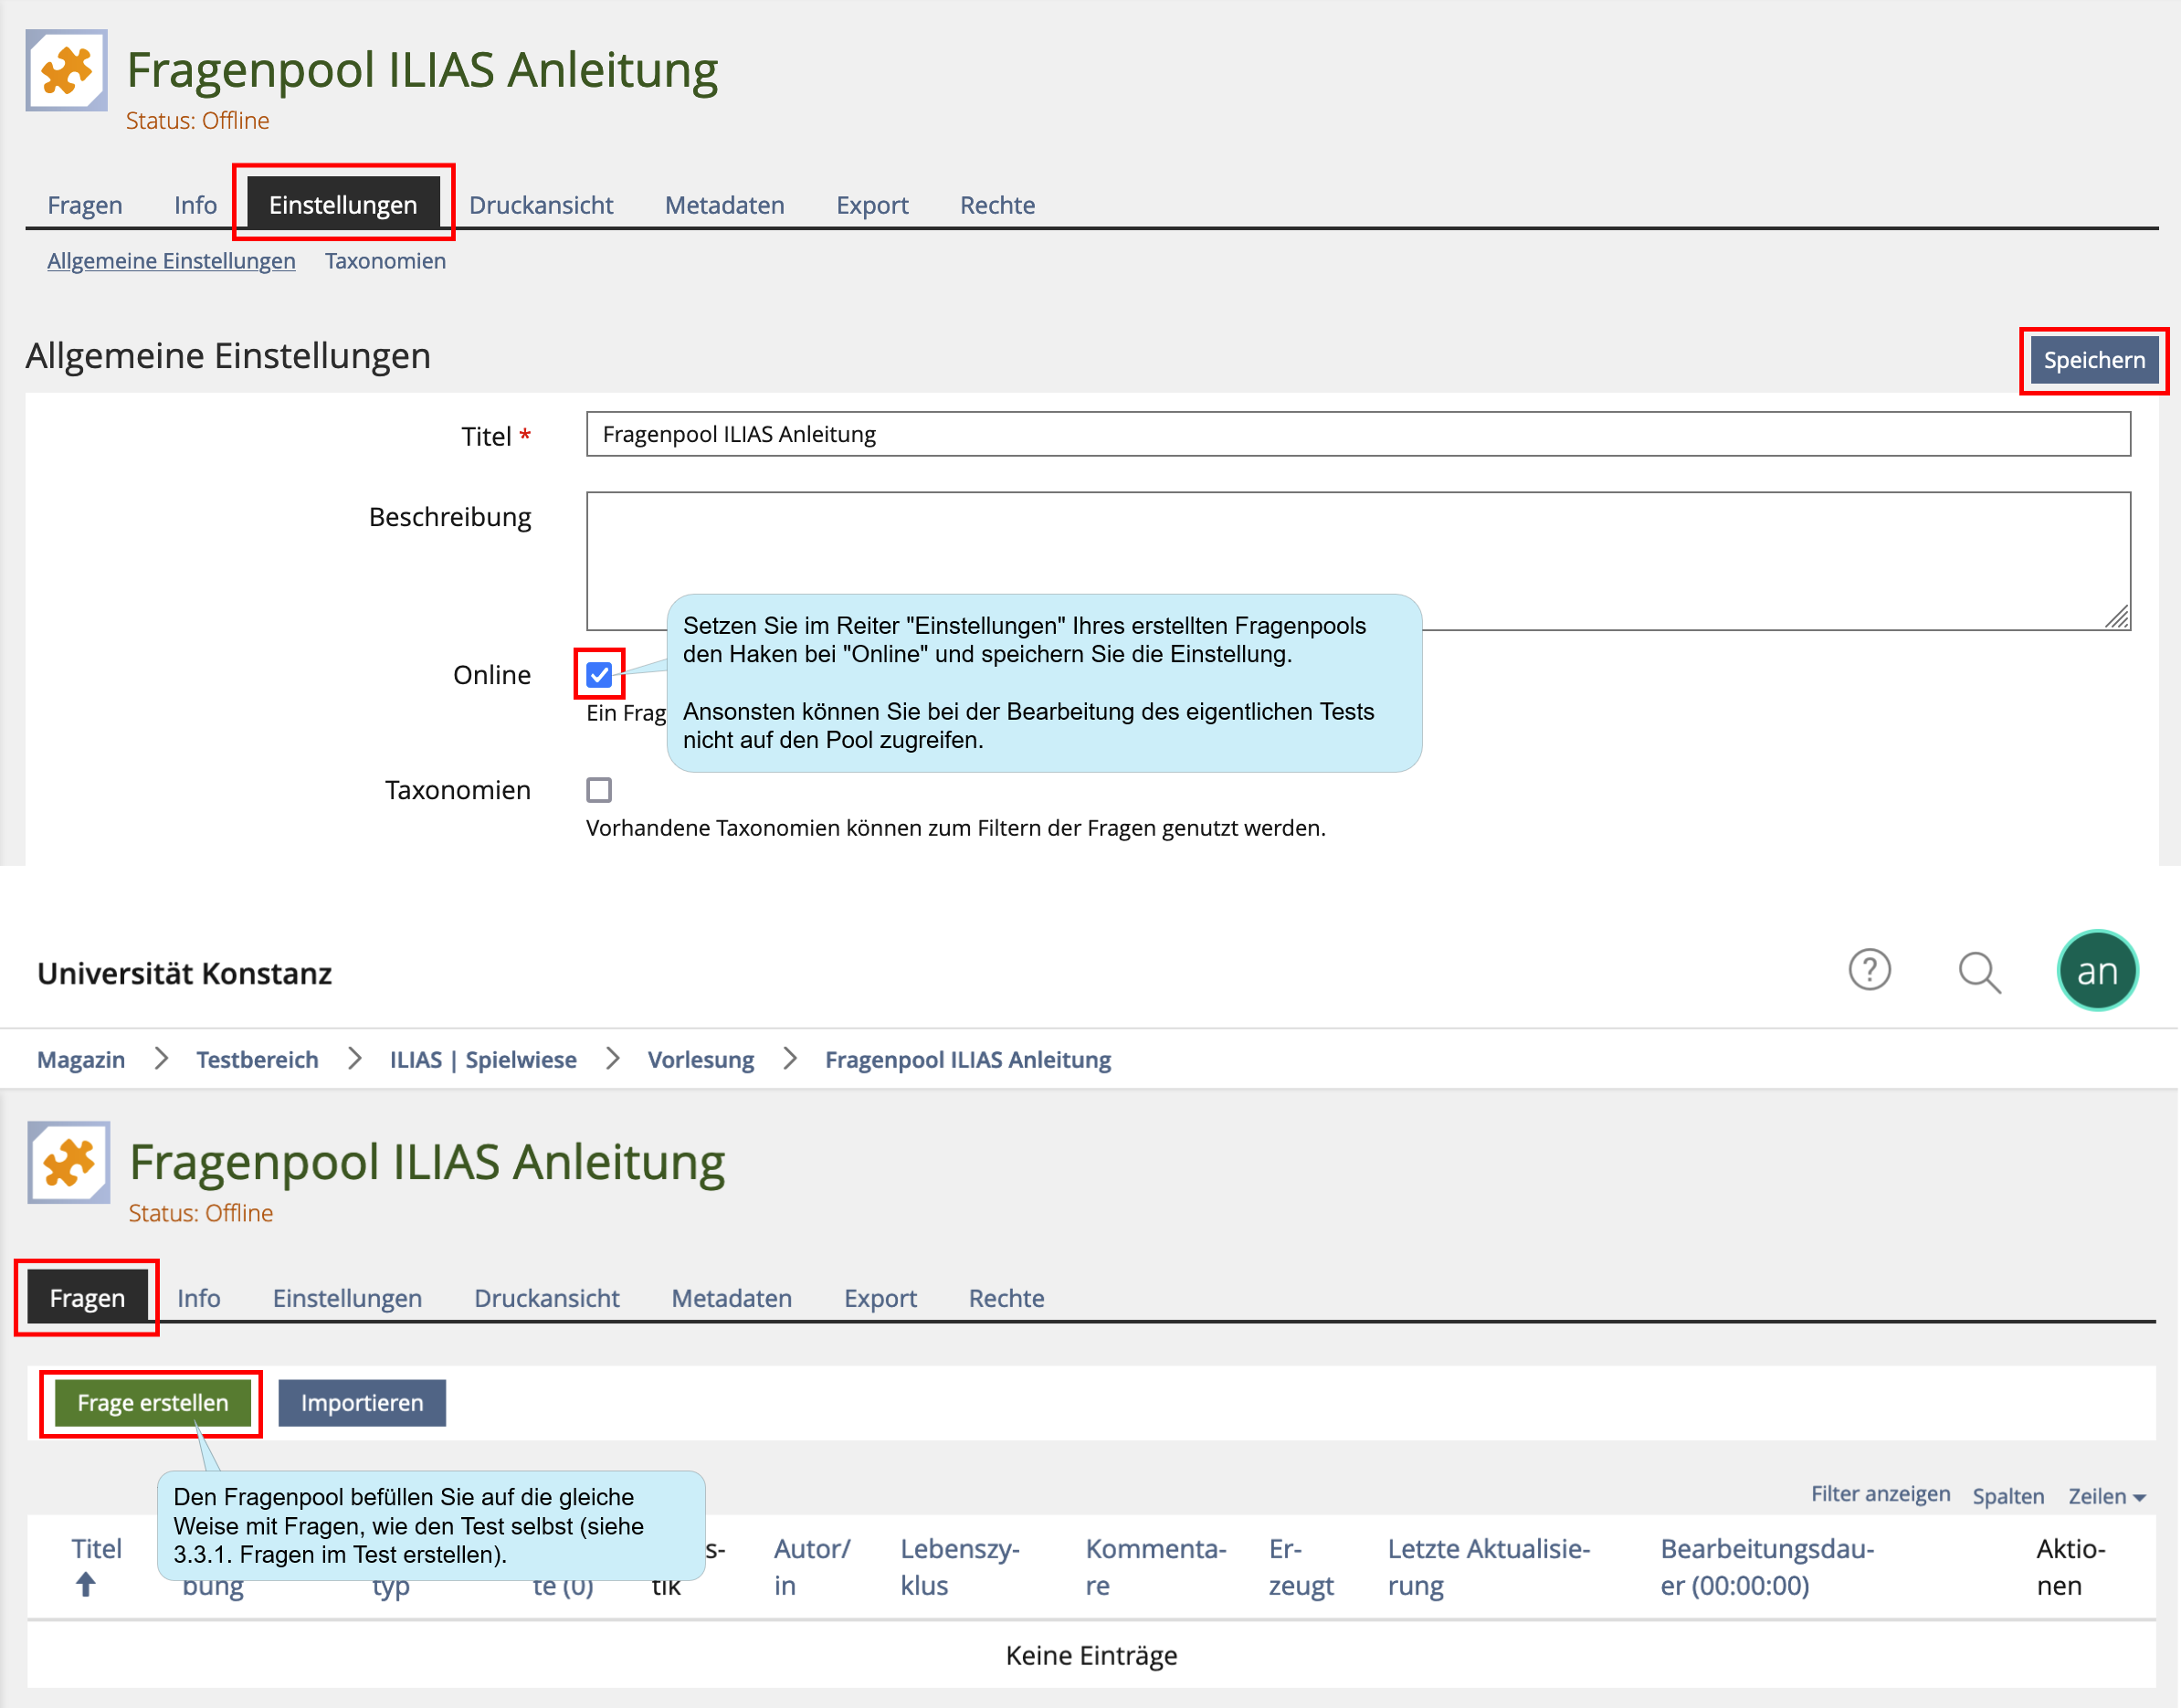
How to create a question pool:
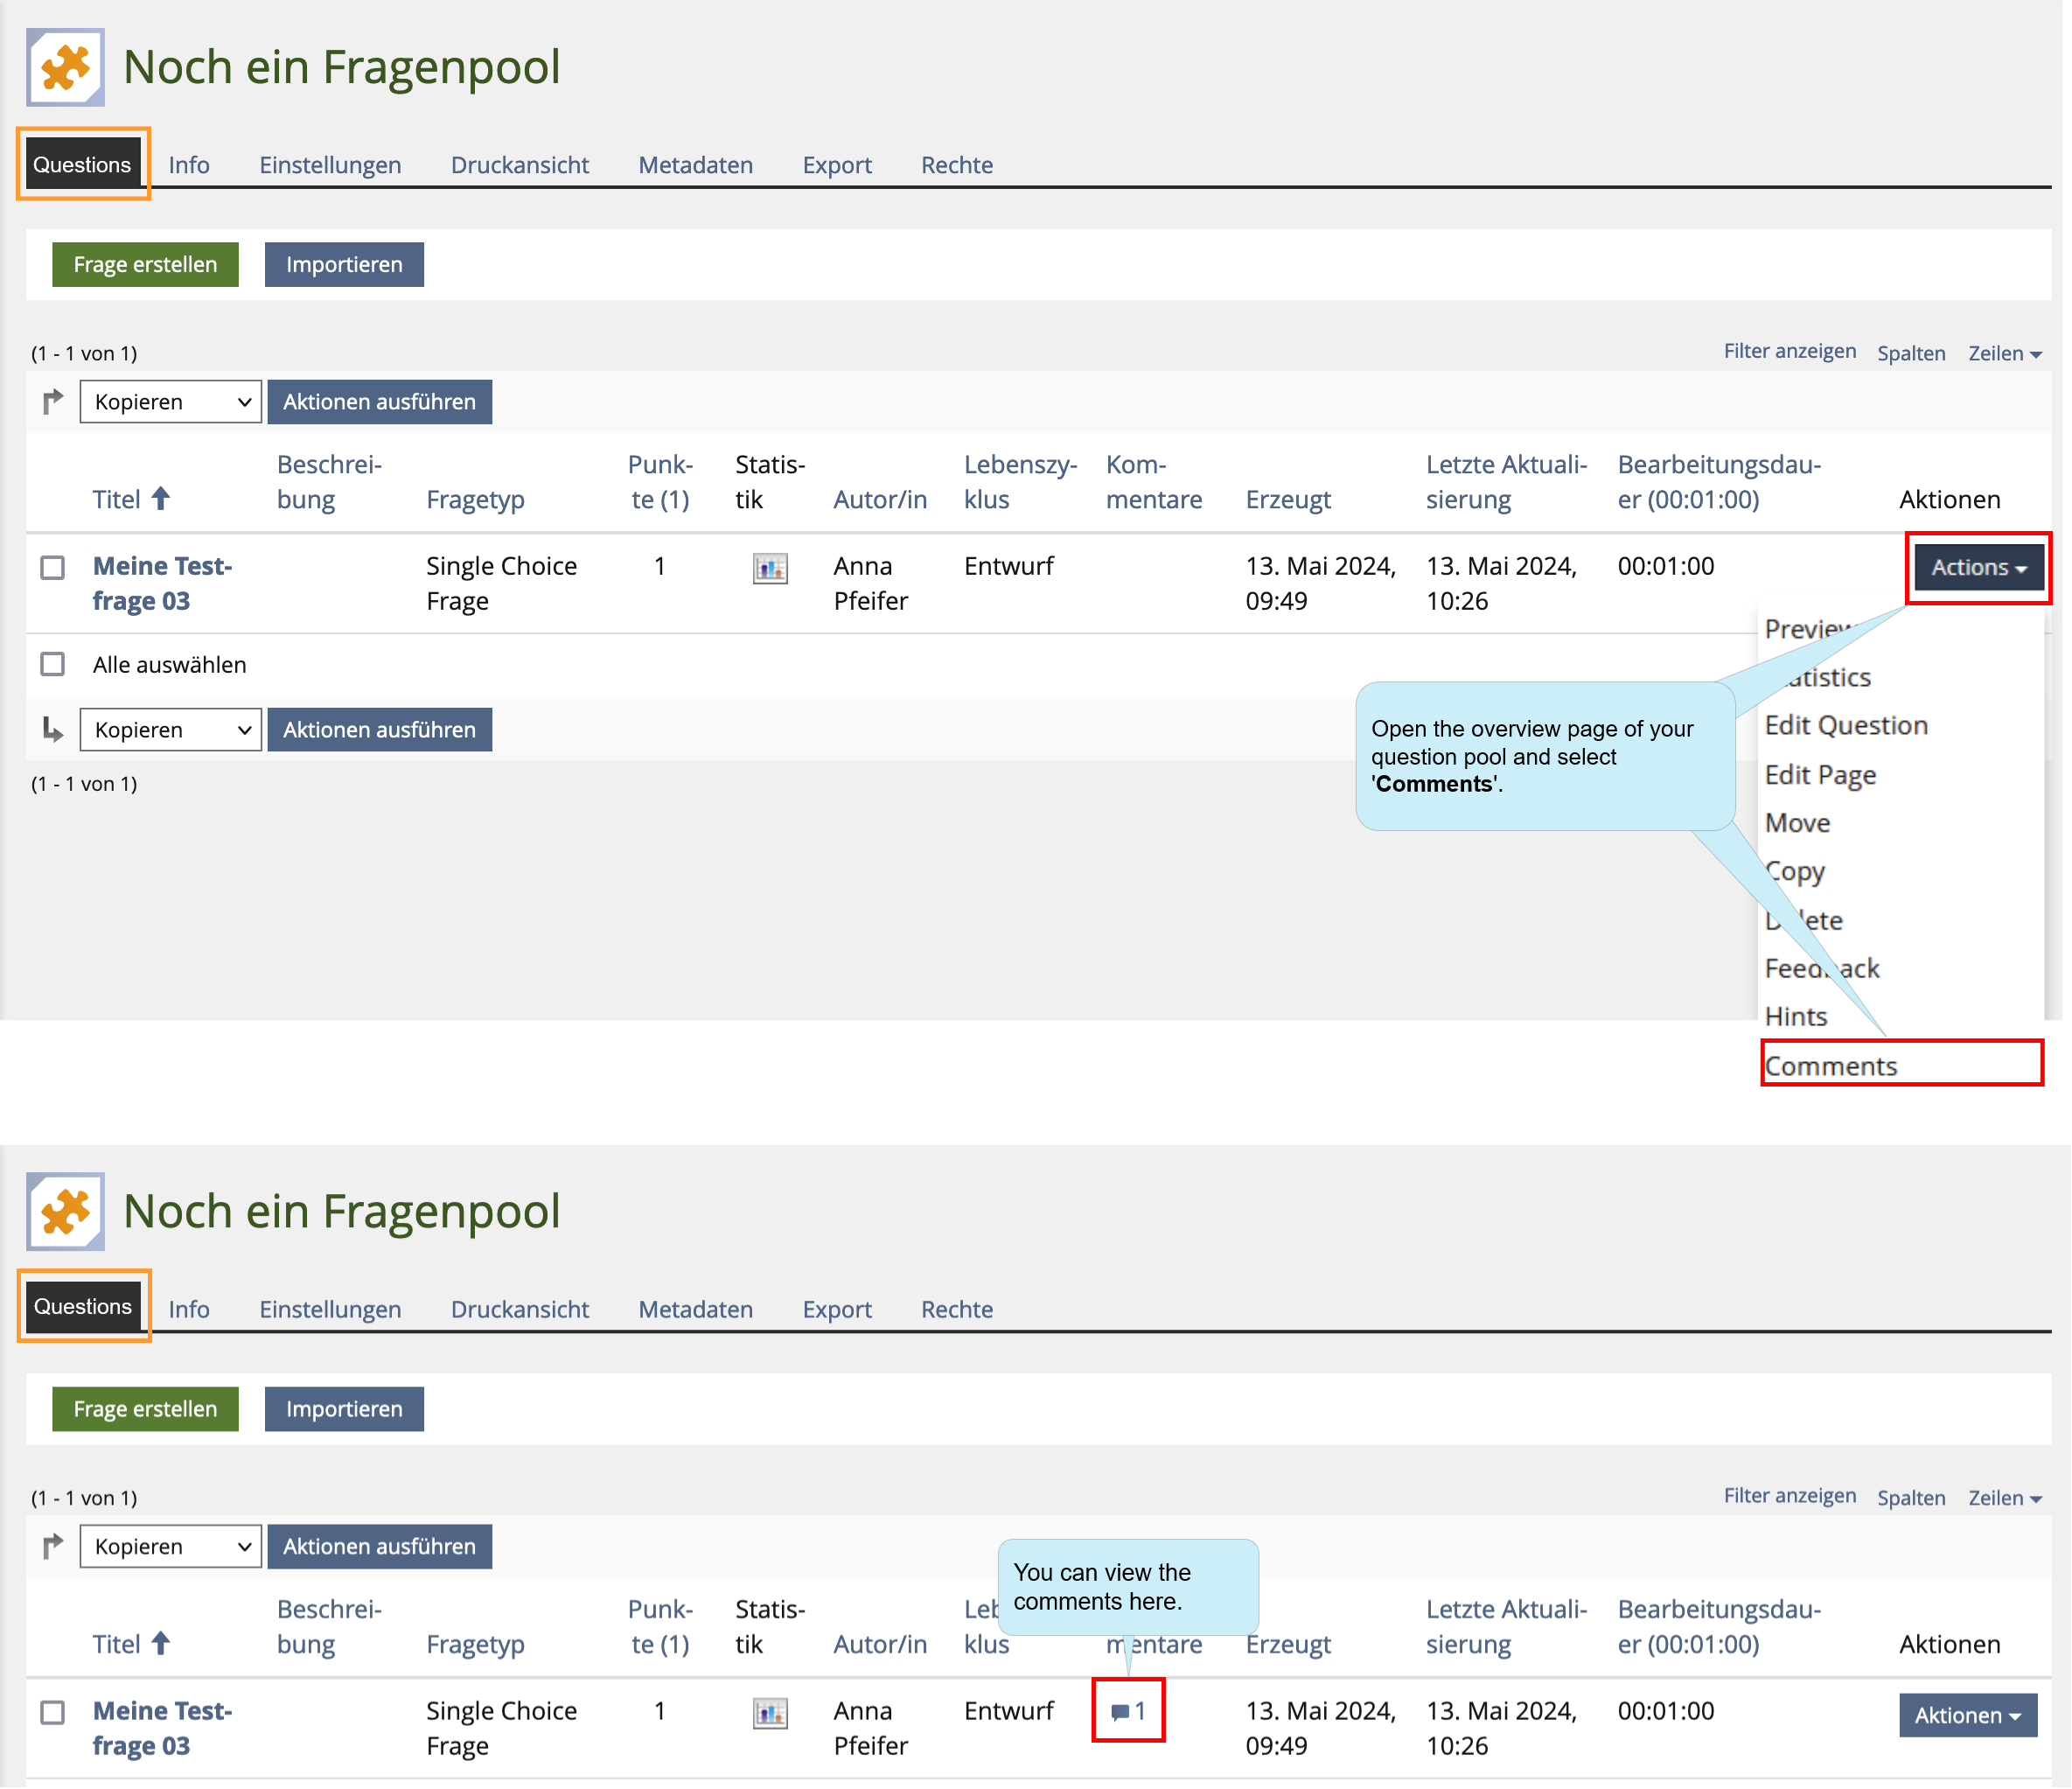
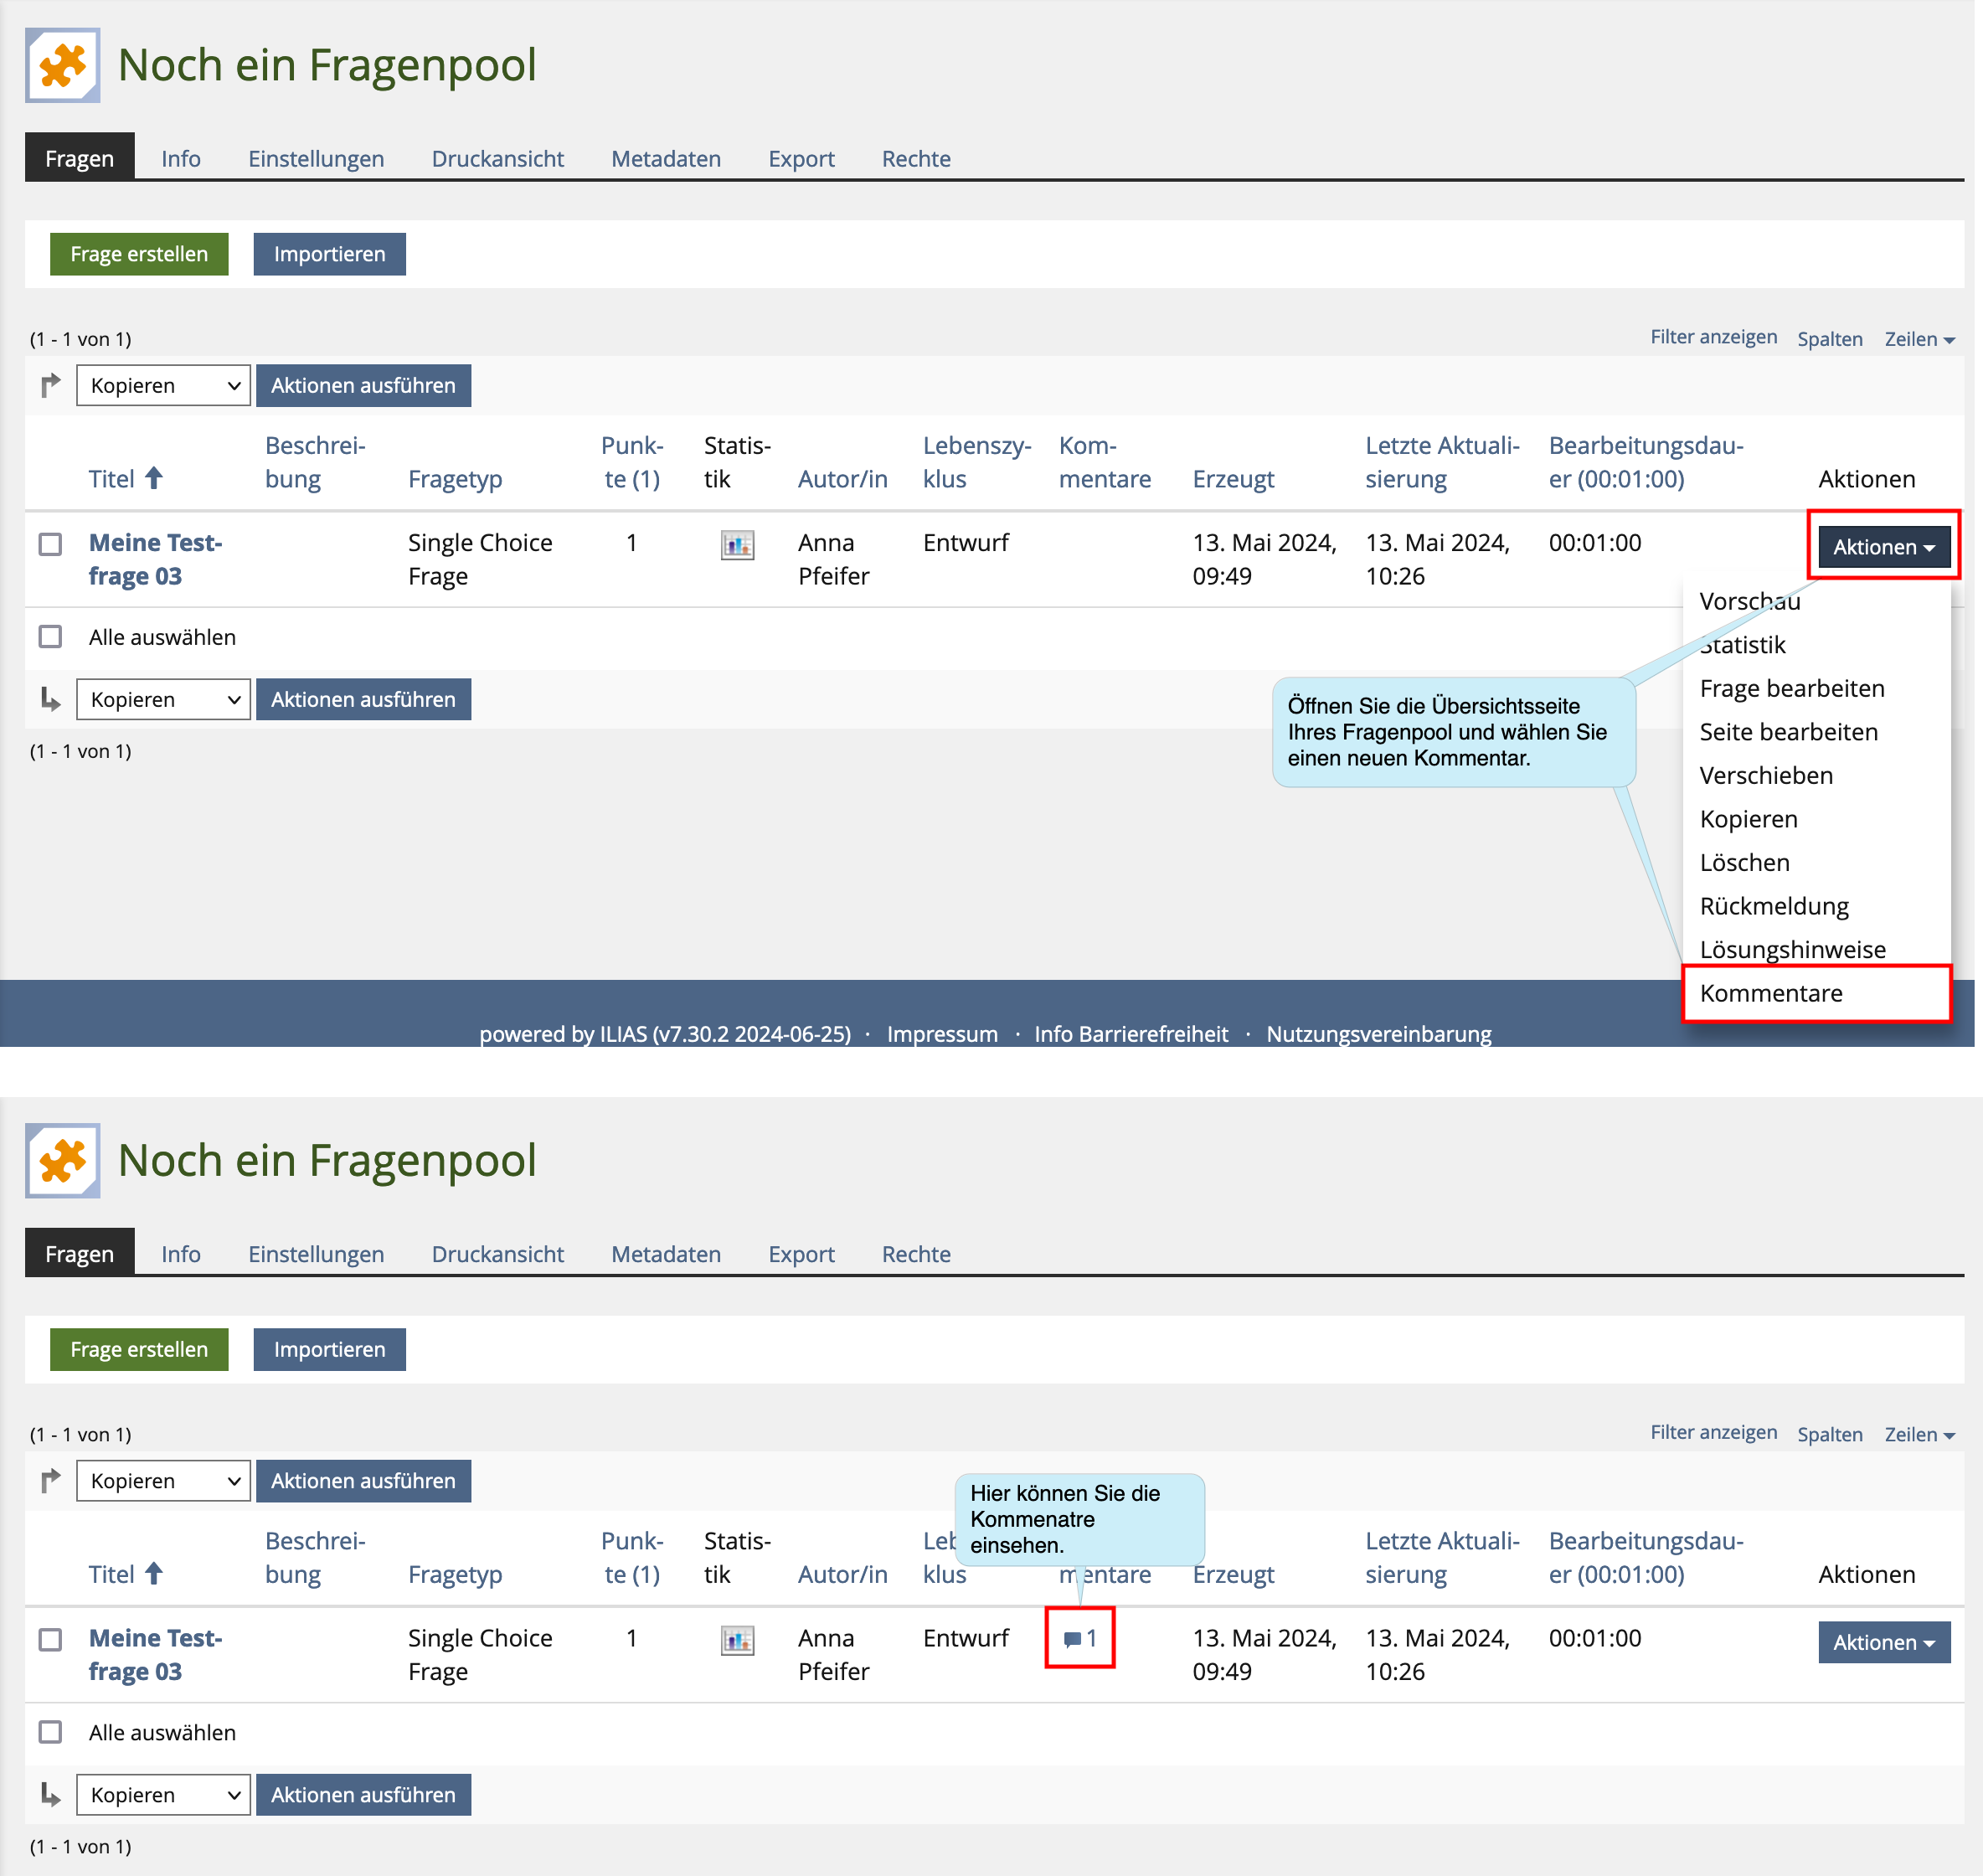
Comments in question pools
You can make comments on the individual questions in question pools: e.g. if you want colleagues to proofread questions or if you want to set a reminder that you would like to edit/correct a question.
Please note:
- Questions that you have created directly in a test can also be moved to a question pool at a later time.
- If you edit a question directly in the test that you have previously created in the question pool, you will receive a message after the change that the changed question has been created as a copy of your original question. You can answer with “Yes” or “No” whether you want to transfer your changes to the original question in the question pool.
- If you delete a question directly in the test, it will still be available in the question pool. To delete a question permanently, remove it from the question pool.
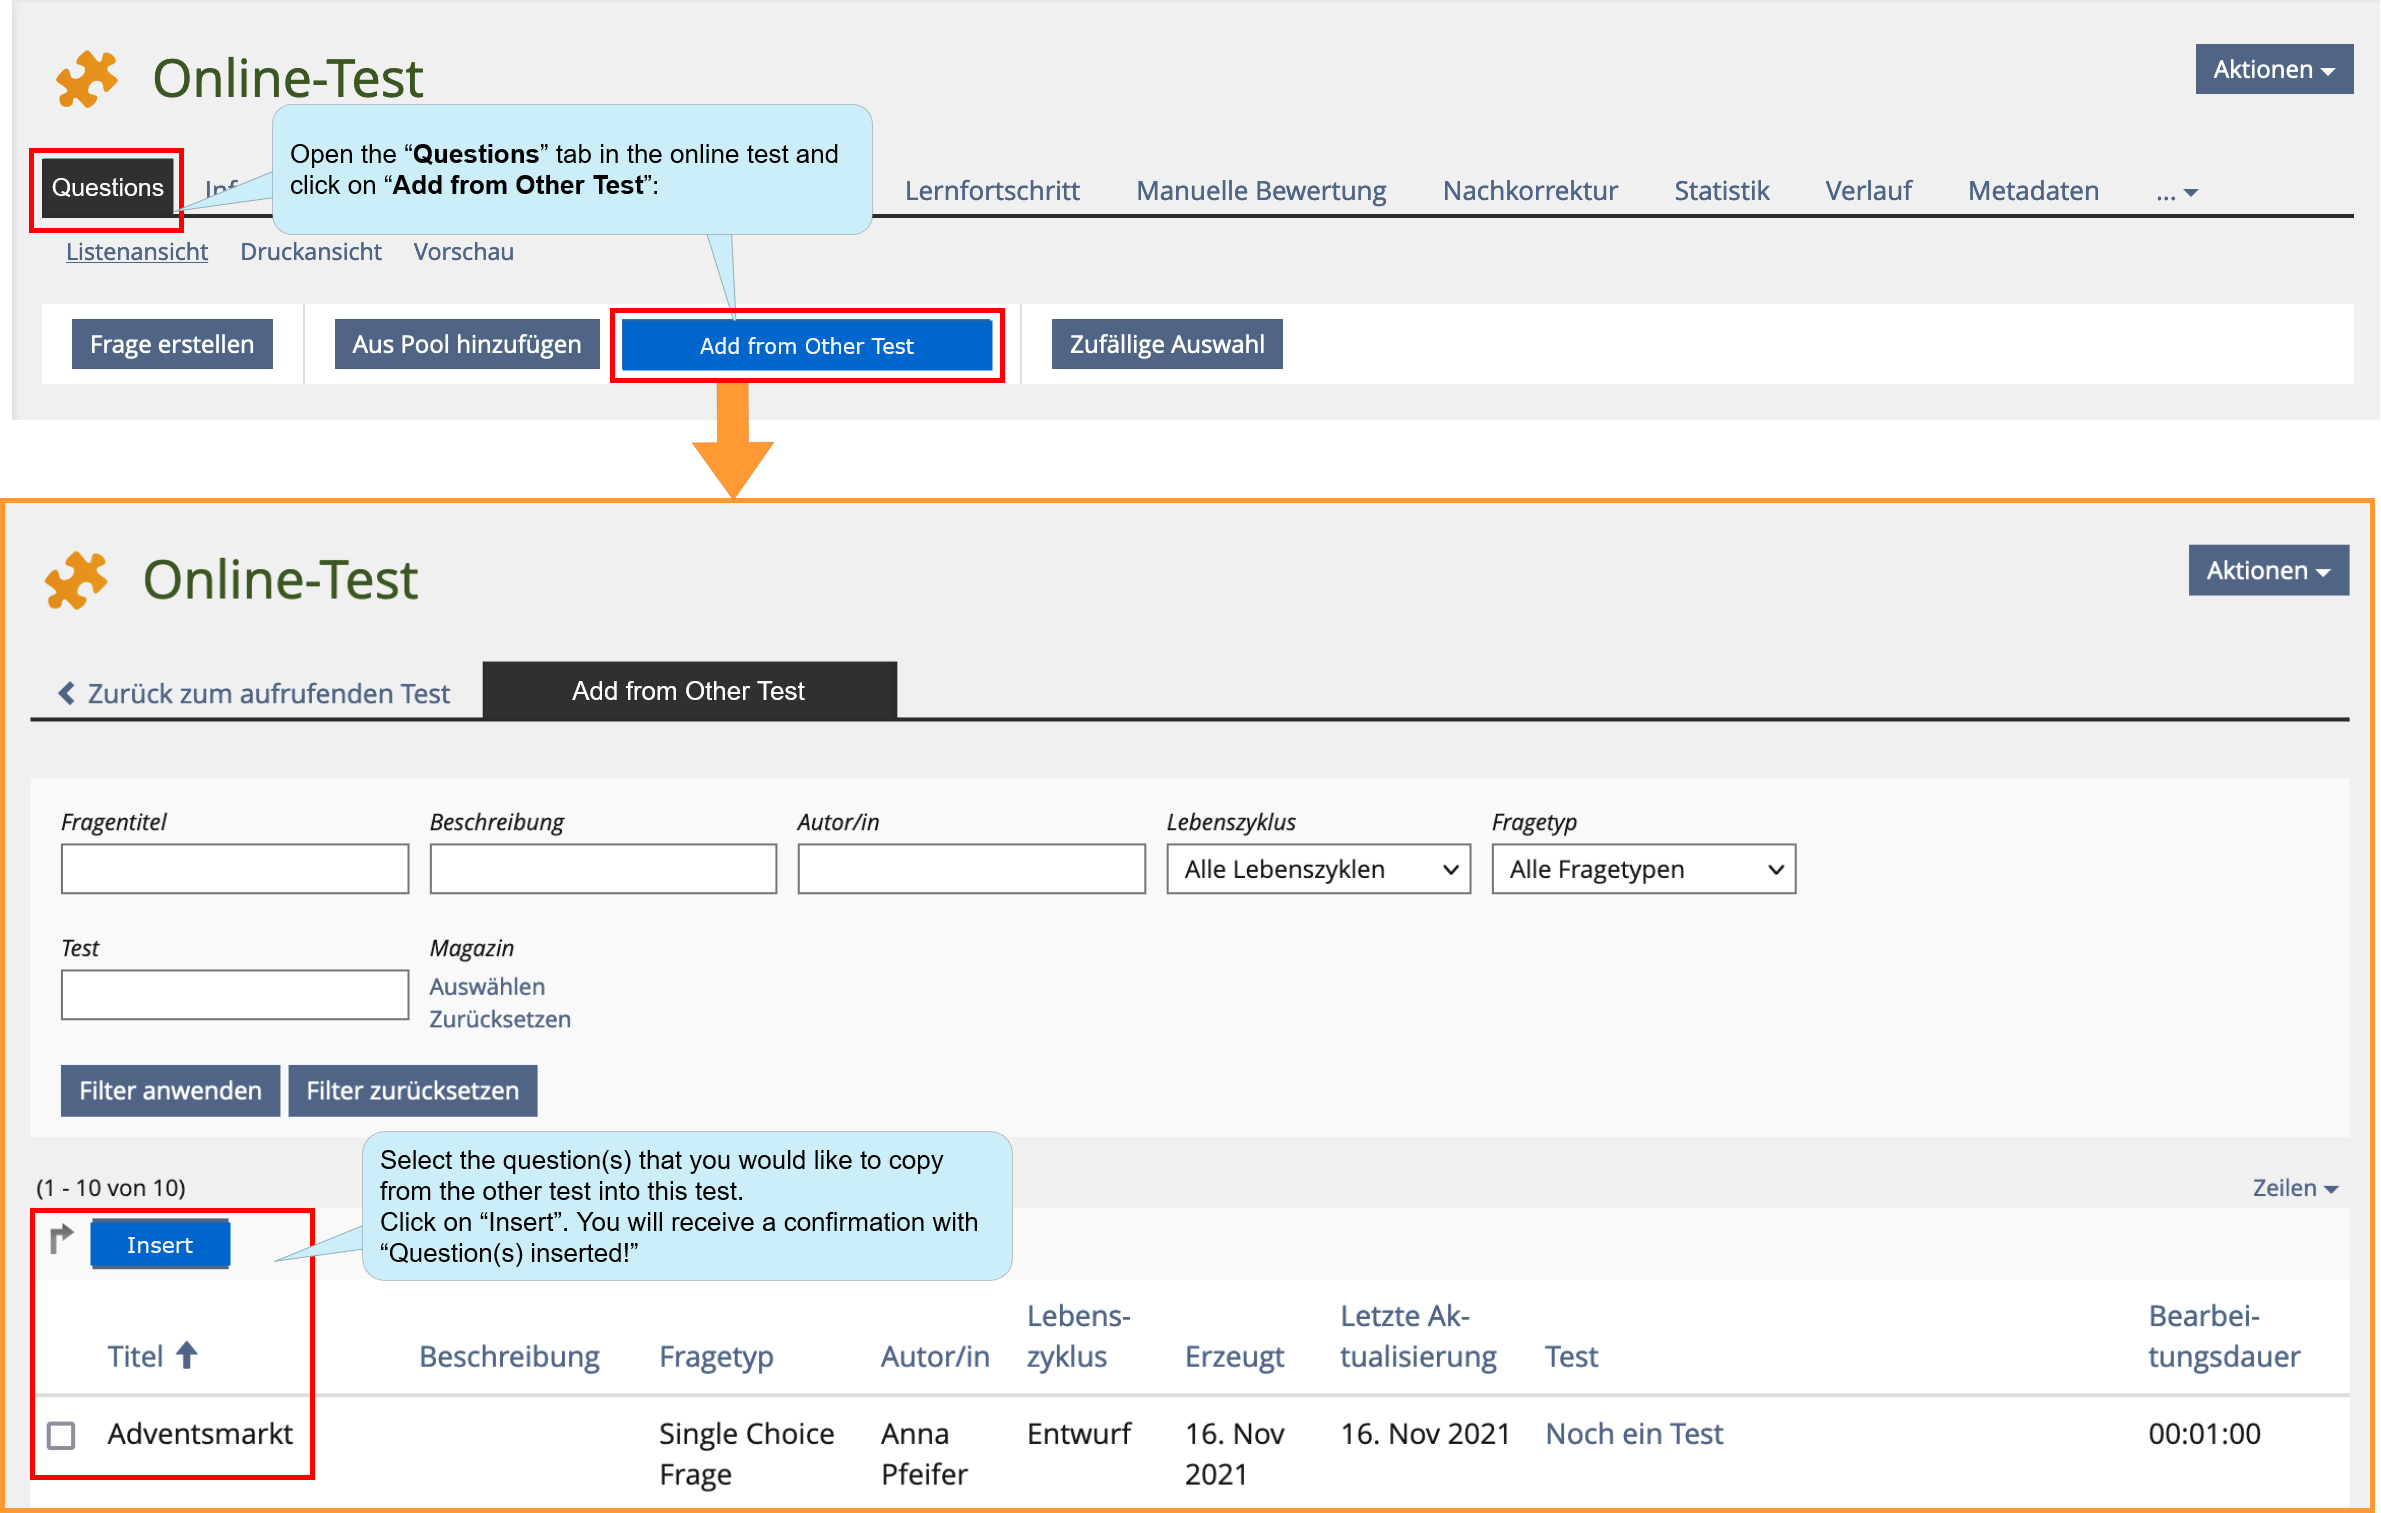
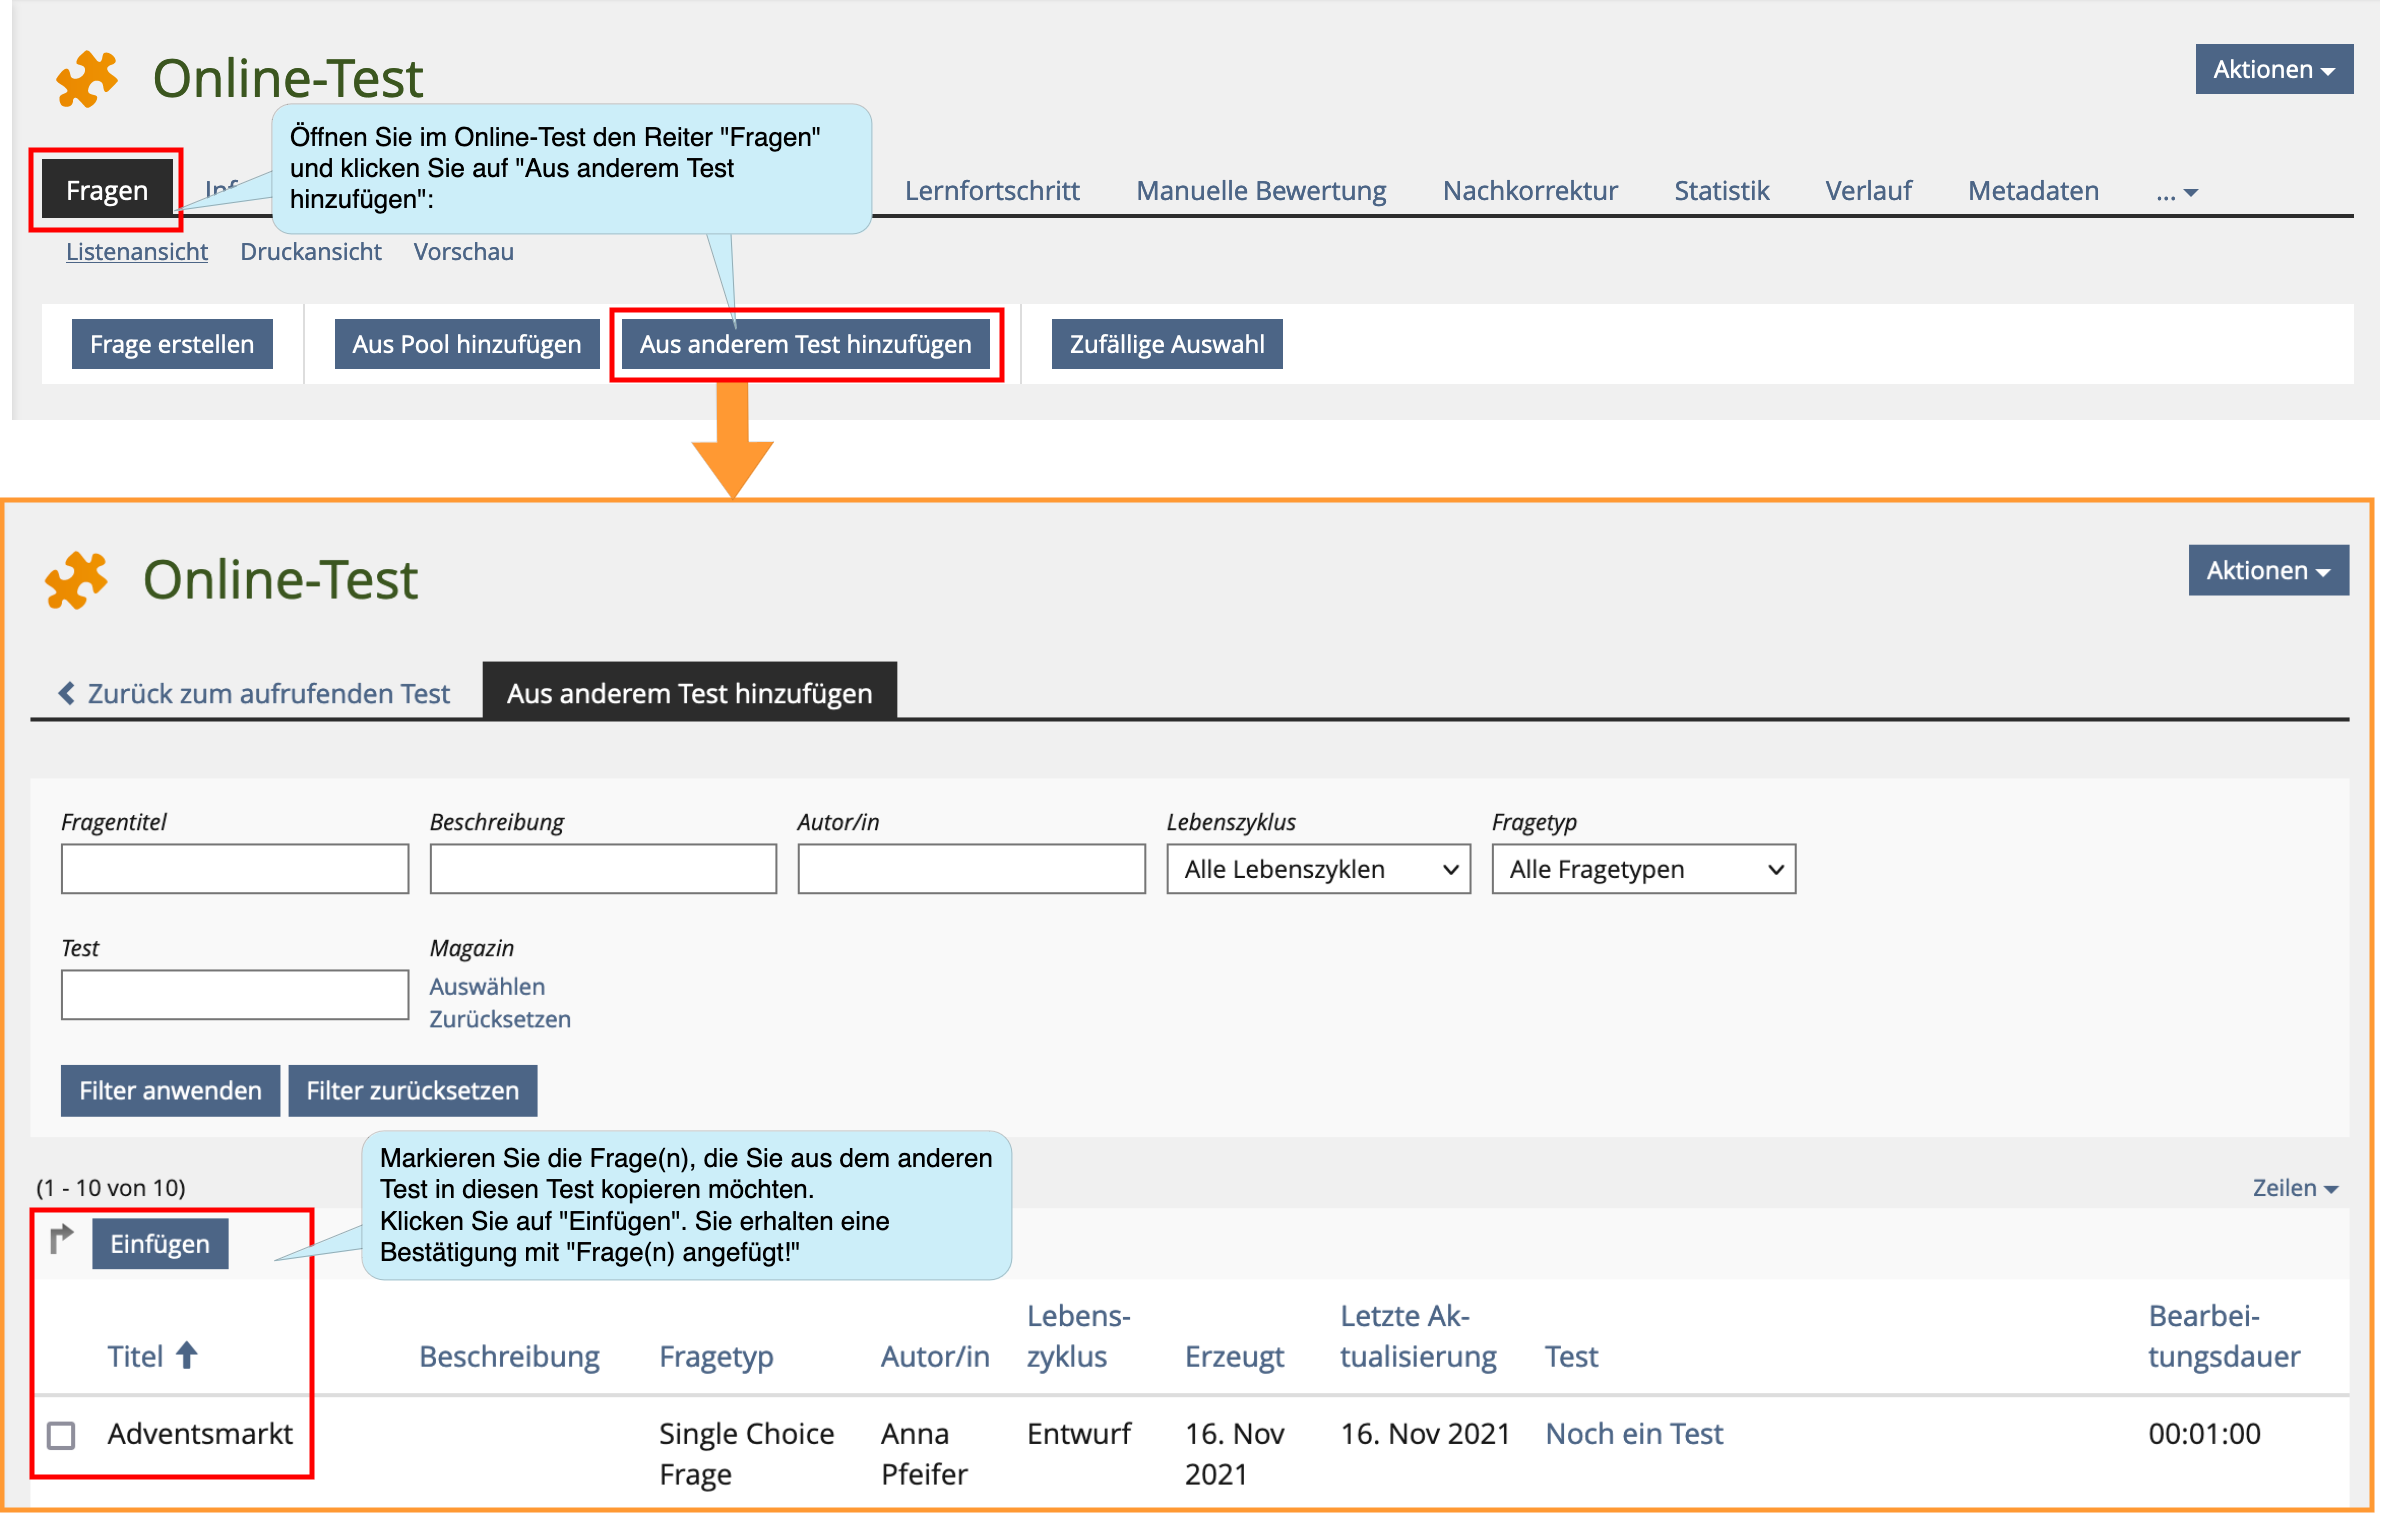
3.3.3. Insert questions from another test
This is how you can insert questions from another test:
3.4. Question editor
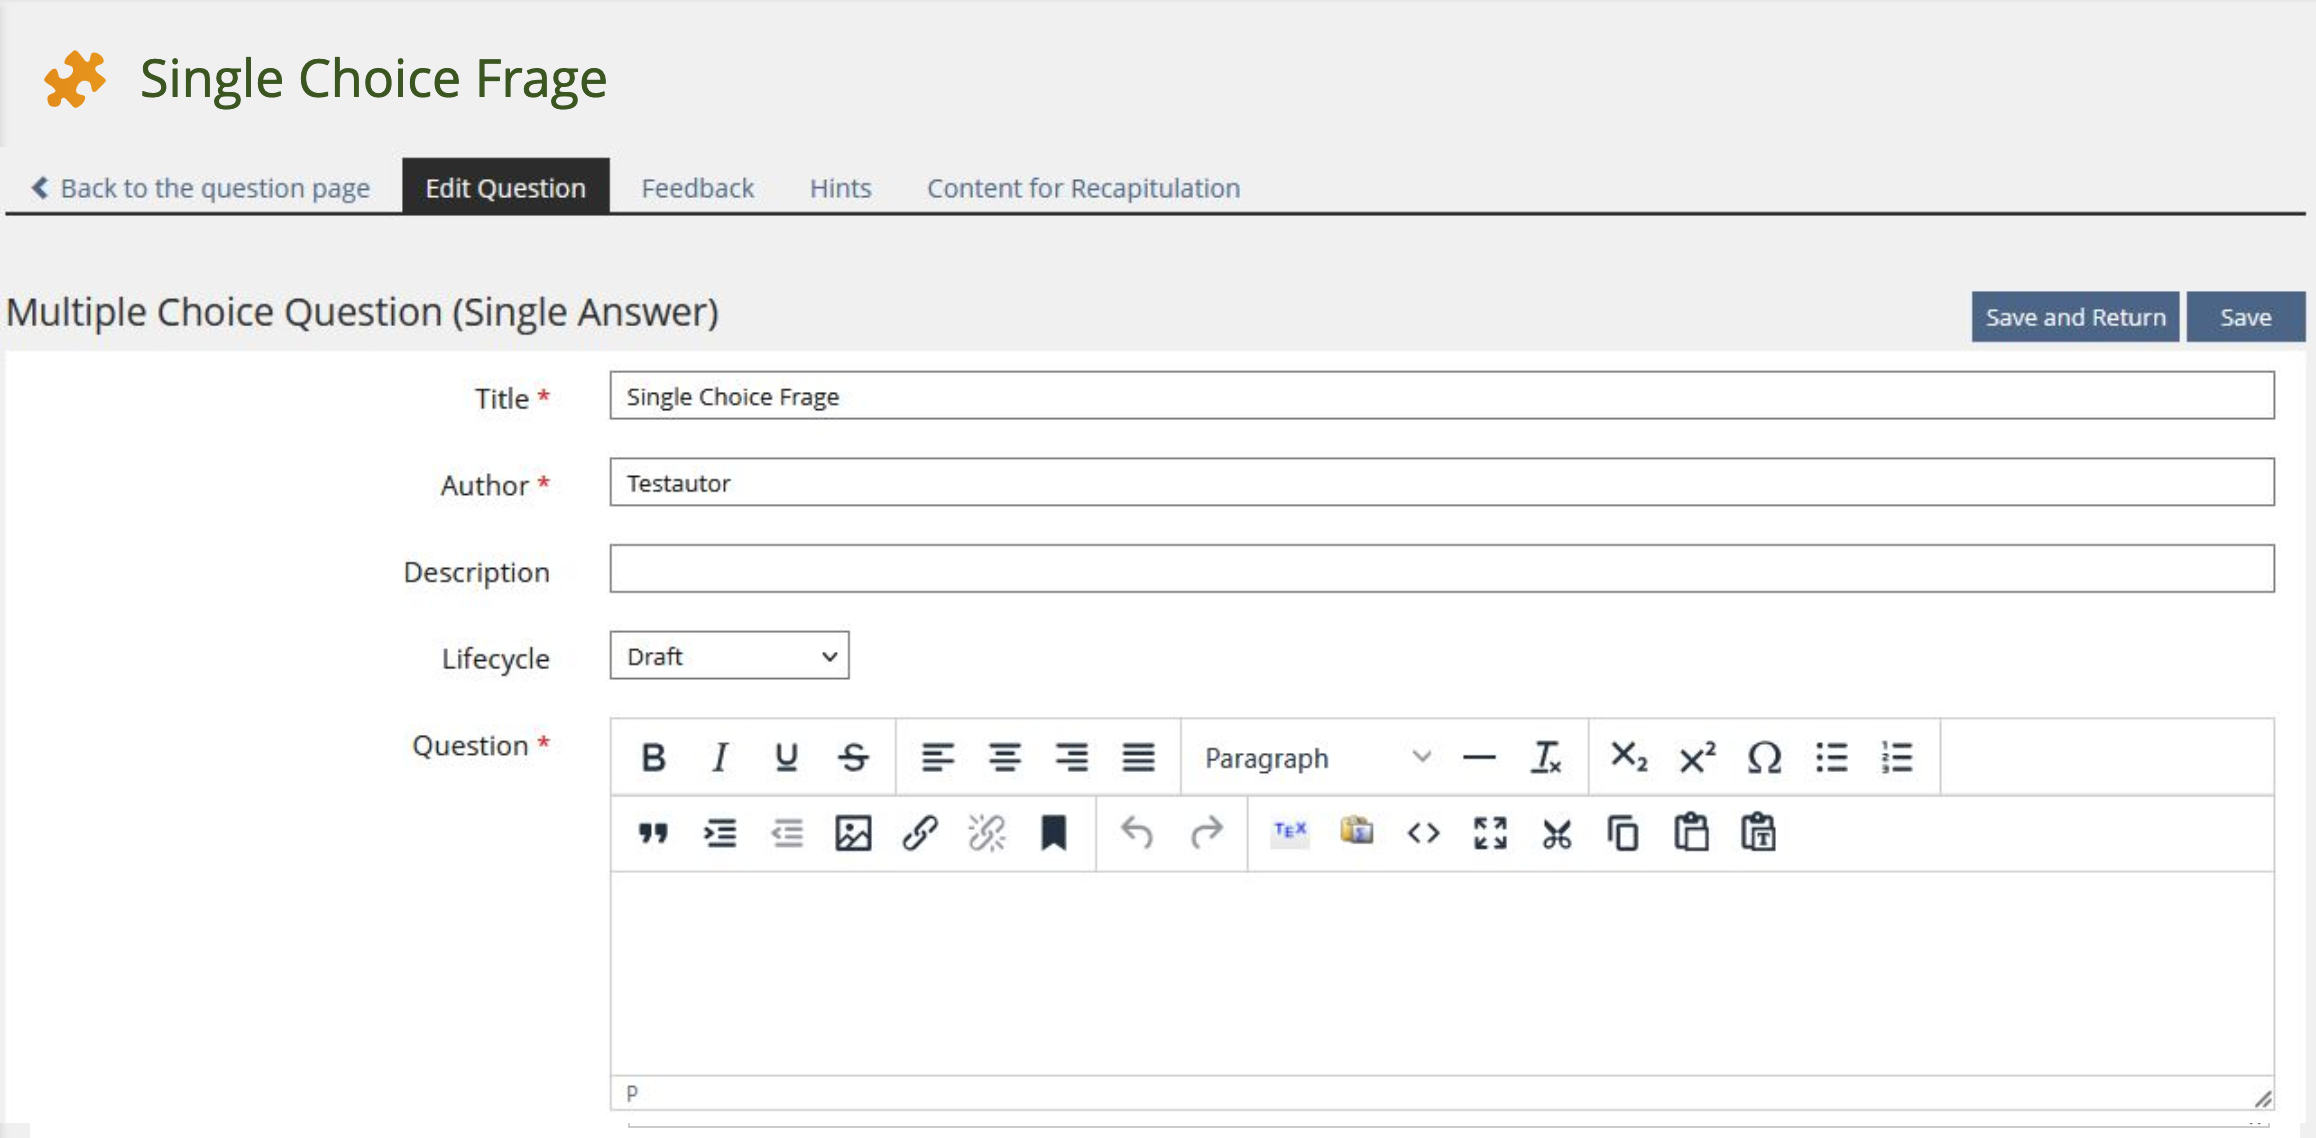
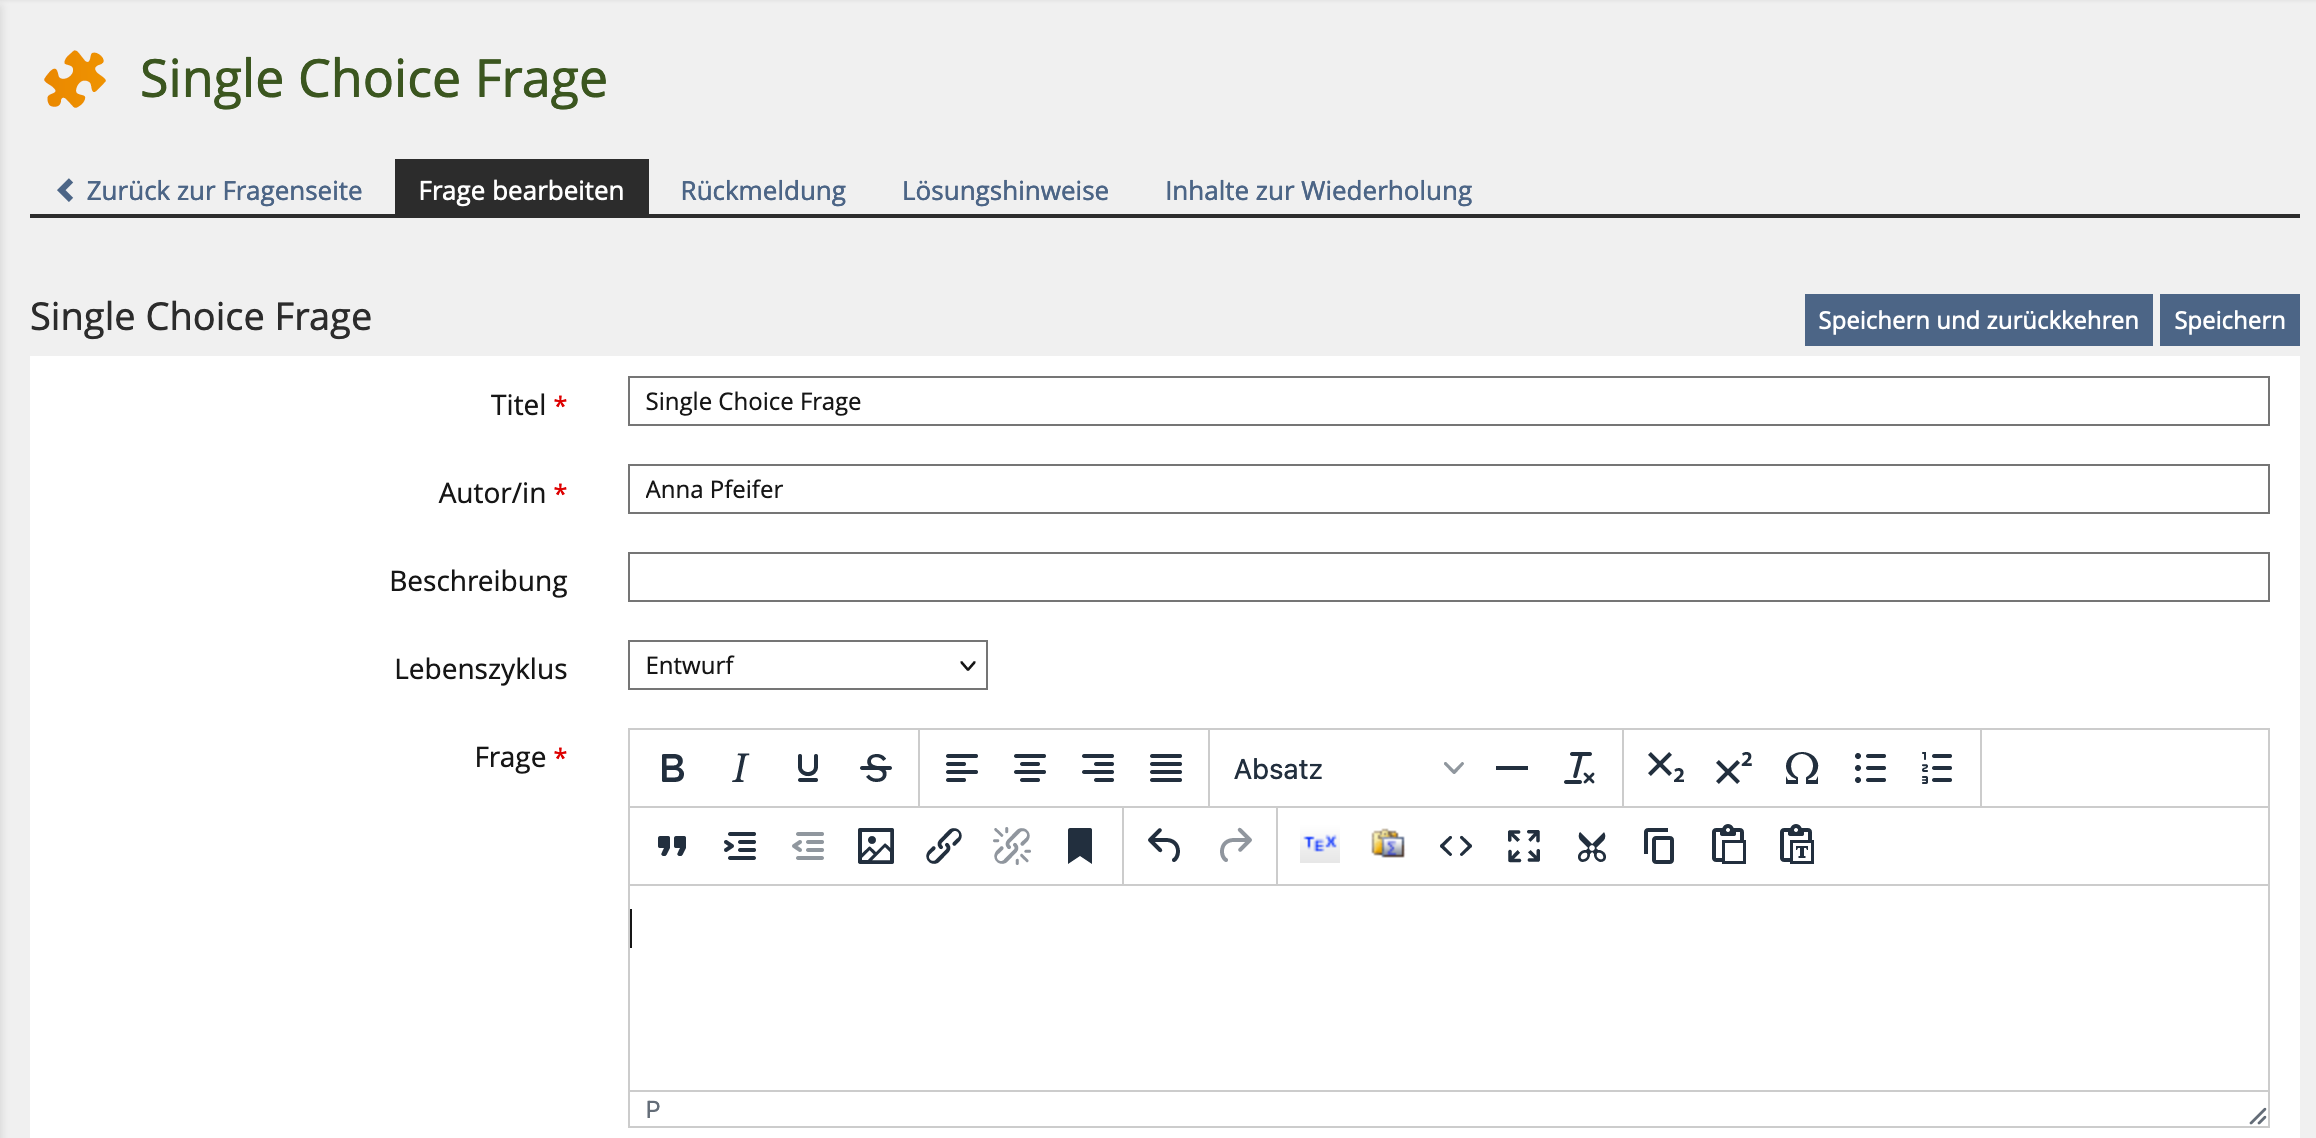
Each question type has an editor for describing the question. When creating the question or later (“Edit Question”), you can, for example, format your question text (bold, italics, font size, etc.), structure it in tables and insert images.
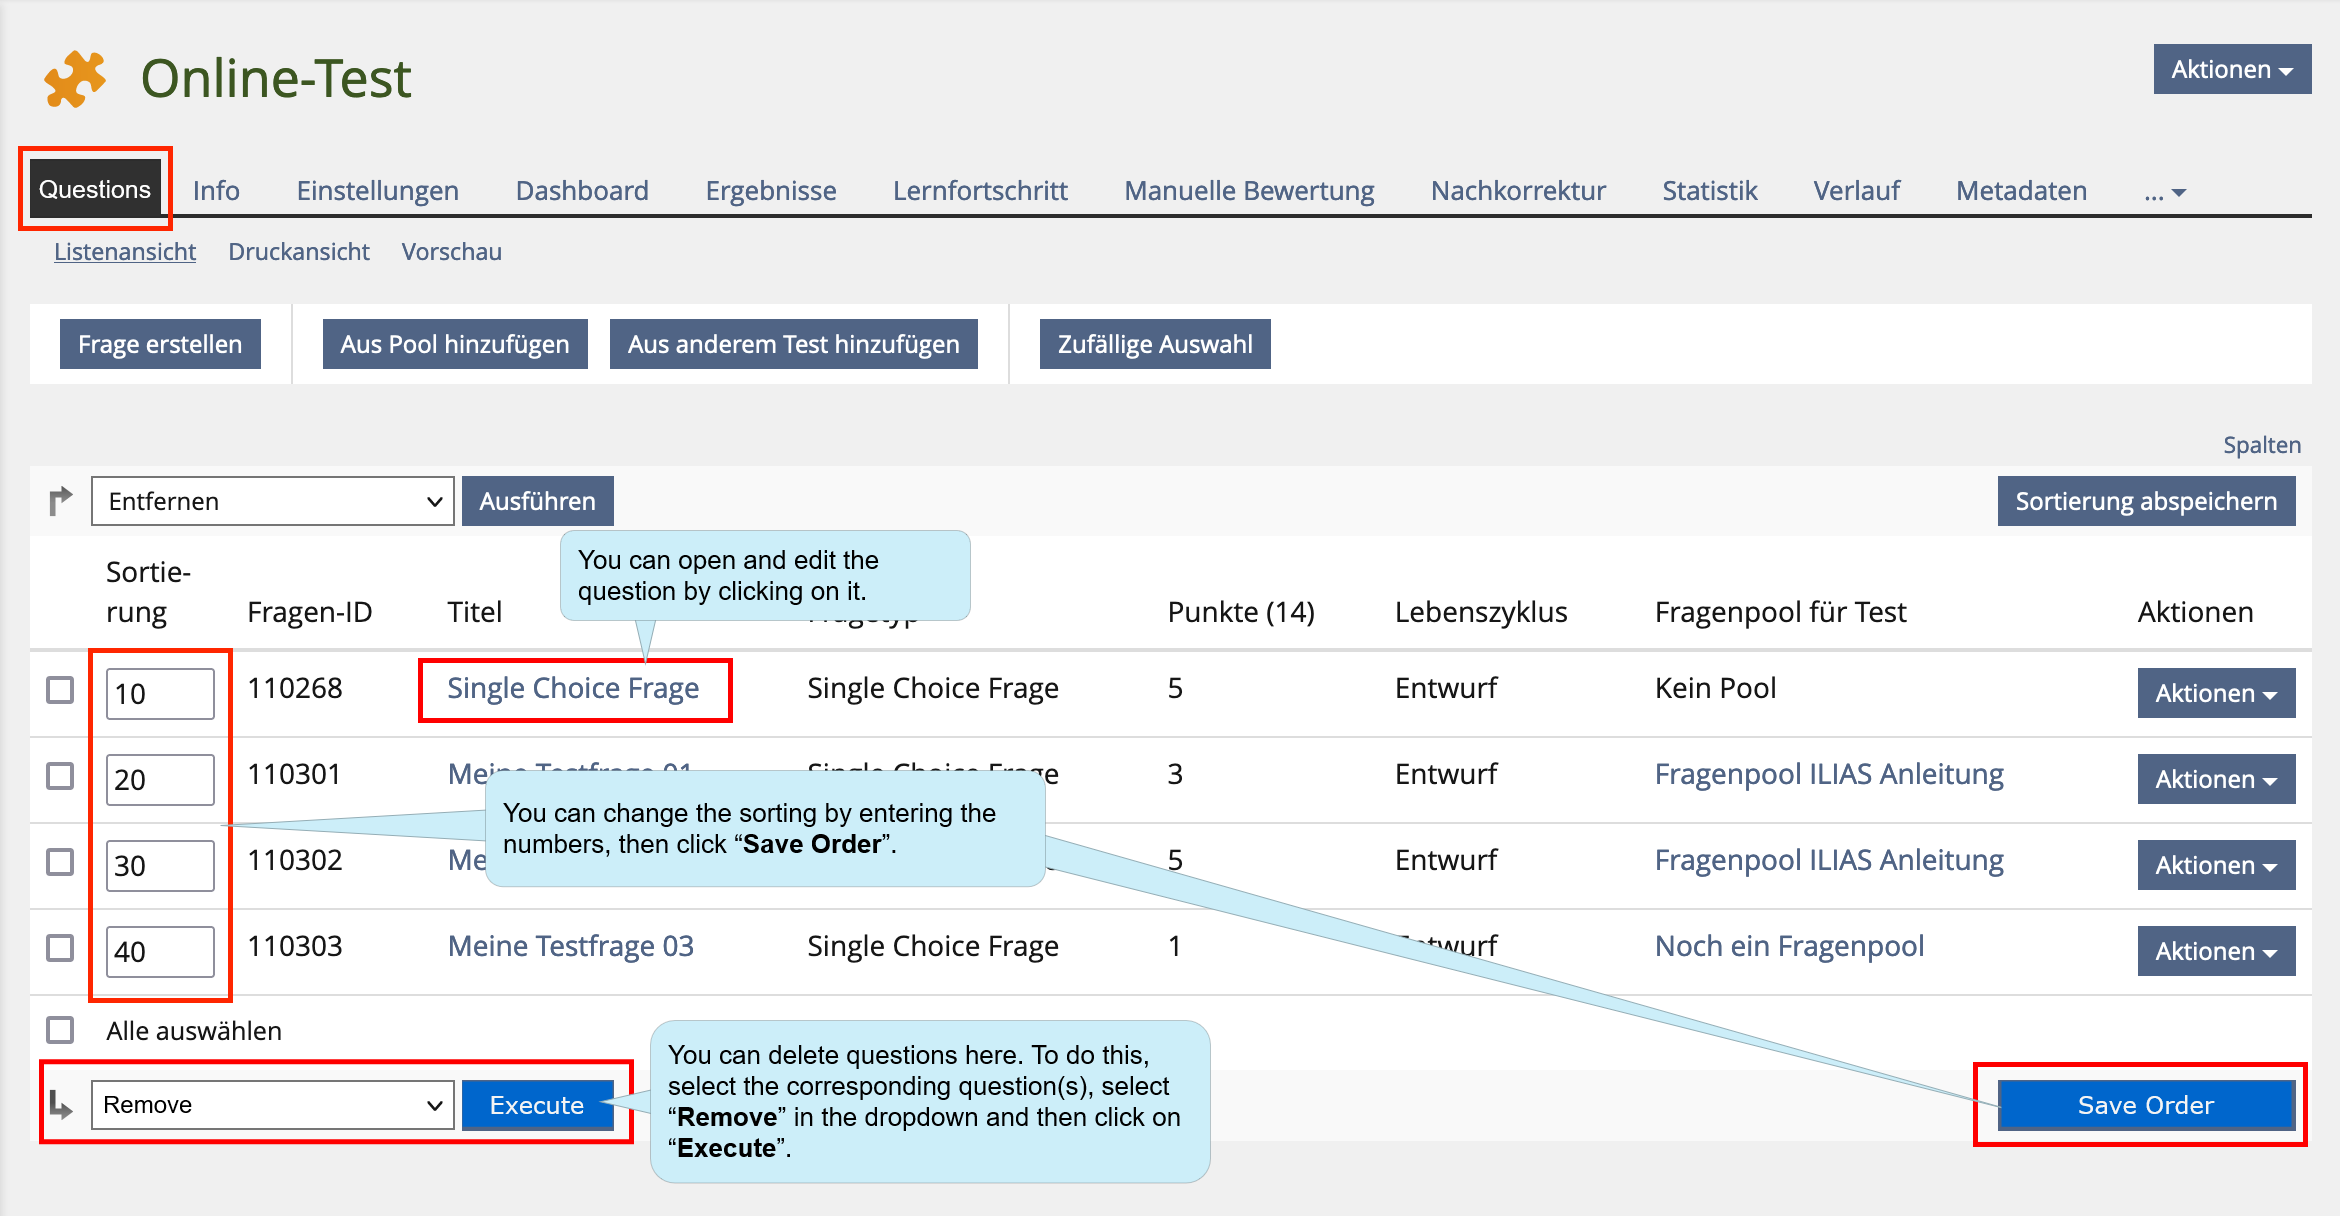
3.5. Administrating questions
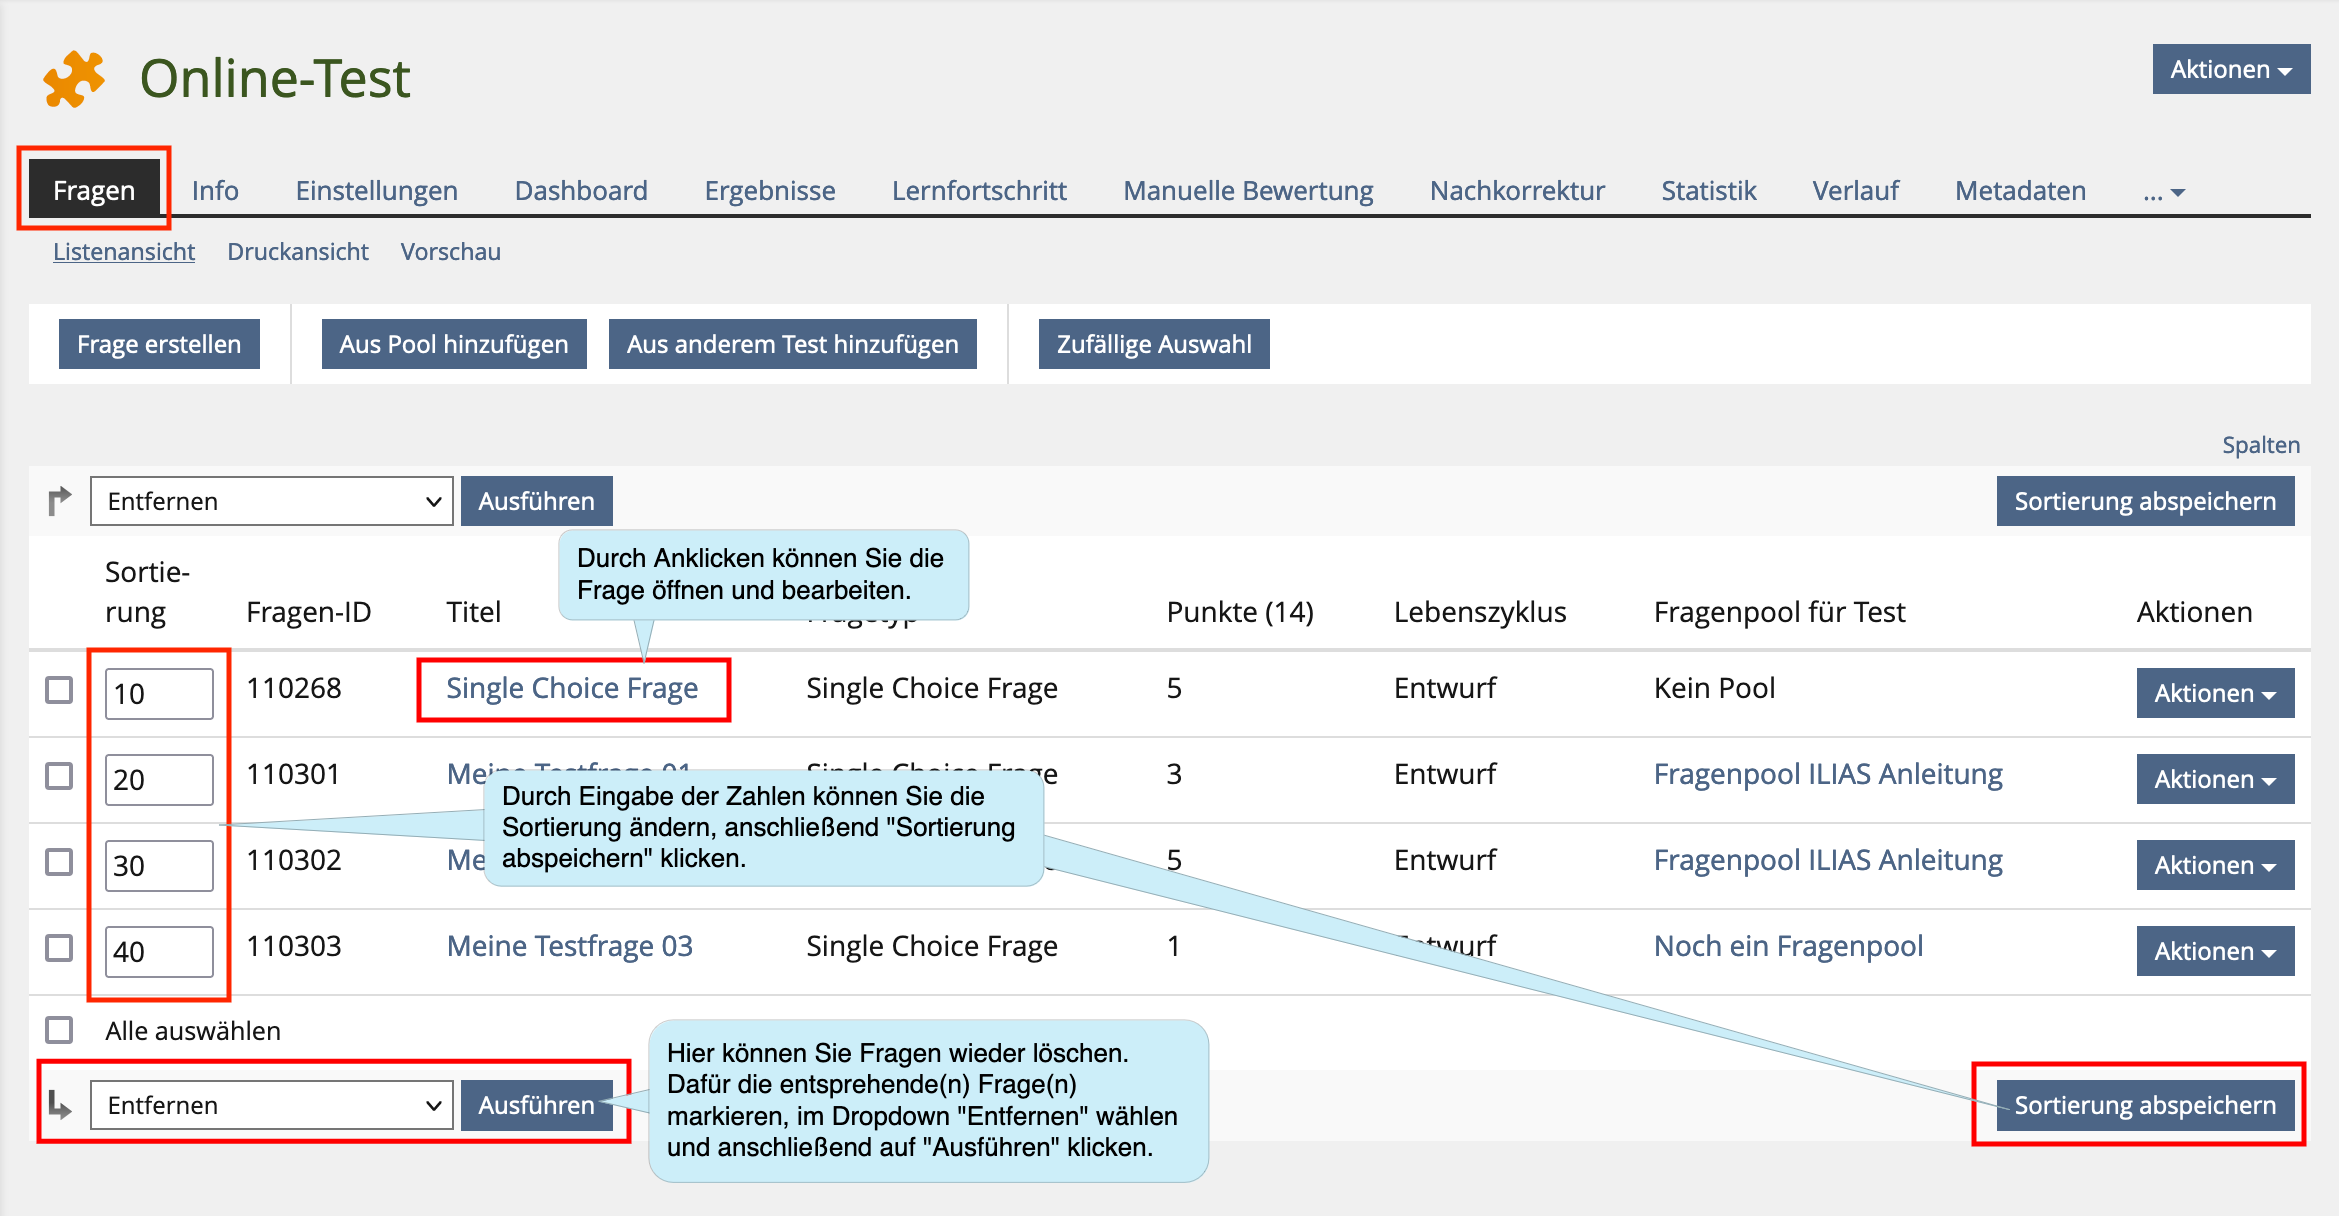
You can edit or reposition your questions in the overview of your online test under the “Questions” tab:
4. Feedback for participants
You can add individual feedback to each question.
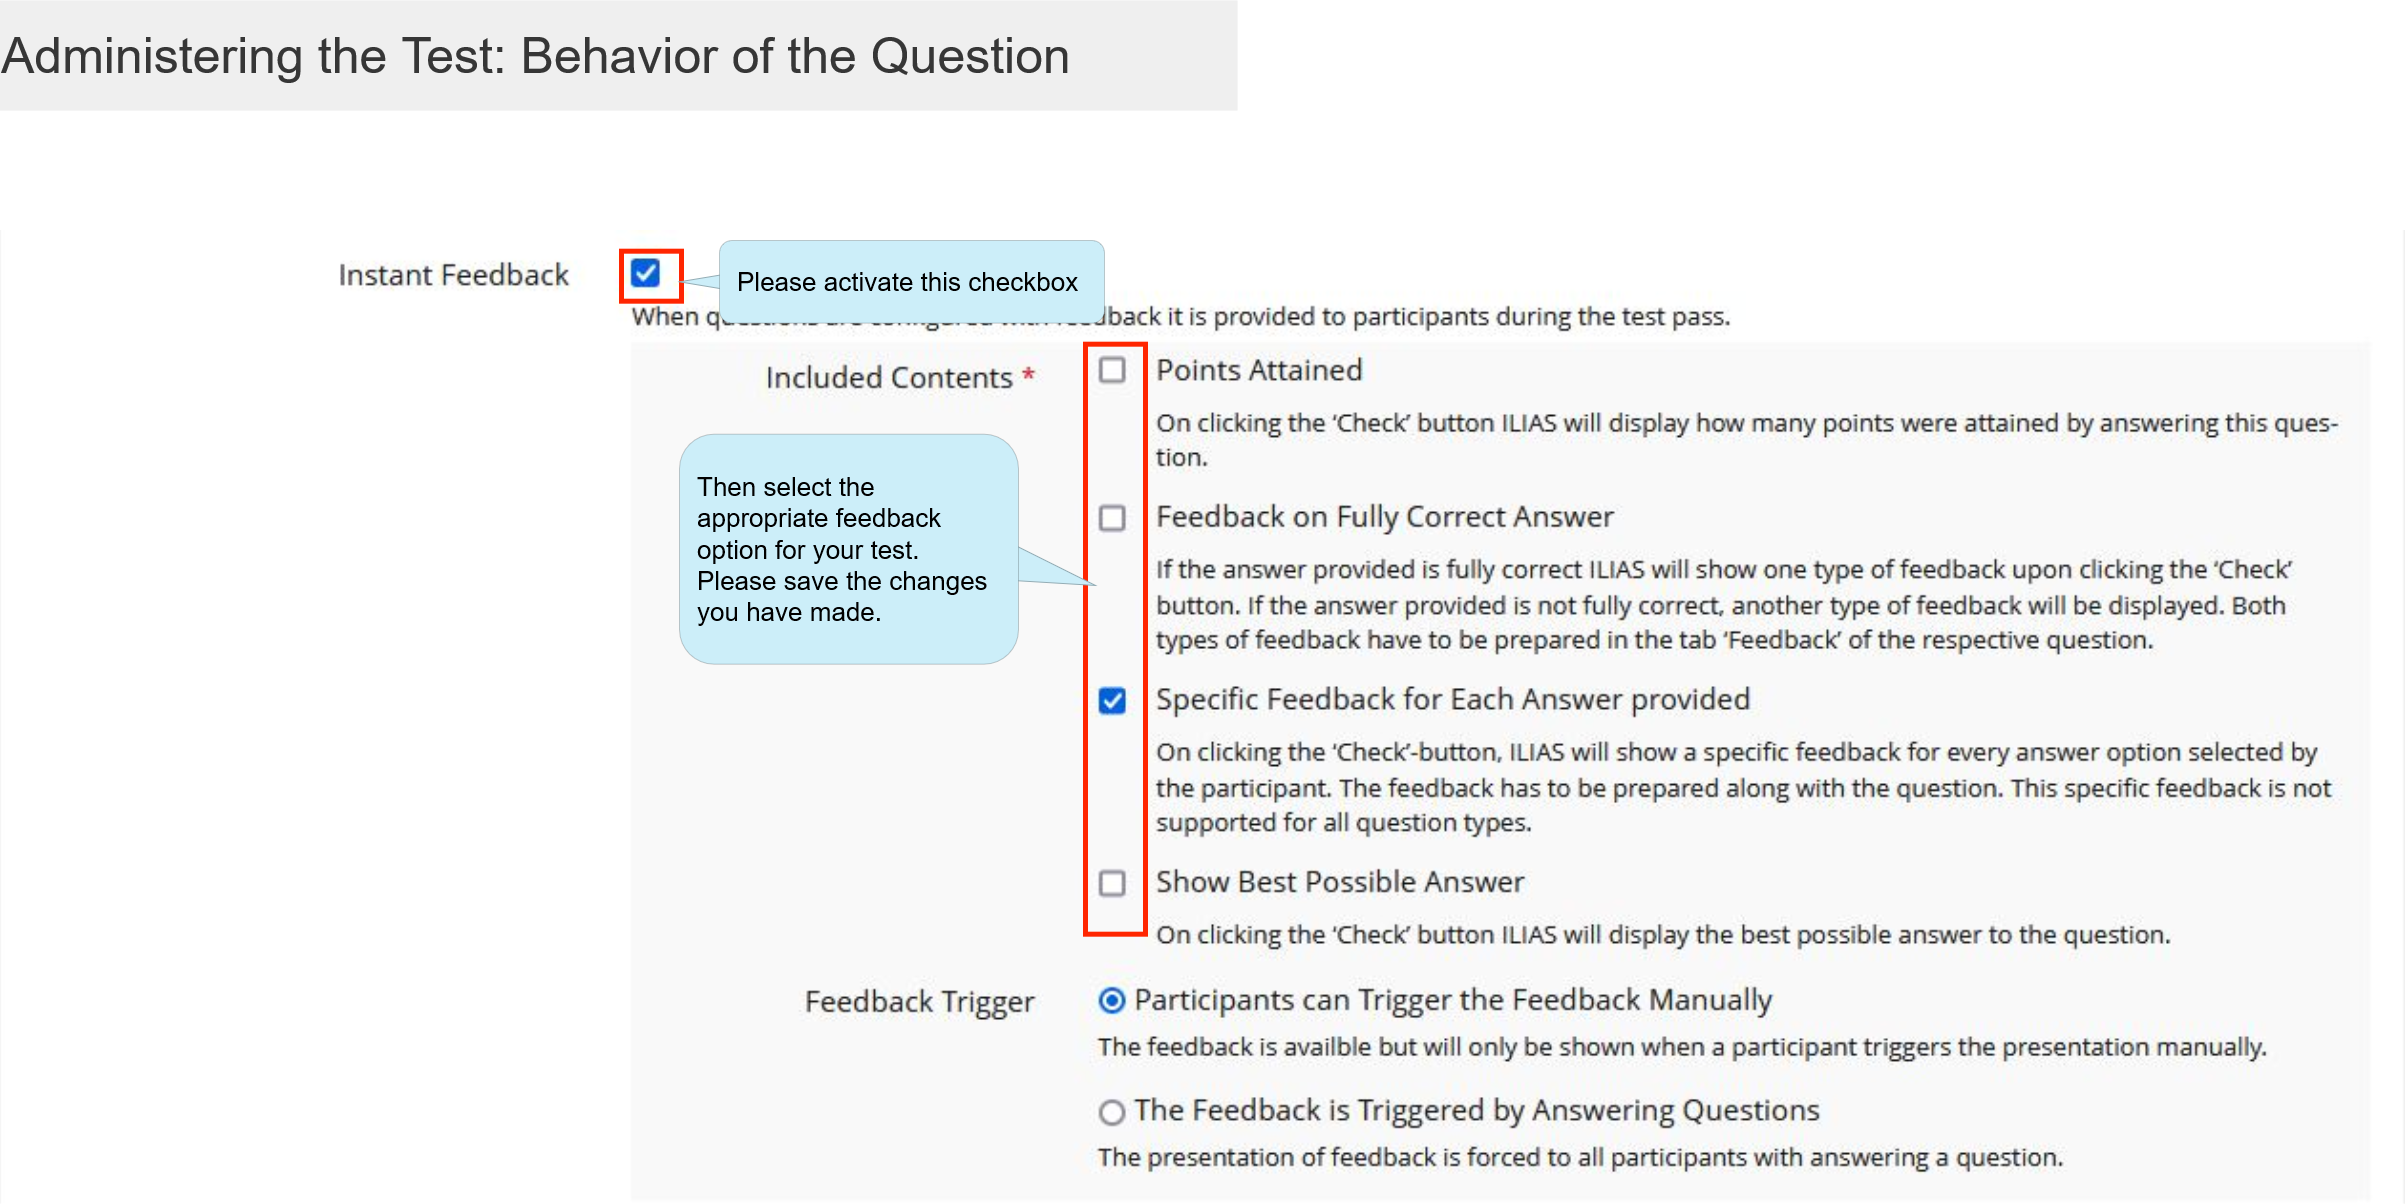
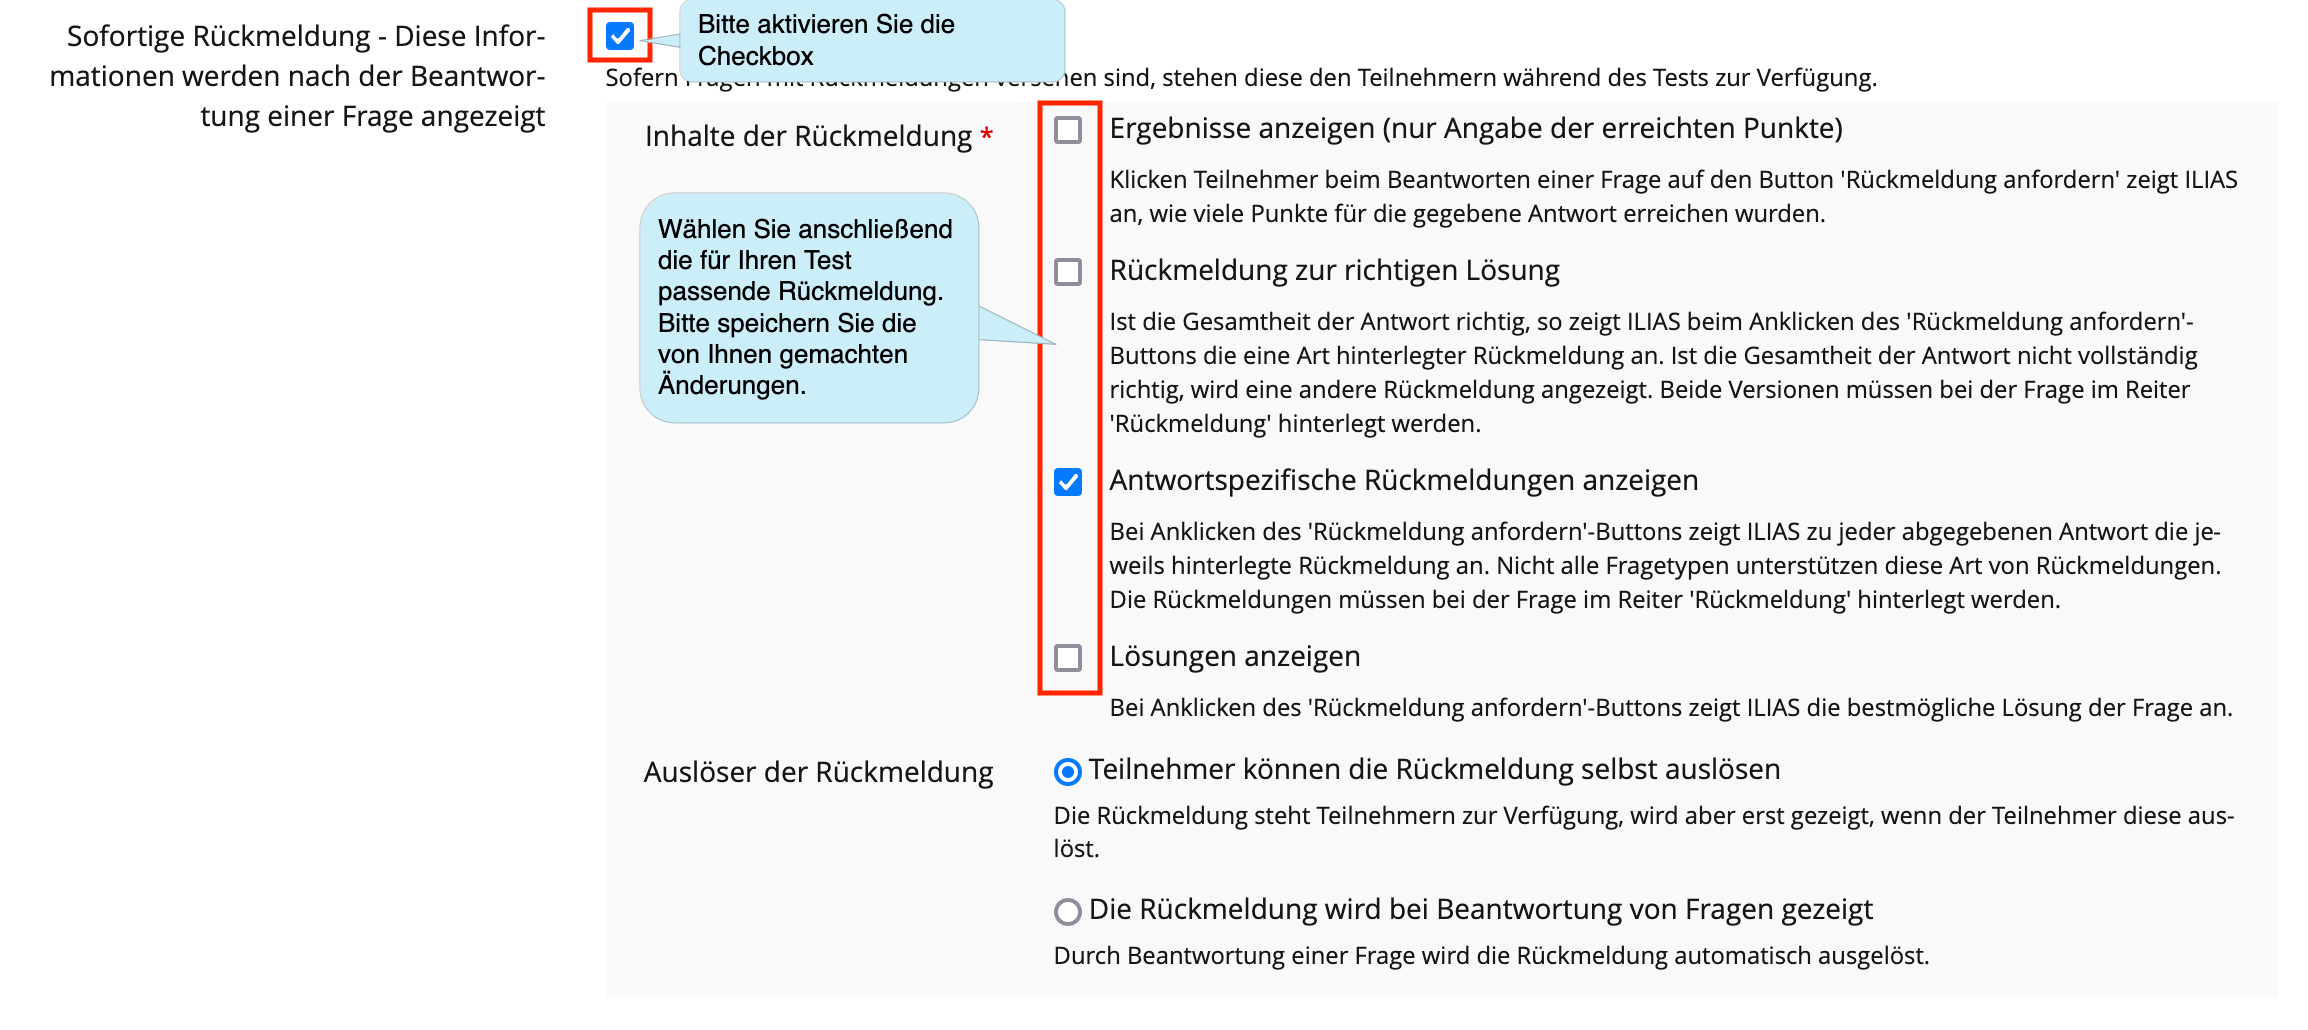
There are four options available for feedback:
4.1. Defining the type of feedback in the test settings
For the necessary default settings, please navigate to the “Settings” and then “General settings” of your online test. In the “Instant Feedback” properties section, you will find the following options for feedback:
A combination of several feedback options is possible, but only makes limited sense
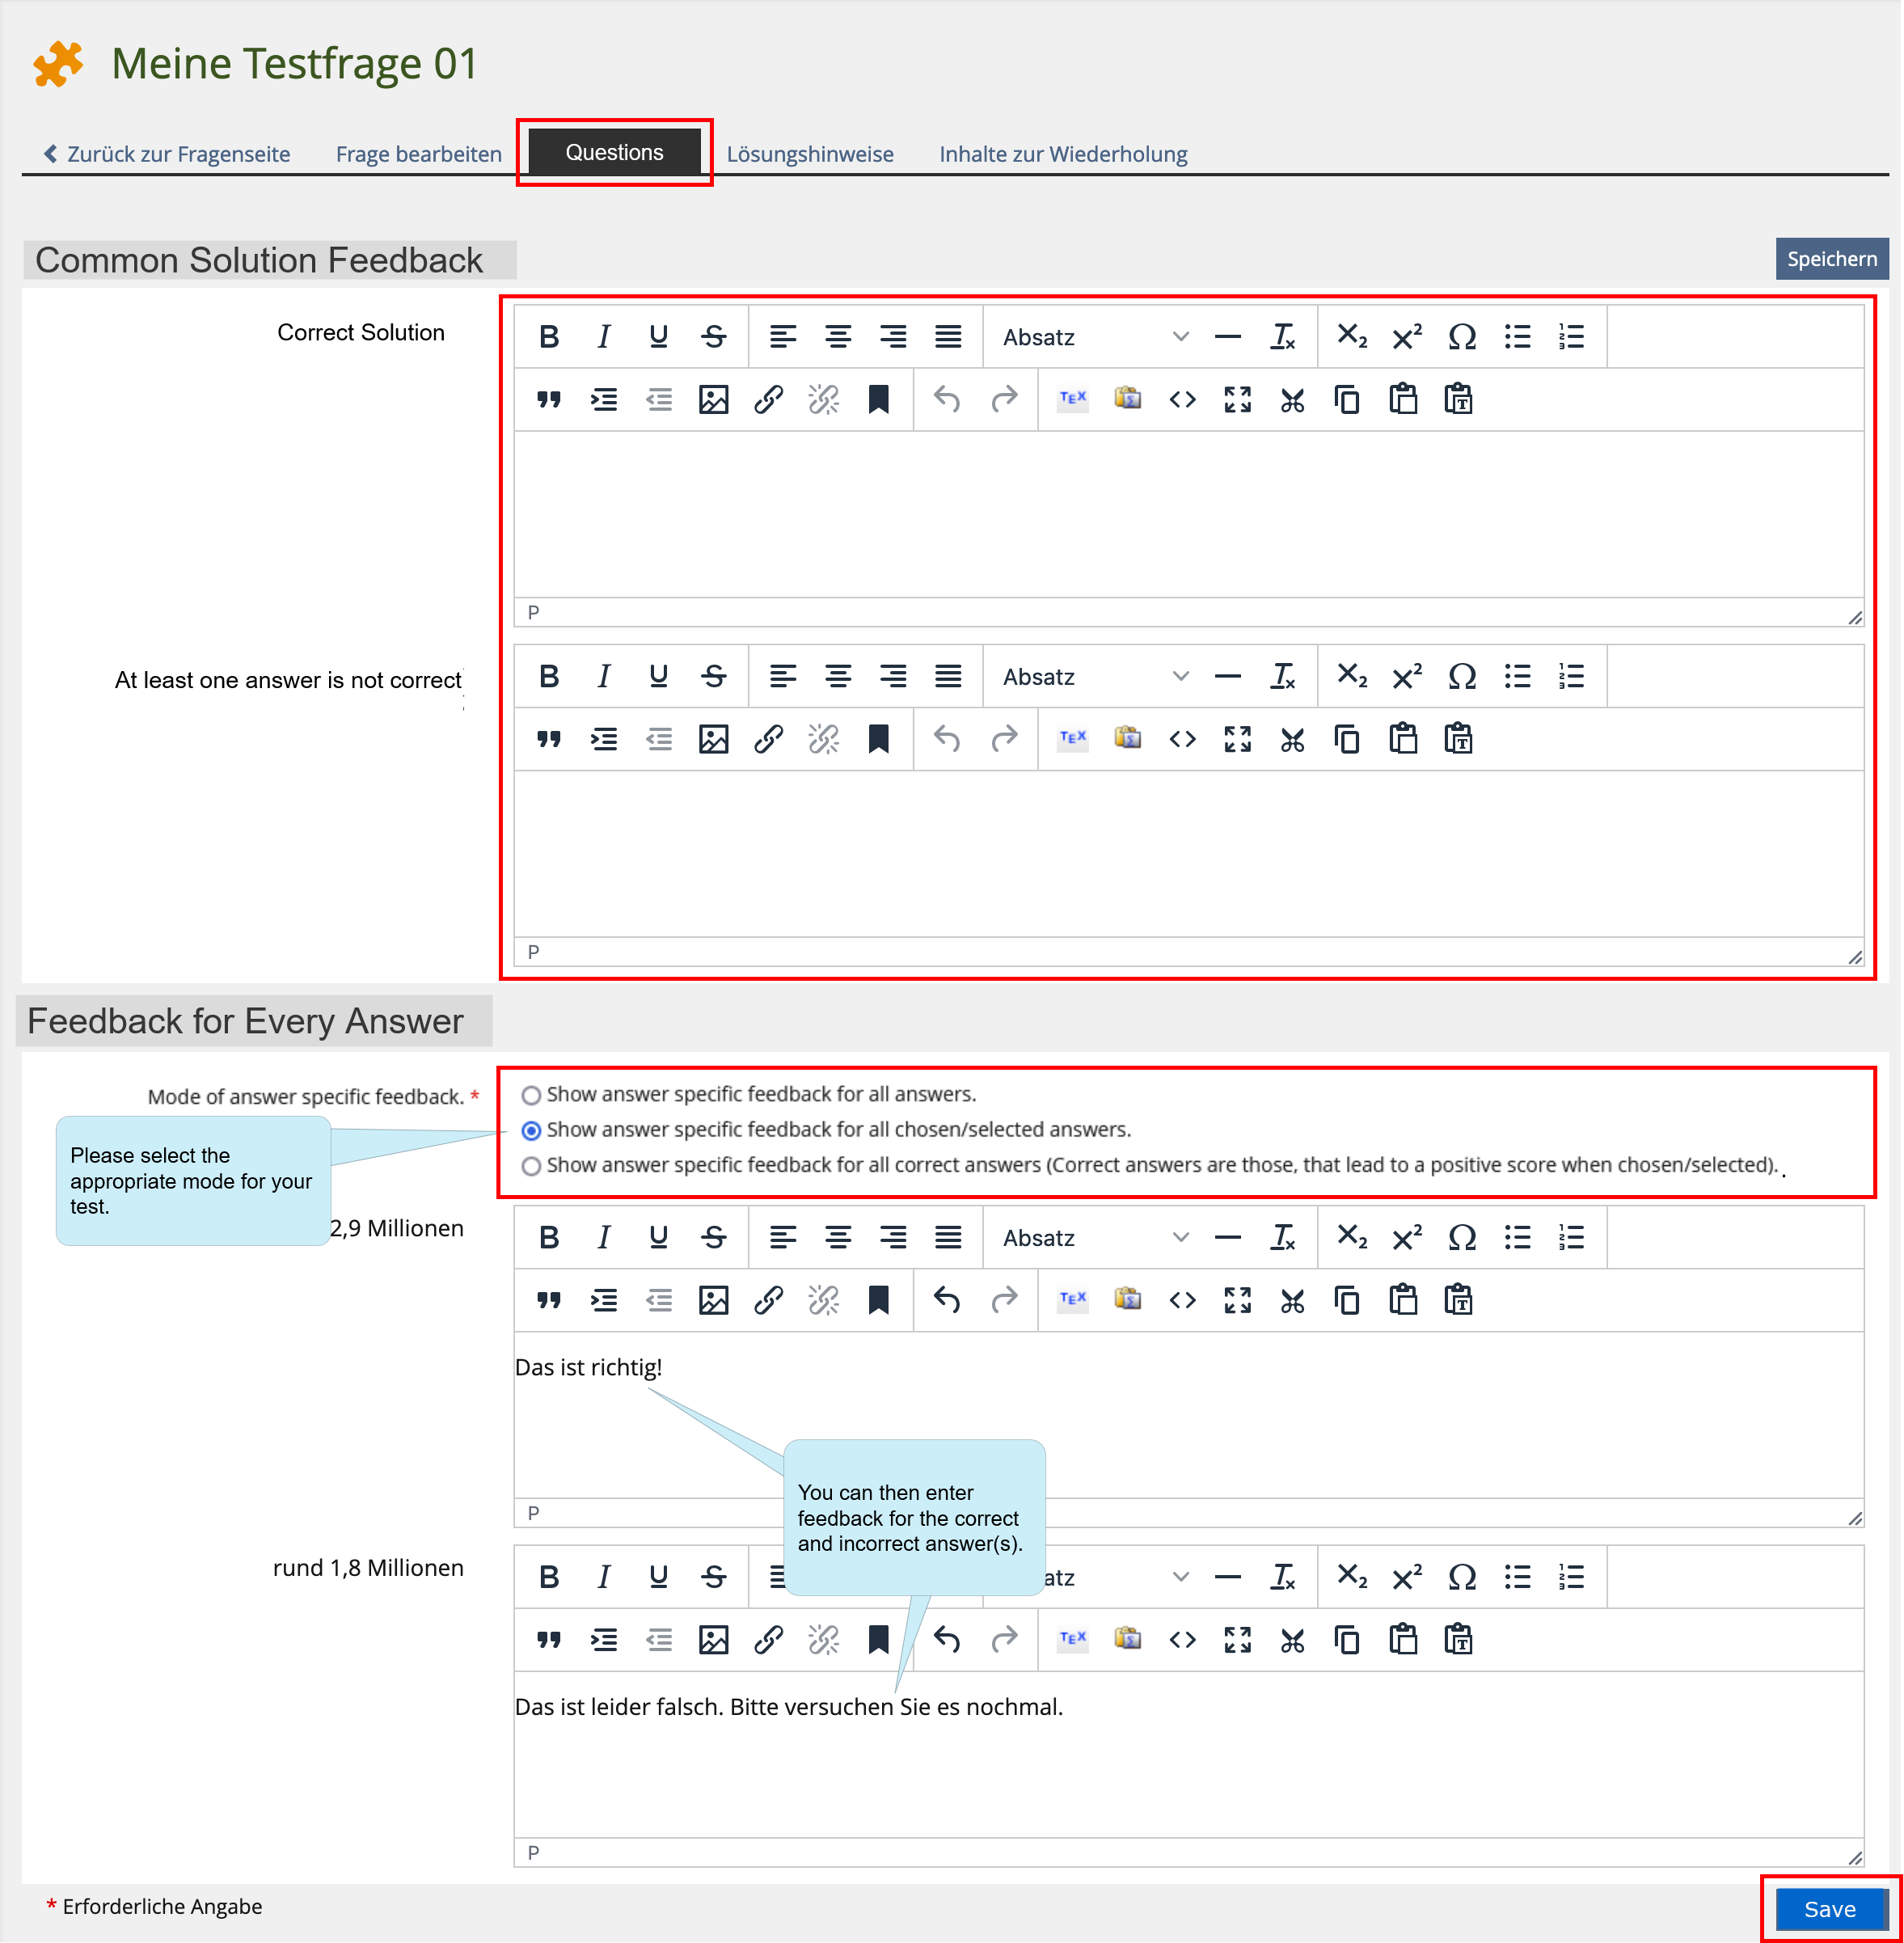
4.2. Adding feedback for a question
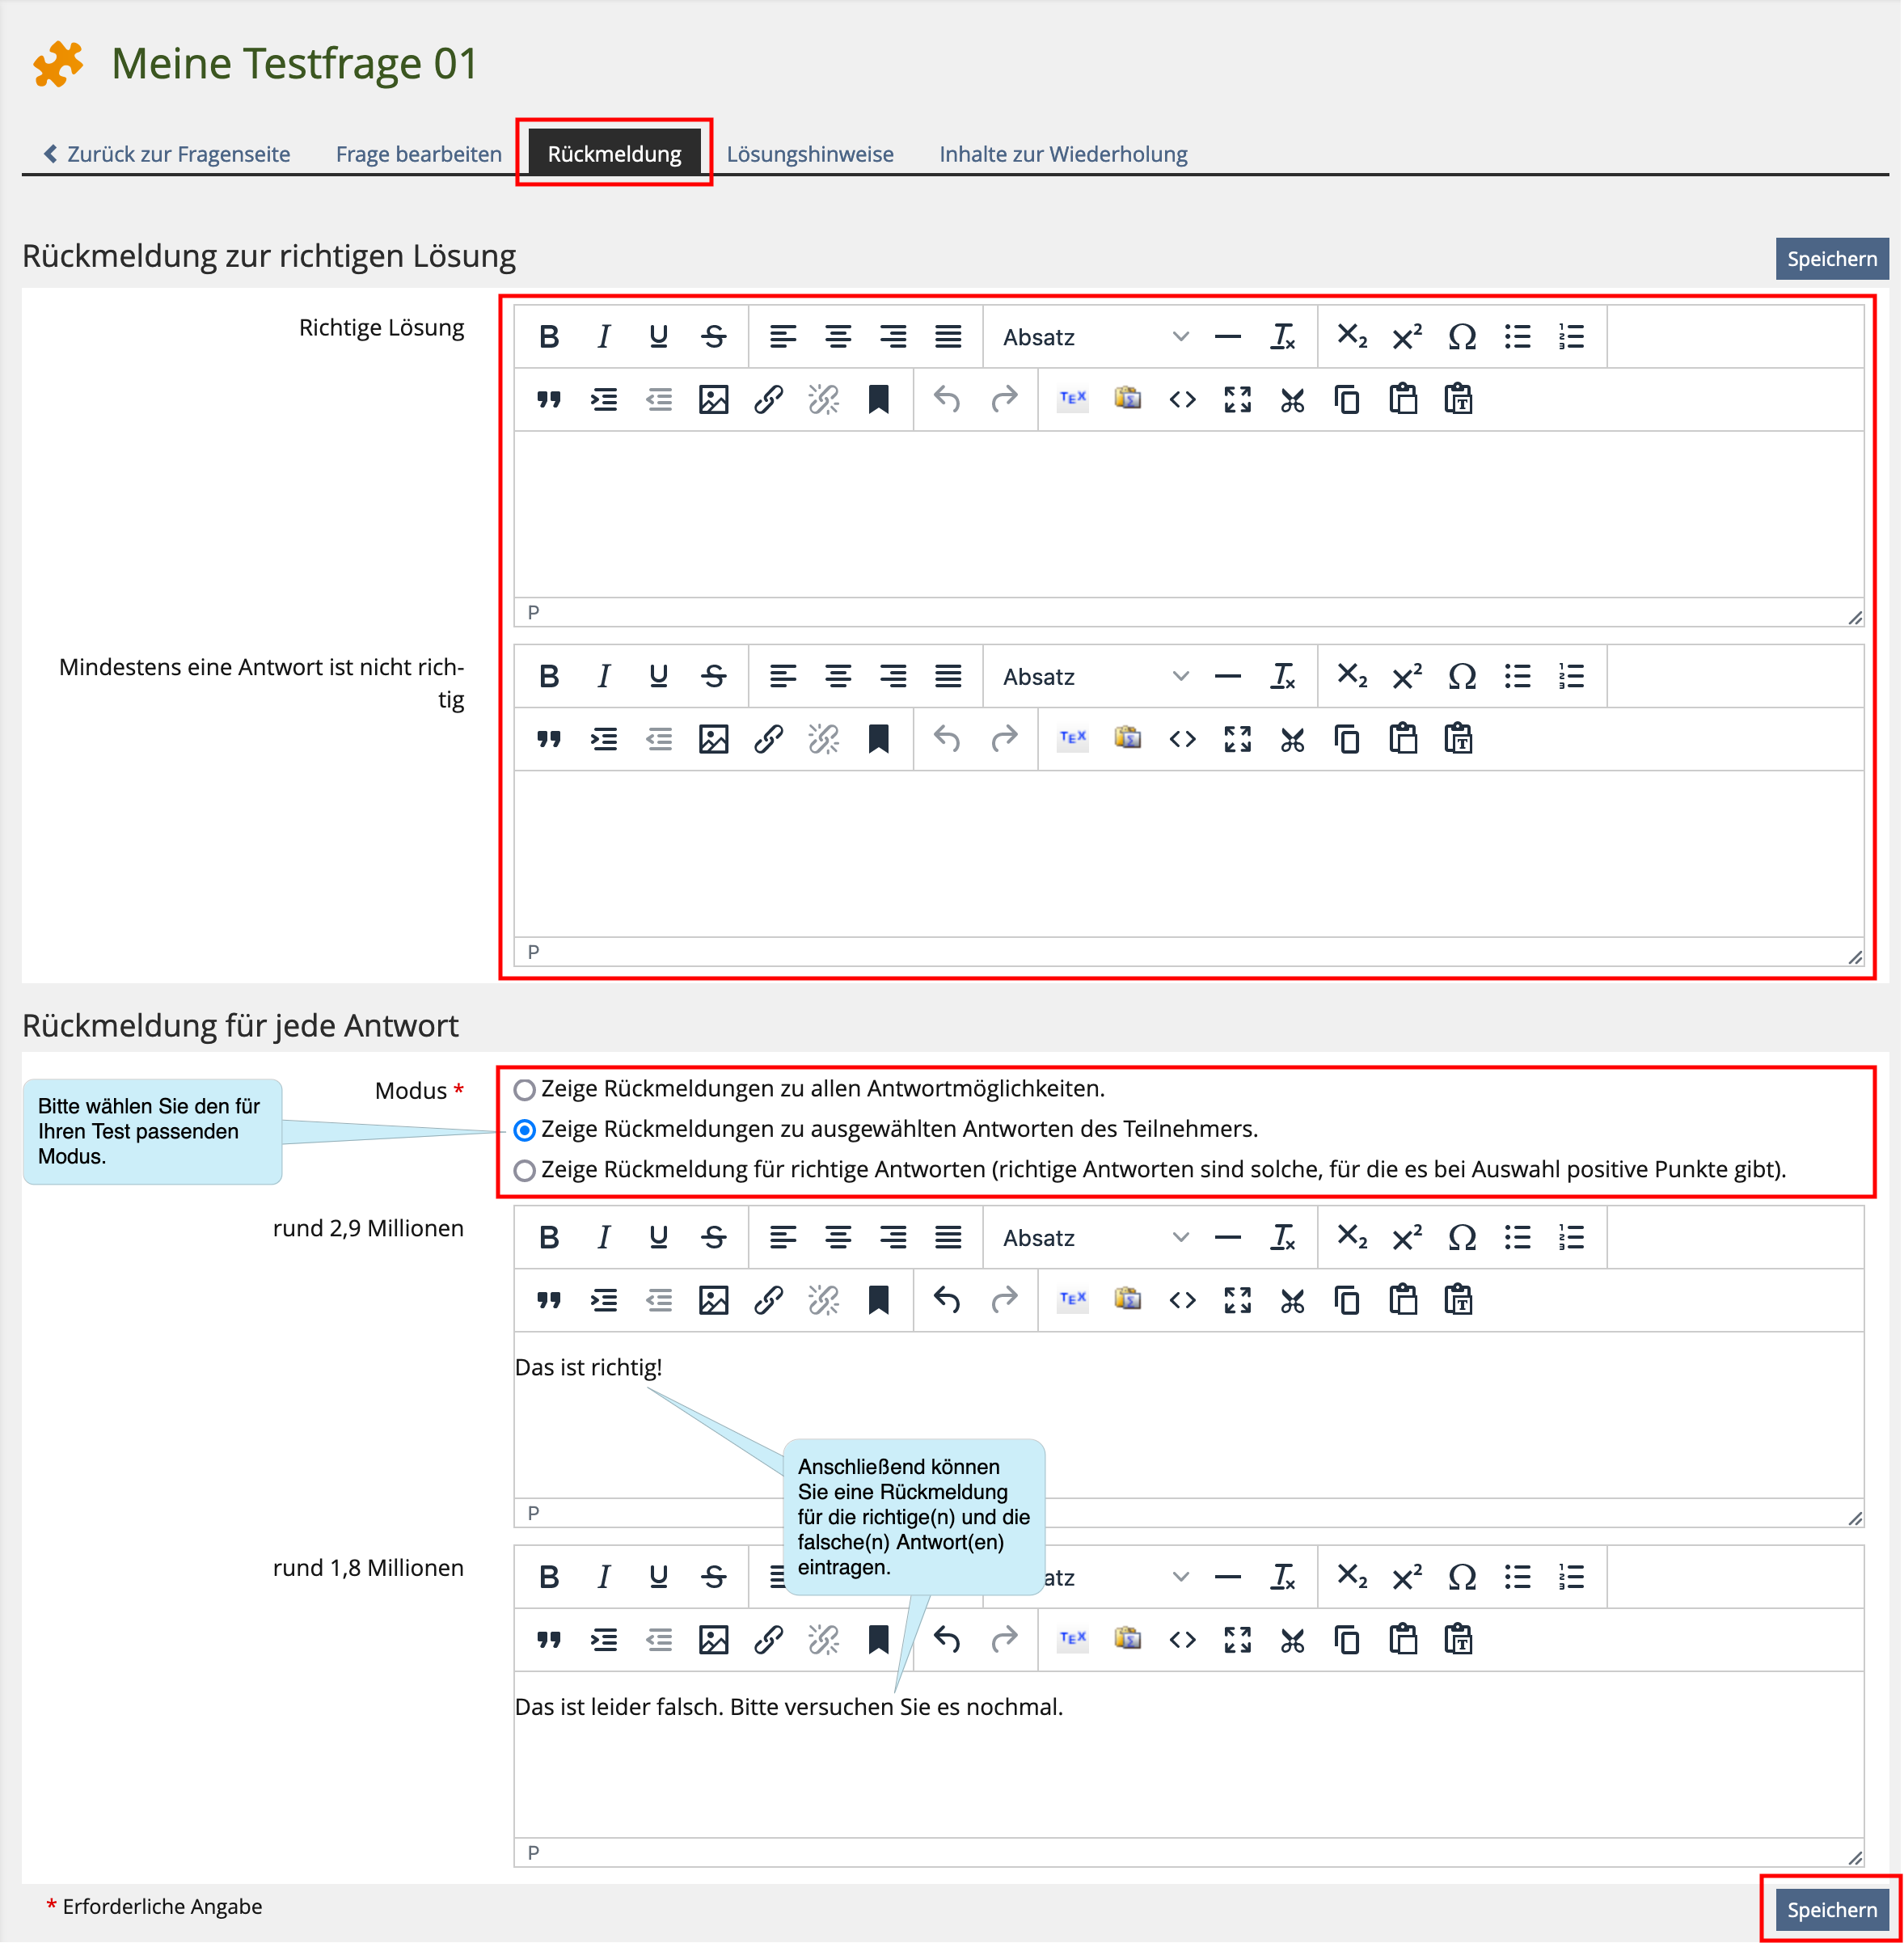
To add feedback, click on the “Feedback” tab in the editing mode of a question. Here you can enter your feedback using an editor.
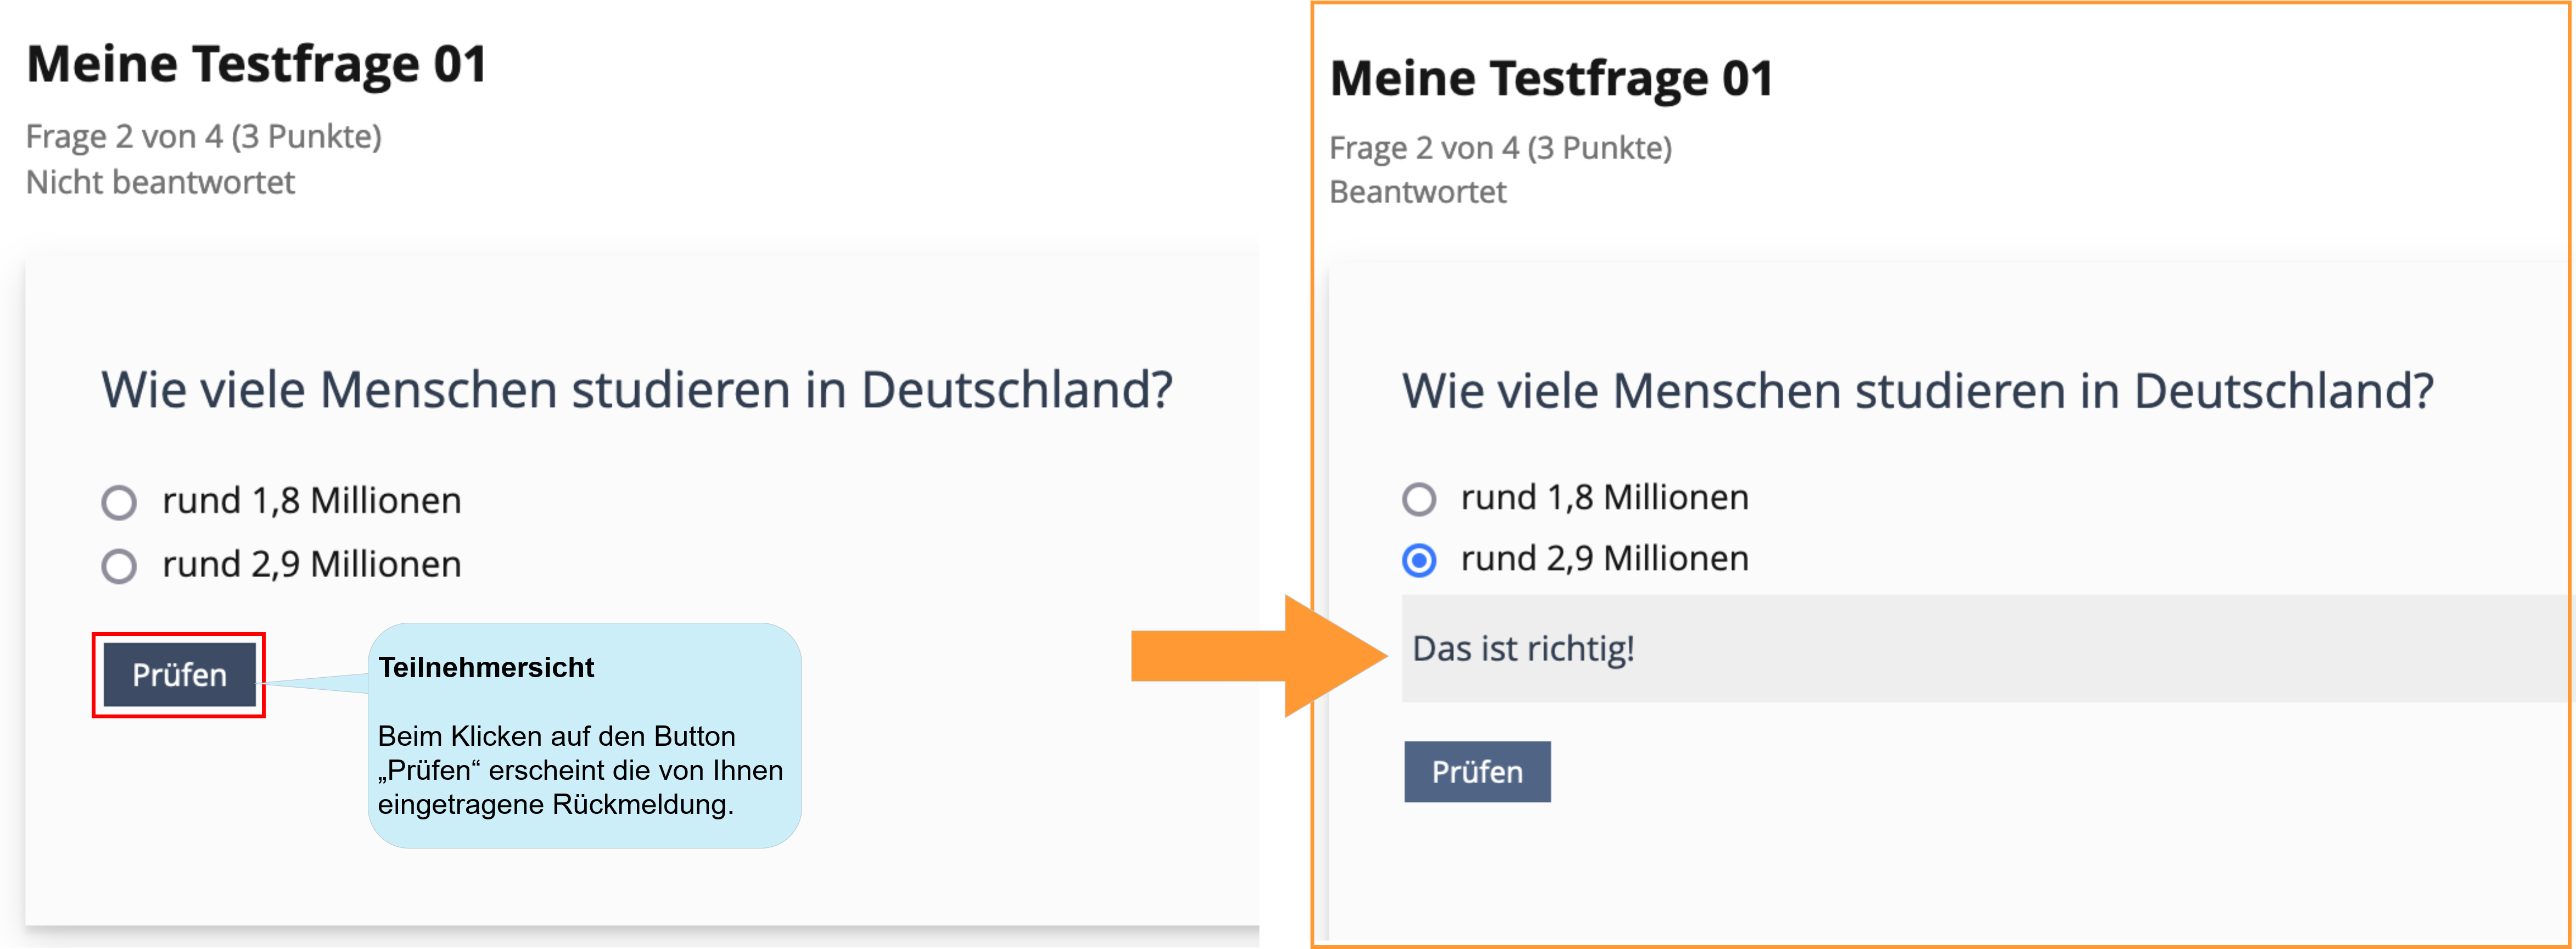
4.3. Participants view
Depending on the setting, the feedback for the participants...
...can be accessed immediately after answering a question by clicking on the “Check” button
...can be viewed in the detailed test results when the overall test result is announced. To do this, the corresponding setting has to be made in the “Settings” tab under “Results” in the “Detailed Results” area
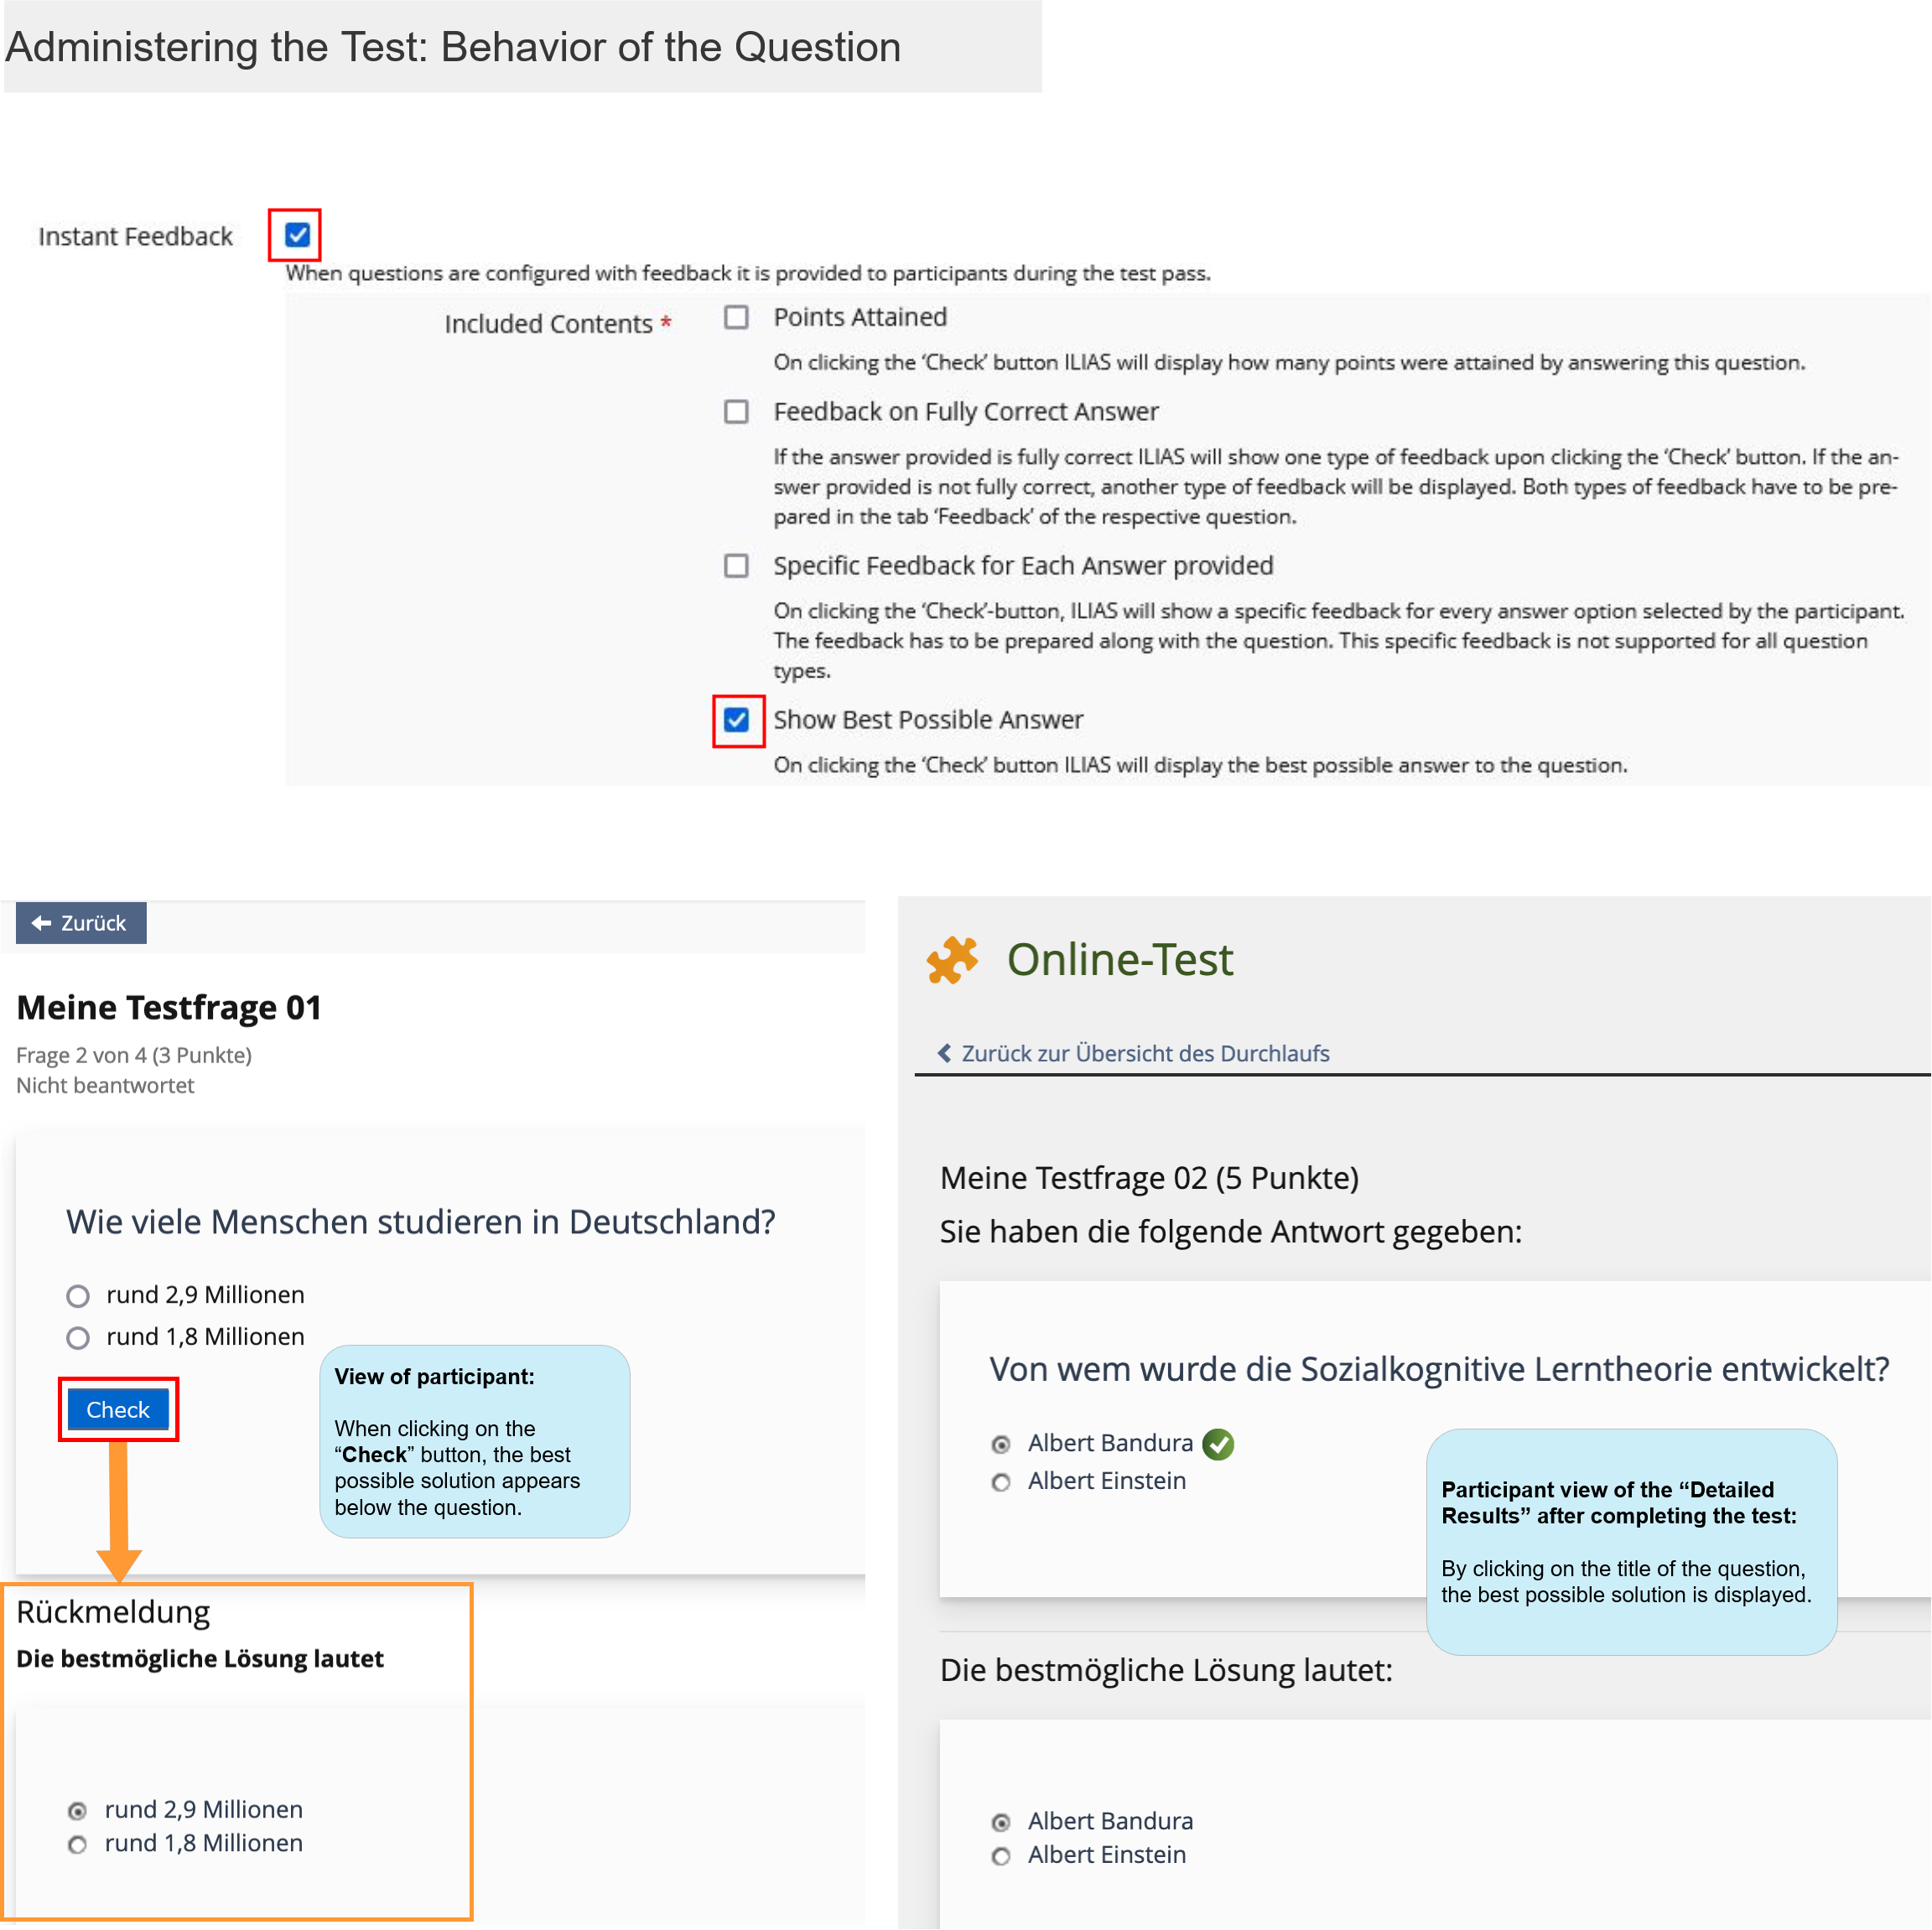
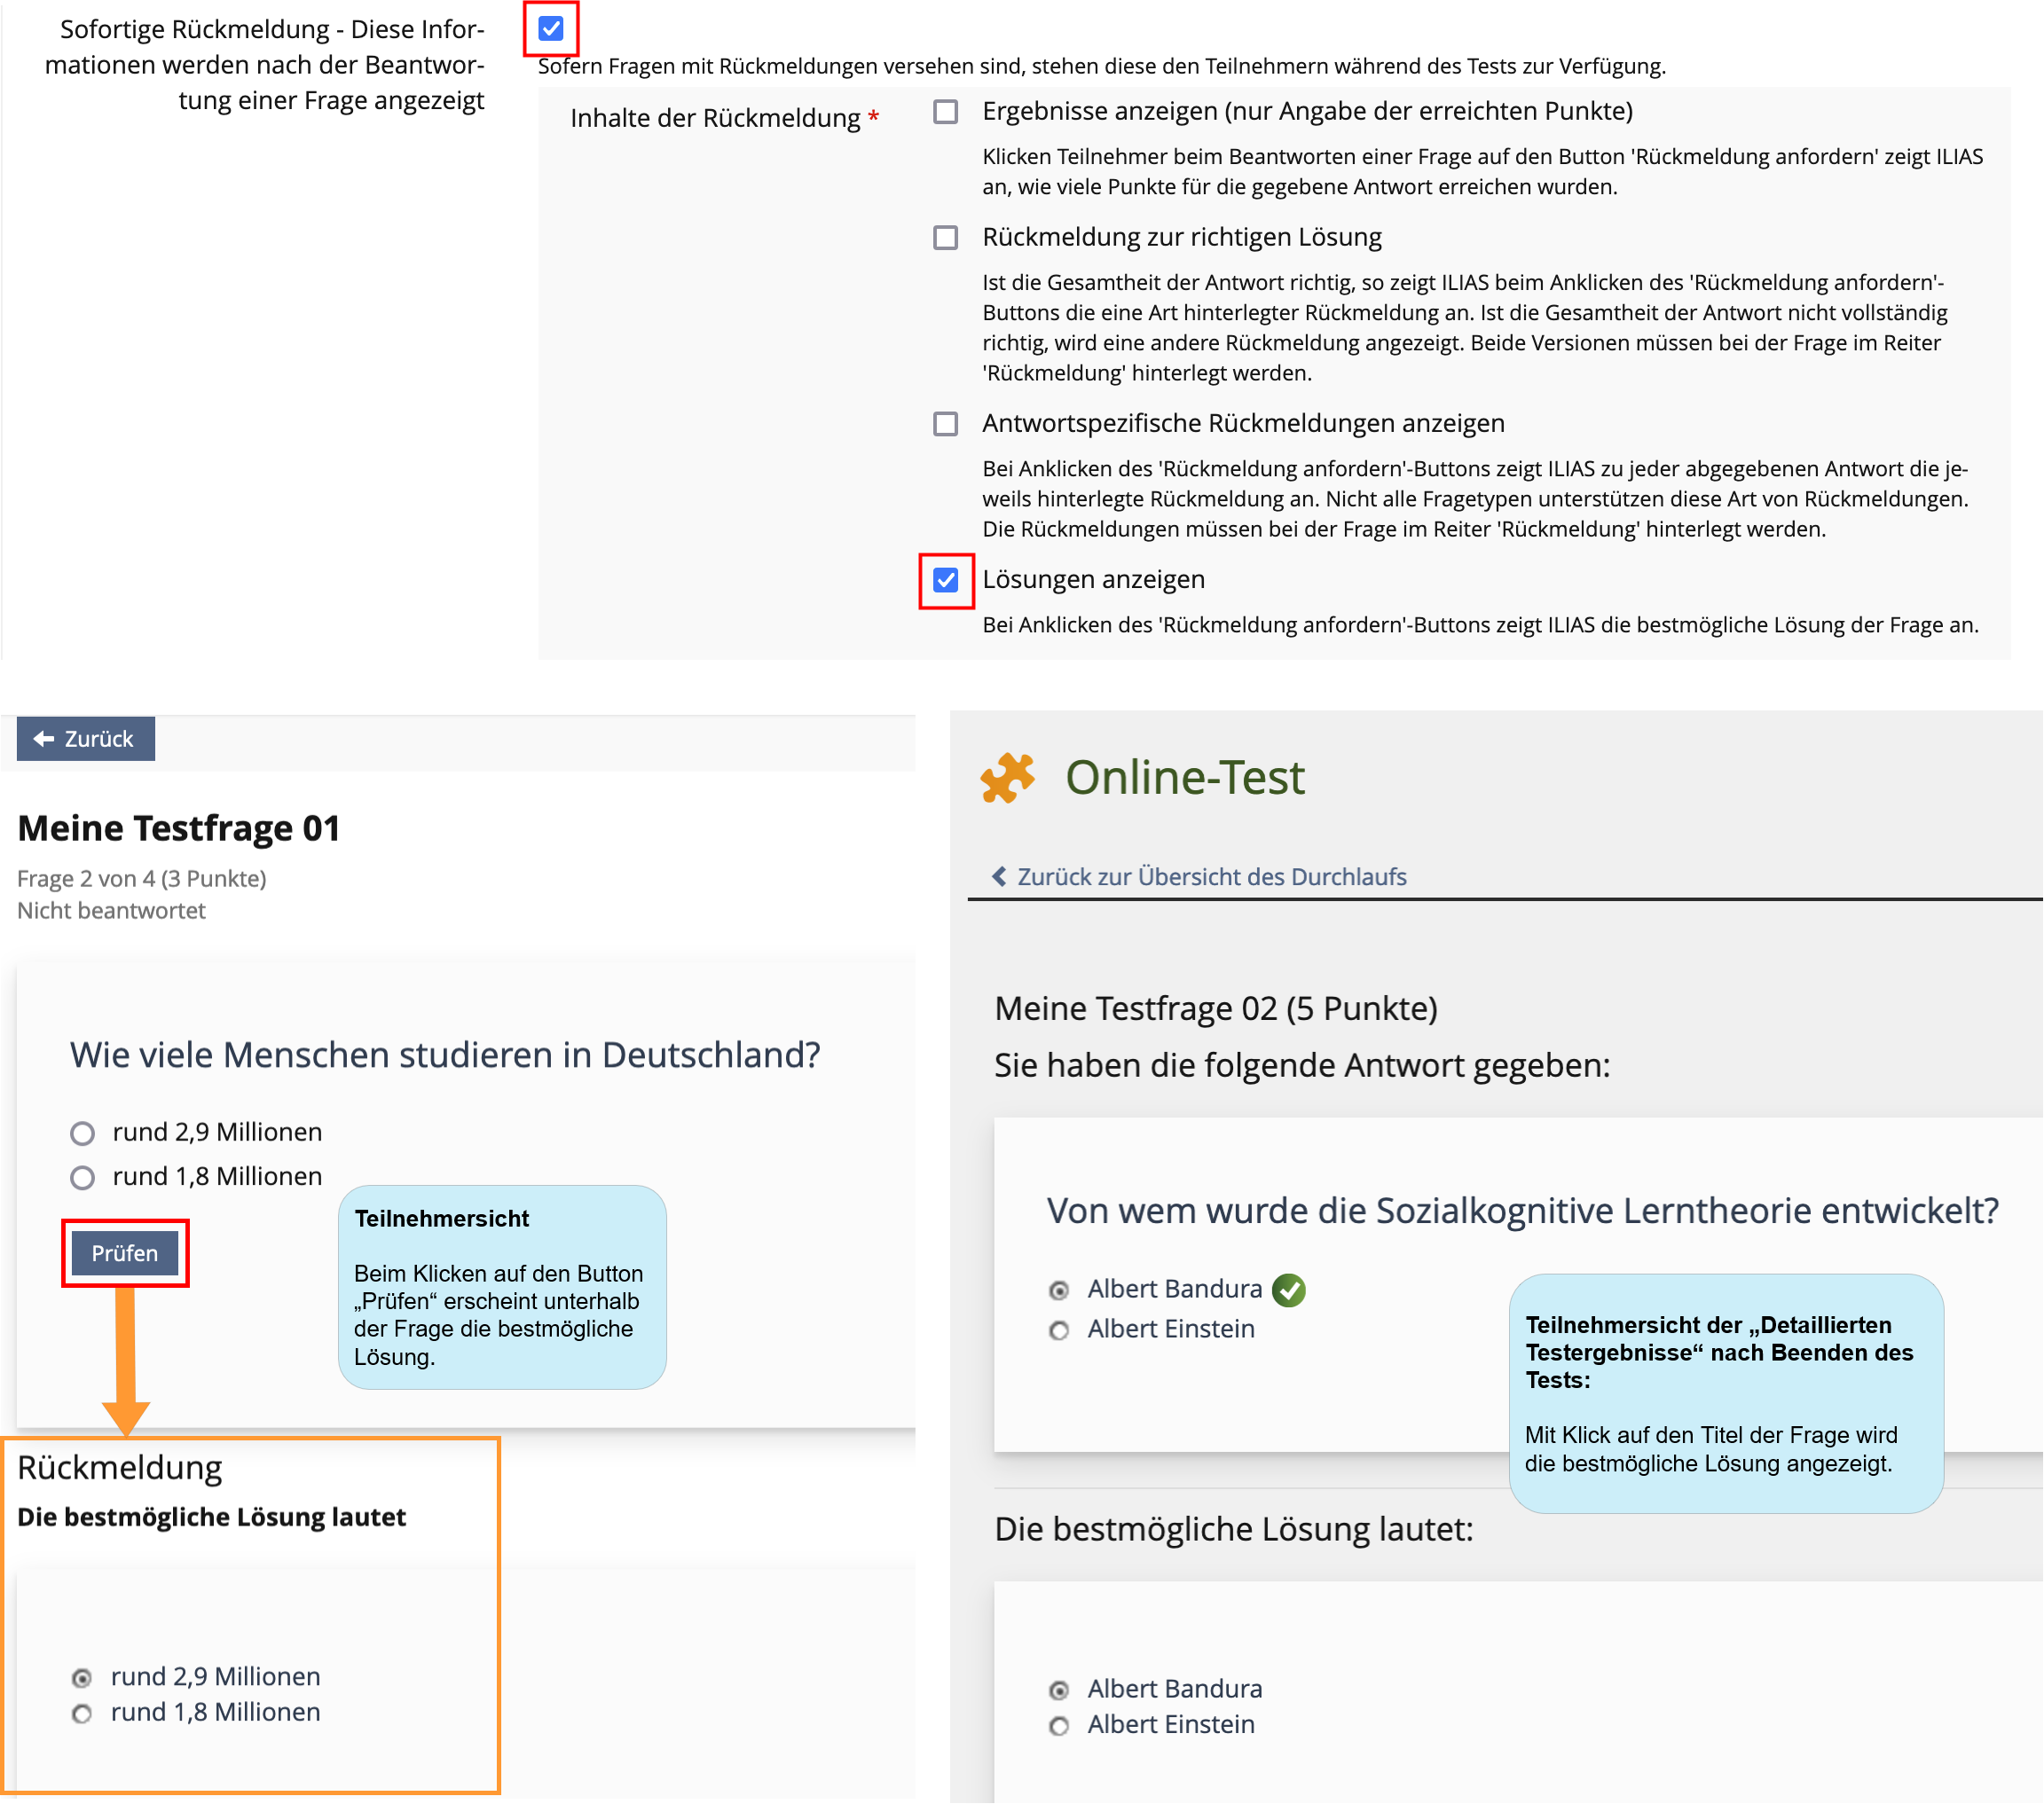
4.4. Best possible solutions
There are two possibilities for displaying the best possible solution (resulting from the number of points set):
- immediately after answering a question by clicking on the “Check” button
- in the detailed test results when the test result is announced at your desired time
(the corresponding setting must be made in the “Settings” tab under “Scoring and Results” in the section “Details to be Included in Test Results”)
For either option, the “Show Best Possible Answer” setting must be set in the “General Settings” under “Instant Feedback".
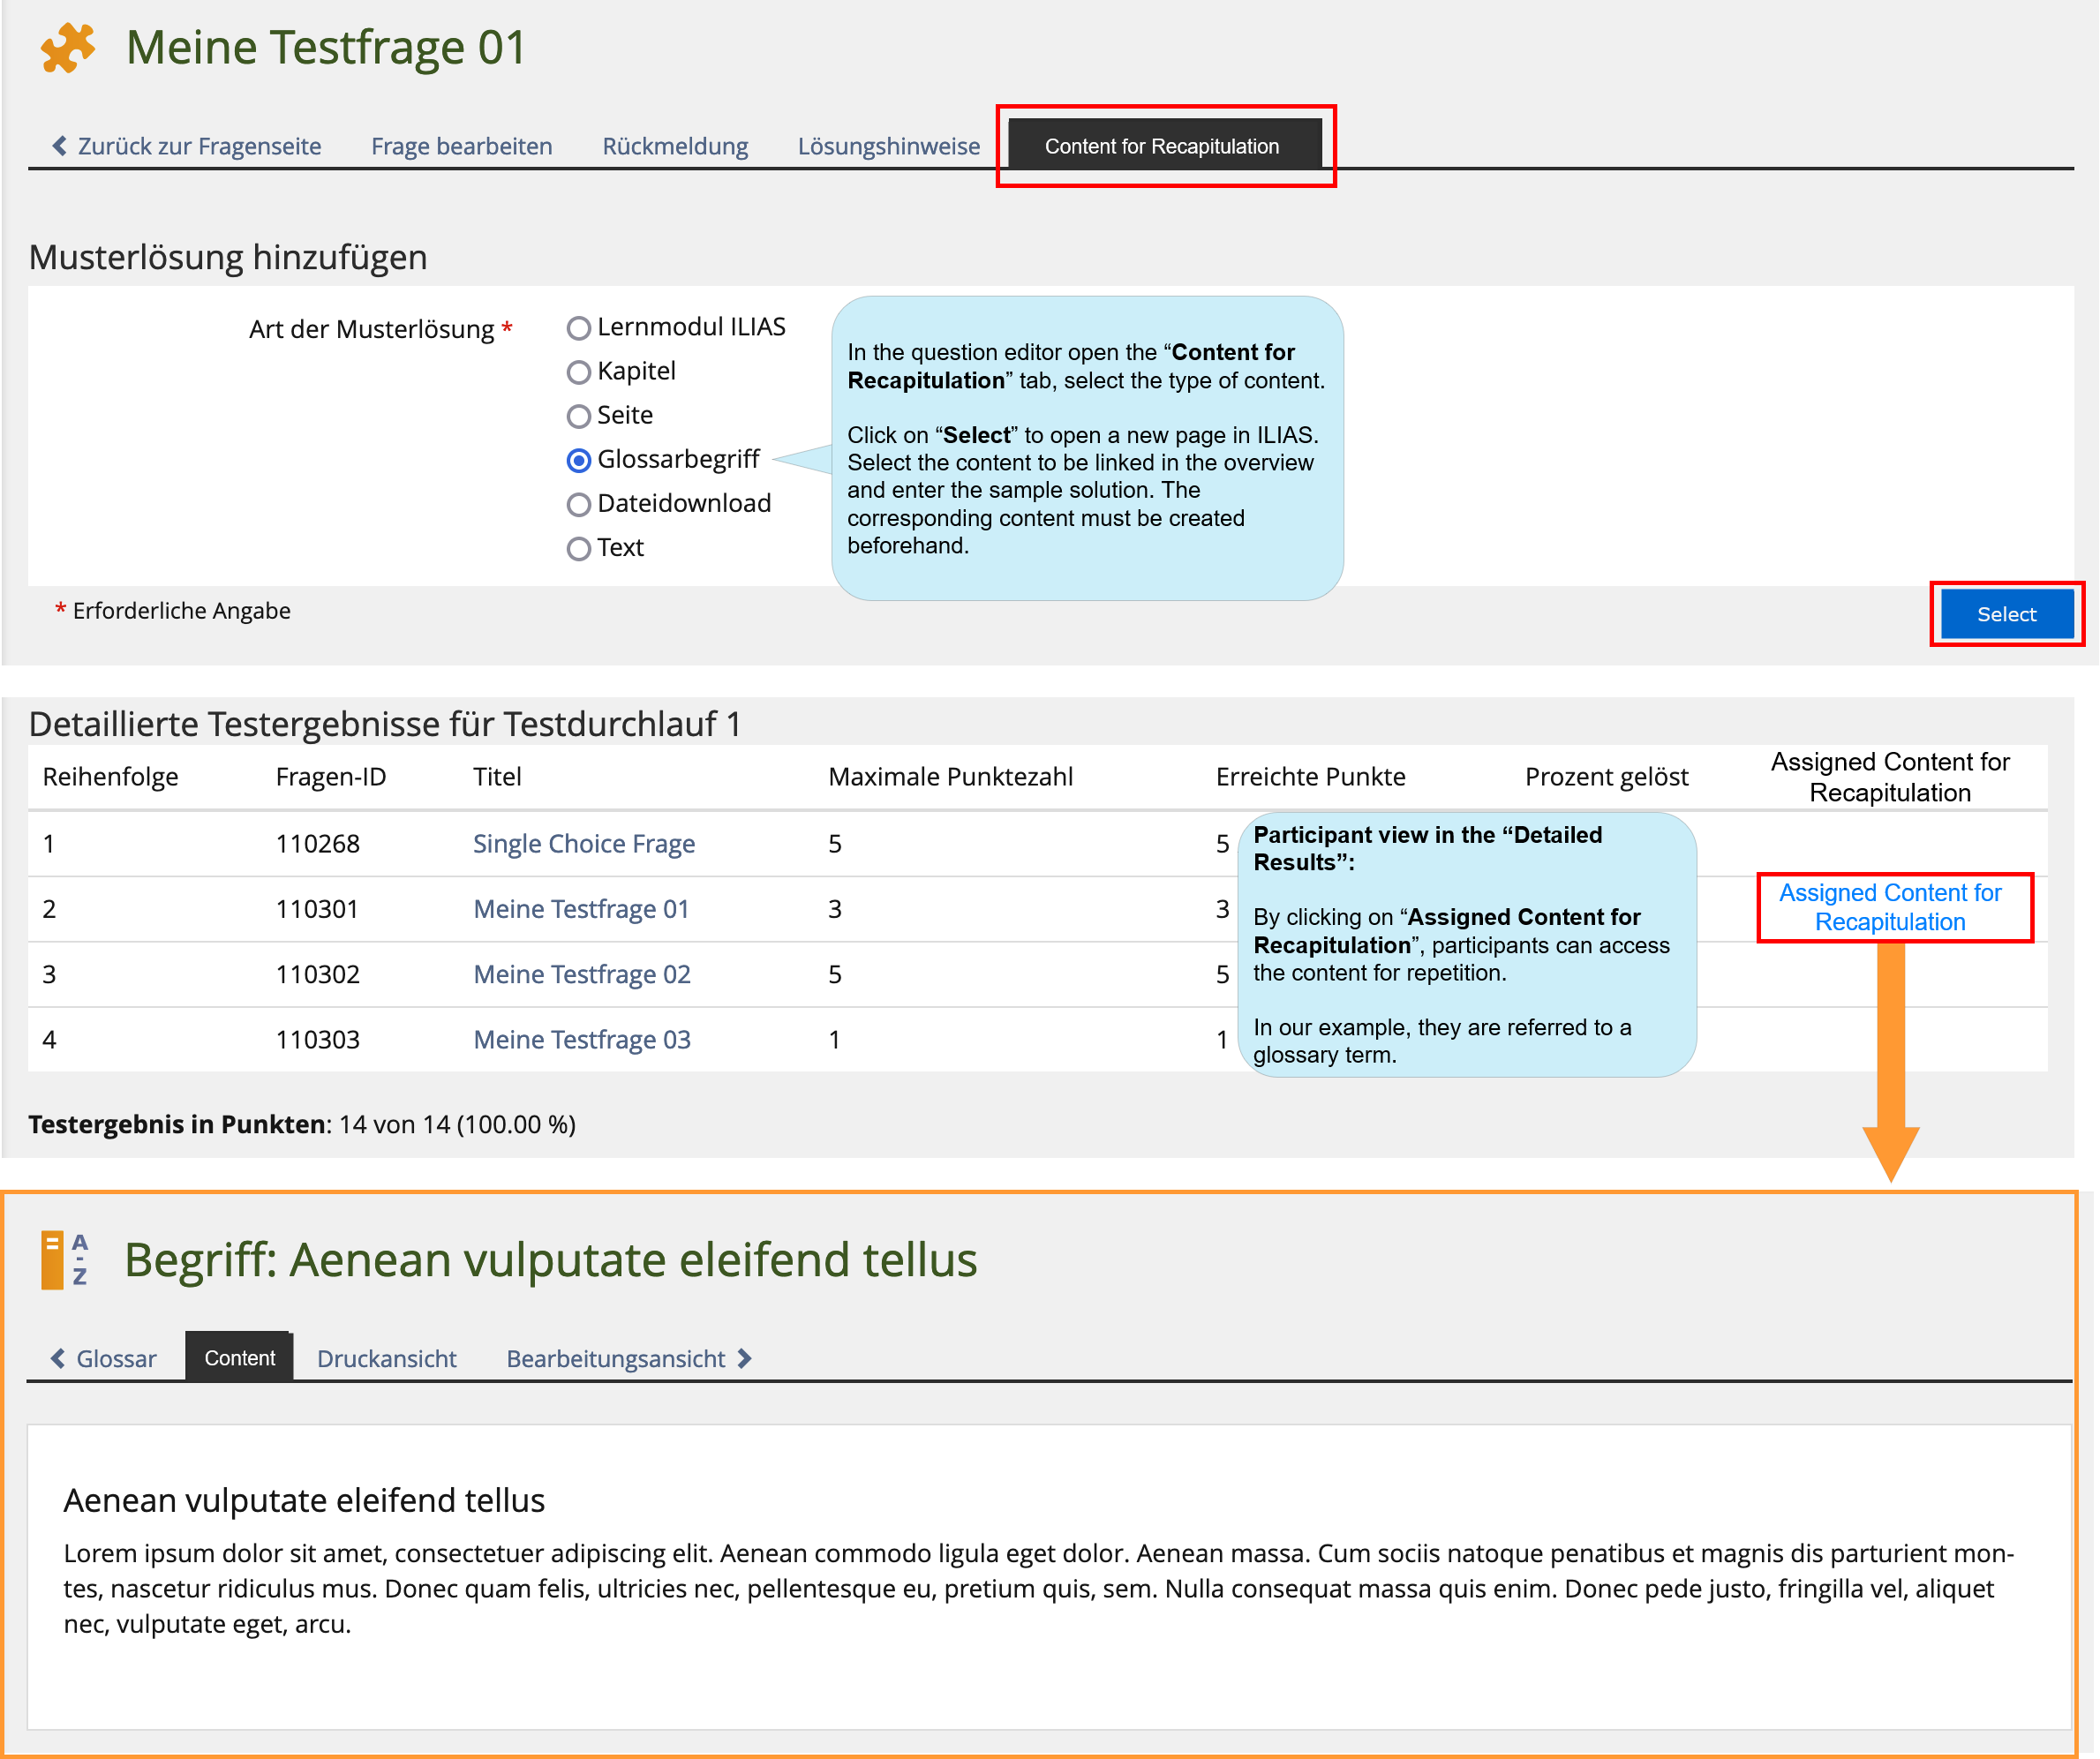
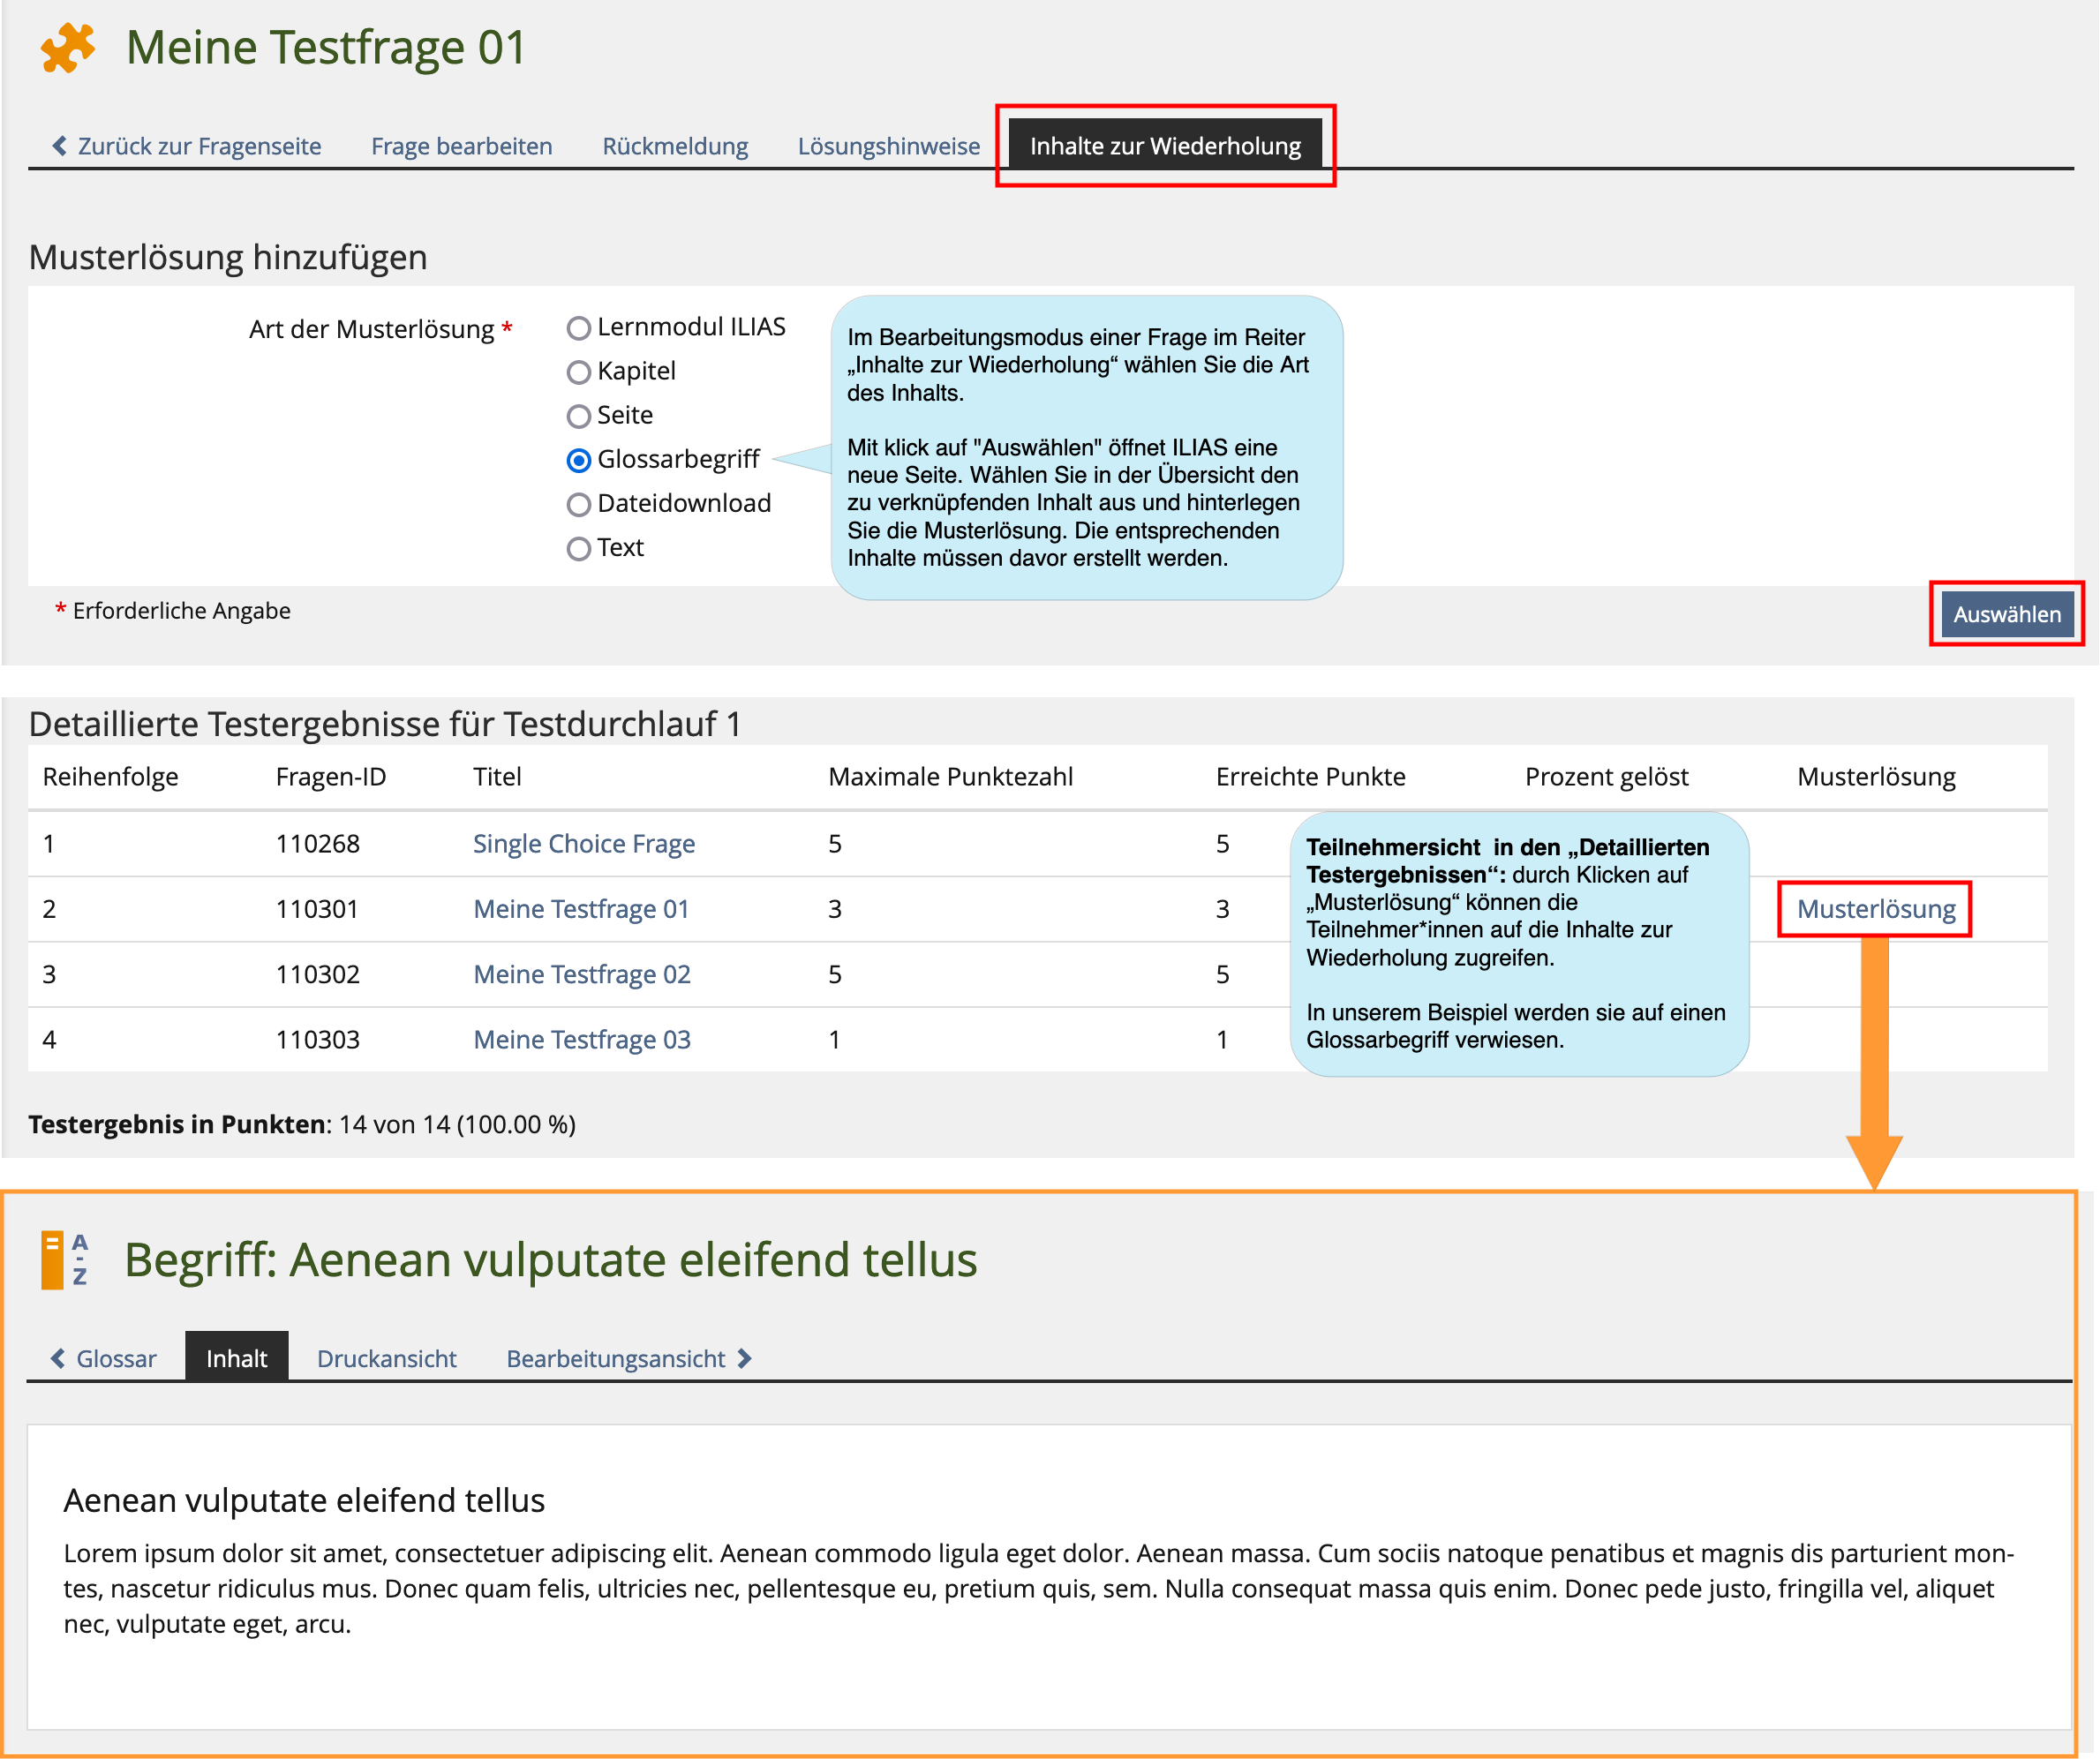
4.5. 'Content for Recapitulation'
With this function, participants can be guided to materials for reviewing the learning content, such as selected pages, files, learning modules and glossary terms, in the “Detailed test results” after completing the test.
First, under “Settings” in the “Scoring and Results” tab of the test, the setting “Show Best Solution” must be activated in the “Details to be Included in Test Results” section. The time at which participants can access this content for repetition depends on the access to the test results, which you define on the same page.
5. Trial runs
After completing your test, it is advisable to check, whether the test is running and the results are being evaluated as you planned, or whether you still need to correct something in the test settings. To do this, the test must be switched online (in the “Settings” tab) You can then “Start the Test” as a trial (this is possible in the “Questions” tab and in the “Info” tab).
Please note: “Results” or “Test data” are generated after each test run (and after each trial run). This data must be deleted before you can continue editing the test (to change settings, edit questions again or add new questions).
To do this, open the “Results” tab, click on “Delete Test Data of all Users” and confirm with “Proceed”. Before using your test, please check that all test data from the trial runs has been deleted.
6. Test results
6.1. Automatic evaluation
6.2. Evaluating manually
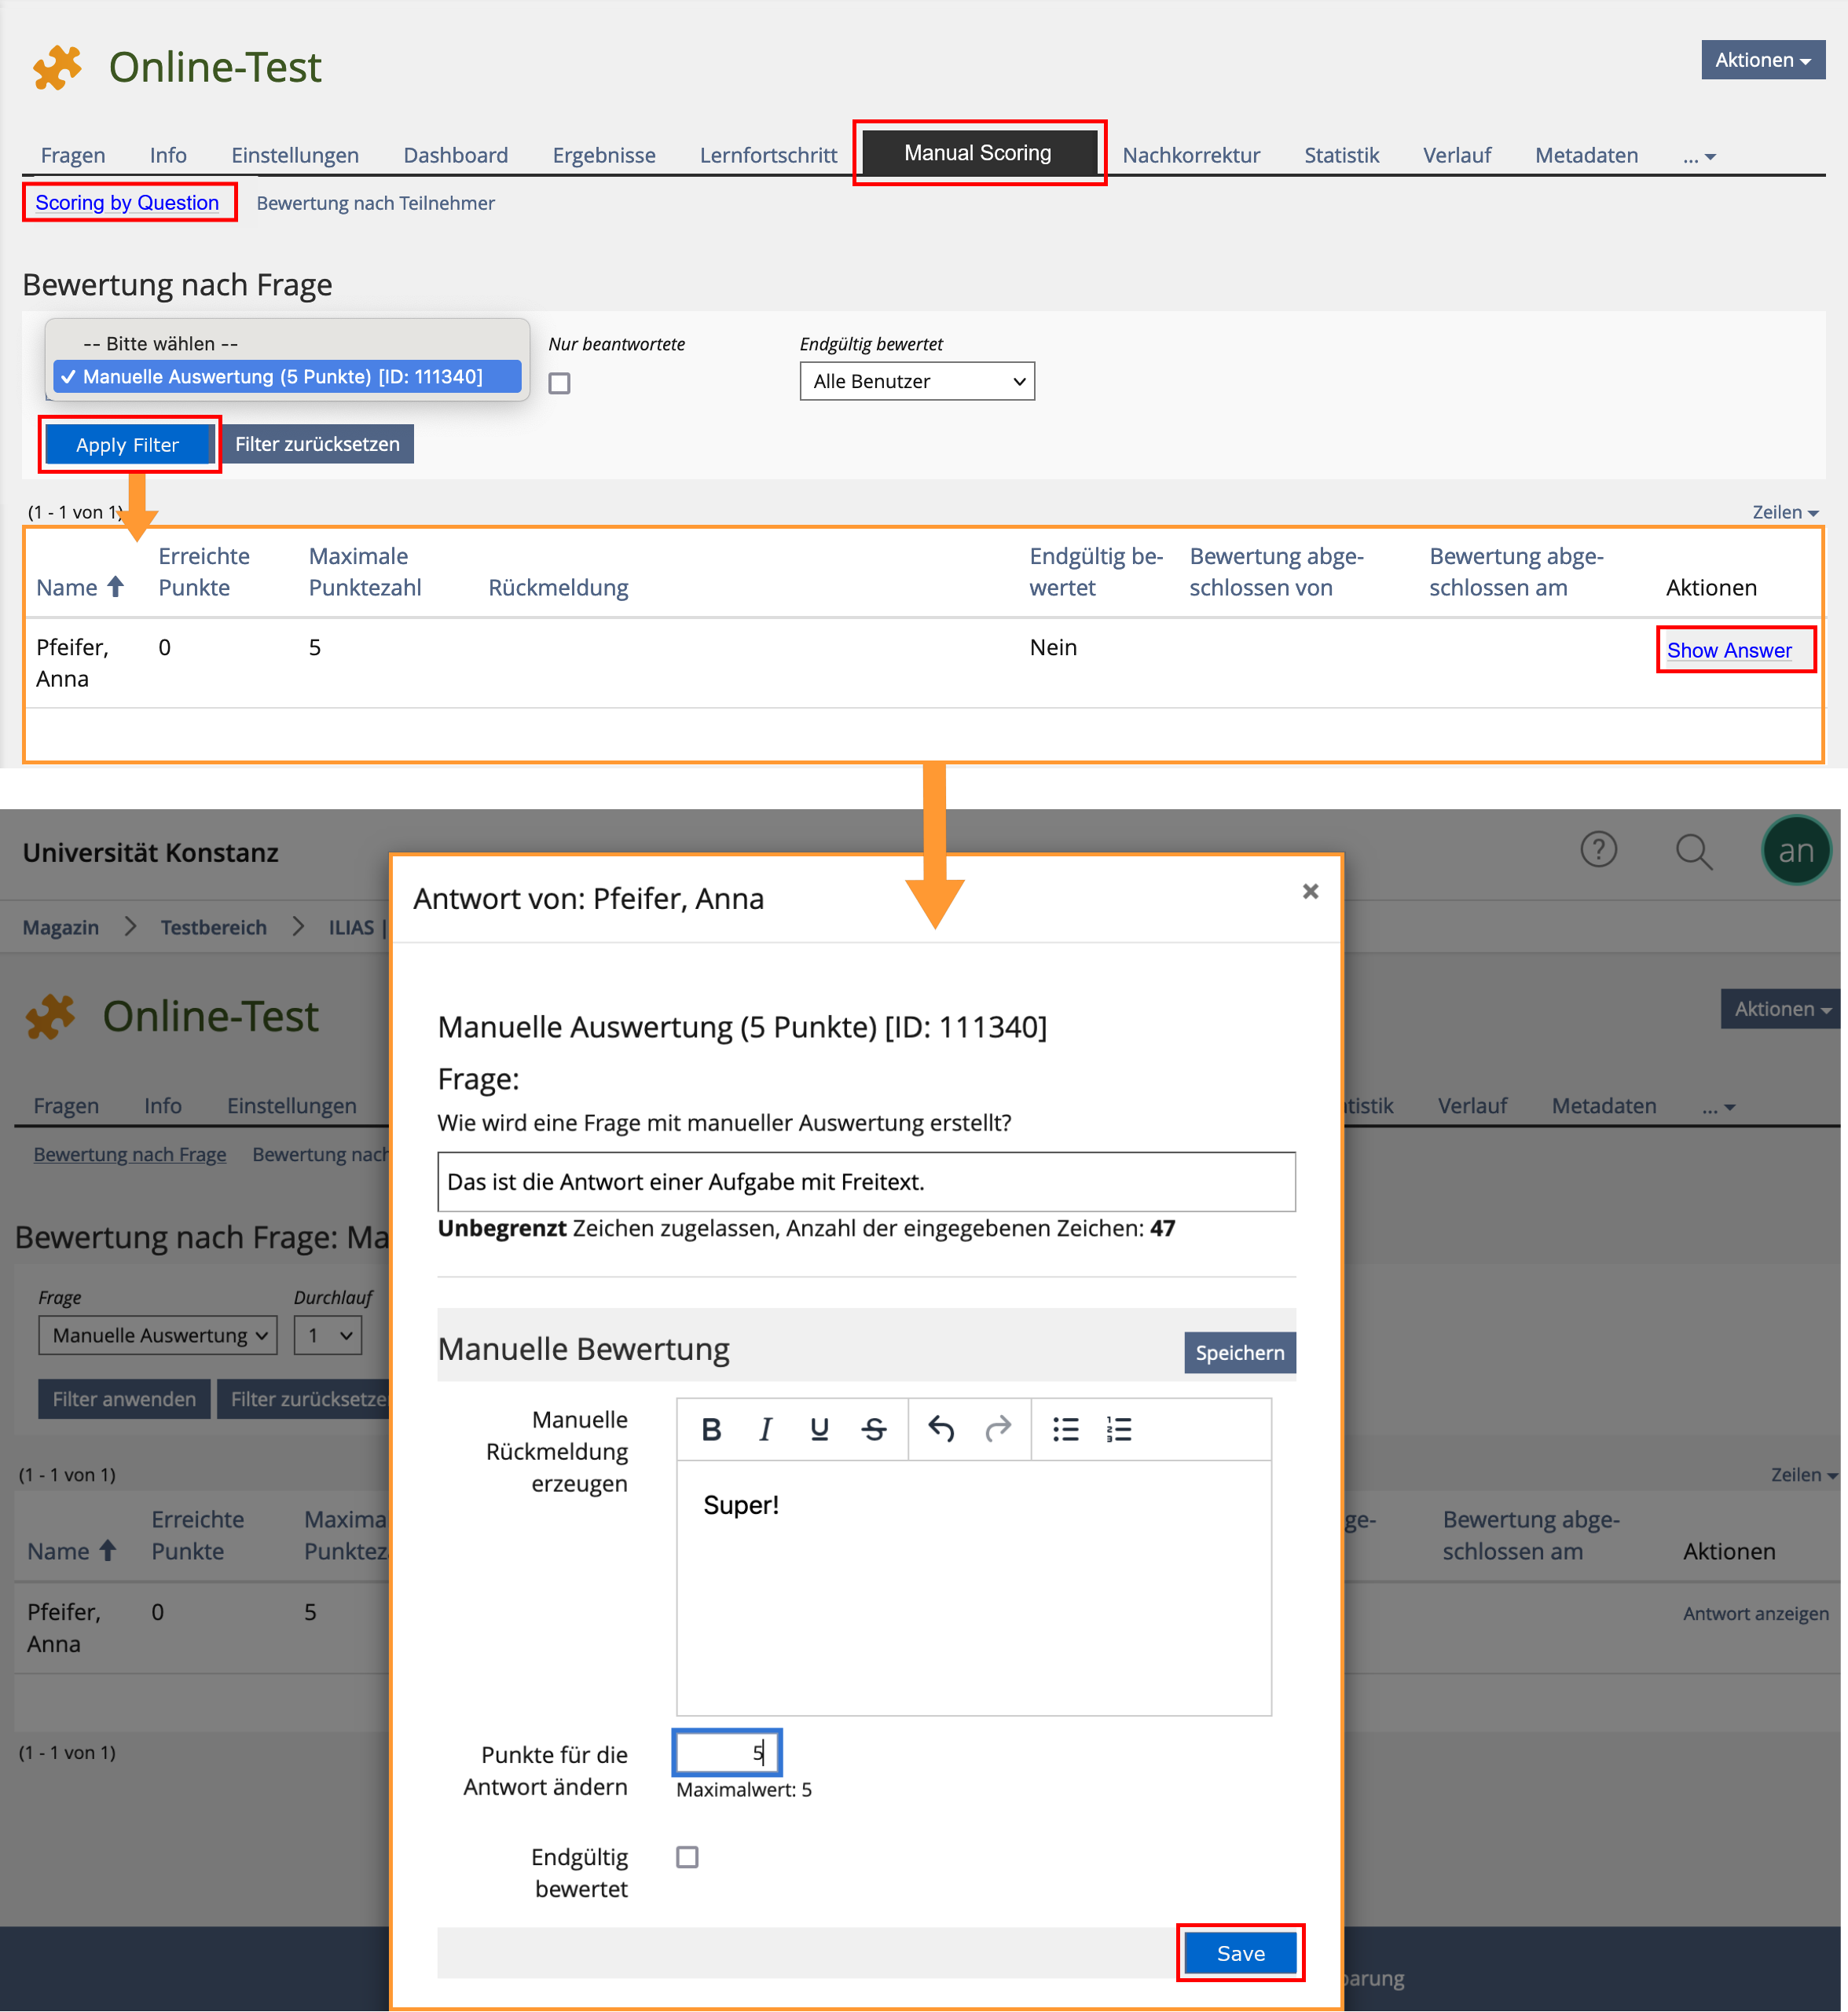
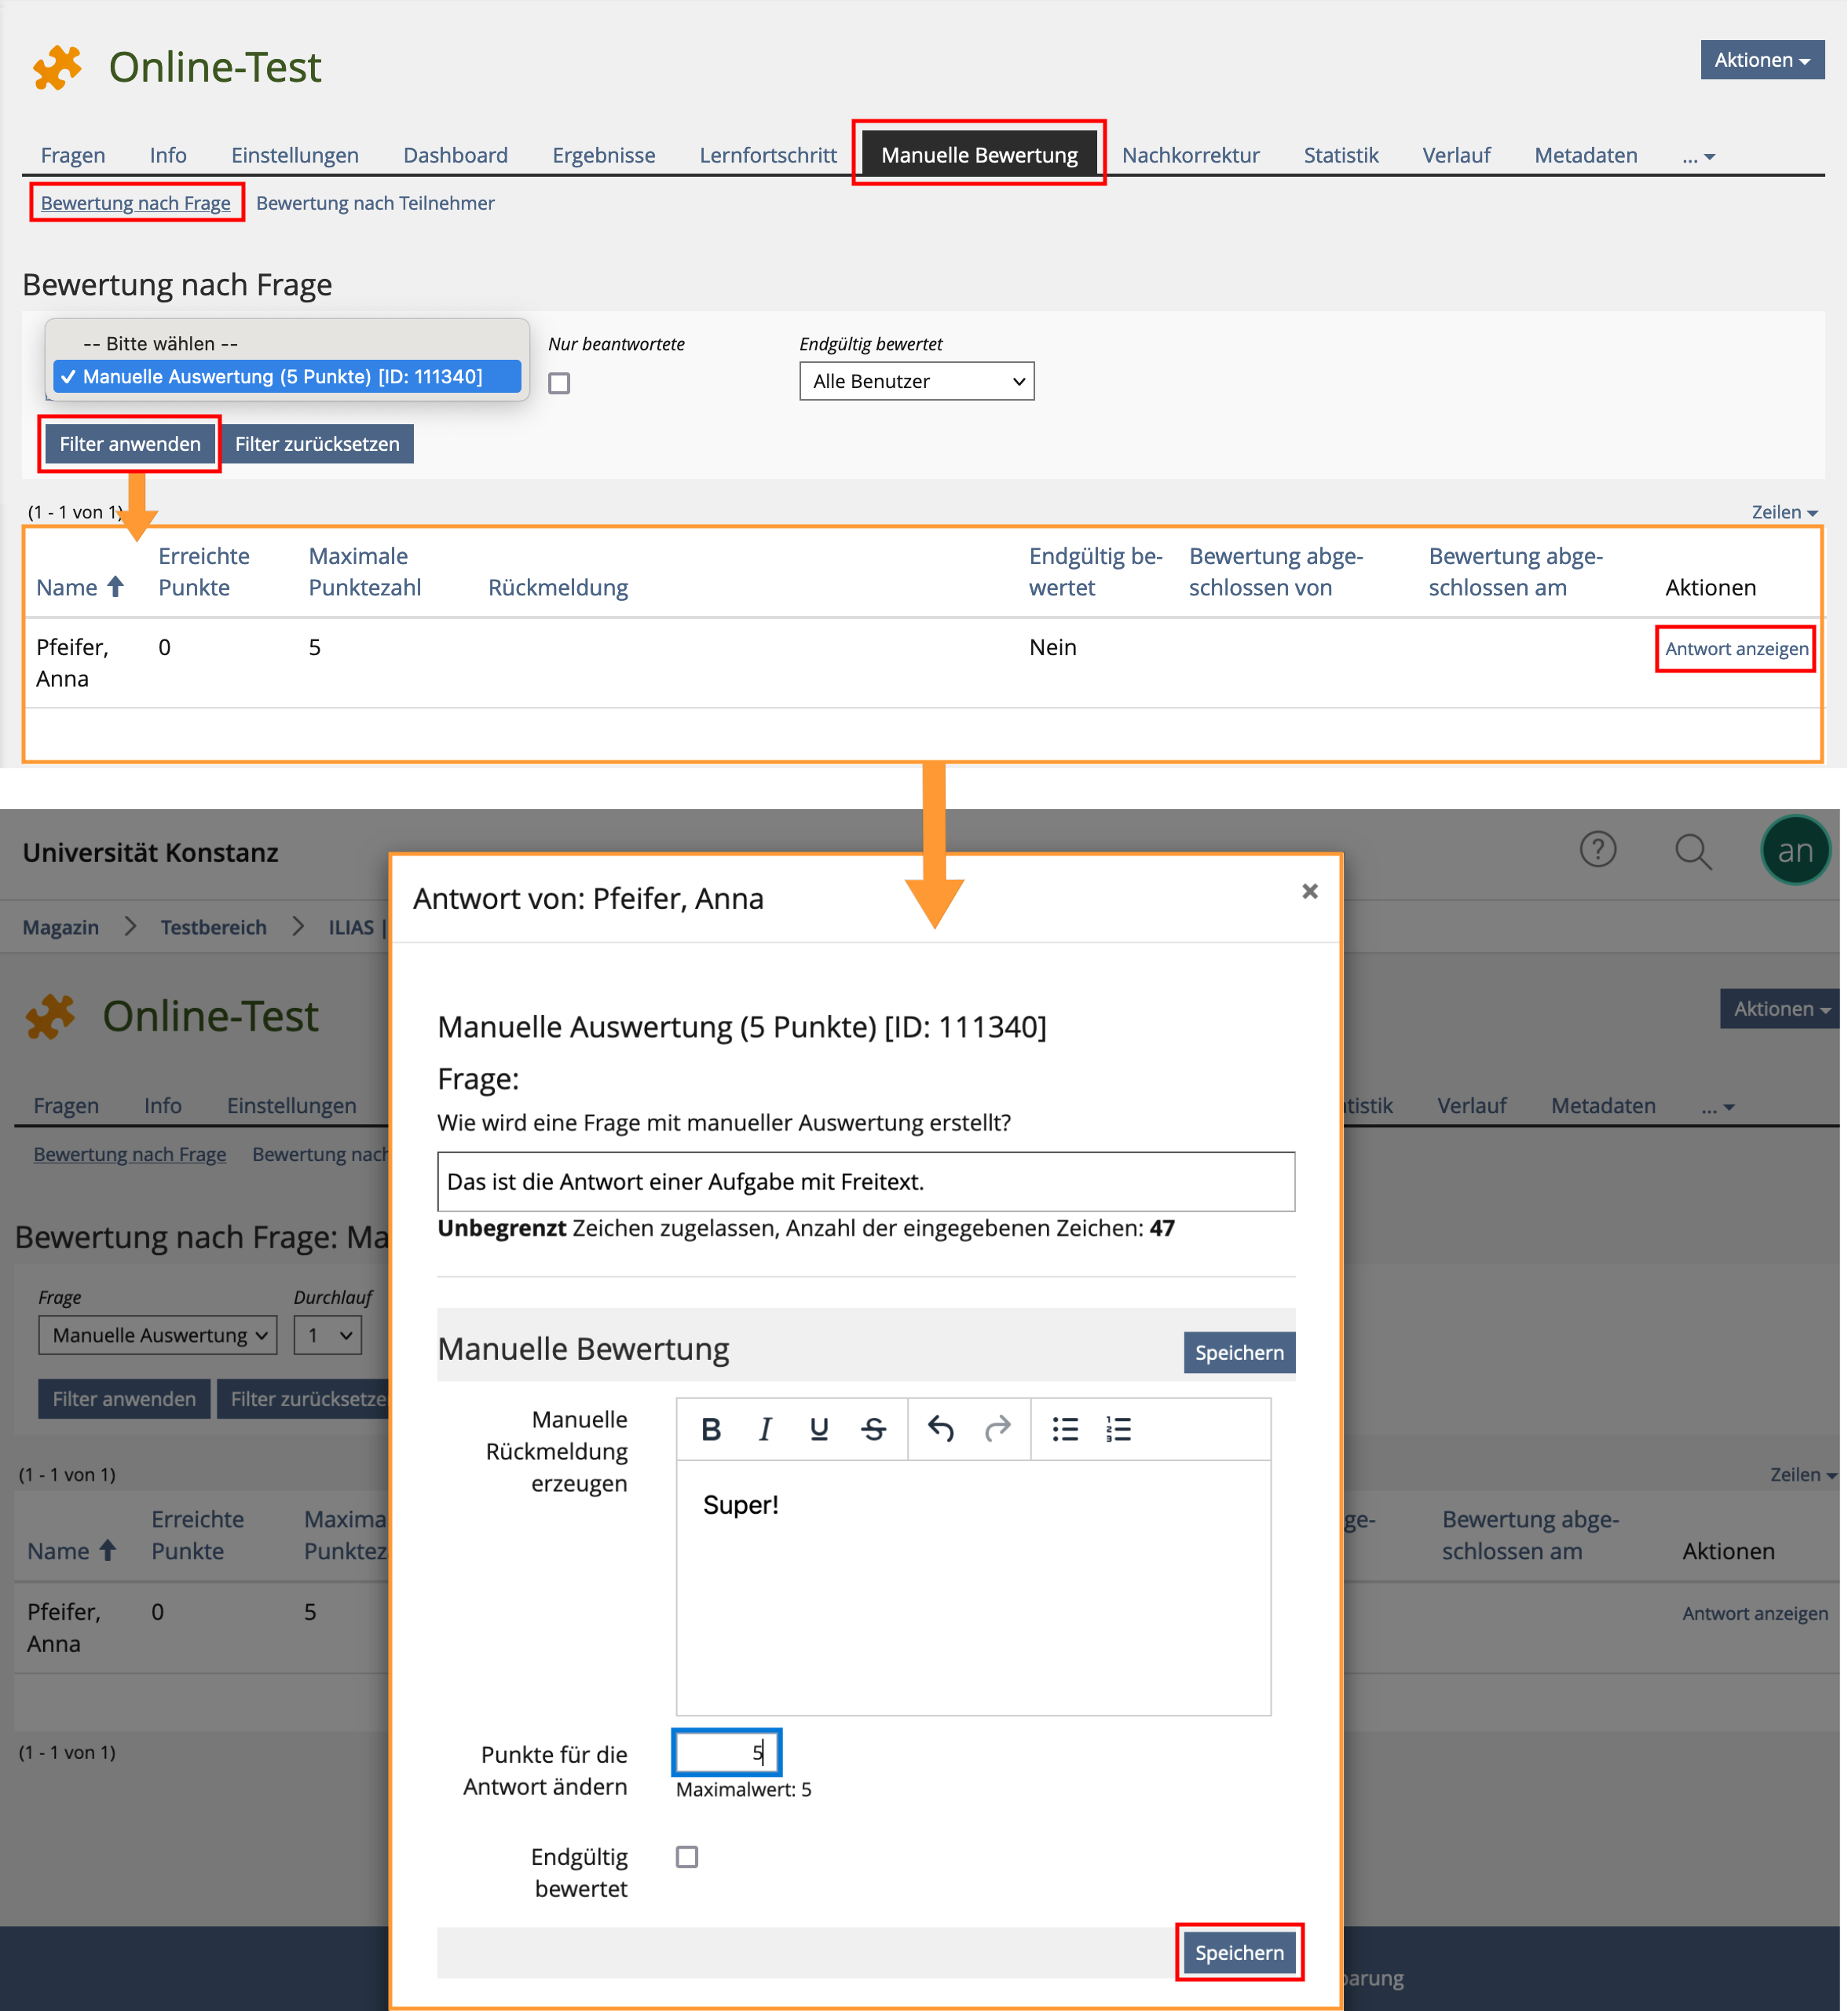
If you are using questions that need to be evaluated manually, click on “Manual Scoring”. Here you select the individual question(s) in the “Scoring by Question” area with “Apply Filter”.
You will then see the participants' answers (“Show Answer”), grade the solution (“Points Achieved”) and “Save” the score awarded.
7. Post-correction after the test
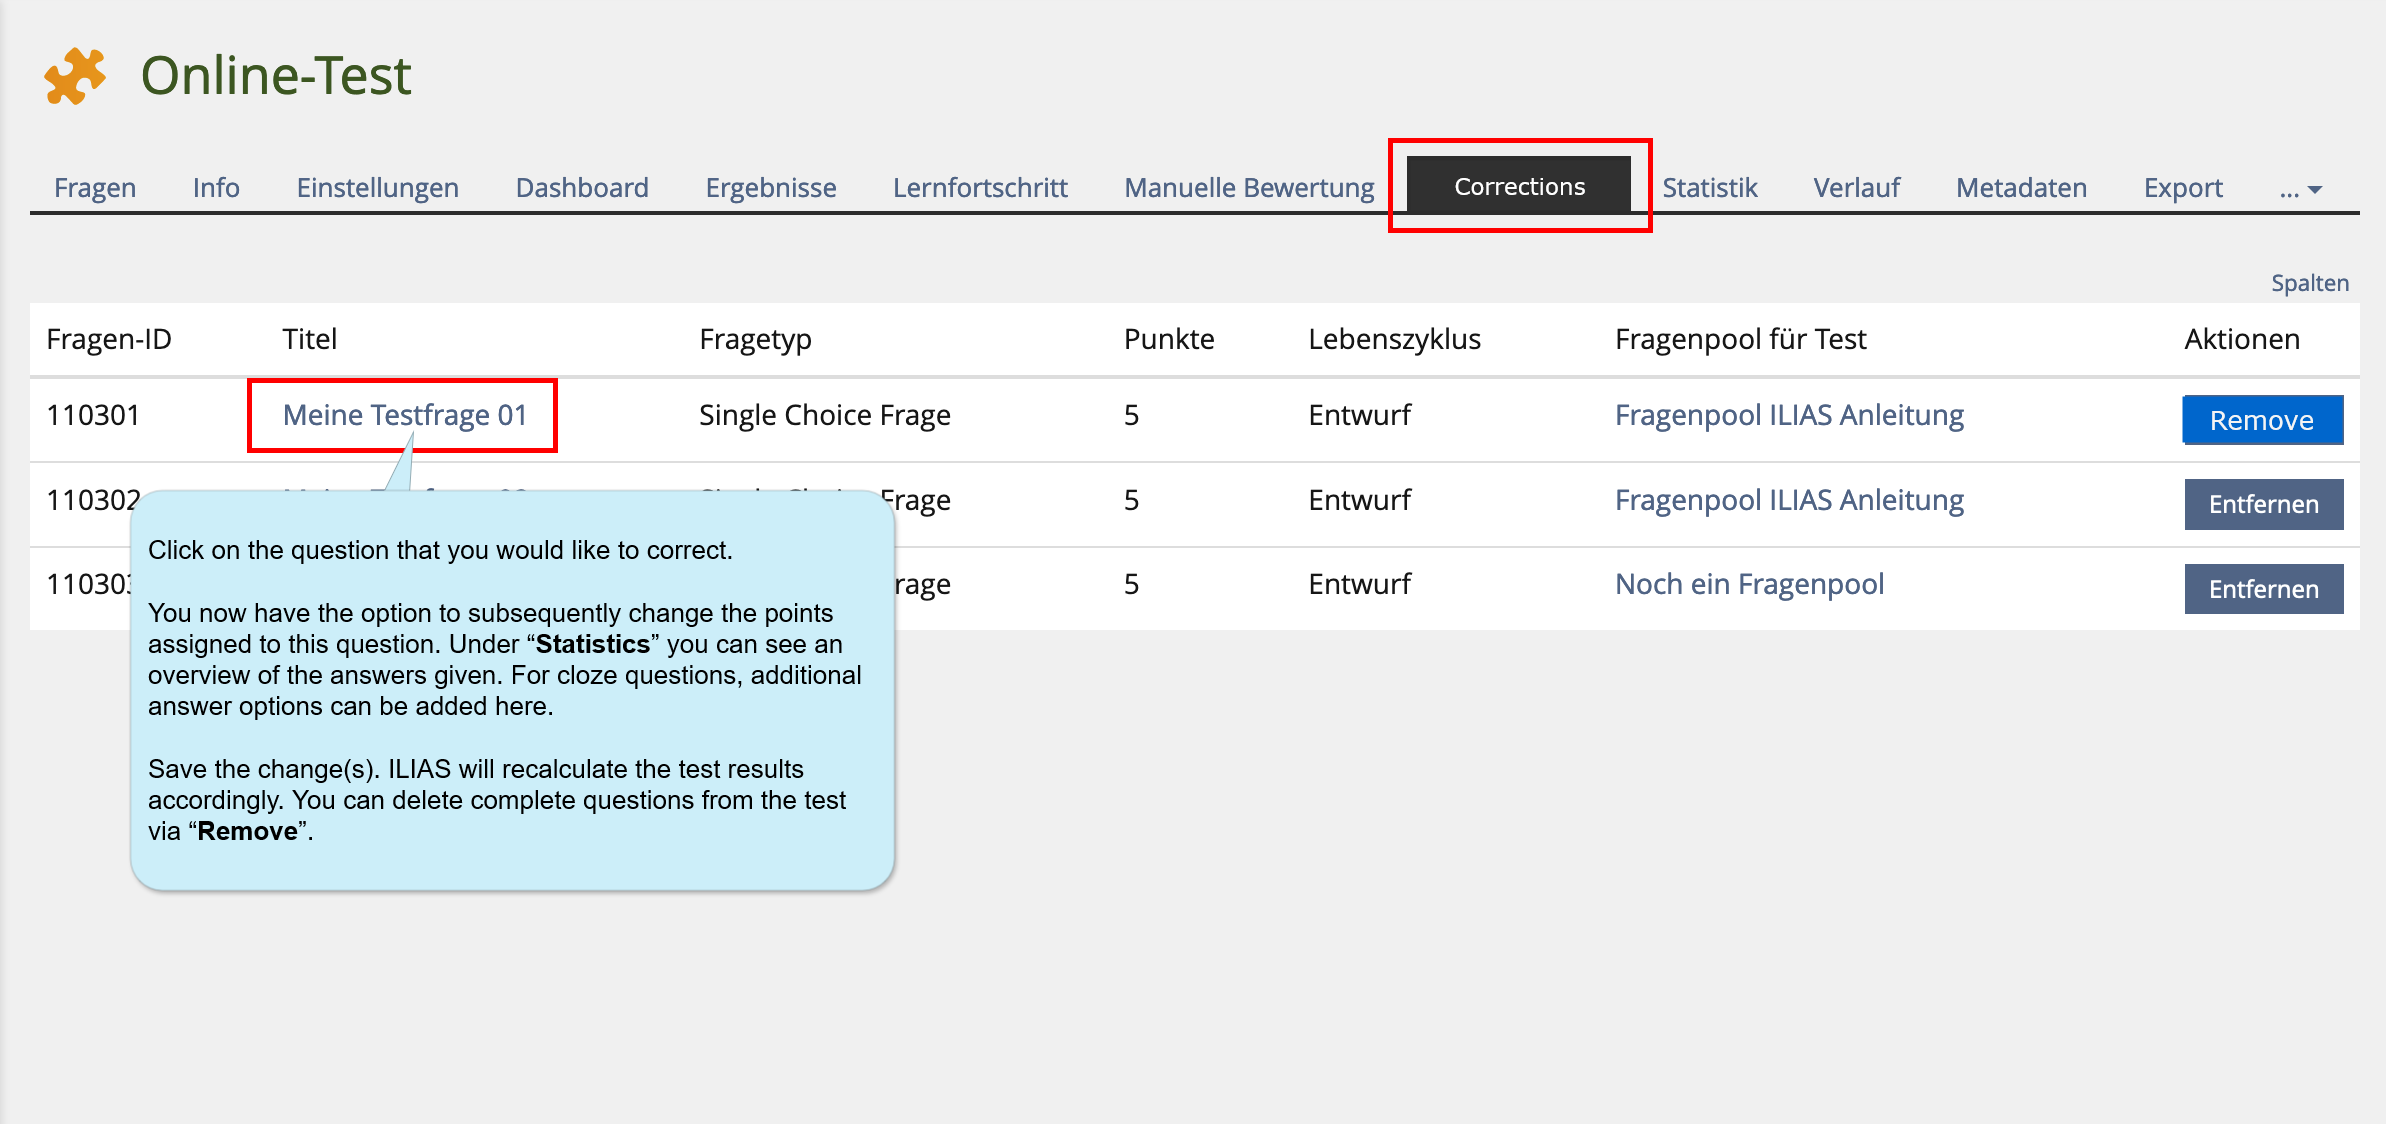
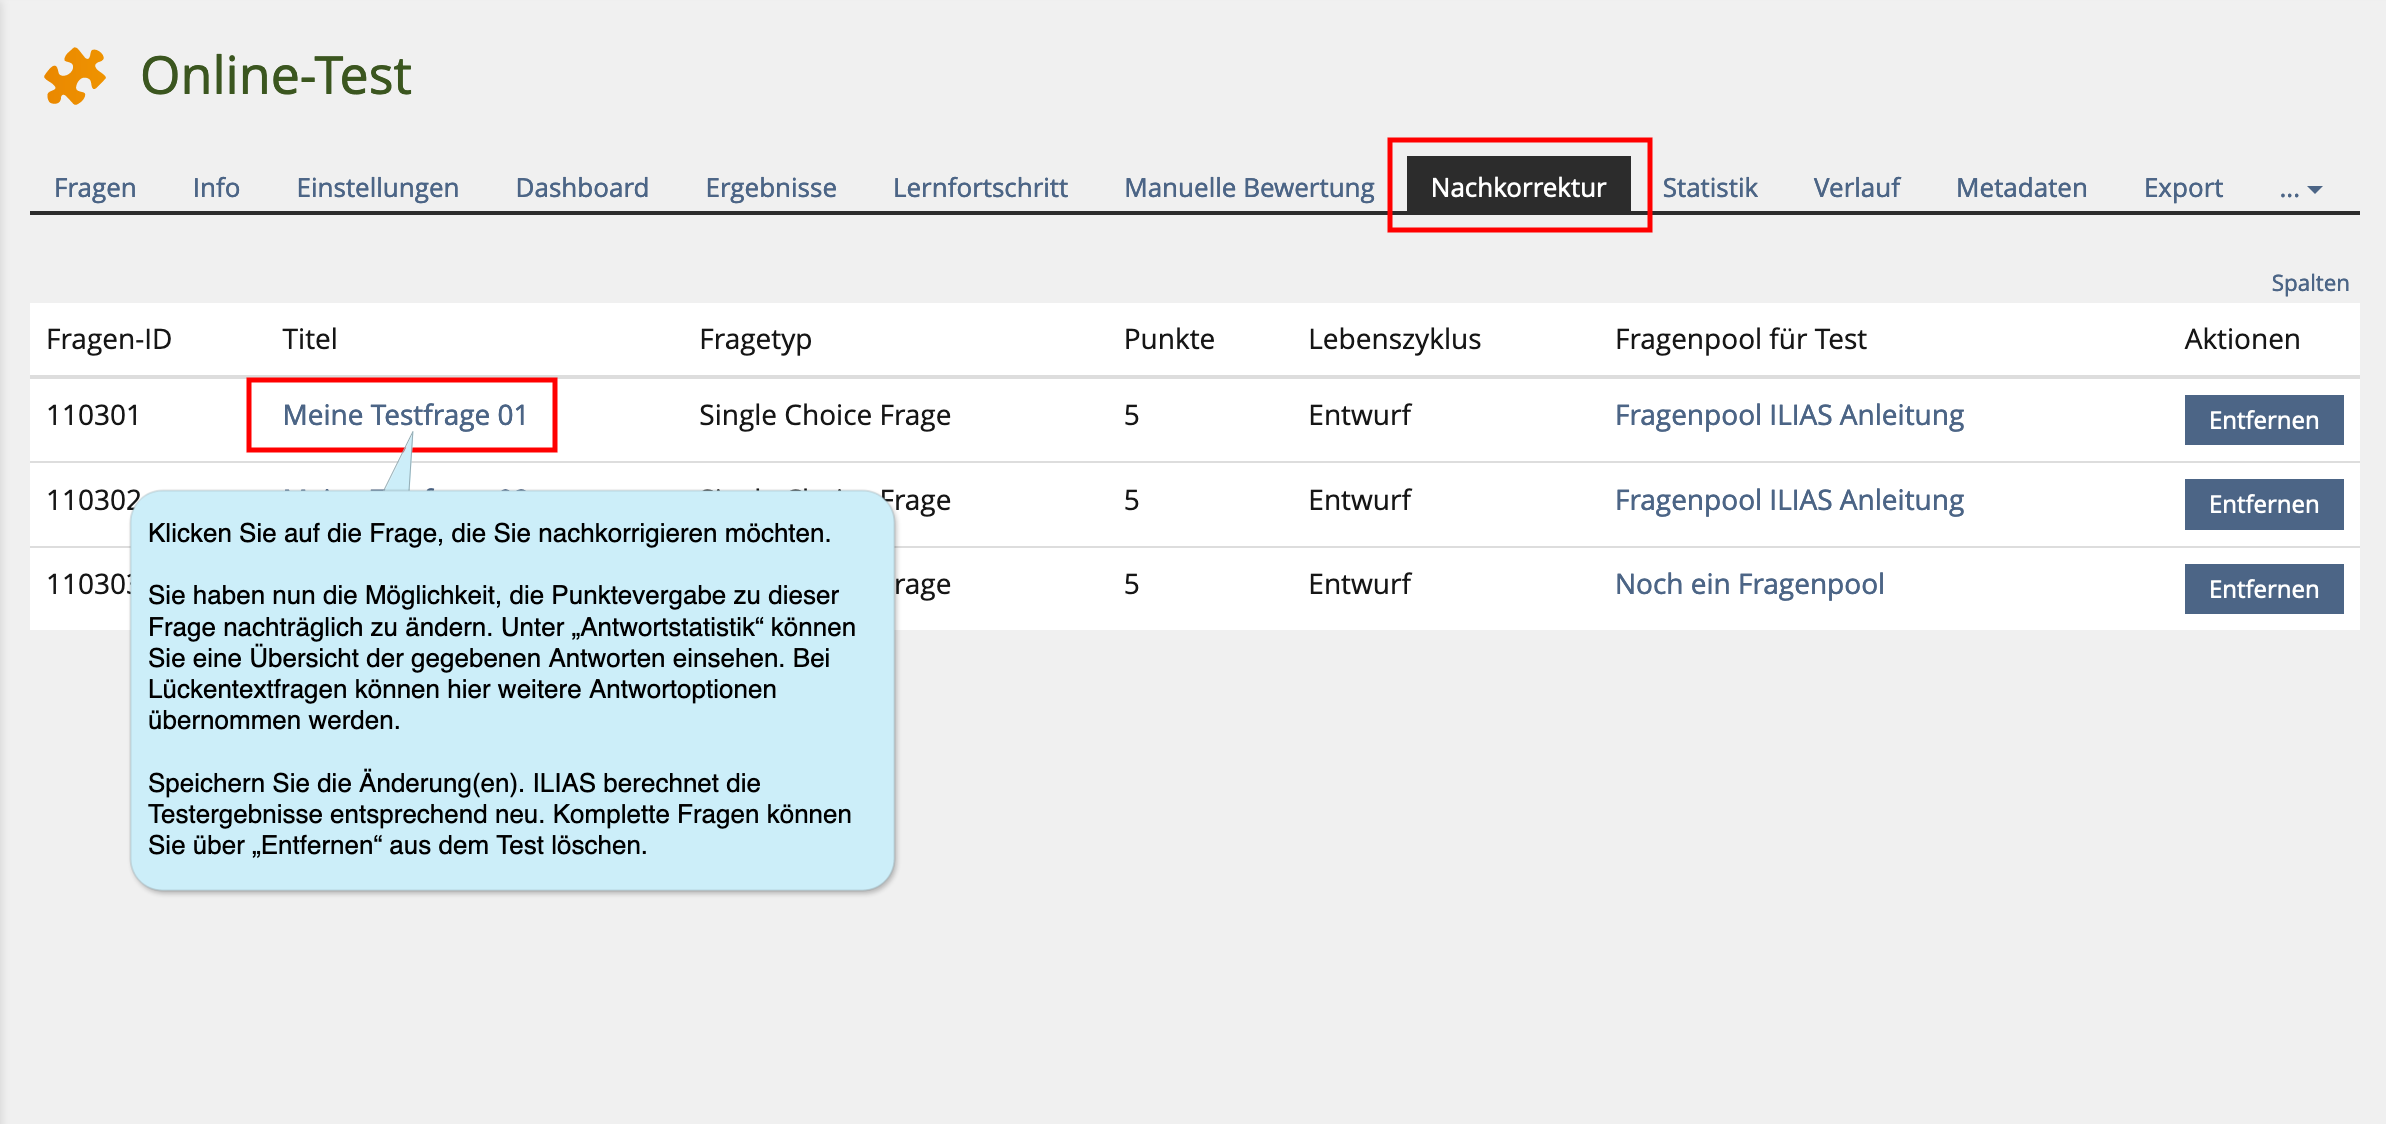
You notice after the test that you made a mistake when assigning points to a question? Or that you did not formulate a question clearly enough, as a result of which it was not sufficiently understood by several participants, that could therefore not answer properly? You can change allocated points for a question afterwards. In the “Correction” tab, you can
- change, remove or add points to the points awarded to the answer options for a question
- change, remove or add individual answer options for a question
- view an answer overview and, if necessary, remove any manual evaluation that has already been created.
Please note: Not all question types can be corrected. Some can only be partially corrected.
Post-corrections and manual corrections should only ever be made by one person at a time.
If several people are working on the correction at the same time and the saving time overlaps, not all corrections can be saved for technical reasons.
8. Accessing and managing test results
8.1. Manage results
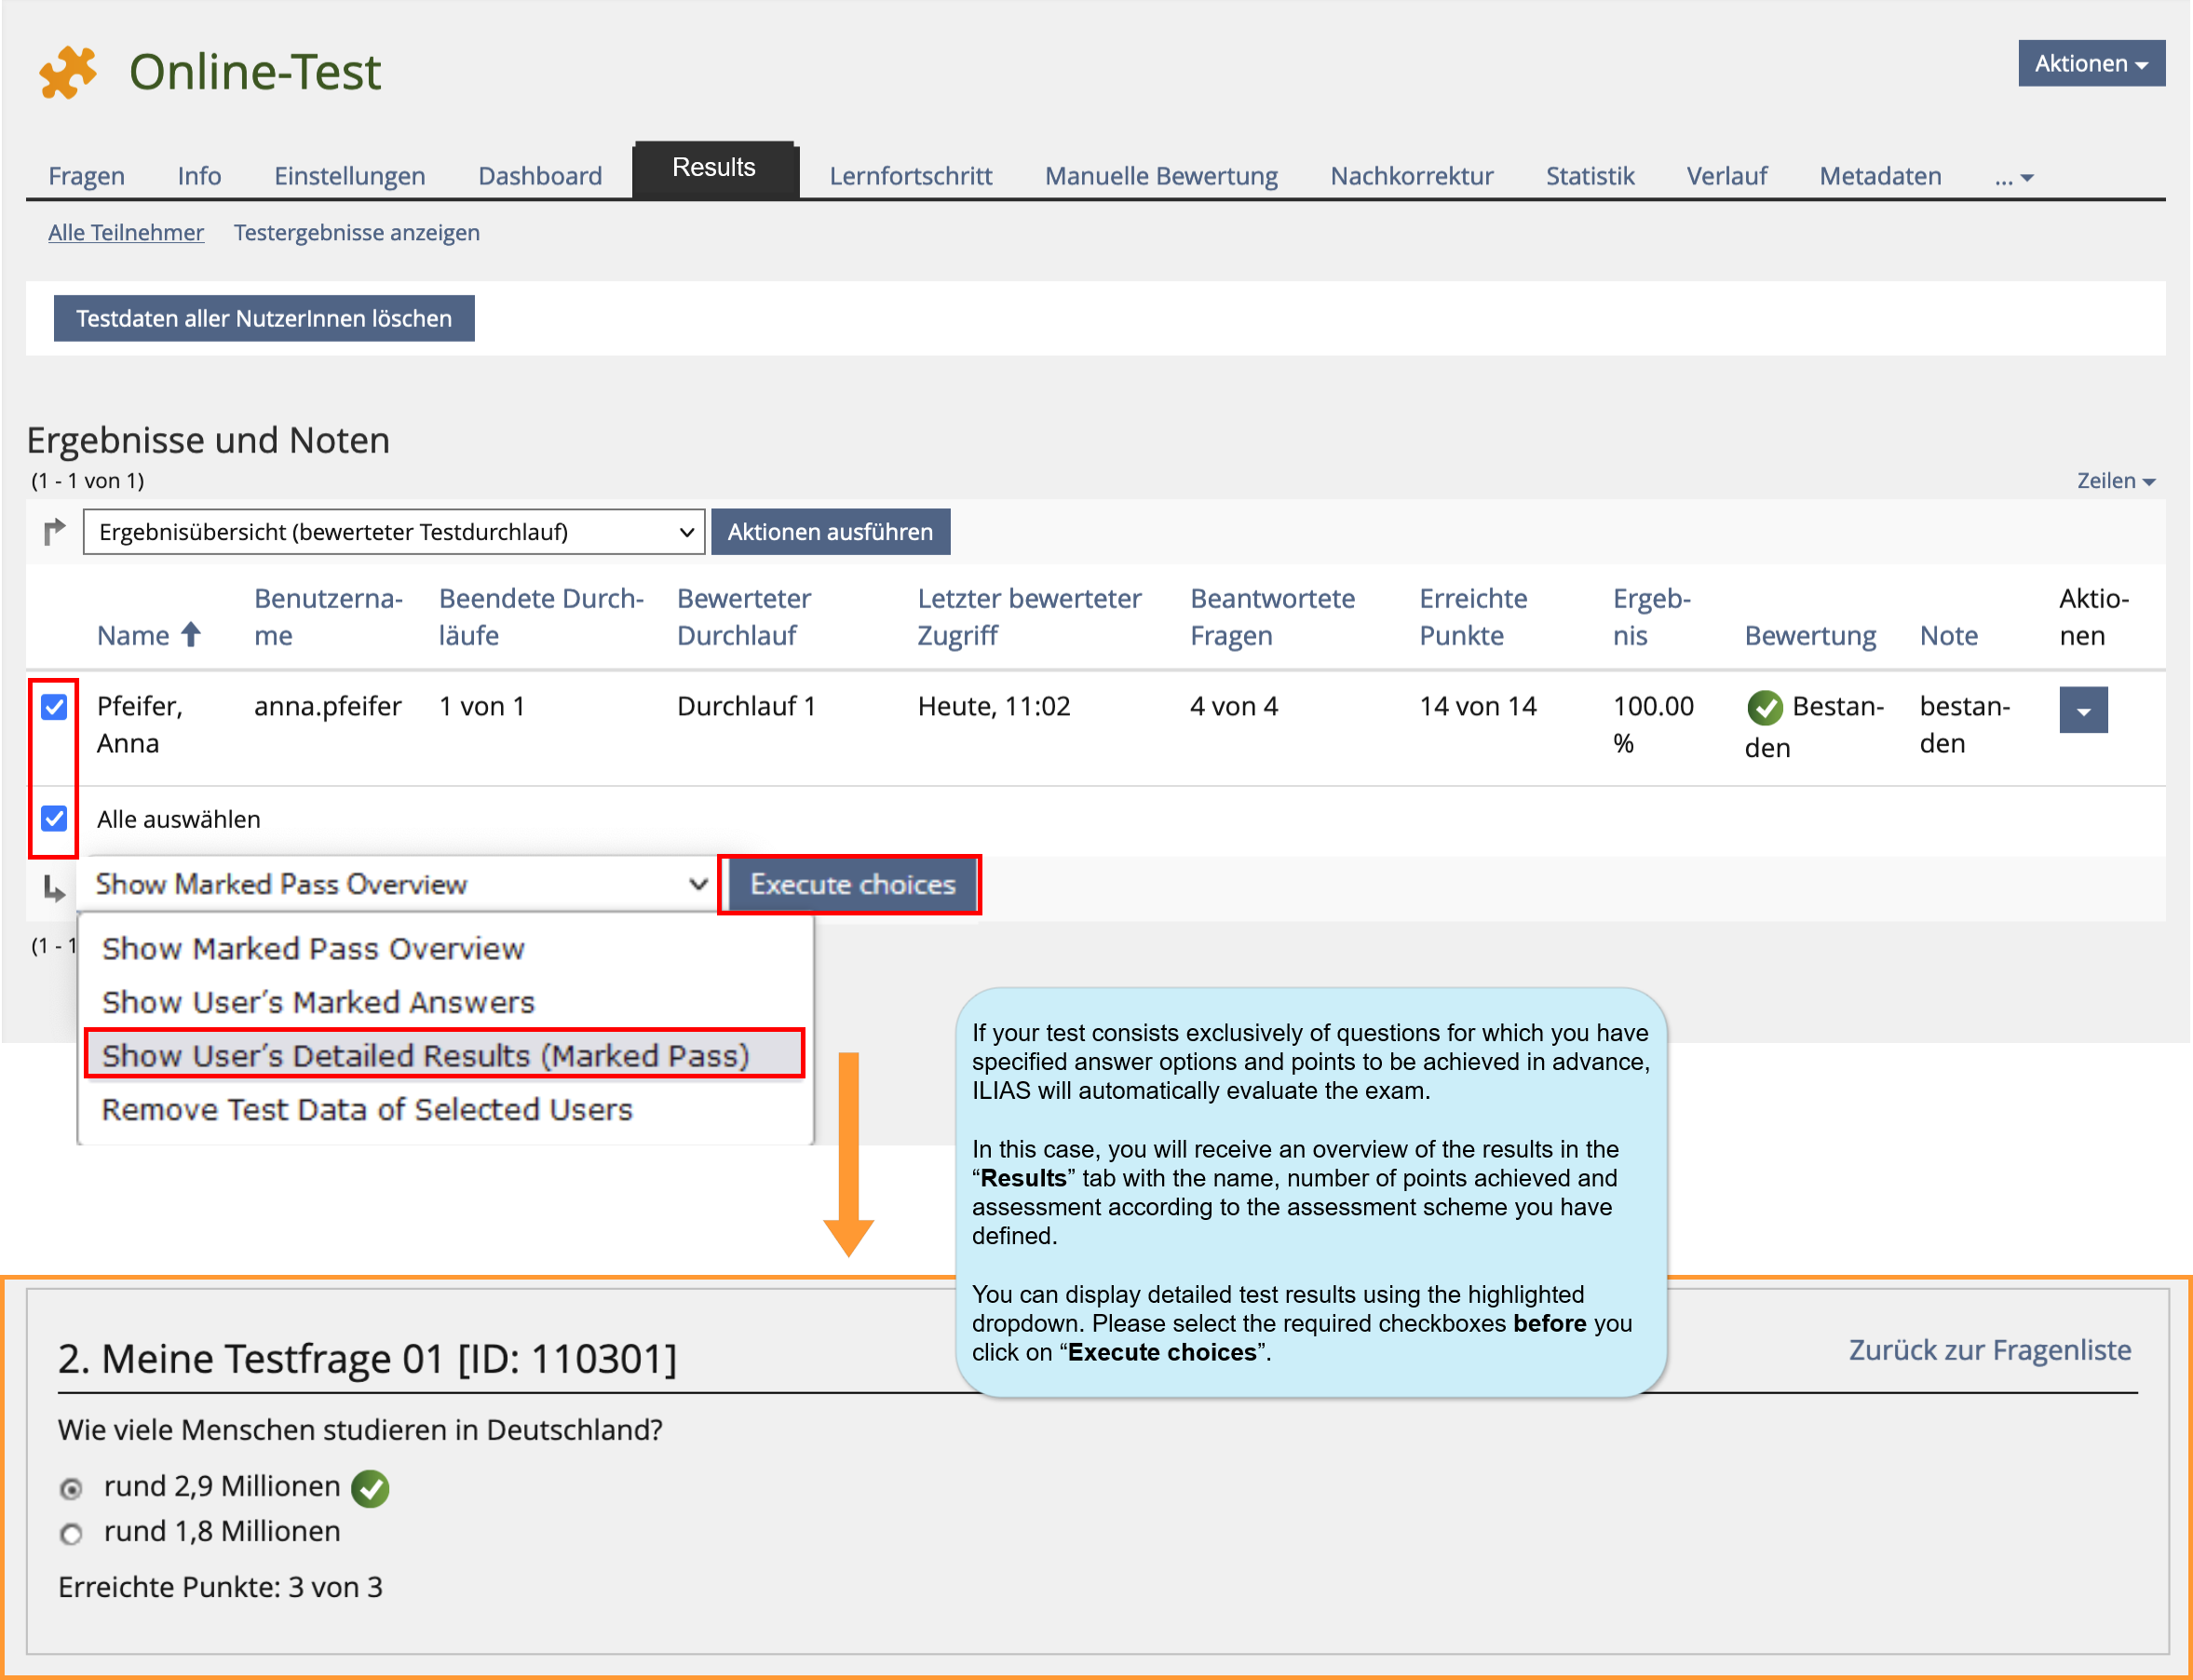
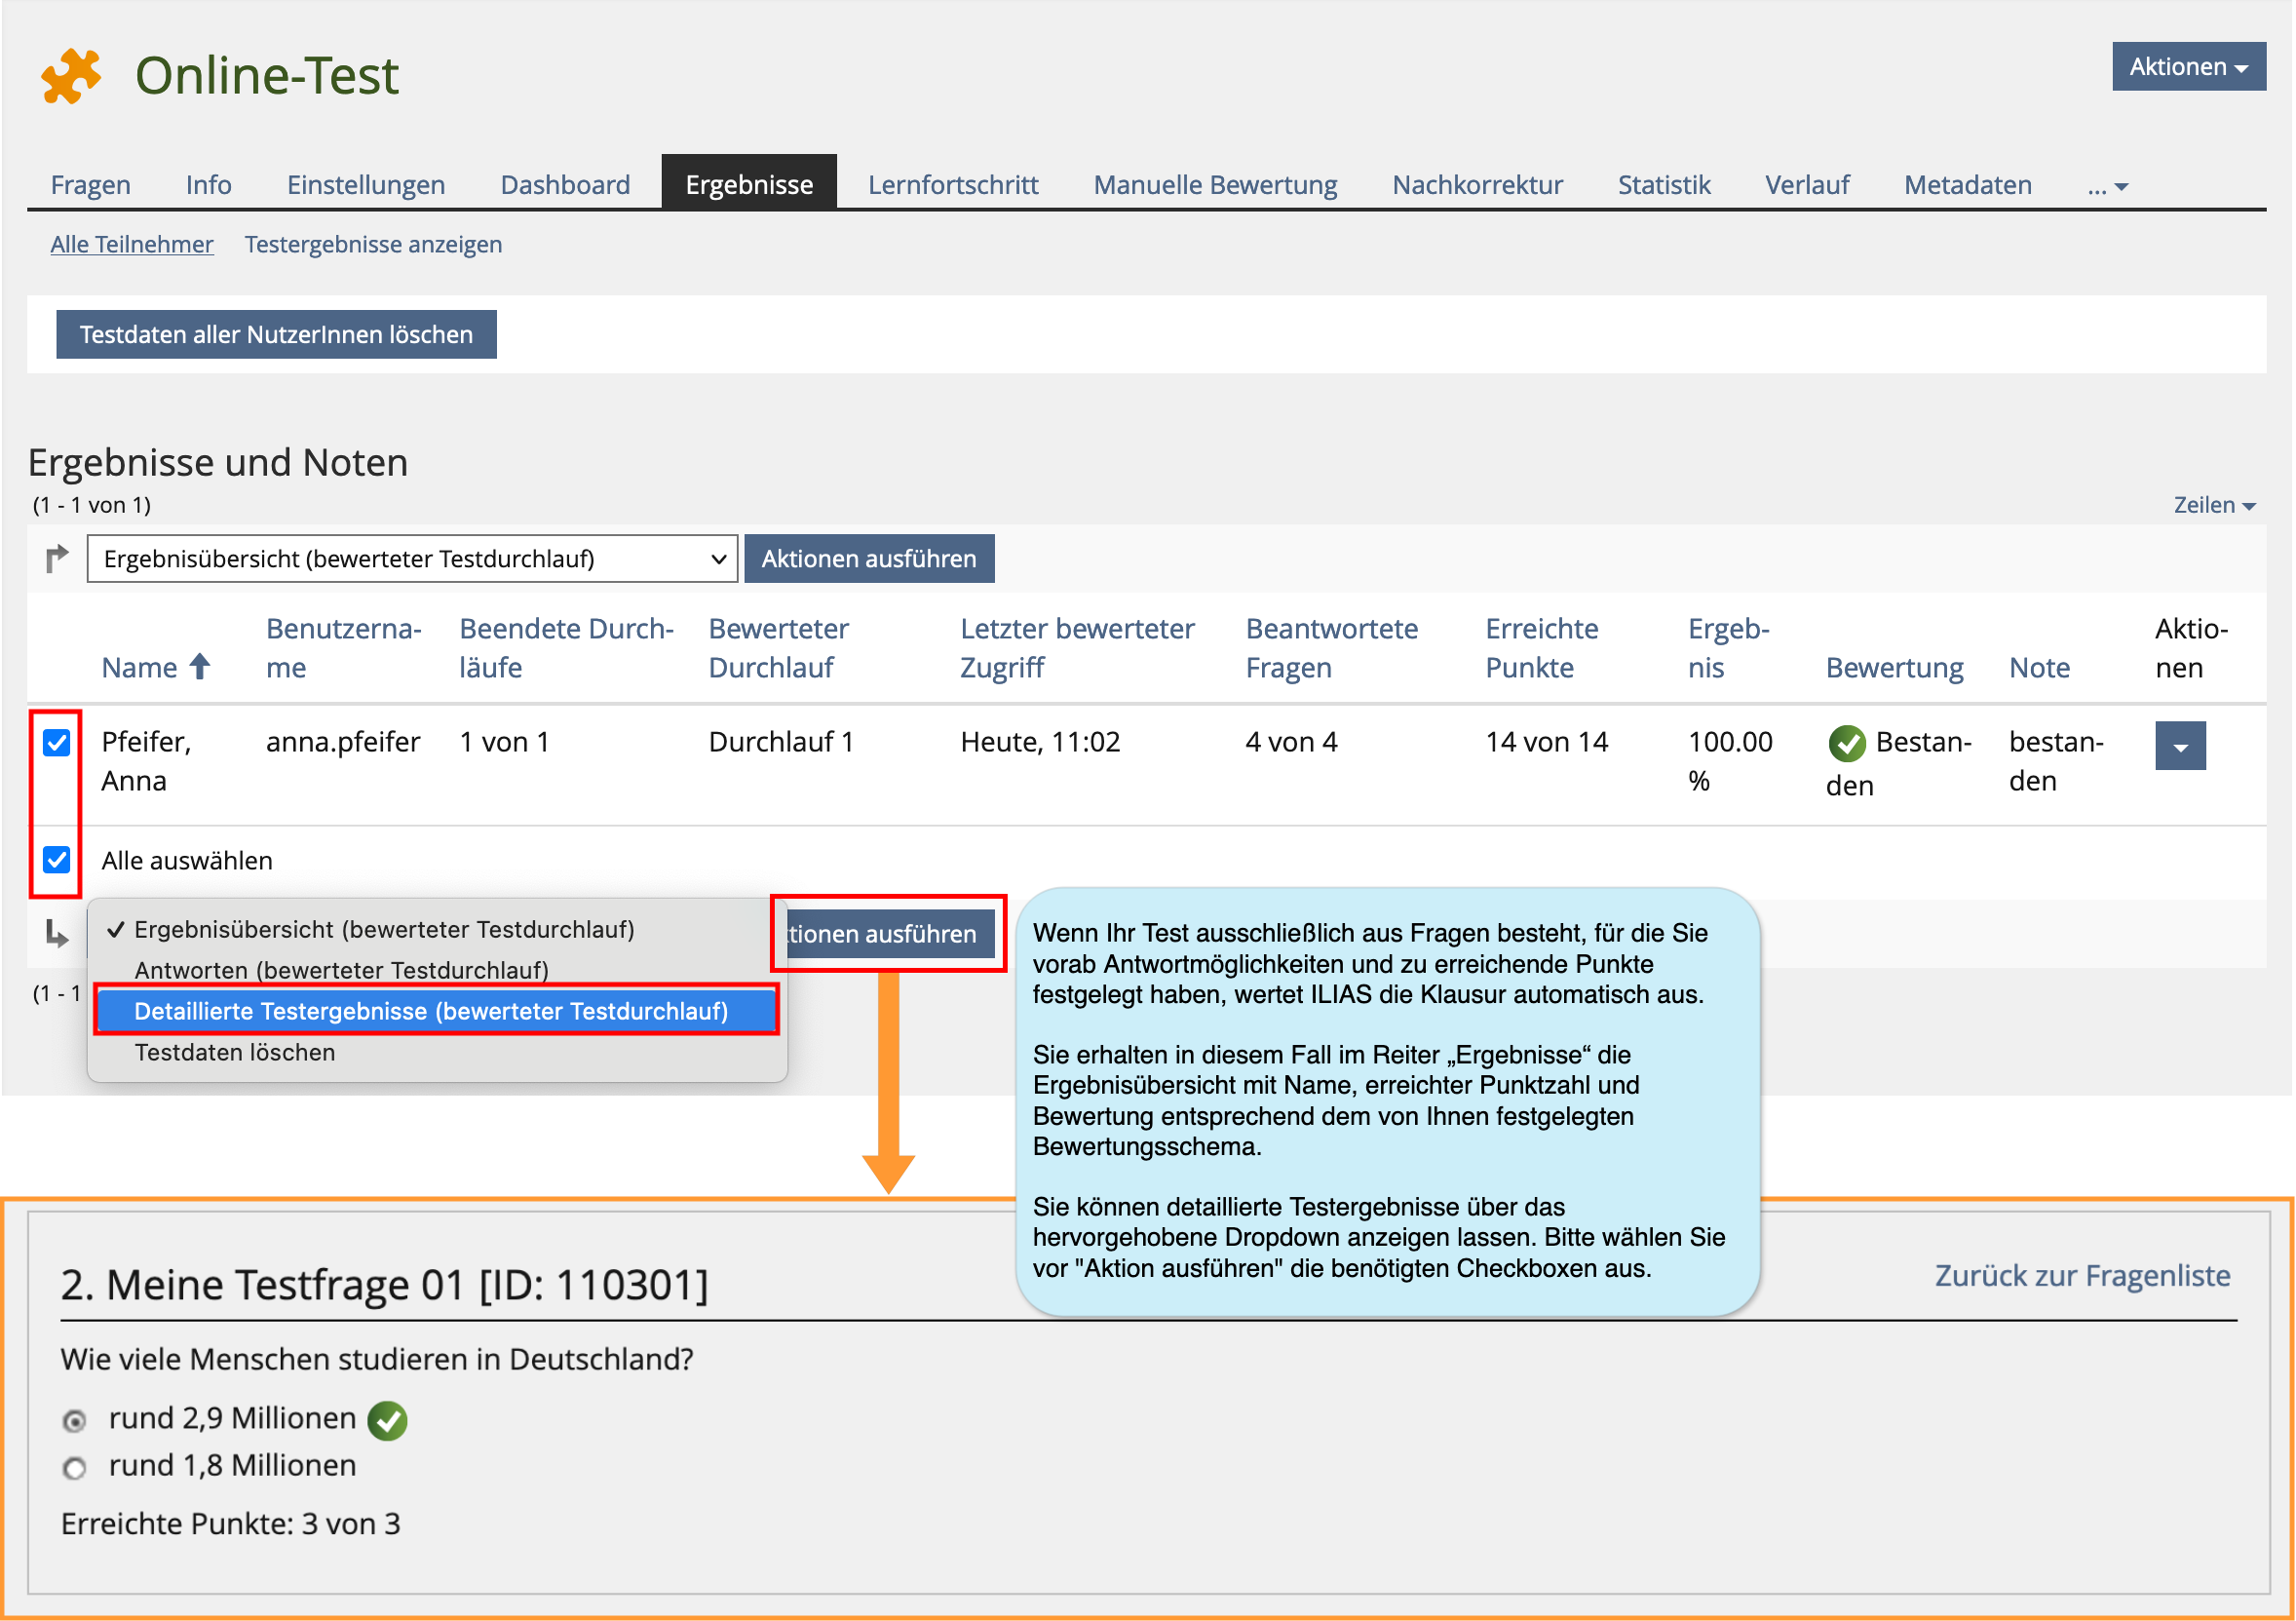
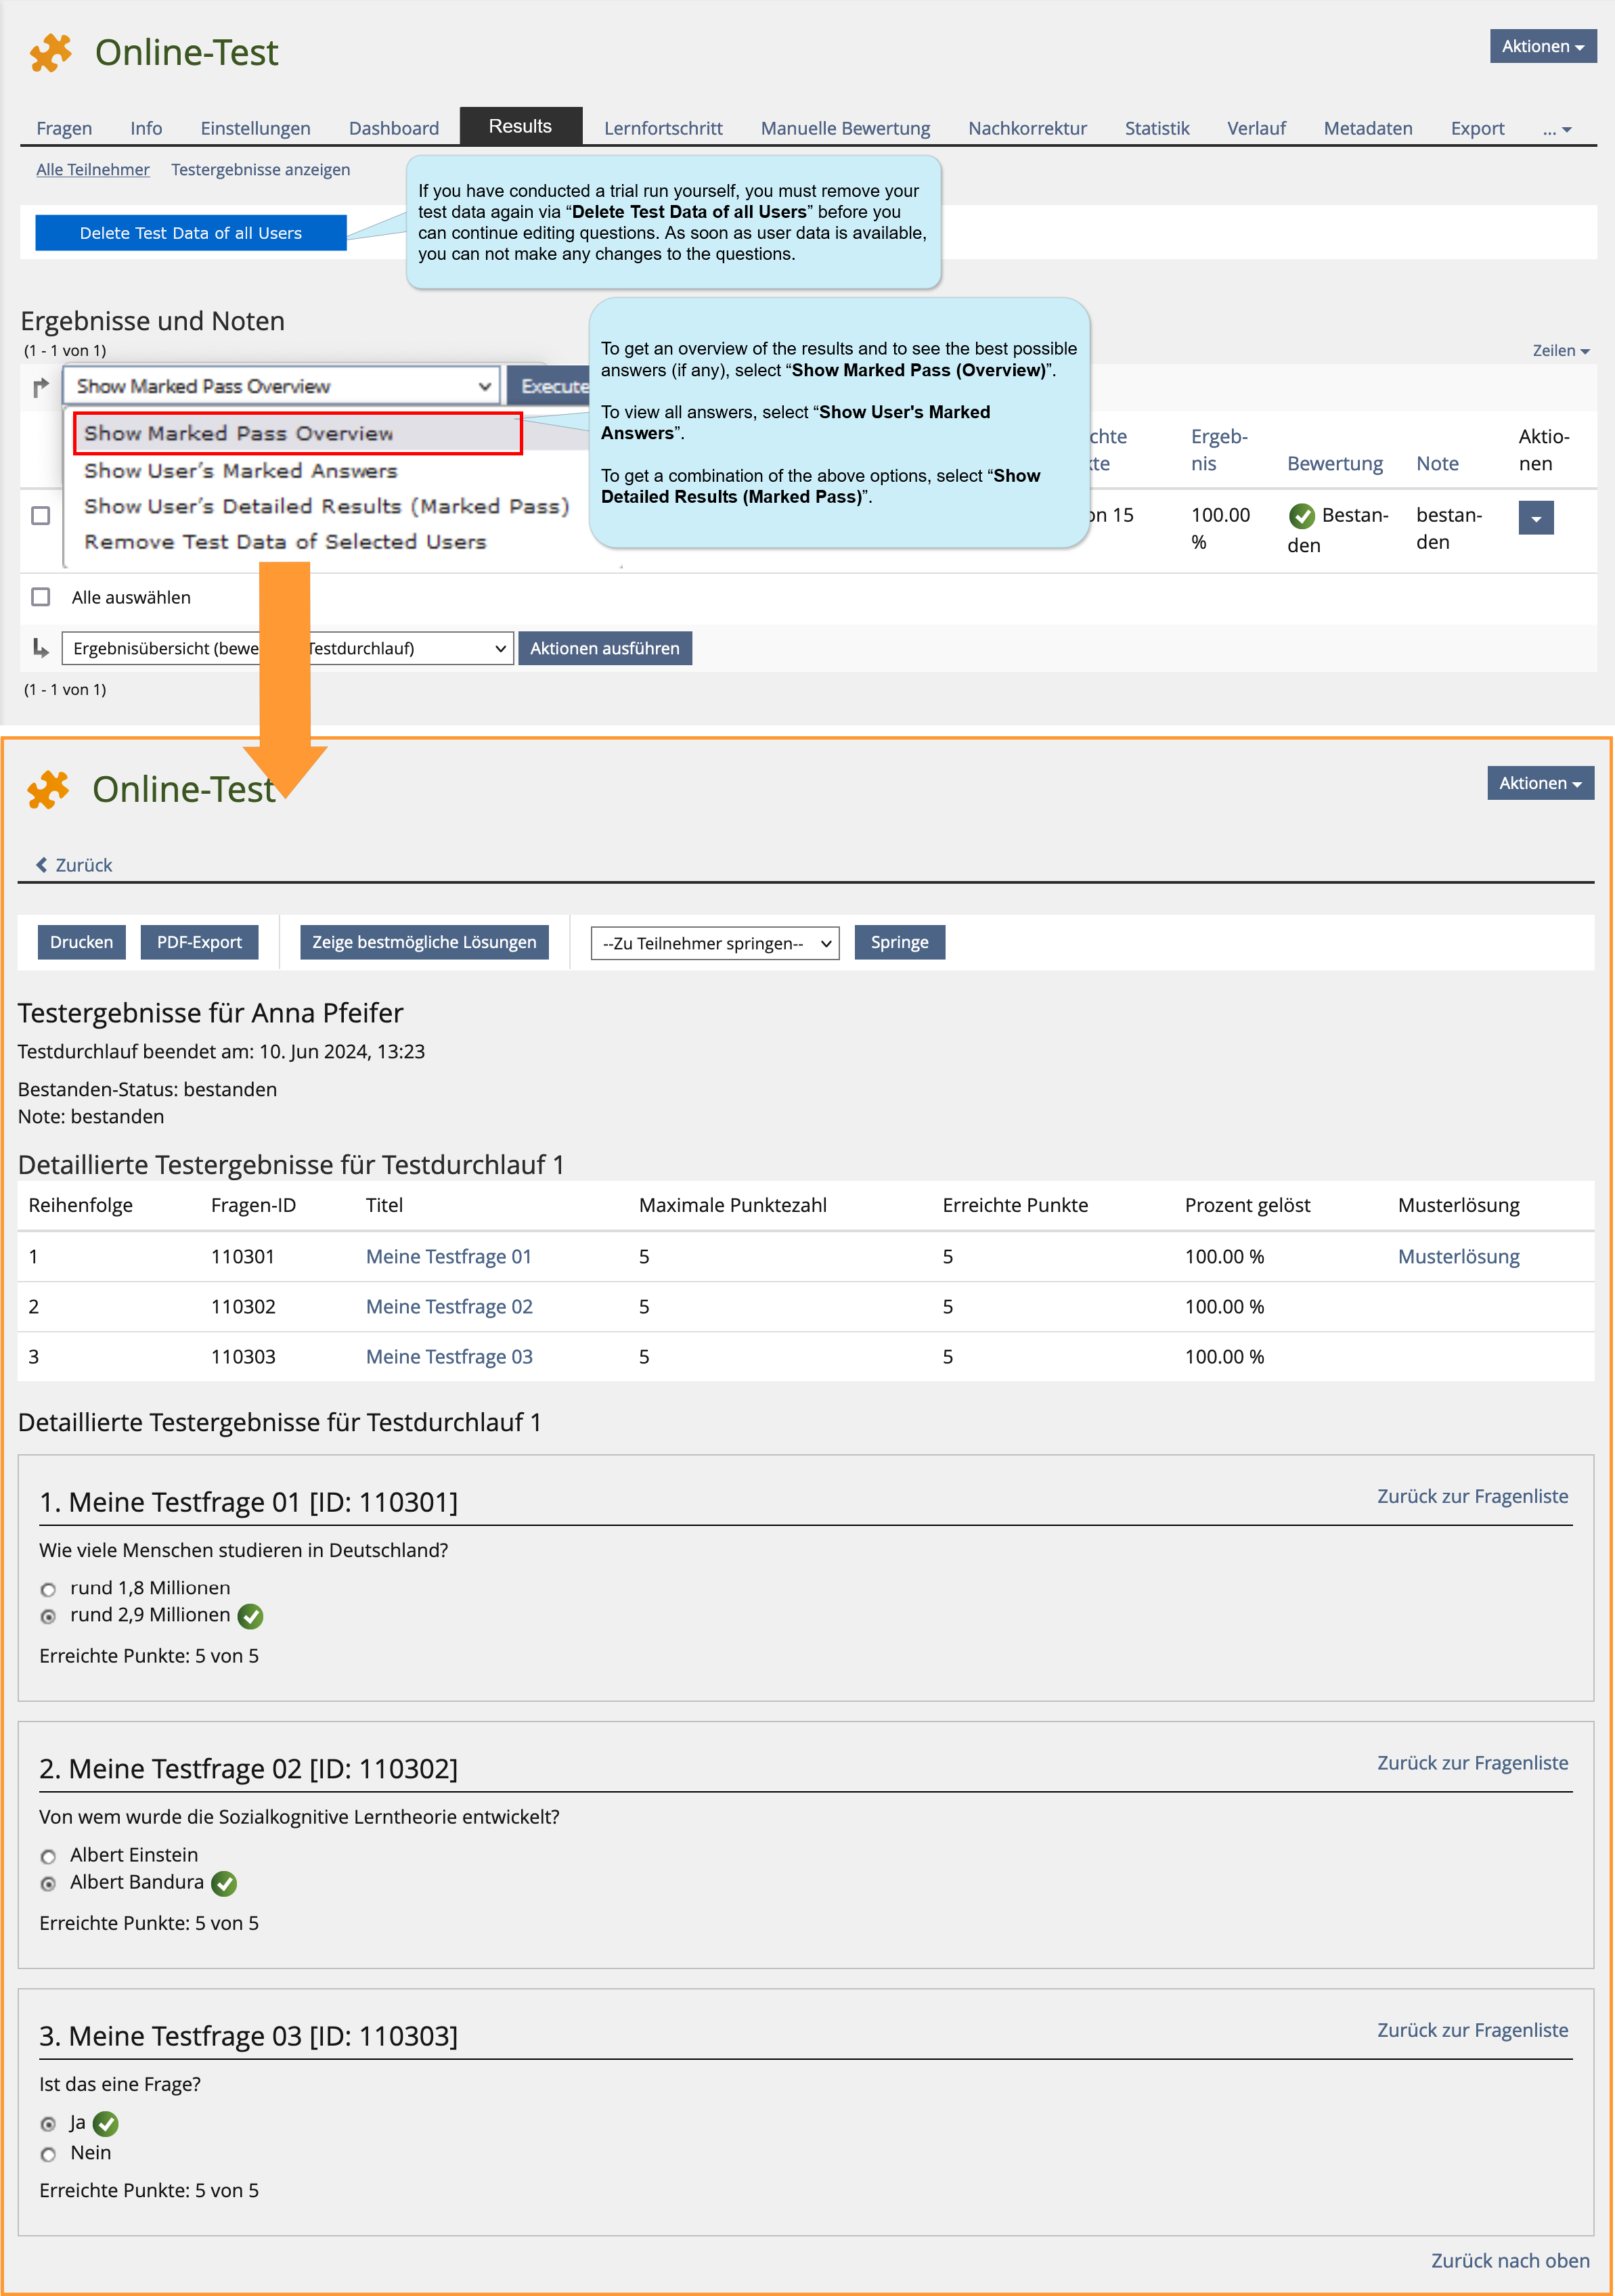
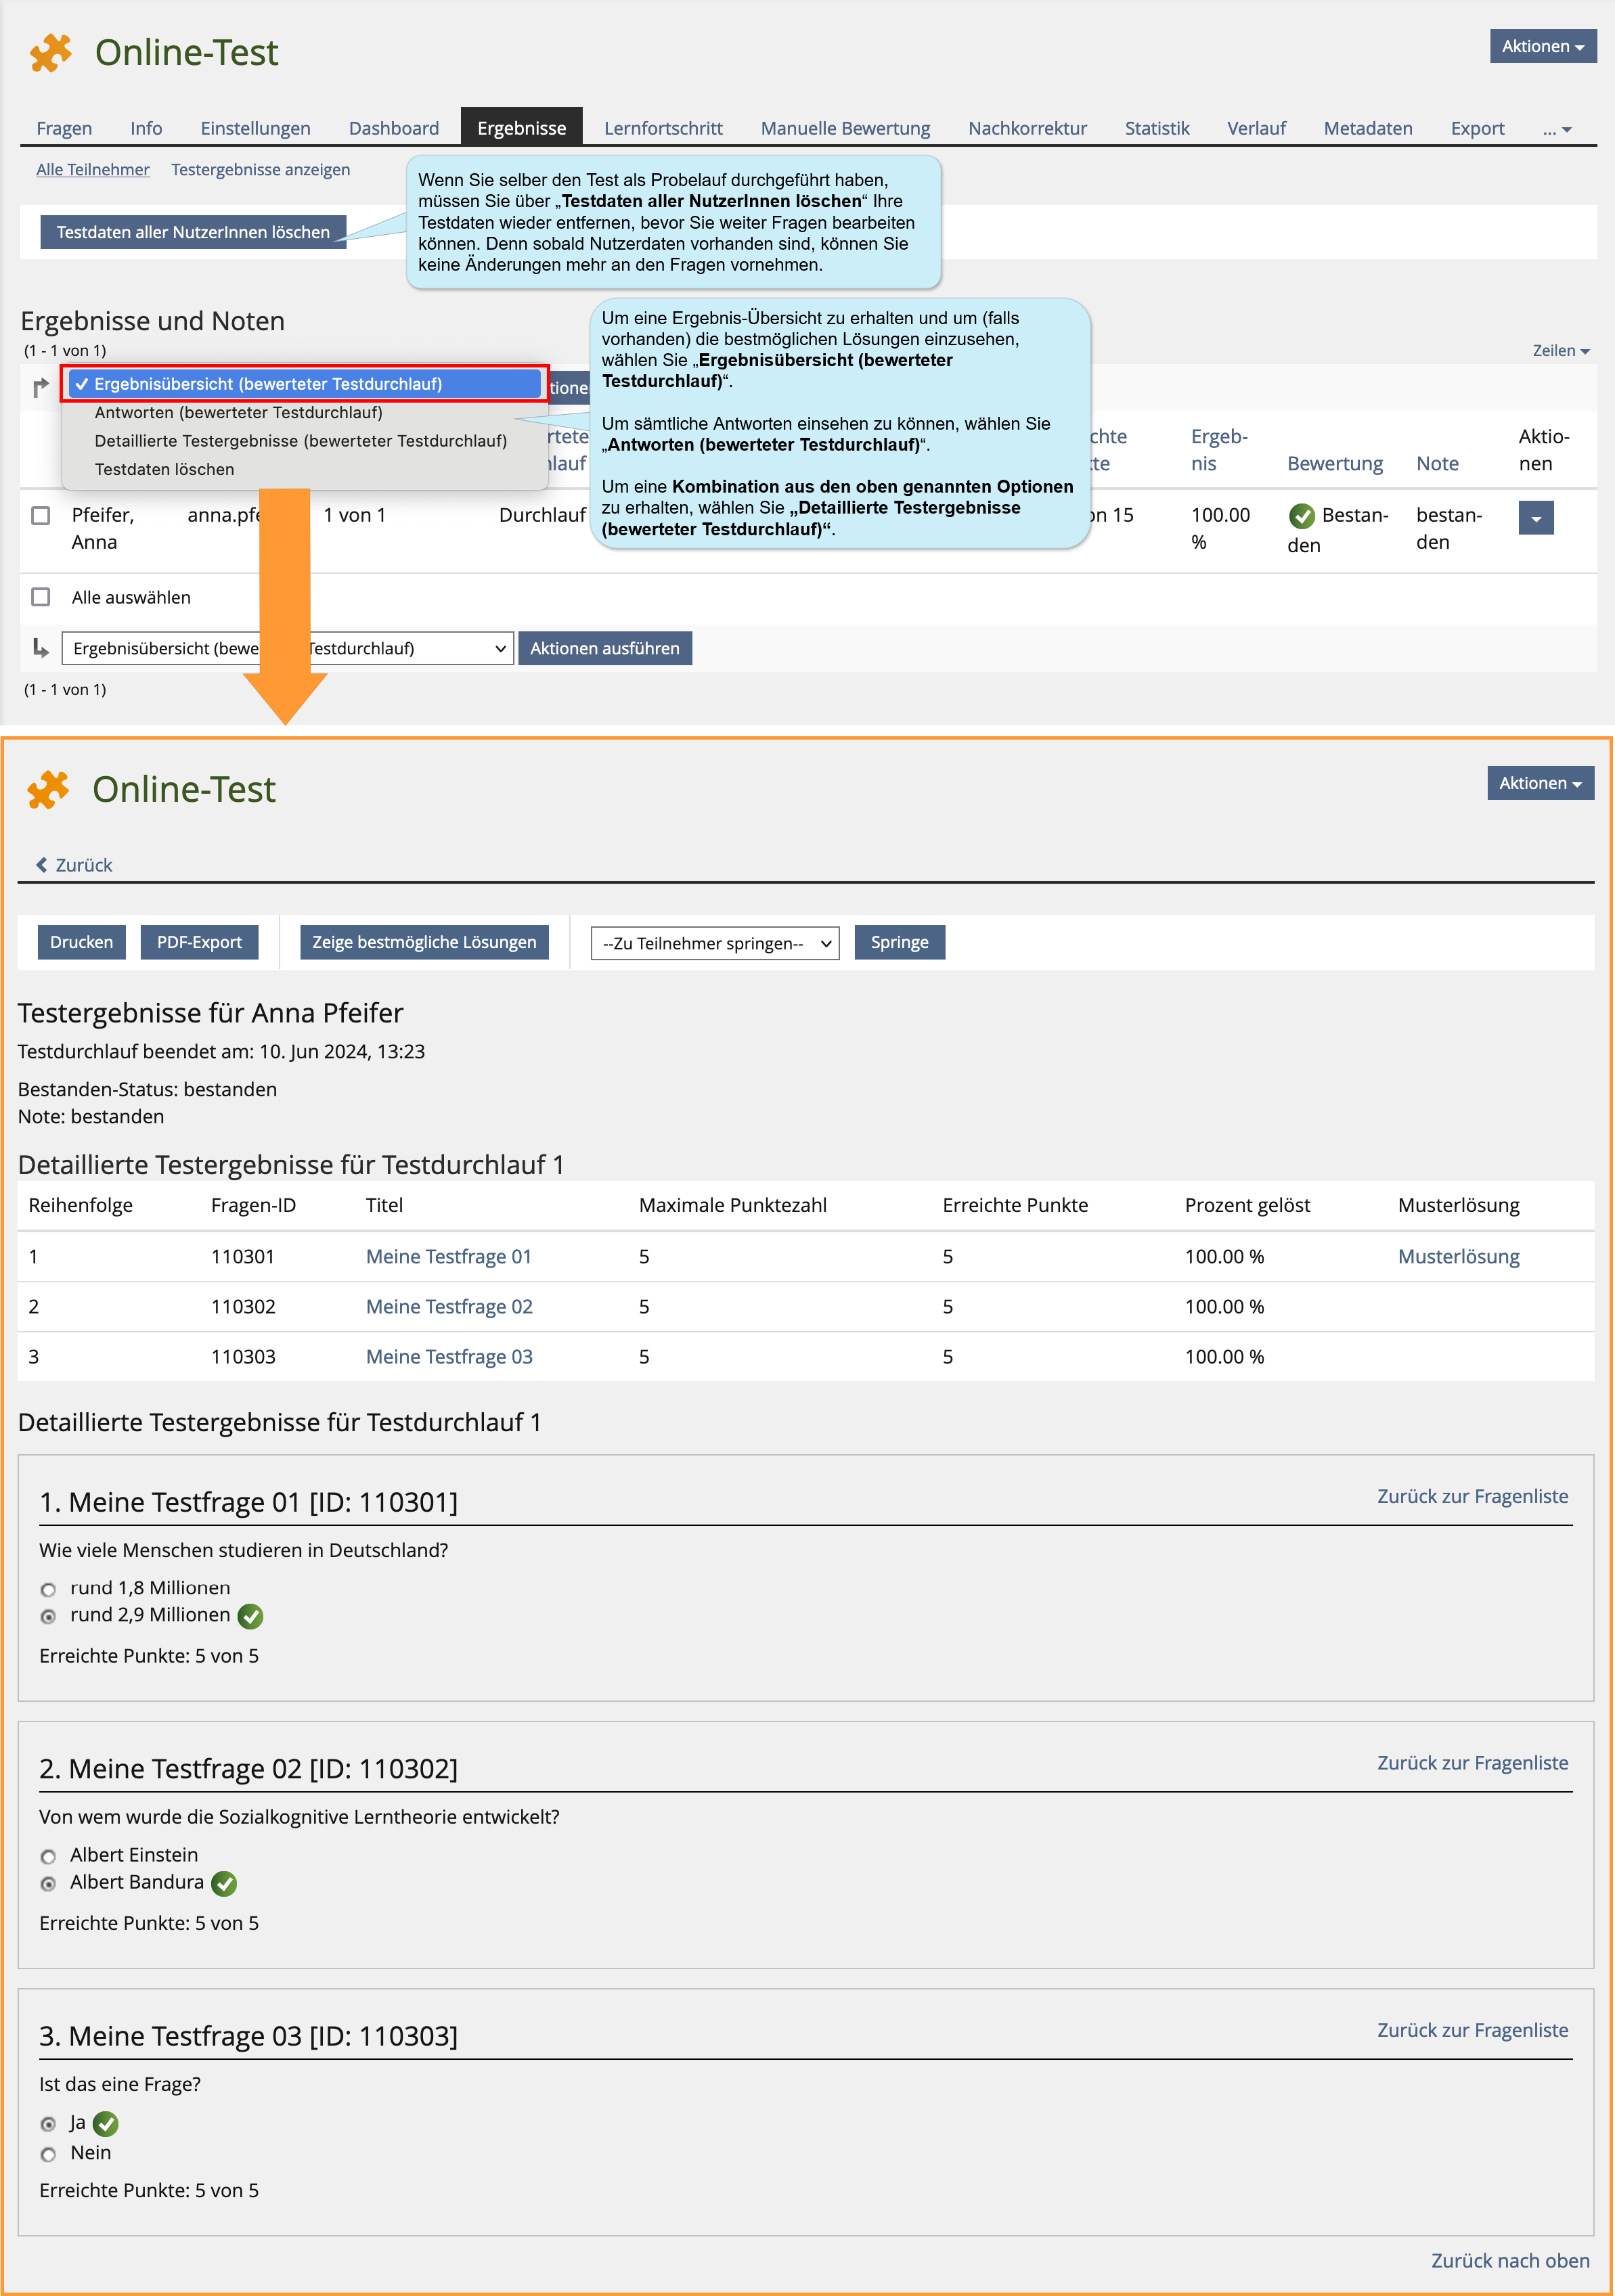
In the “Results” tab, you can view and delete user data from the test. All participants who have started or completed the test are shown in a list. You can access the answers directly via “Show User's Detailed Results” (including the results of unassessed test runs) or choose the two other views available in the drop-down menu:
8.2. Reviewing statistics
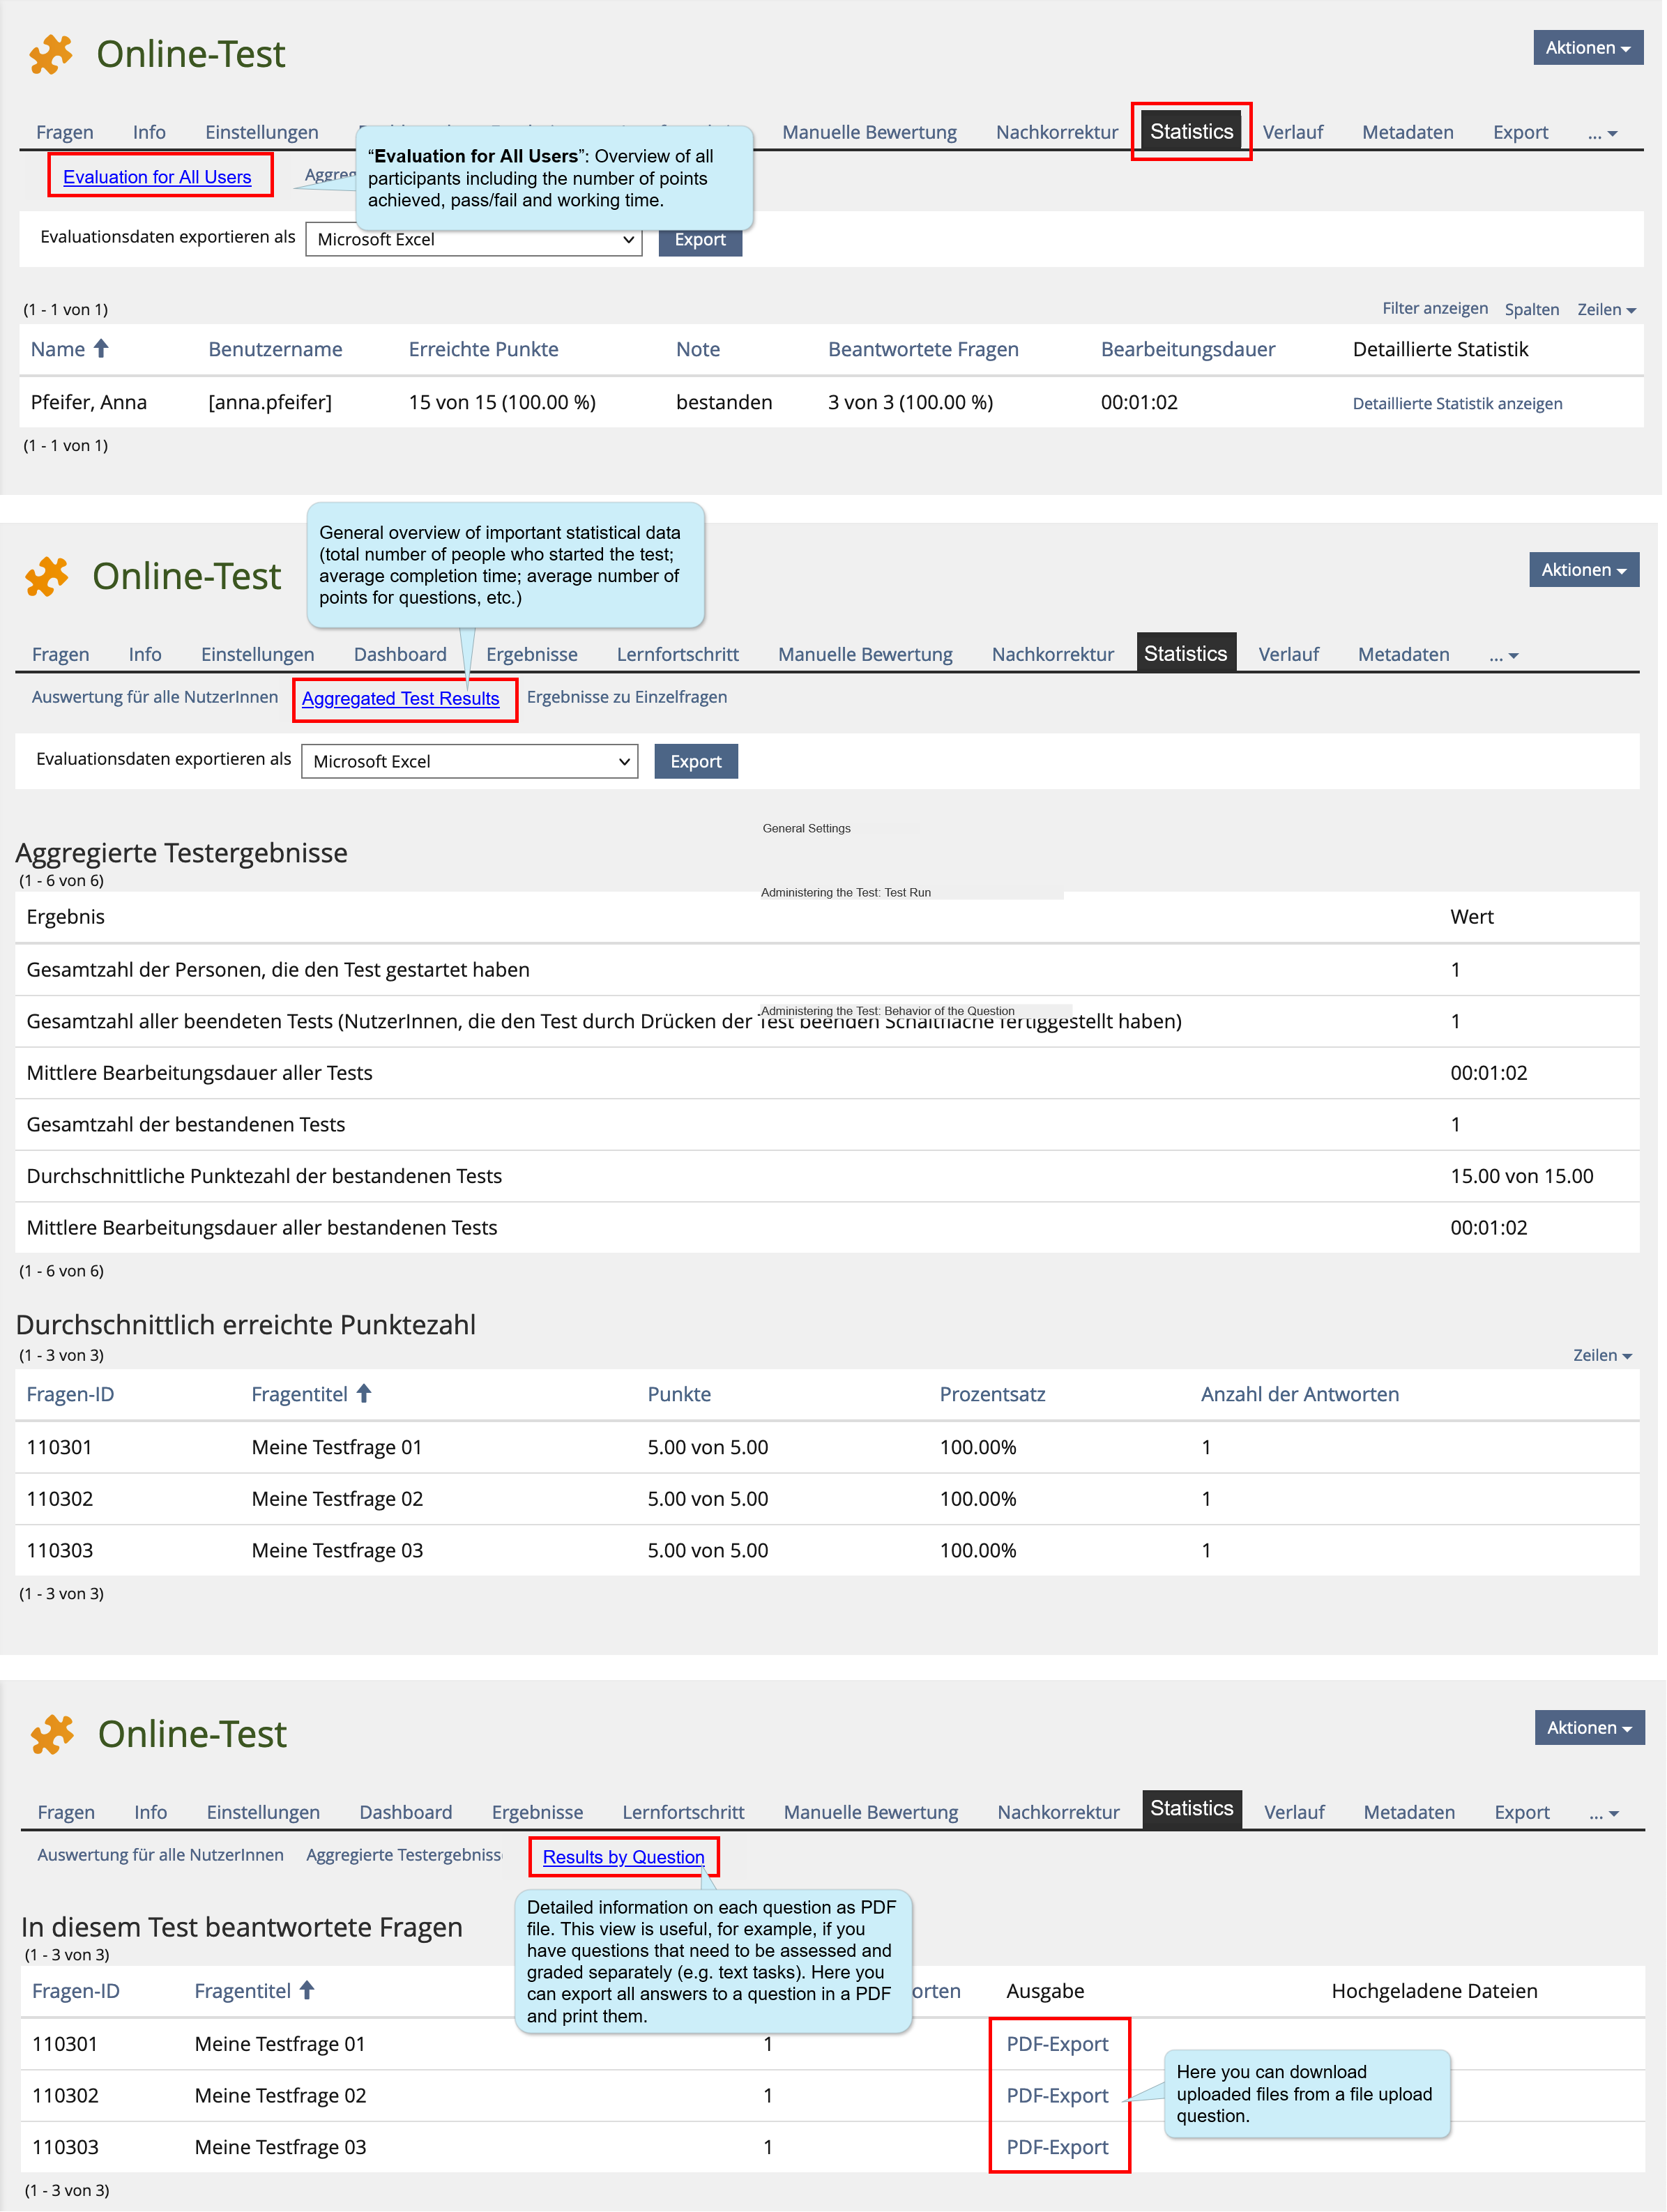
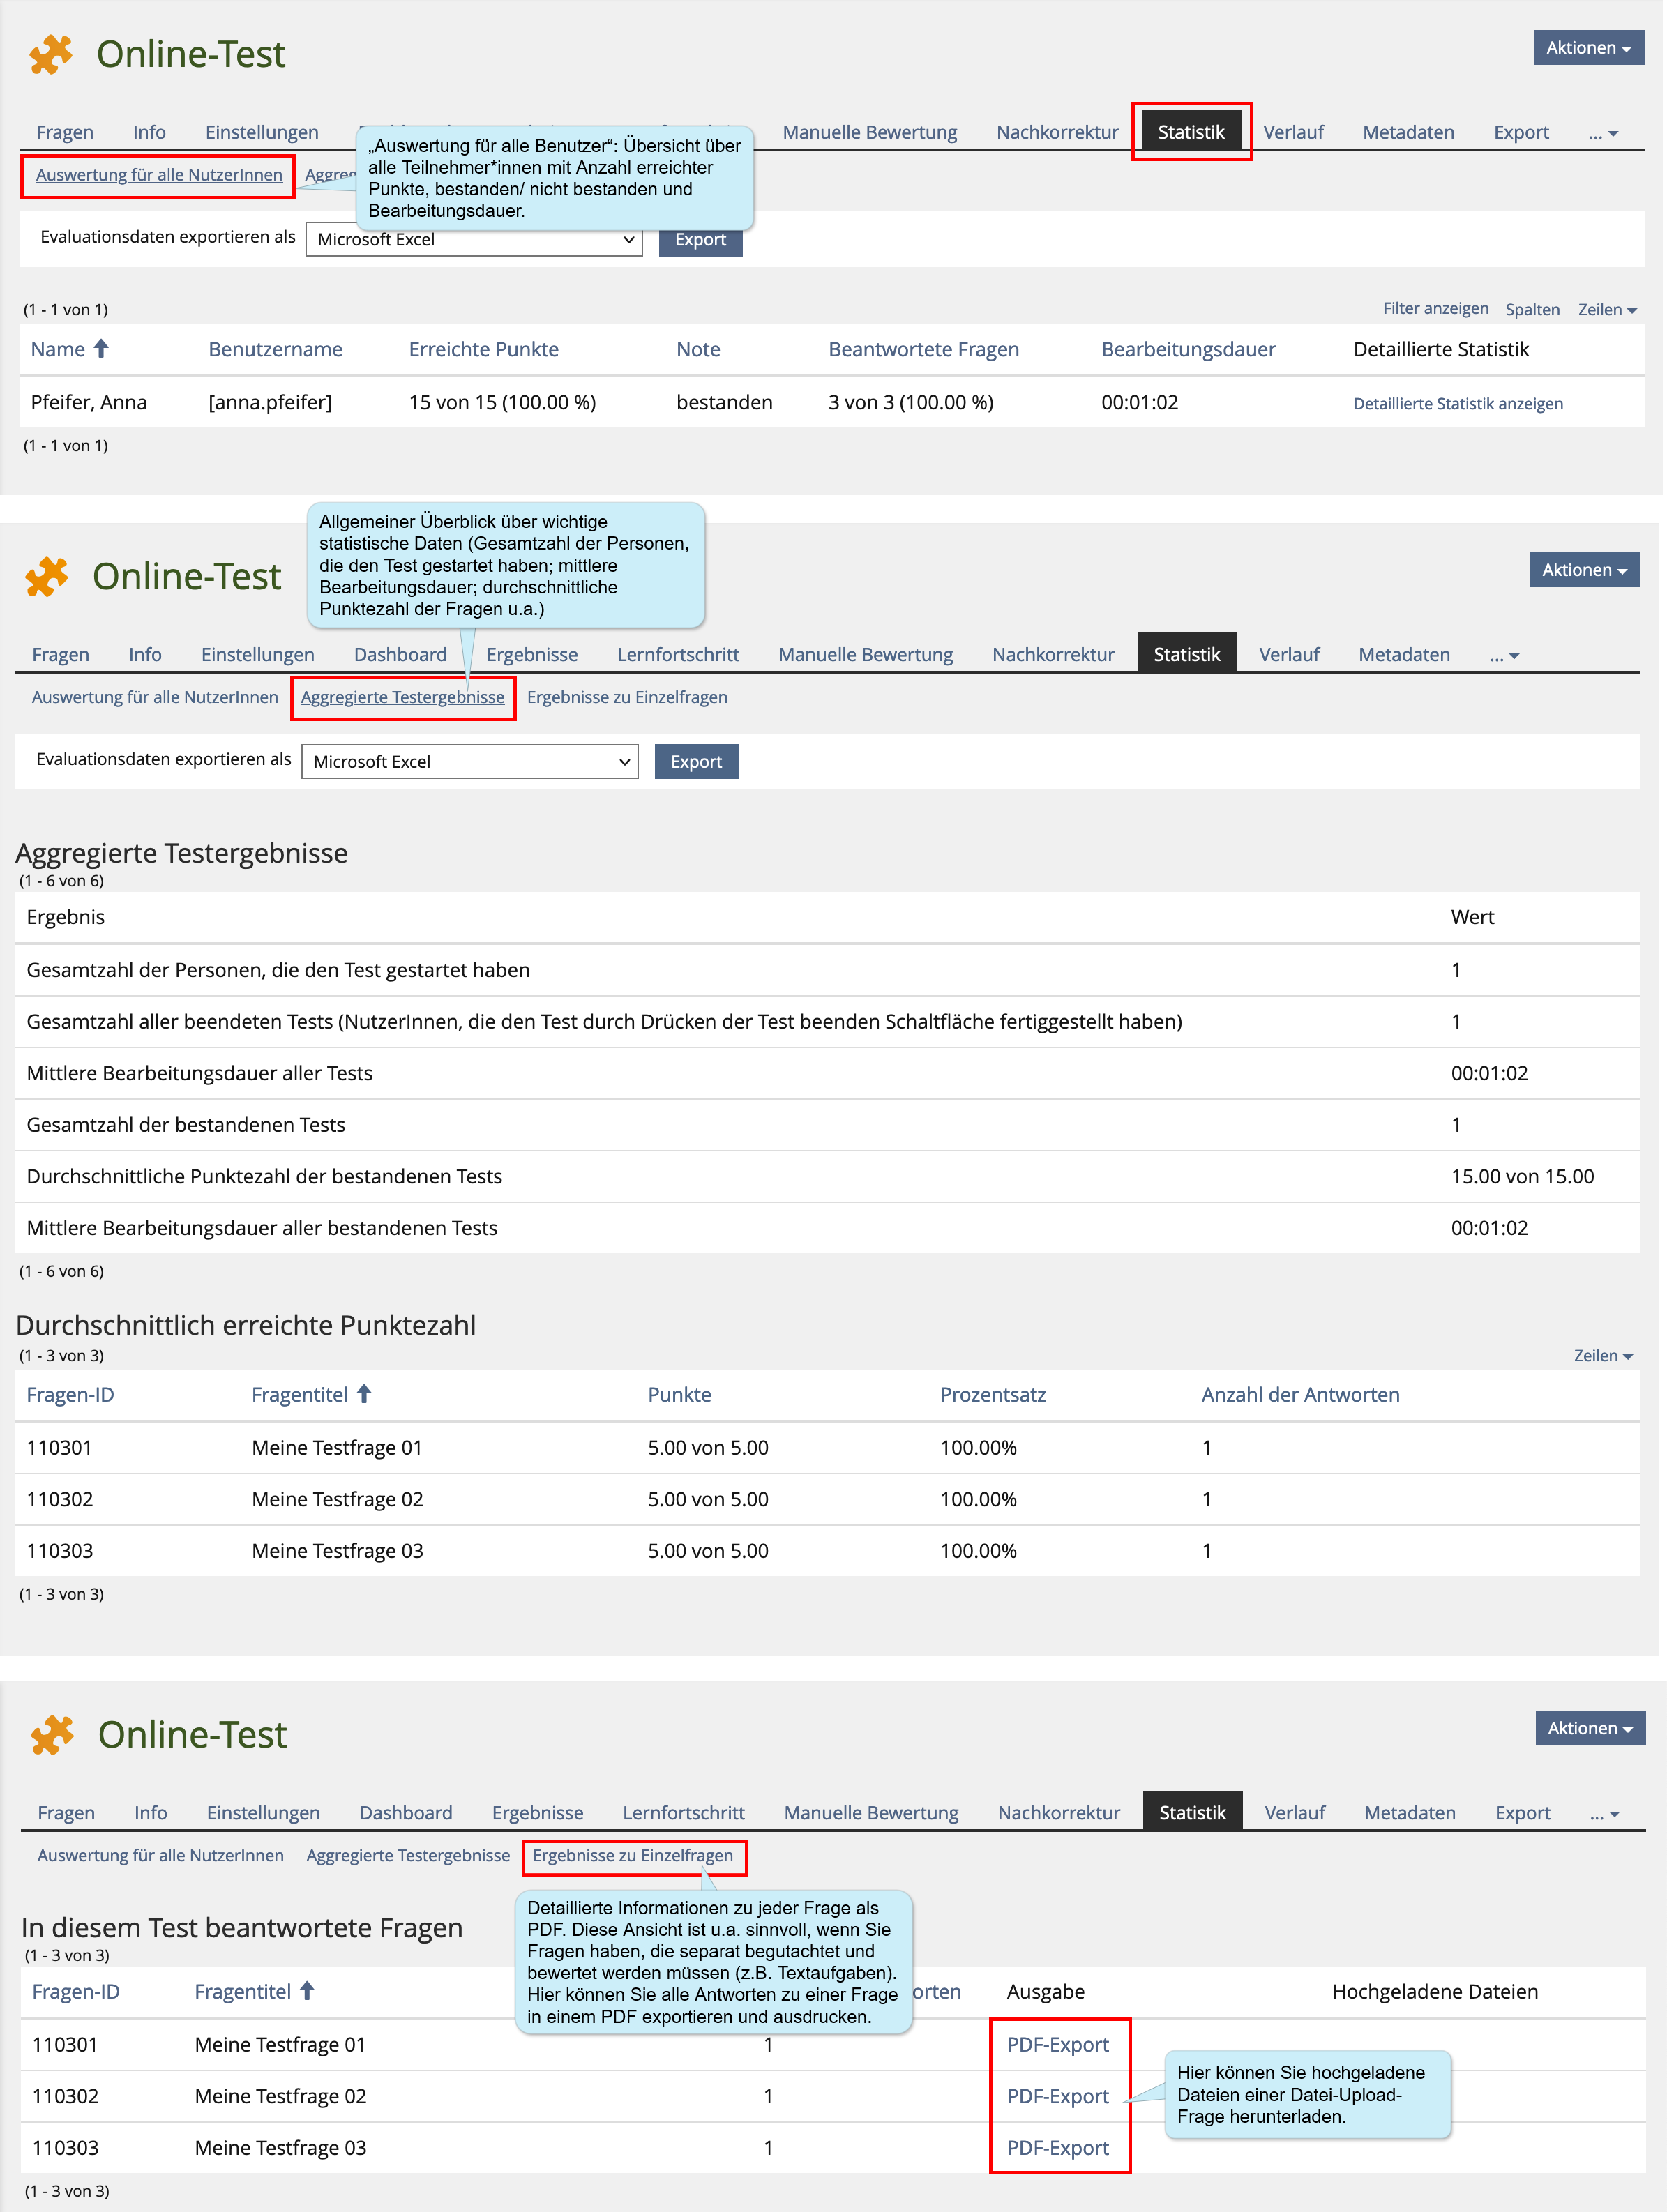
In addition to aggregated results (e.g. grade point average), the “Statistics” tab also provides individual data for each participant.
You can export the displayed results to Excel or CSV format (comma-separated values).
8.3. Exporting a result file
In the “Export” tab, you have the option of creating export files and then downloading them.
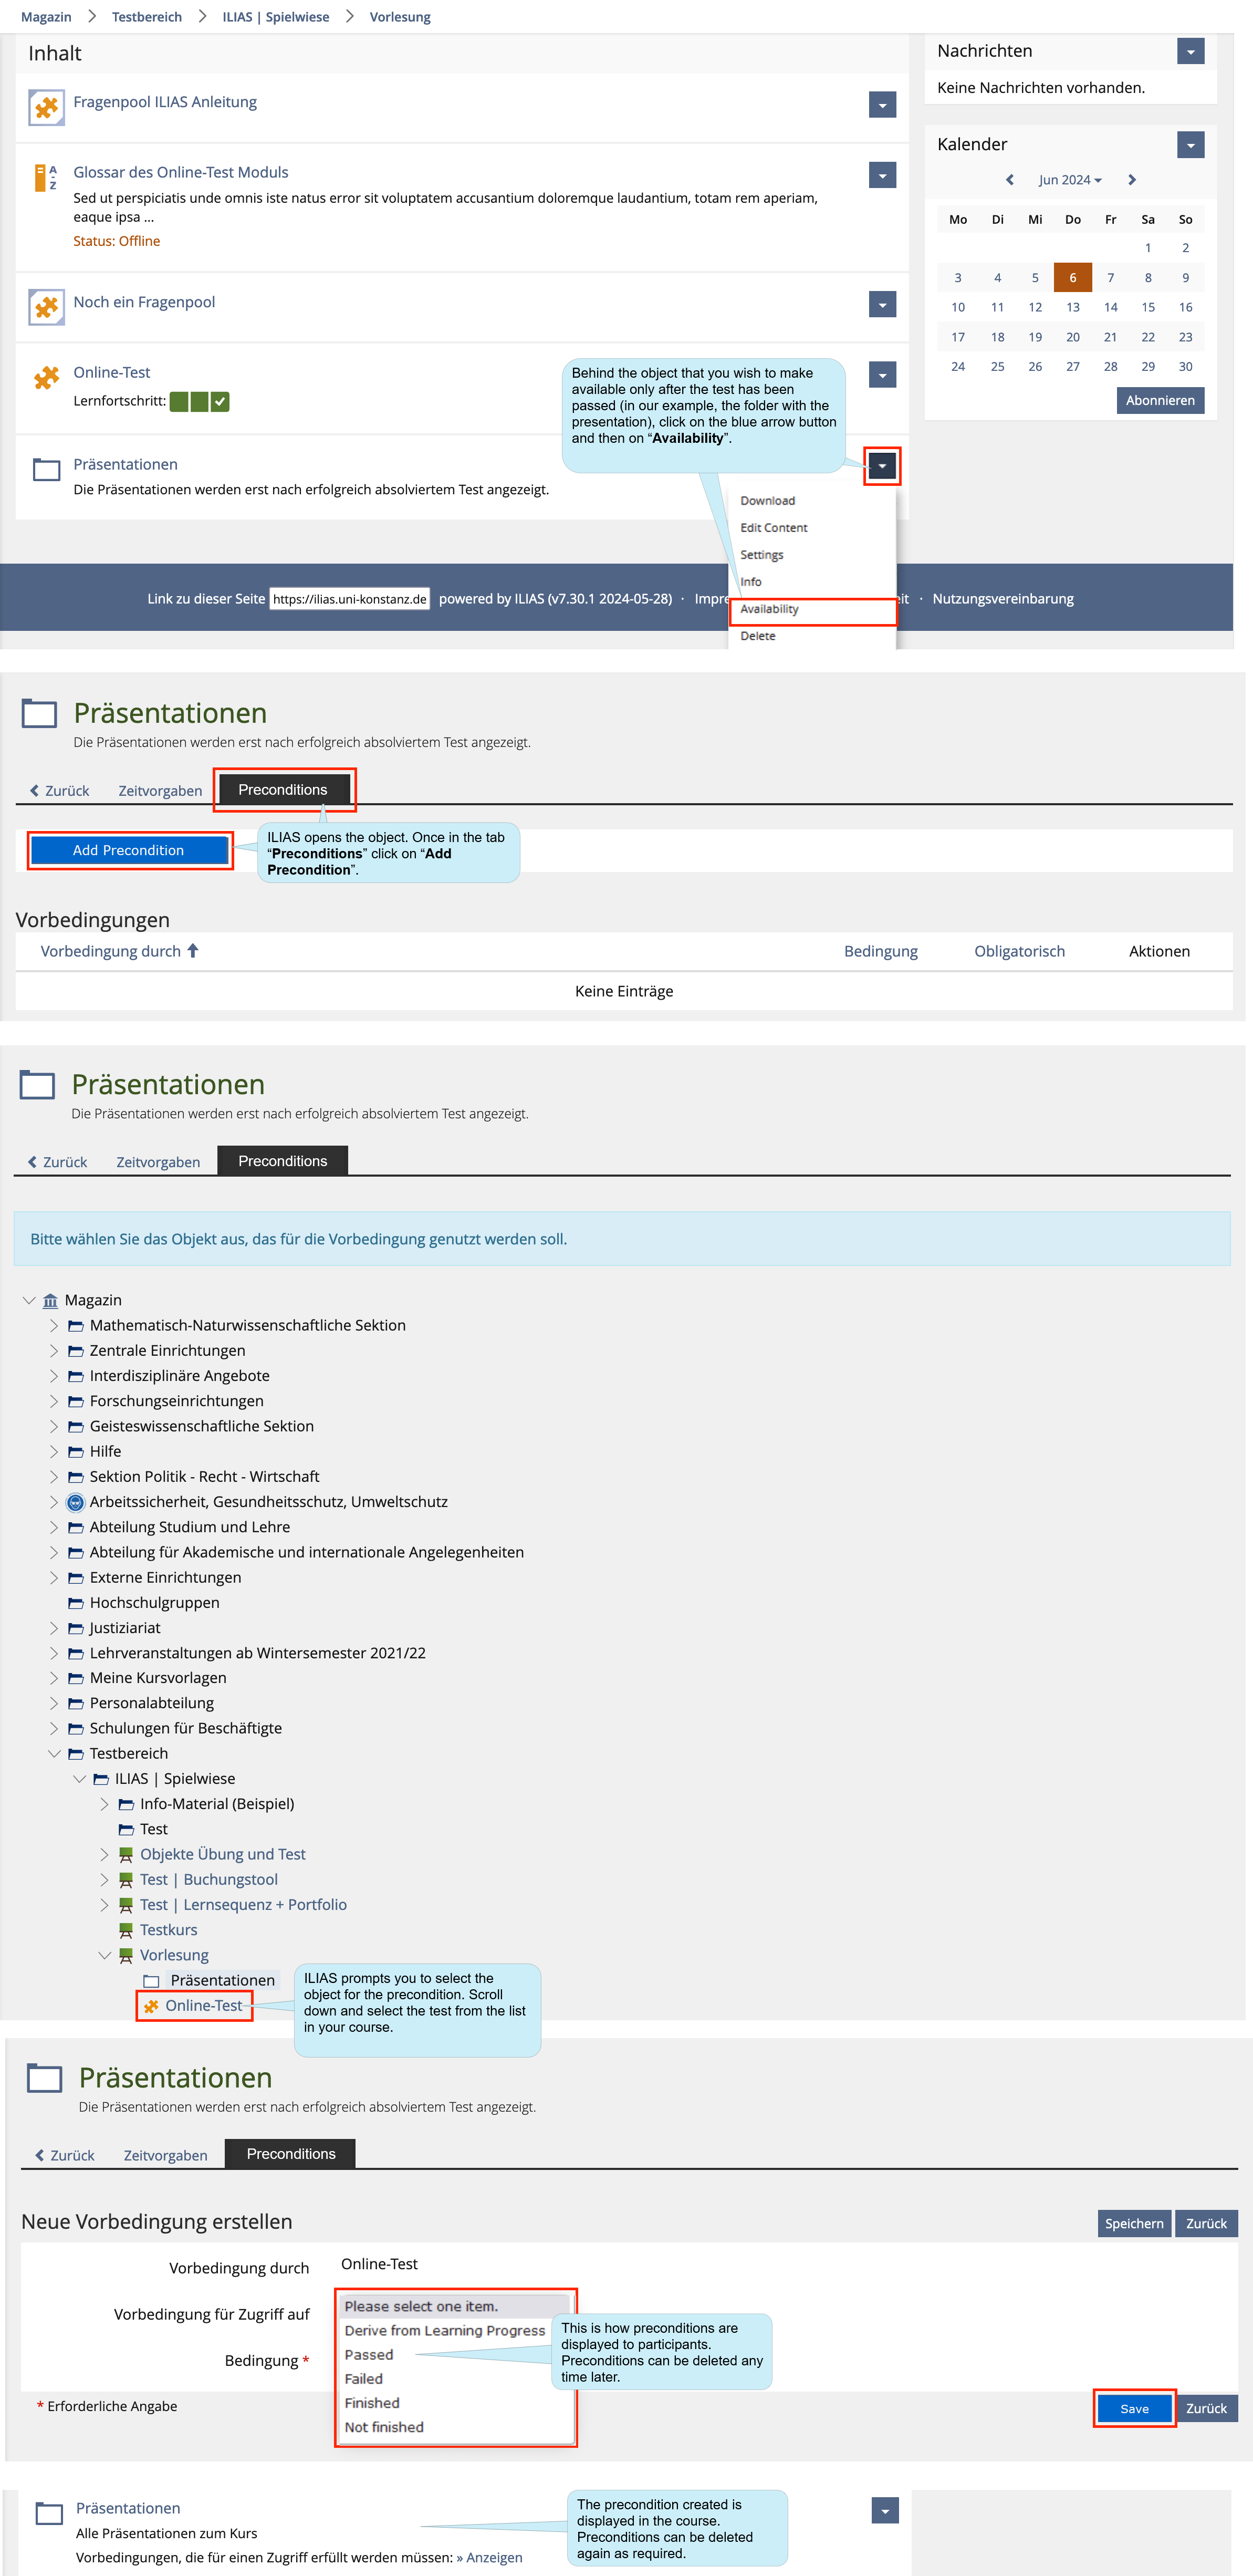
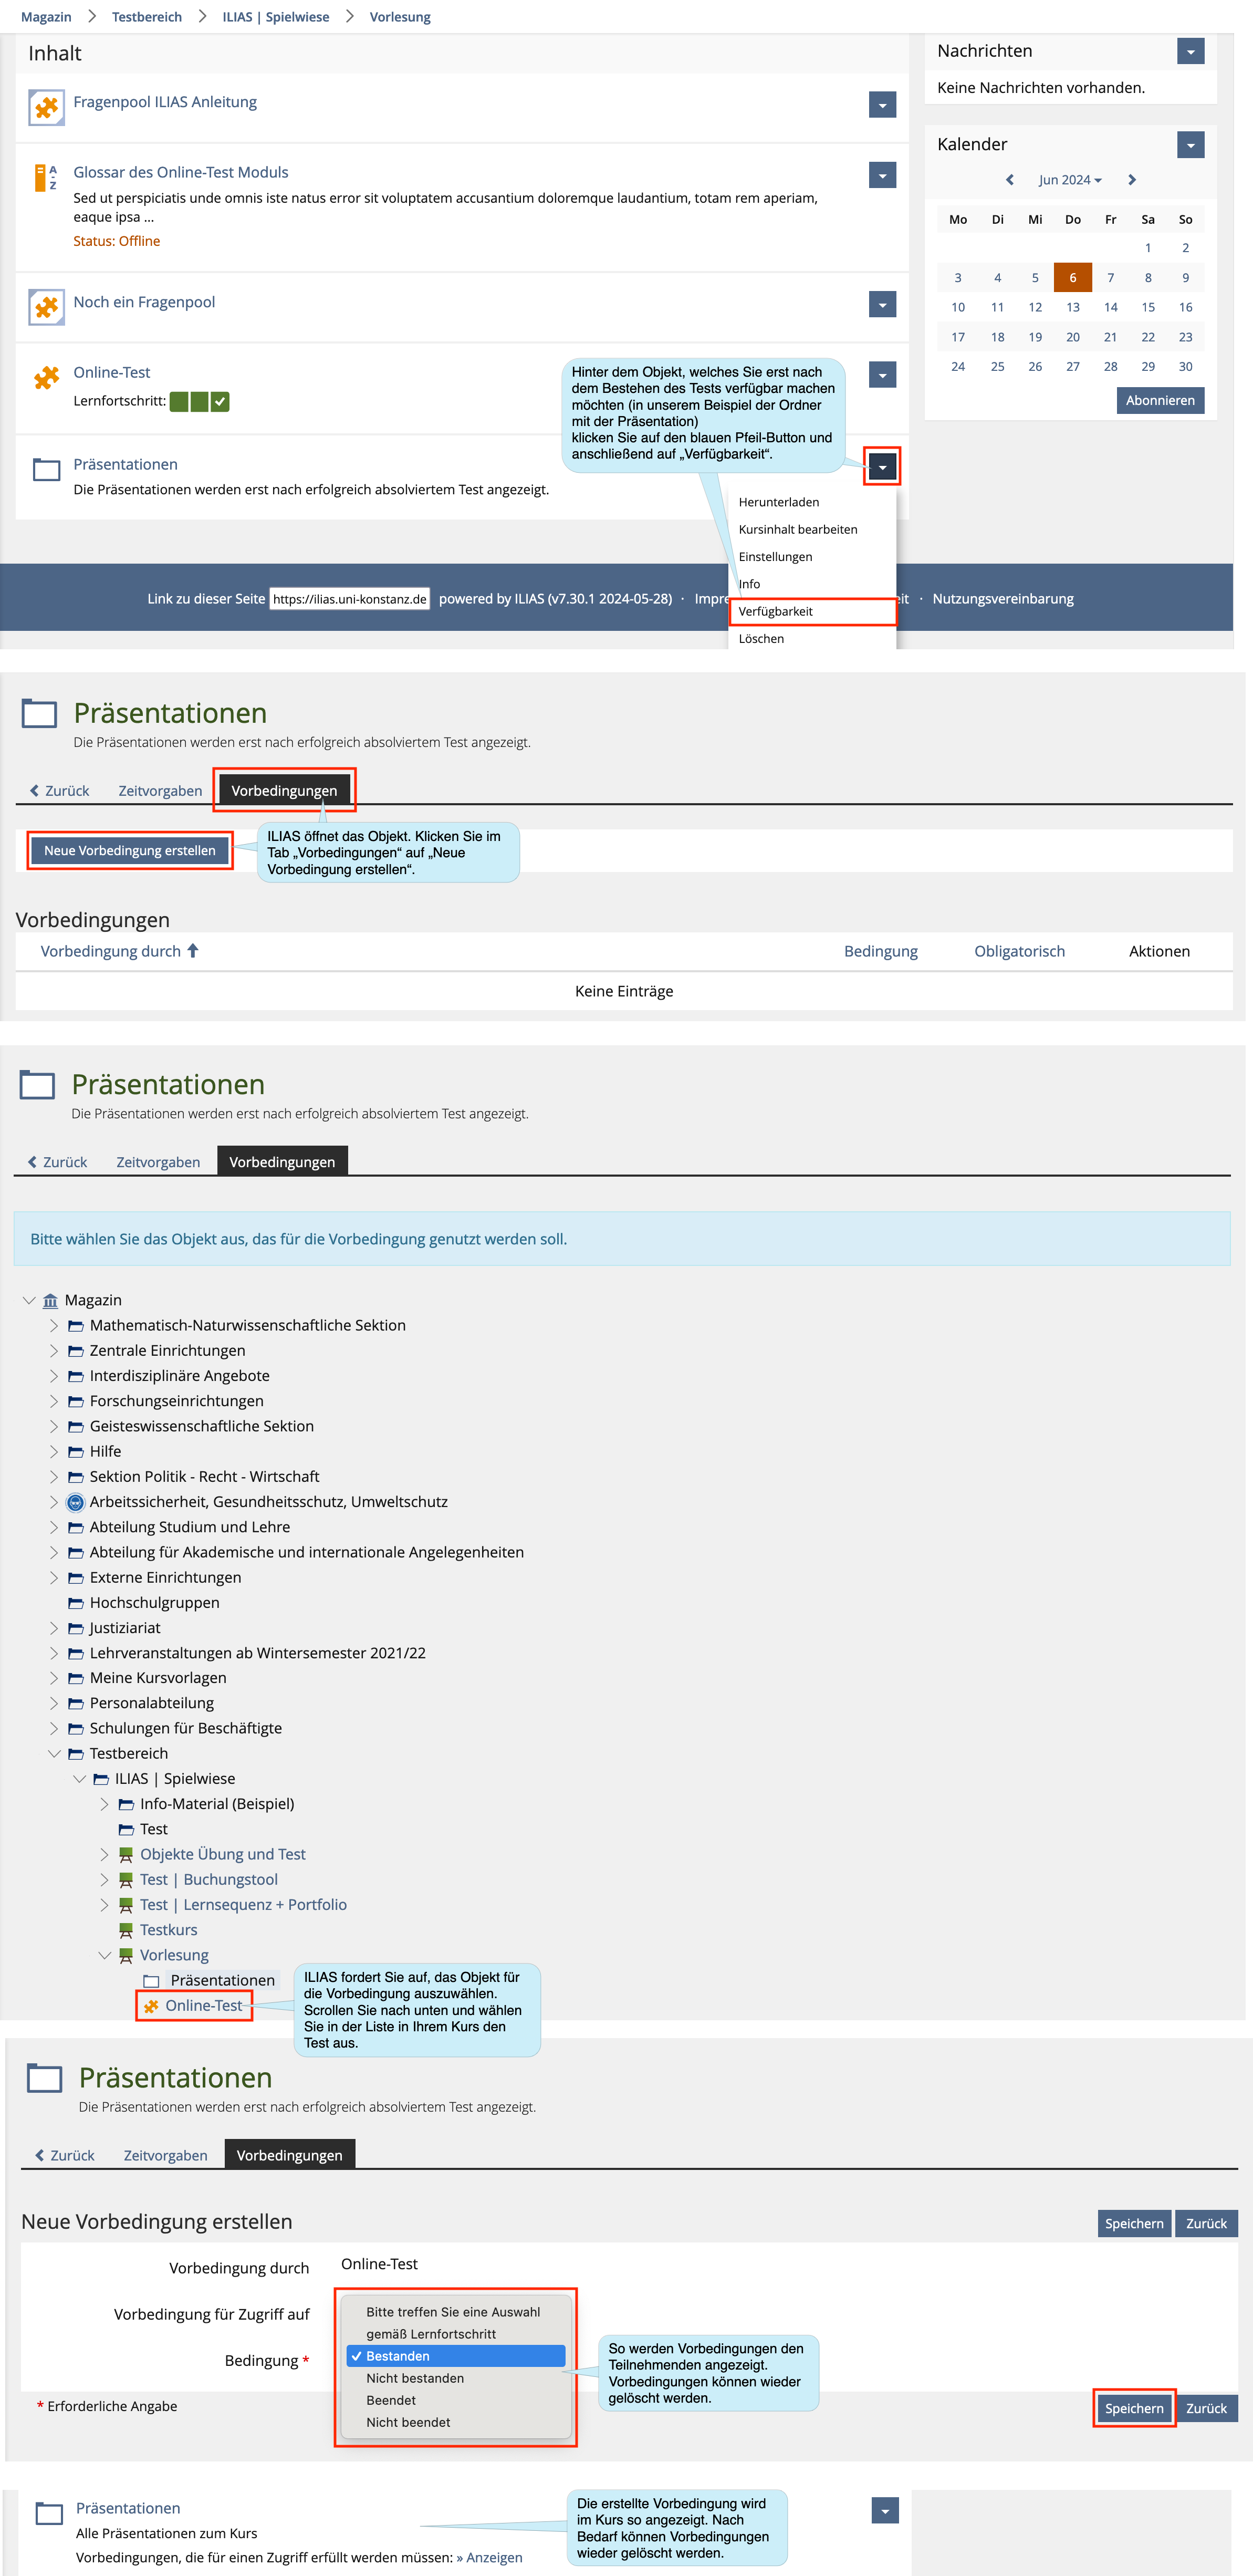
9. Test as precondition before accessing further course materials
Sie können Tests auch als Vorbedingung für den Zugriff auf weitere Materialien nutzen: Erst nach dem Bestehen des Tests sollen Teilnehmer*innen Zugriff auf andere von Ihnen bereitgestellte Materialien haben.
