ILIAS/Instructions/Online-test
1. Scenarios of use
In this guide, you will learn how to assess learning outcomes using the object test on the ILIAS learning and teaching platform. There are essentially two scenarios of use for which this guide is intended:
1.1. Performance assessment within ongoing ILIAS courses
- To assess the learning progress or prior knowledge of the participants in your course
- As a precondition for accessing further materials
- As part of the coursework
1.2. Self-assessment for learners to practice
- For applying and consolidating the content learned
- To assess individual learning levels in relation to performance expectations (e.g. in preparation for an exam)
Recommendations for self-assessment
- Self- assessment tests should be carried out anonymously without registering names.
- Allowing several test runs can contribute to learning outcomes.
- Optionally, the participants can request clues to solutions during the test (e.g. for a point reduction).
- Self- assessment questions should be comparable to the final exam questions, providing participants with orientation for their grade-relevant performance.
| Hinweis zu Online-Klausuren |
|---|
| Wenn Sie einen Test für eine Online-Klausur erstellen möchten, dann nutzen Sie bitte diese Anleitung |
2. The test object
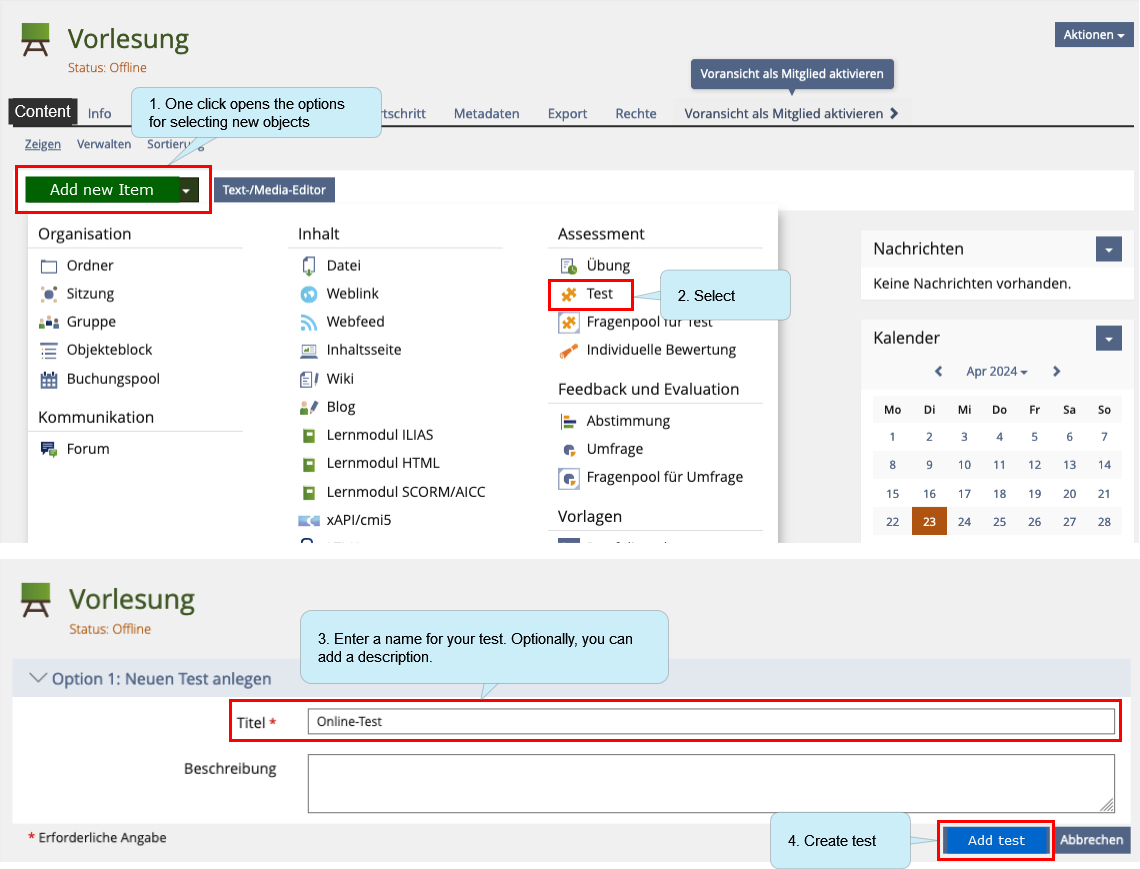
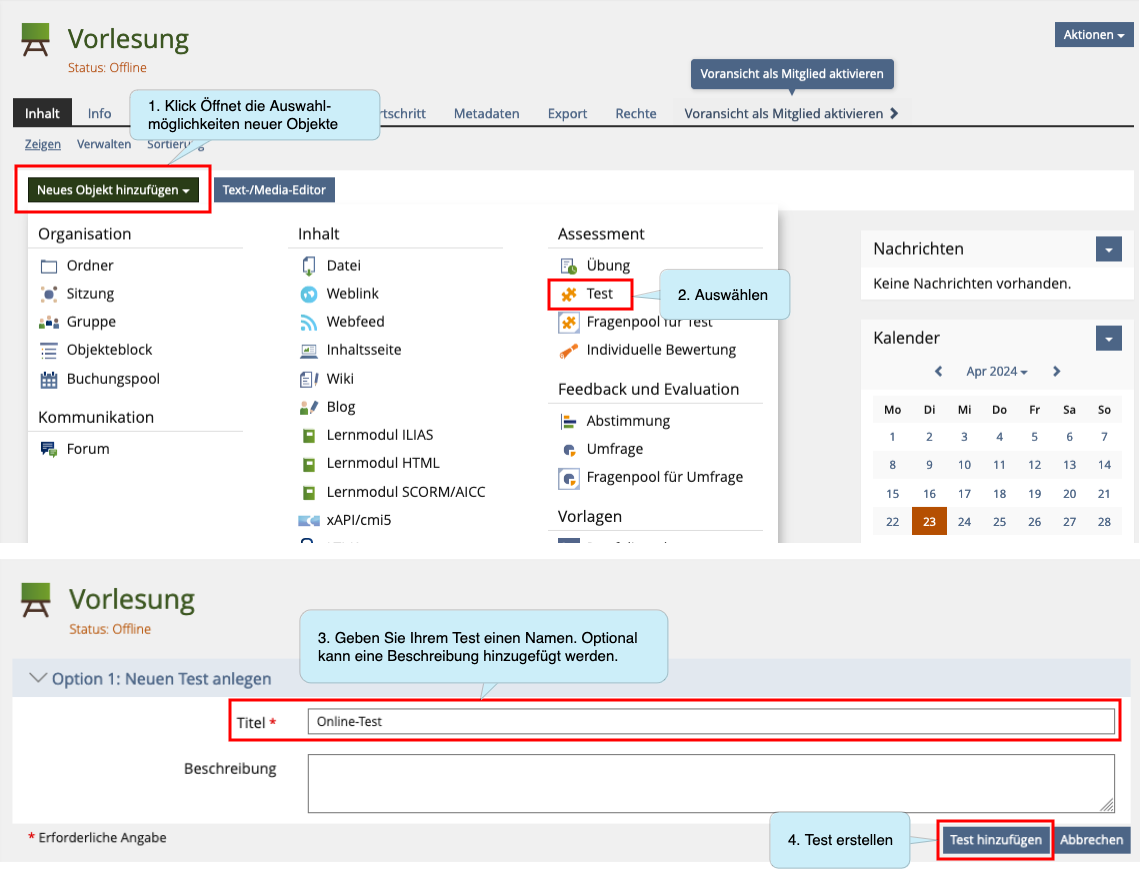
2.1. Adding the test object
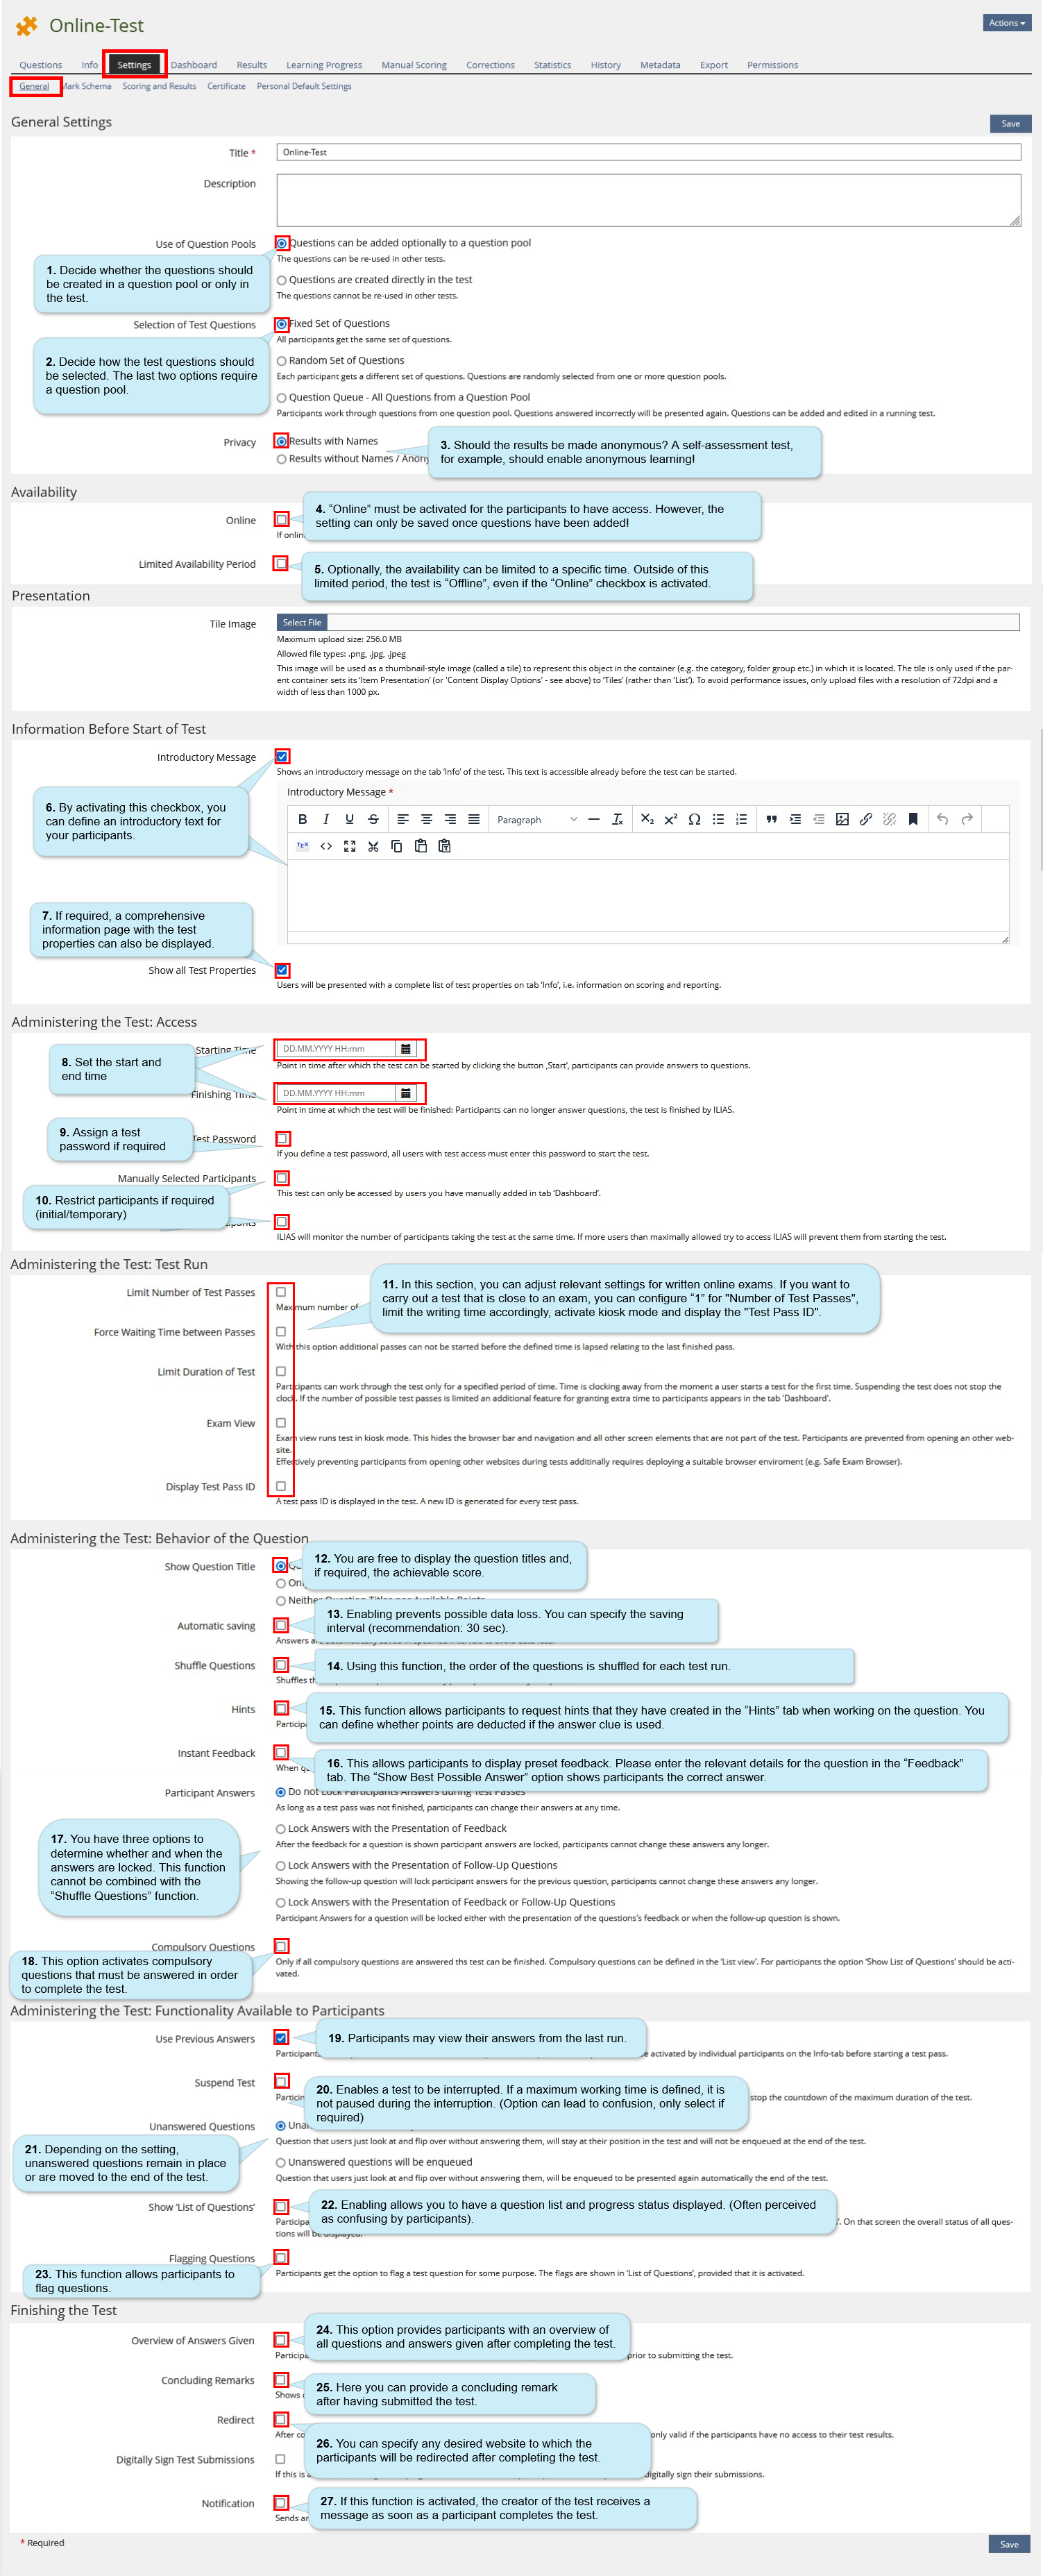
2.2. 'General Settings'
In the following step, you can make basic settings. To do this, open the “General settings” tab.
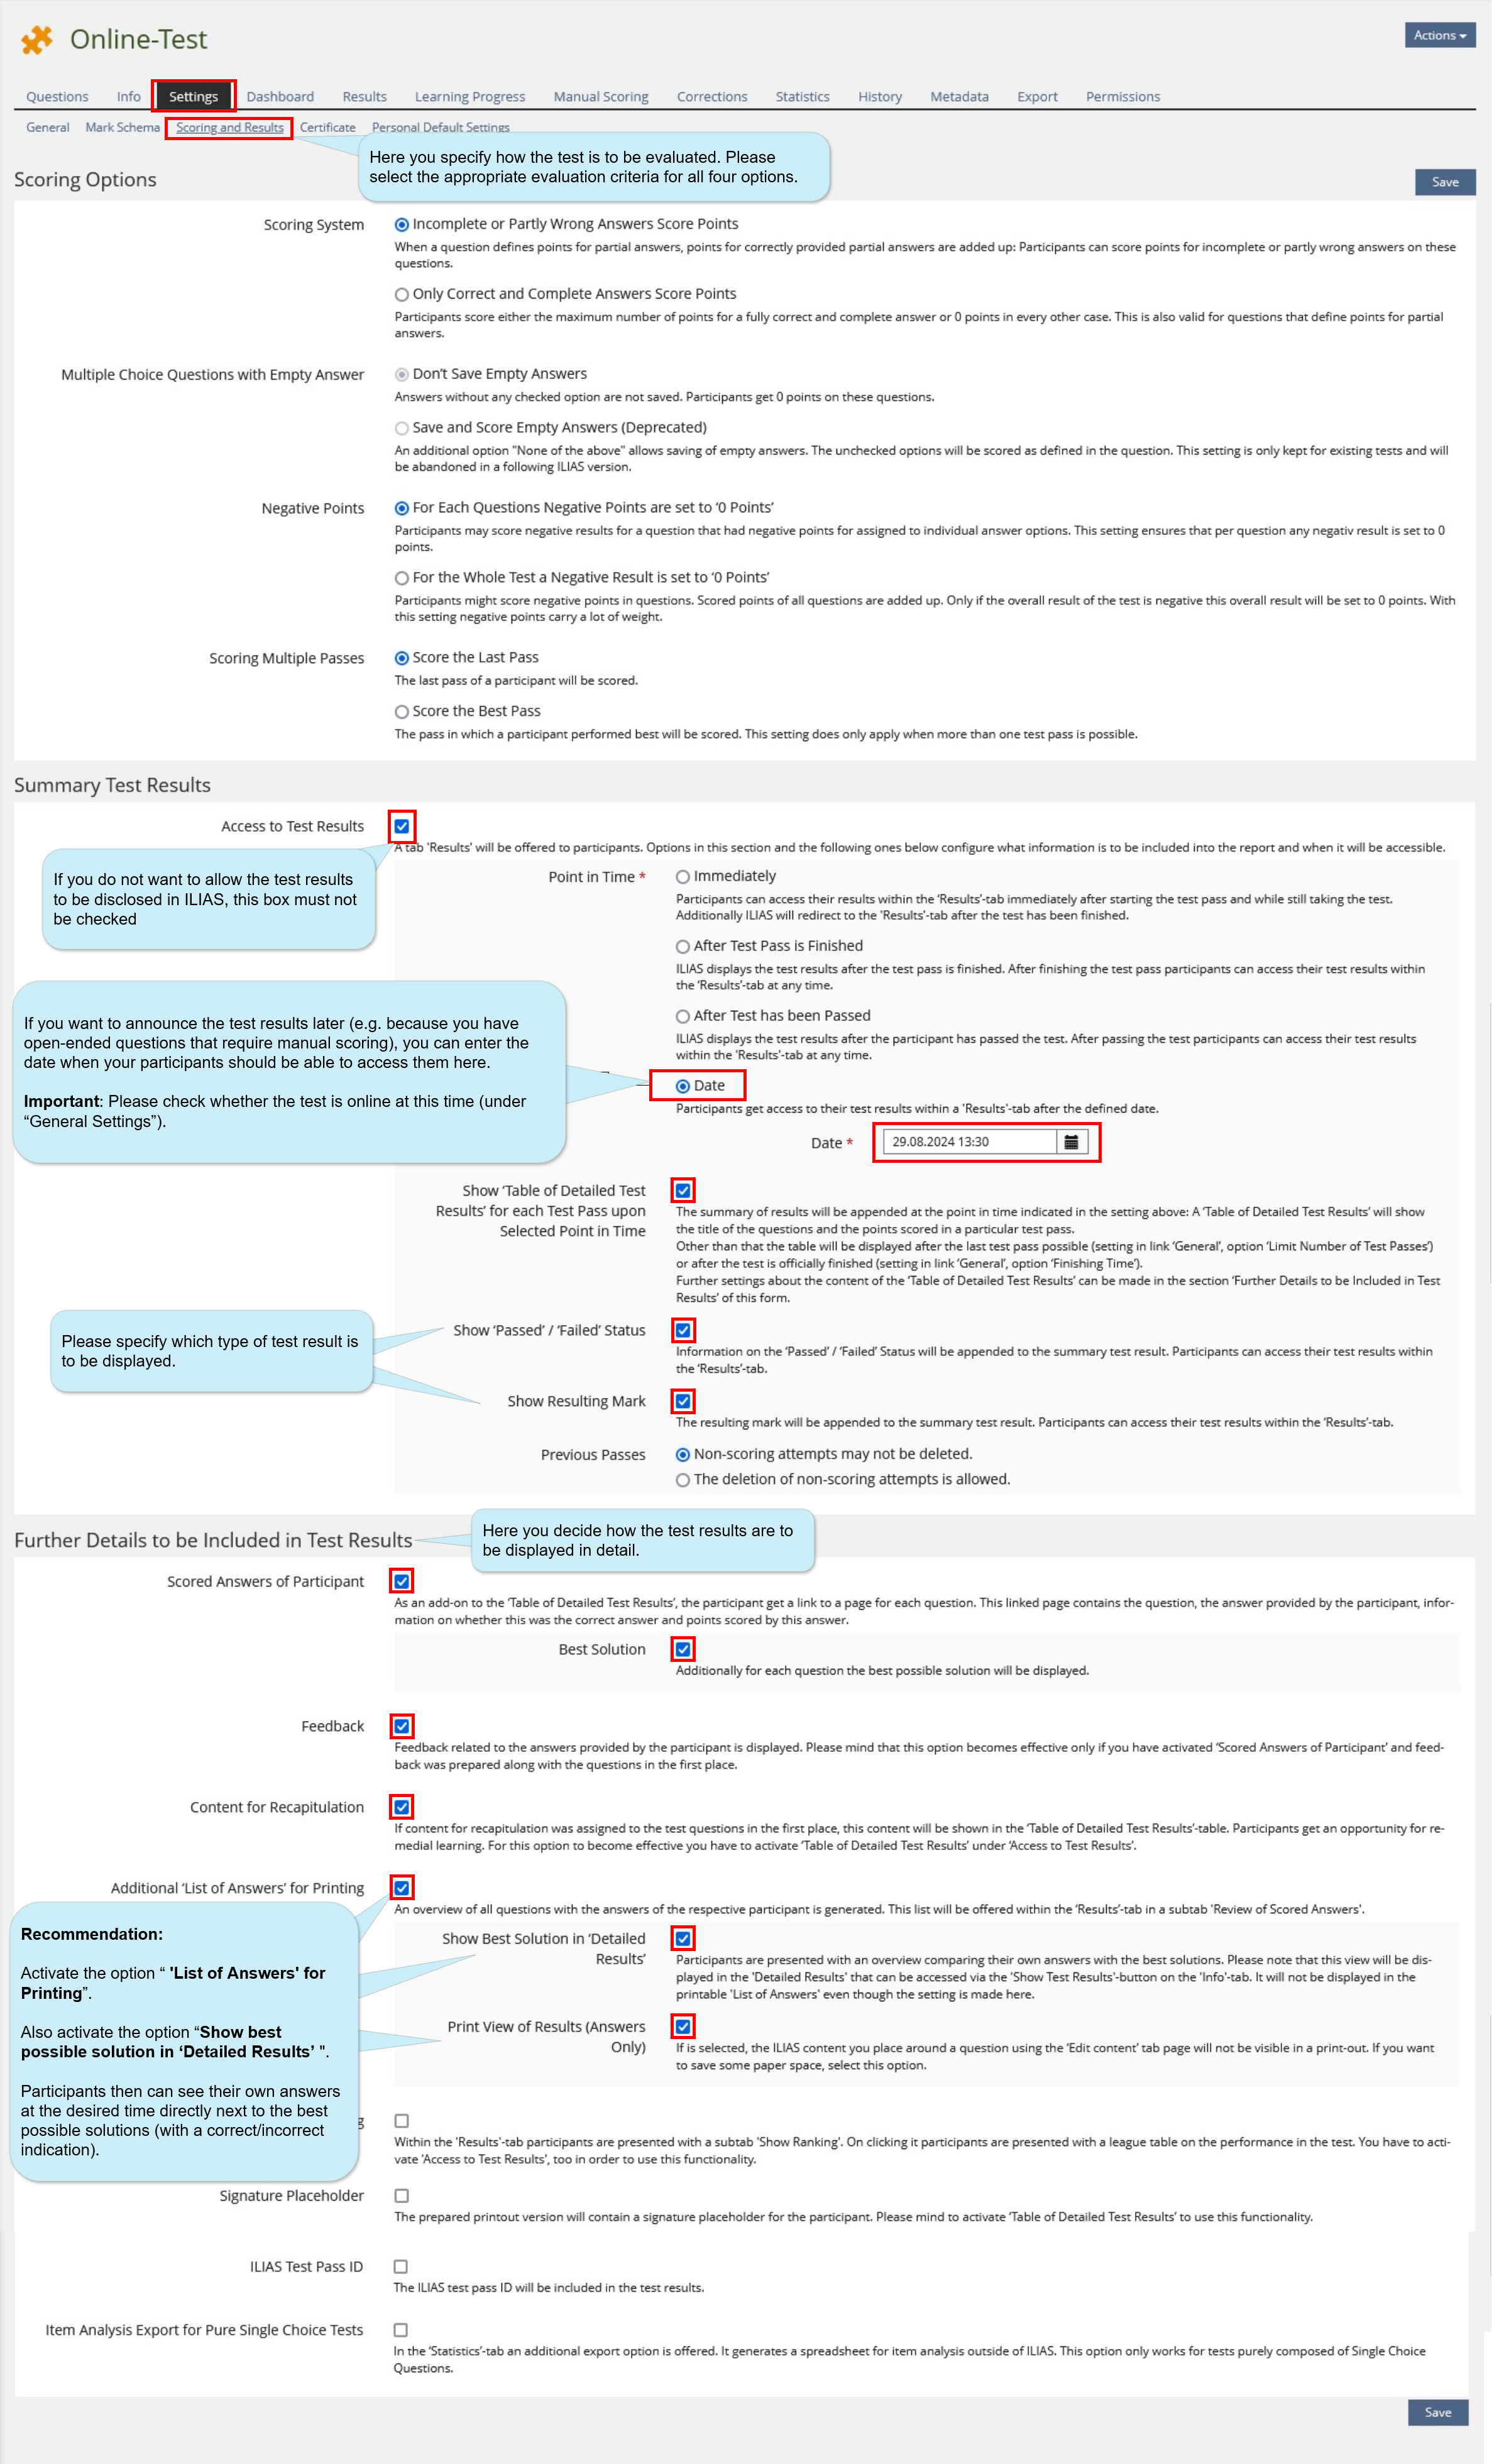
2.3. 'Scoring and Results'
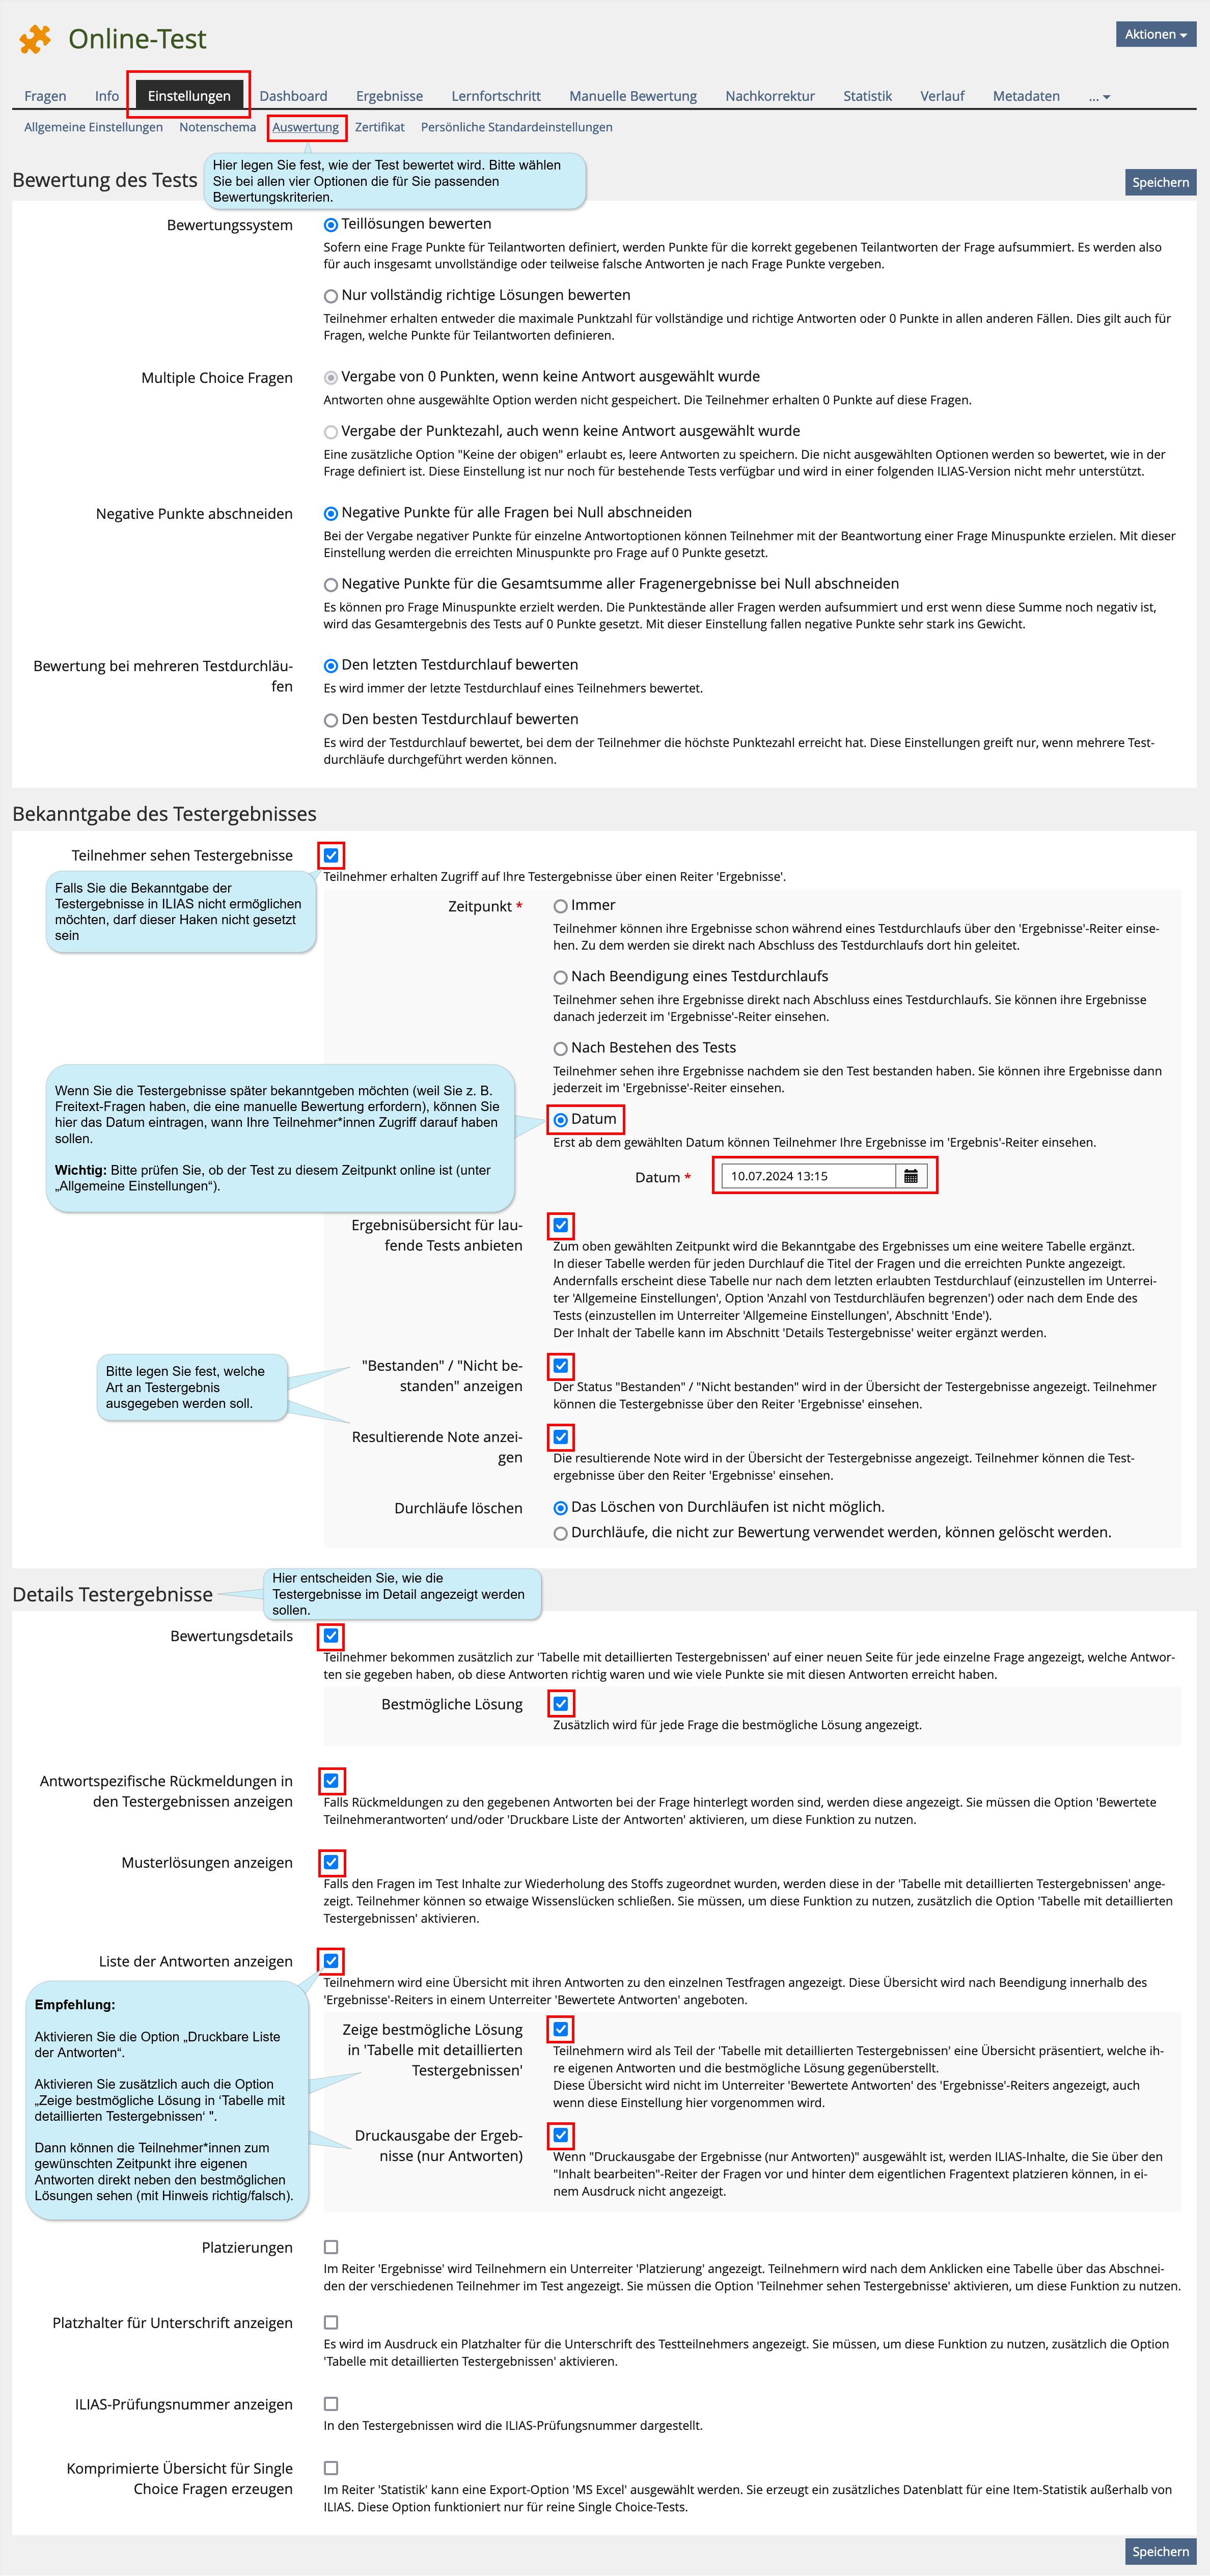
Under “Settings” in the “Scoring and Results” tab, you can set the method of evaluating the test.
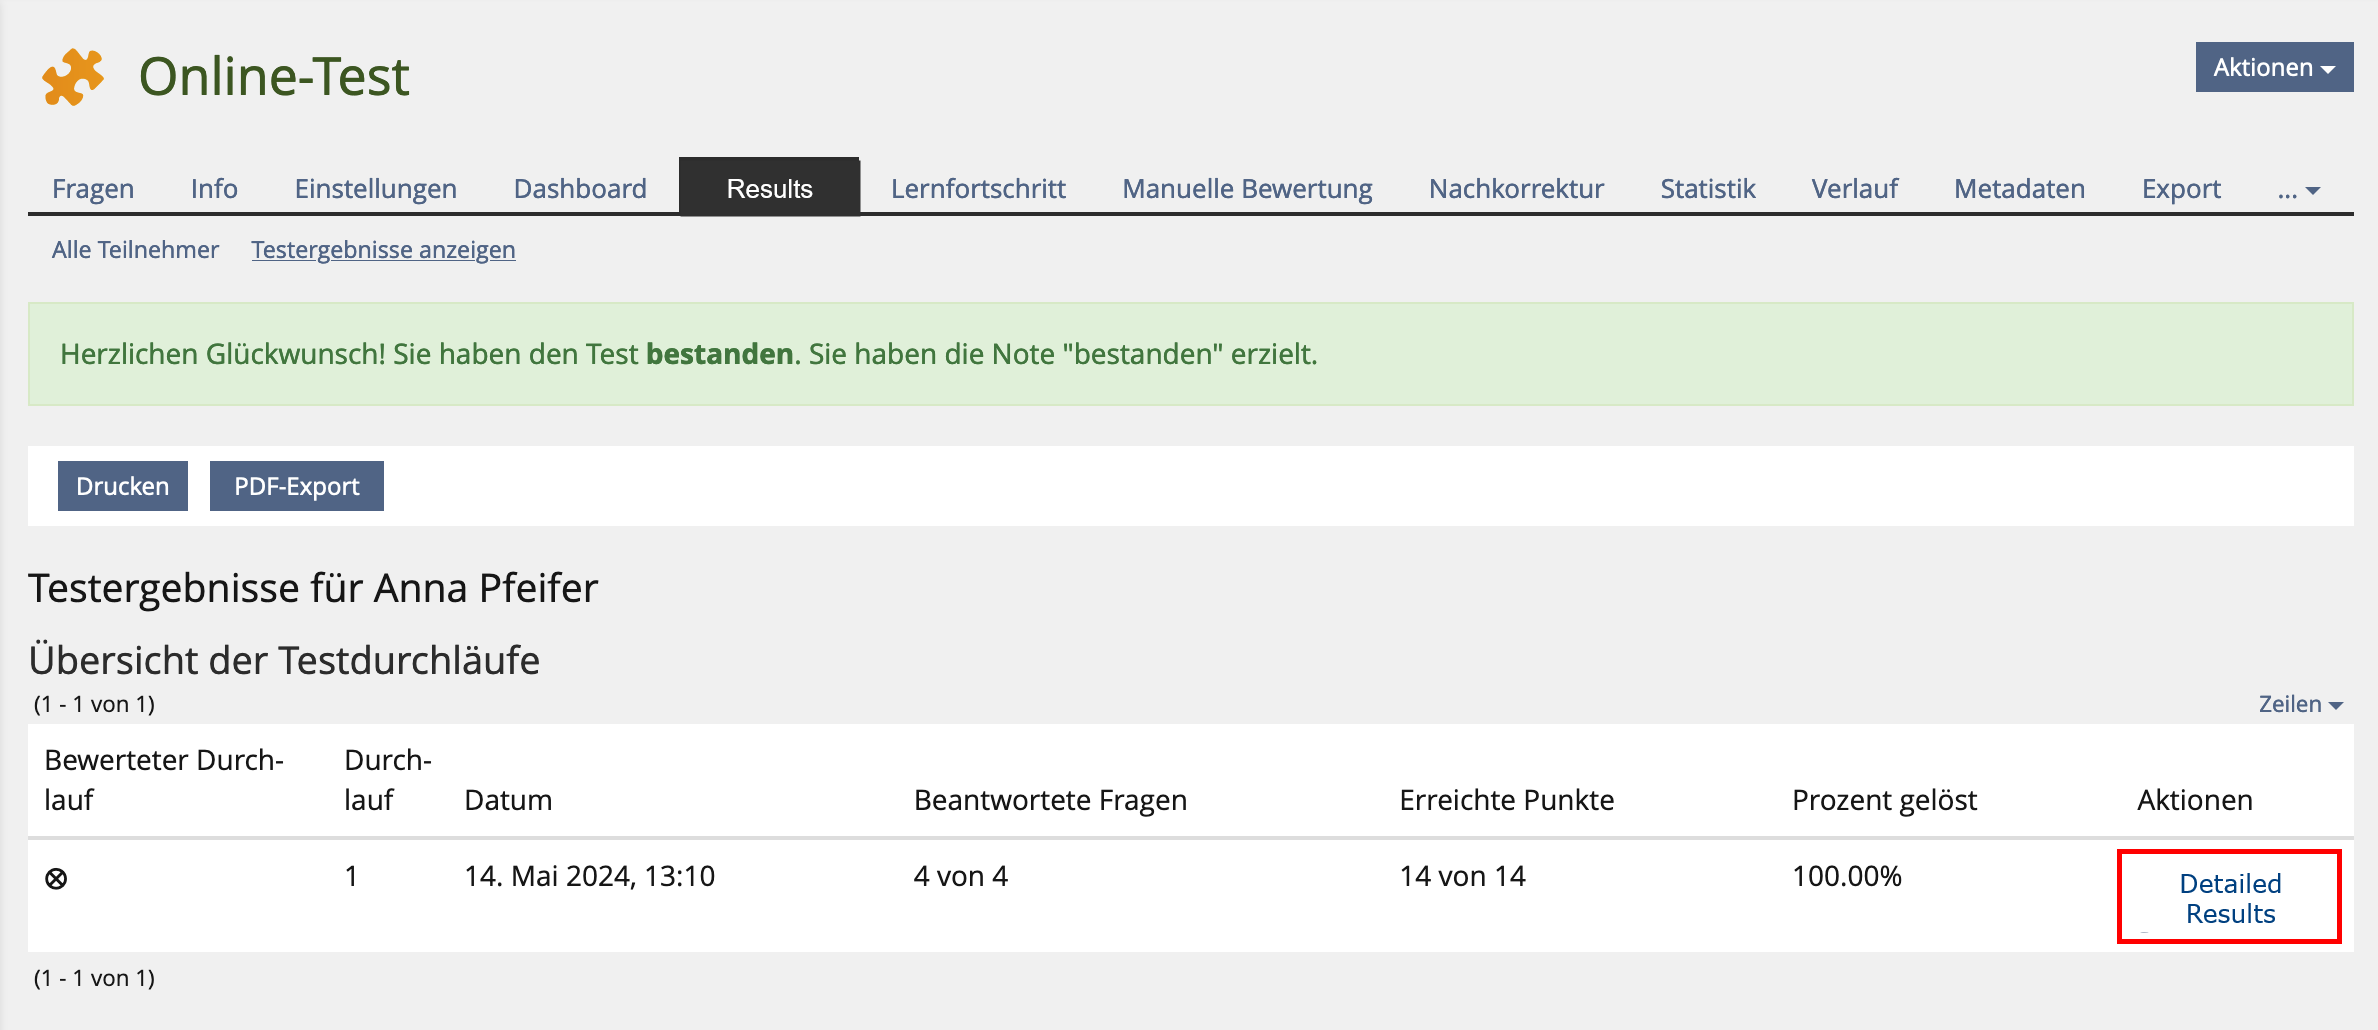
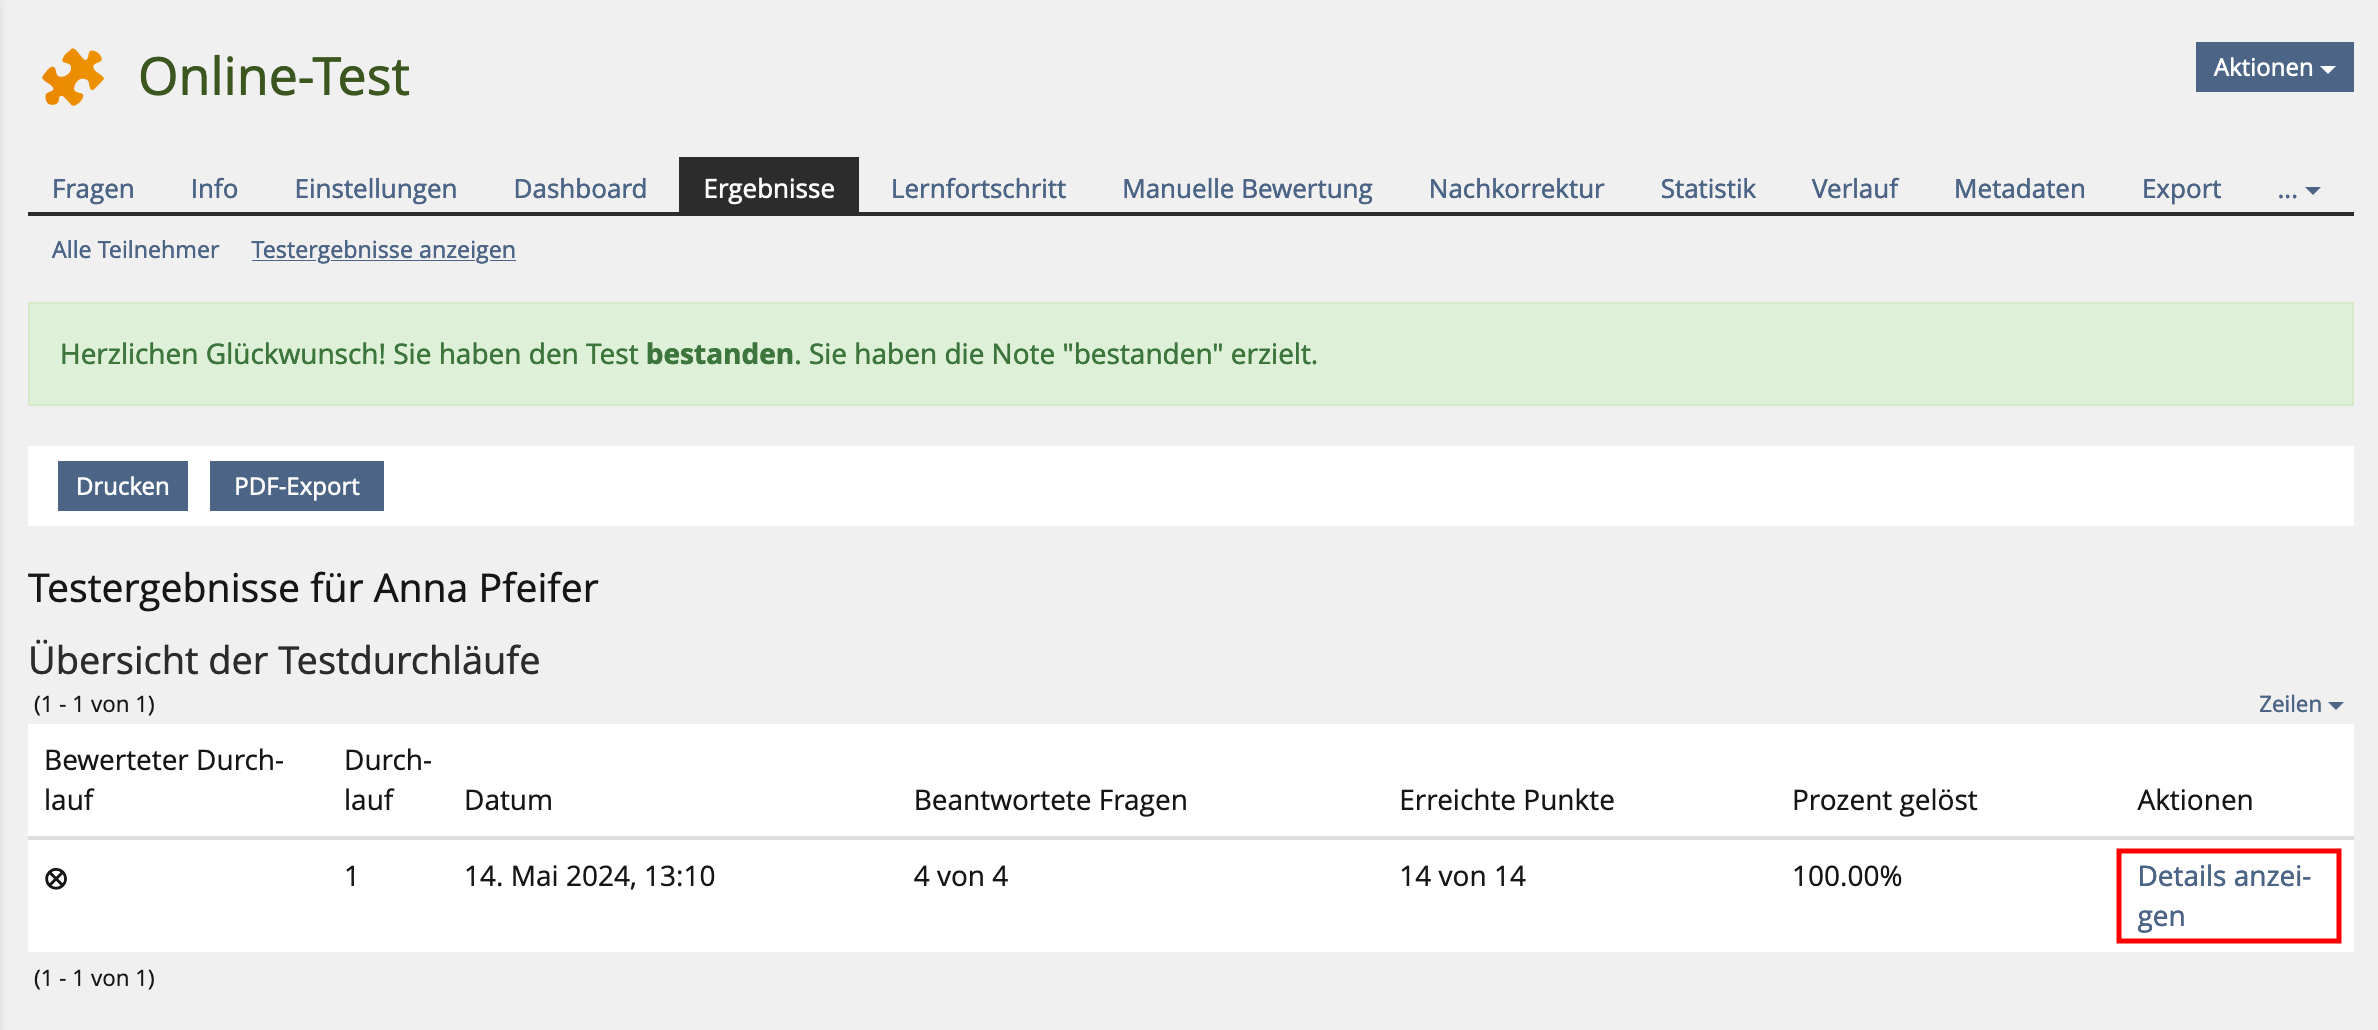
Depending on how you have configured the settings for the announcement of the test results, participants can see their own test results. This example displays test results cantaining “Detailed Results”:
2.4. 'Personal Default Settings'
The “Personal Default Settings” tab allows you to save your settings so that you can use them in further tests without any effort.
3. Creating and administering questions
3.1. Available question types
You can find an introduction to the different question types for online tests here: Question types in ILIAS
3.2. Open question
For open questions, use the question type “Essay question”.
Please note:
- The Essay Question is ideal for relatively short answers (up to around 5 sentences).
- The Essay question can also be used for longer answers. However, we recommend creating several individual questions with shorter answer texts instead of one Essay question with a longer answer text. (Background: It is not possible to make comments or notes on individual text segments during correction, but only to provide final feedback on the entire answer. With a shorter answer text, this feedback is therefore more specific).
- For longer answers or essays that need to be subdivided and formatted and then corrected directly in the text, the "long text essay task" object is more suitable. To do this, you need to add a new object (“long text task”) outside the online test. We will be happy to advise you on this (lias-support@uni-konstanz.de).
3.3. Adding questions
There are three options how to add questions to your test:
- Create questions directly in the test
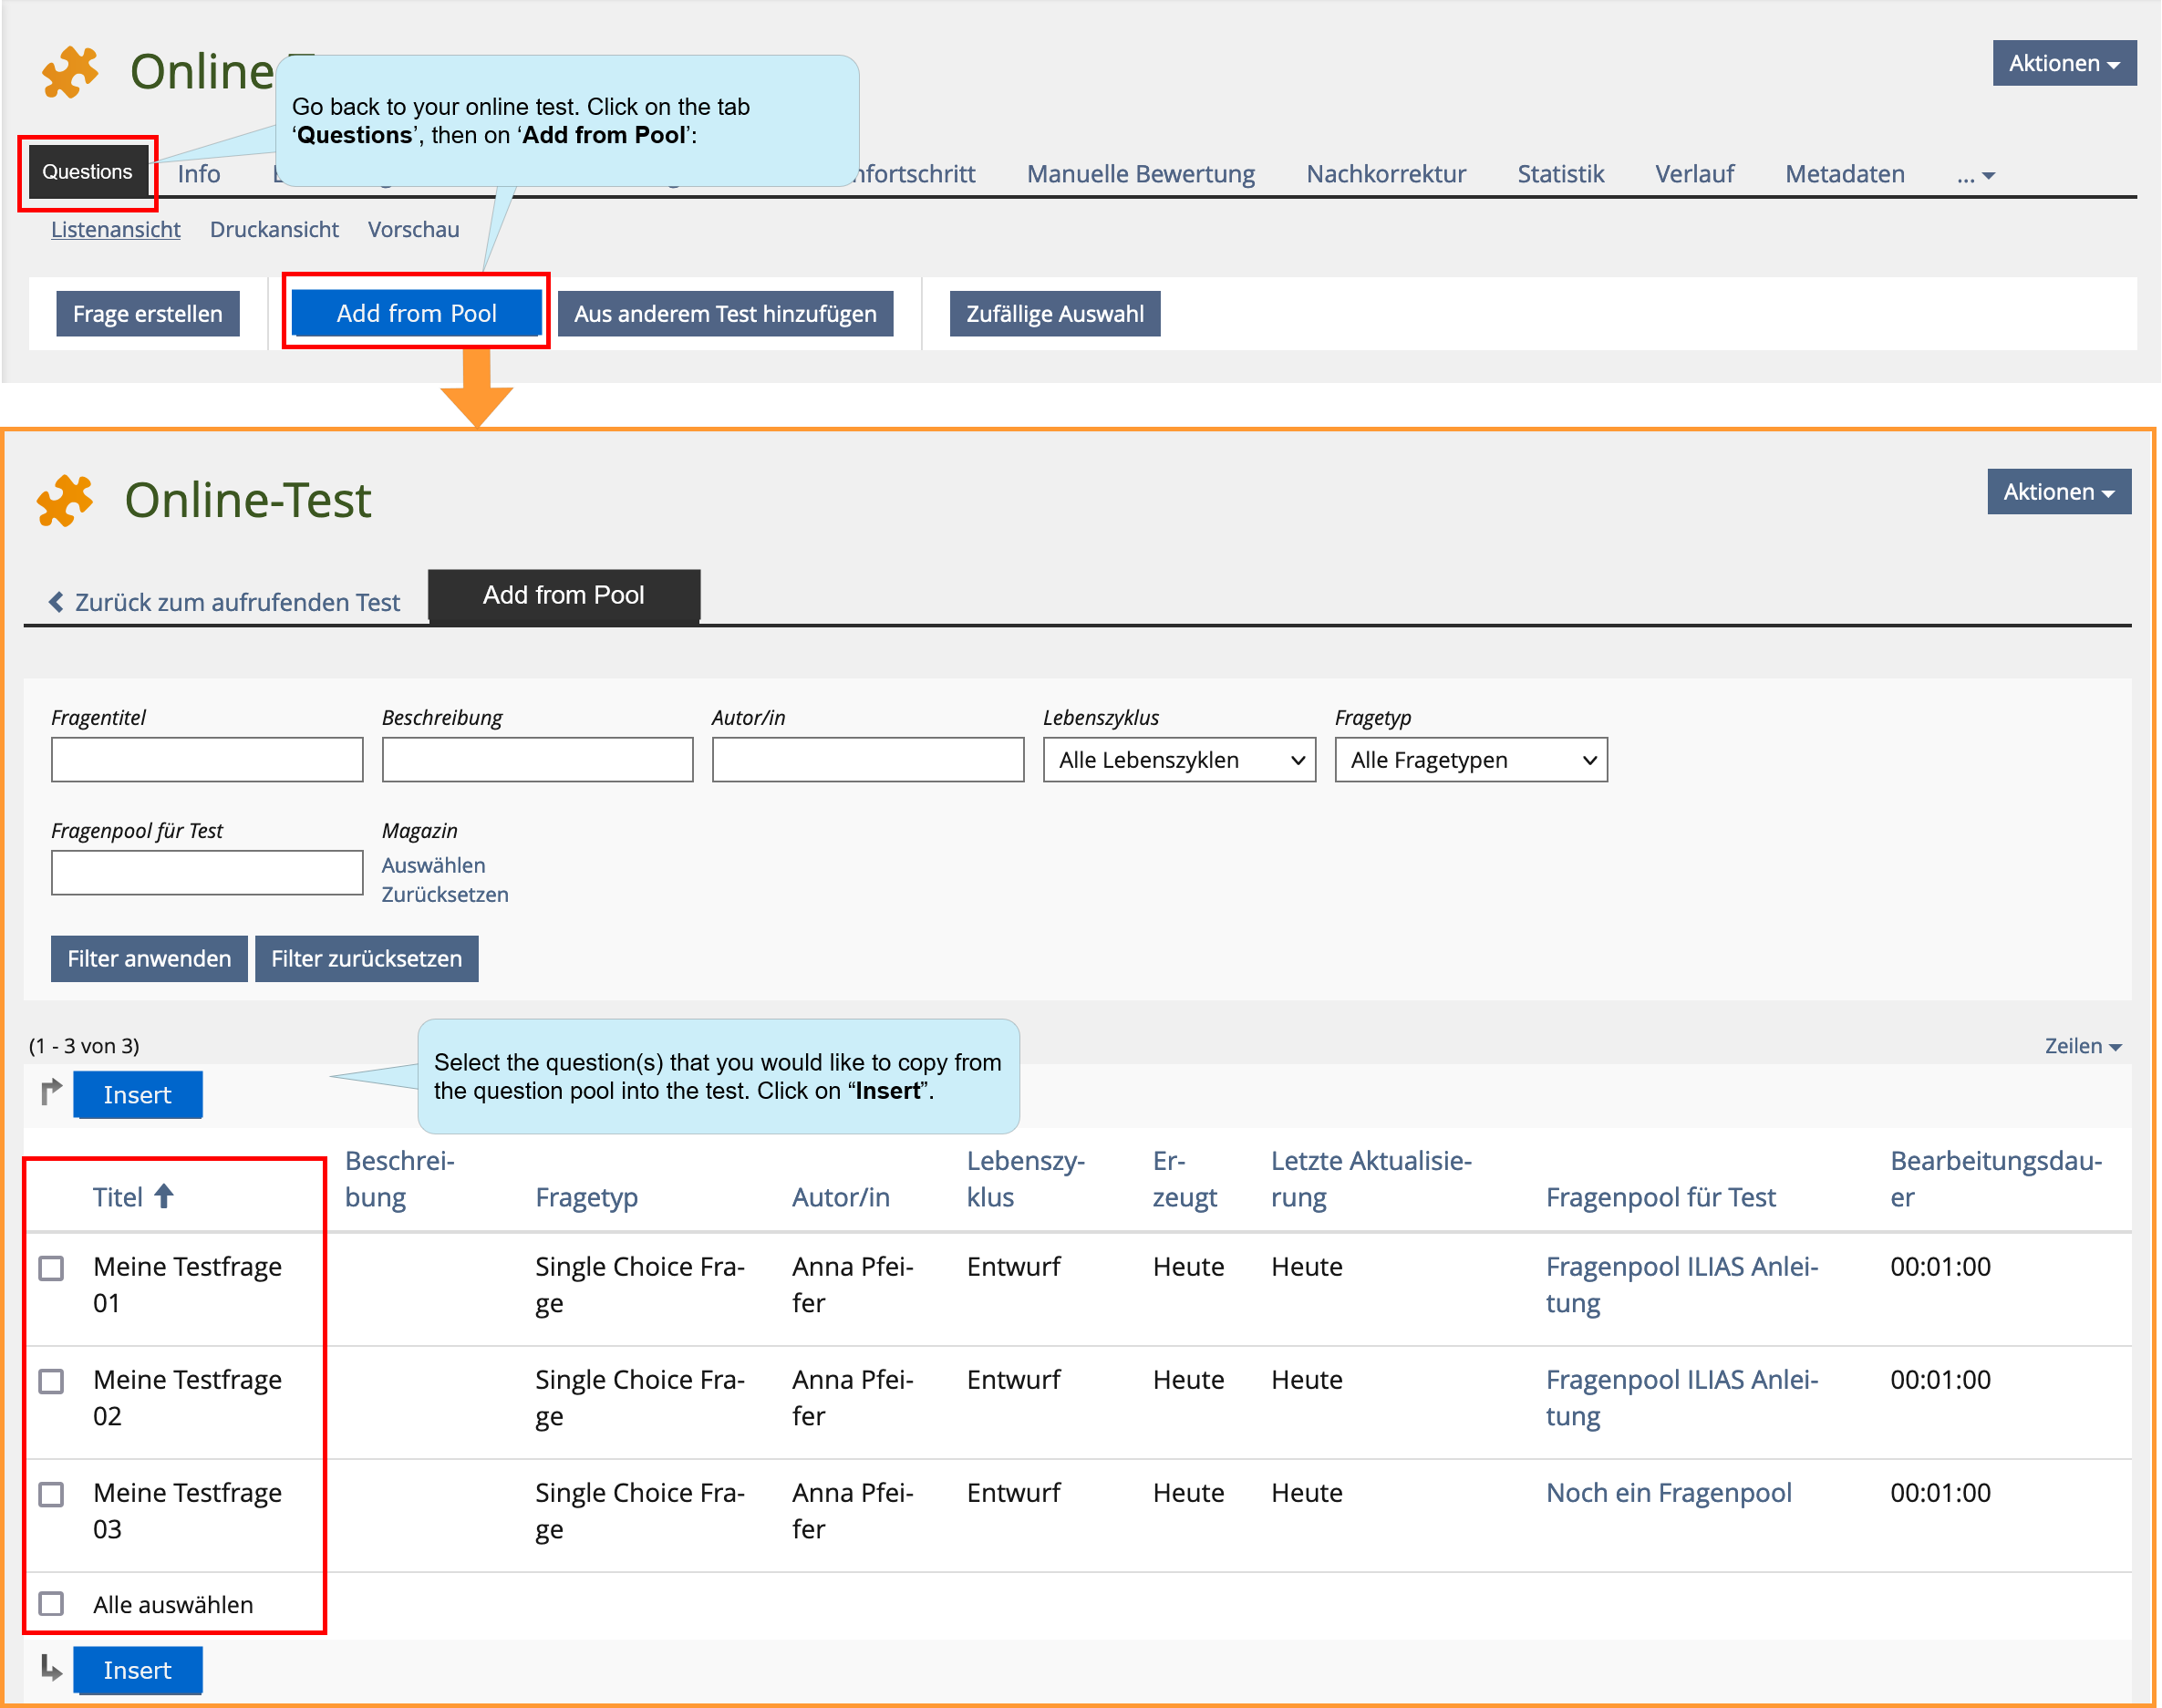
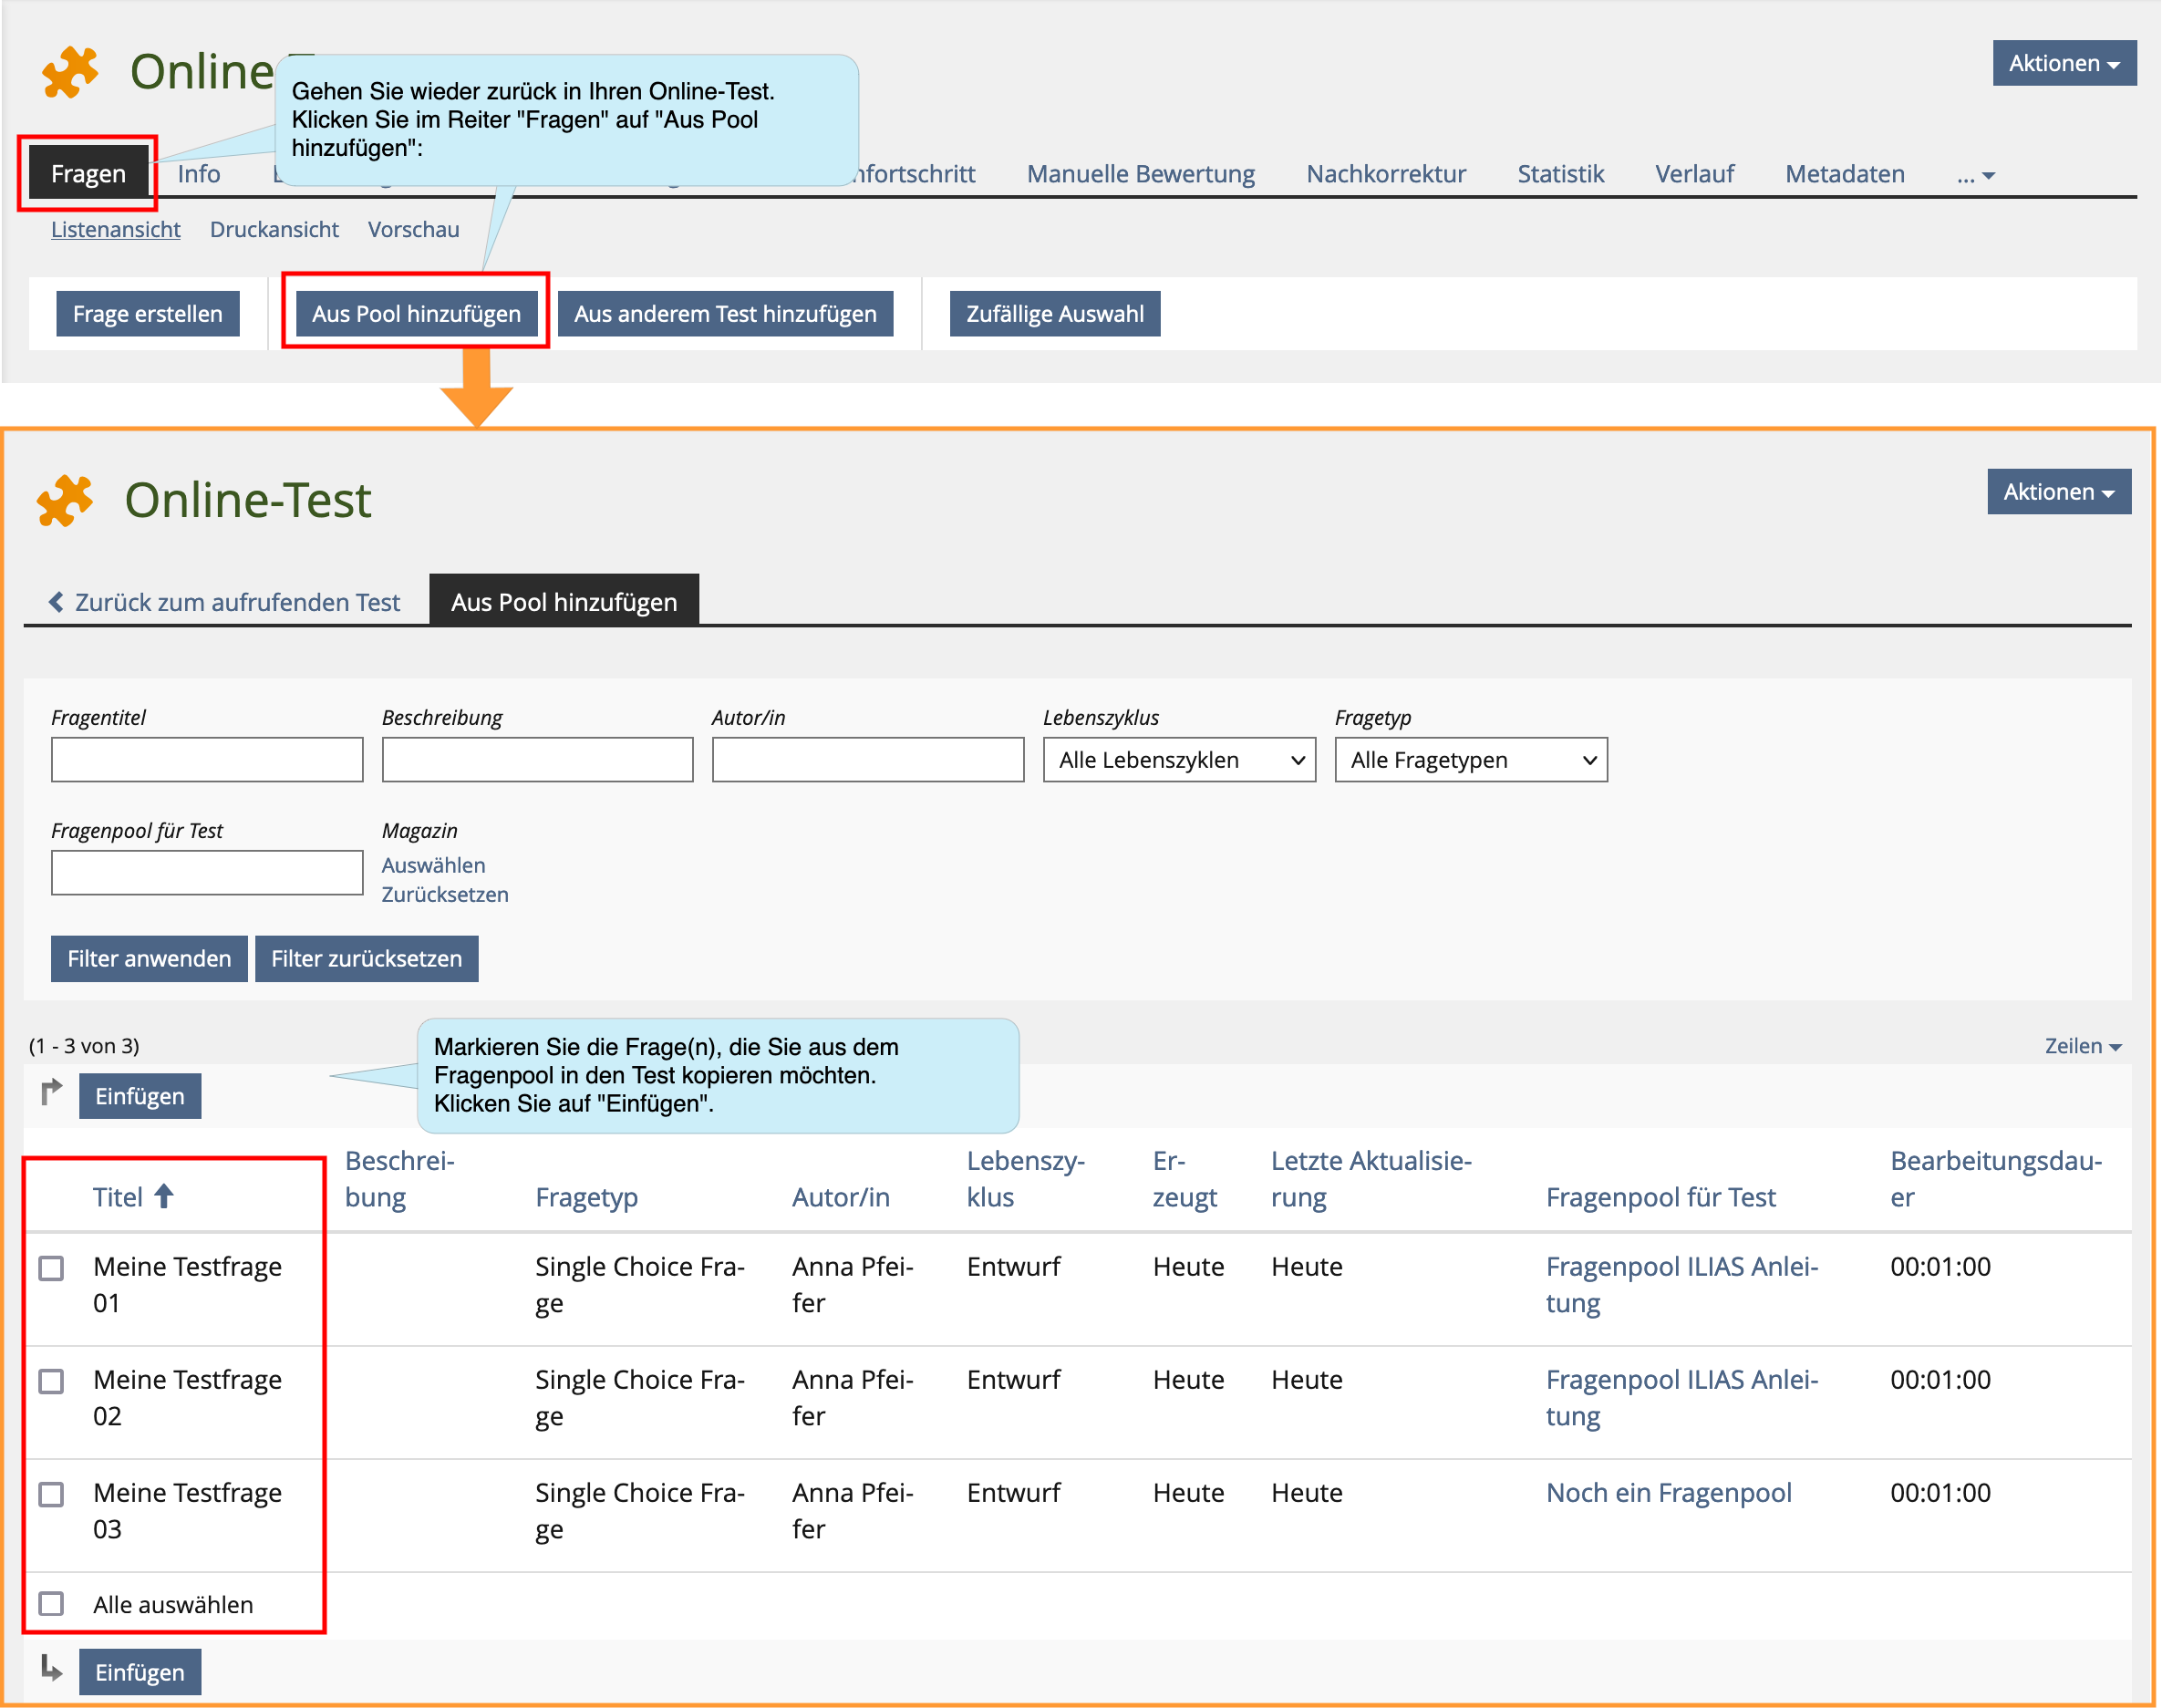
- Collect and manage questions in one or more question pools and include them in the test according to certain criteria
- Insert questions from another (already existing) test
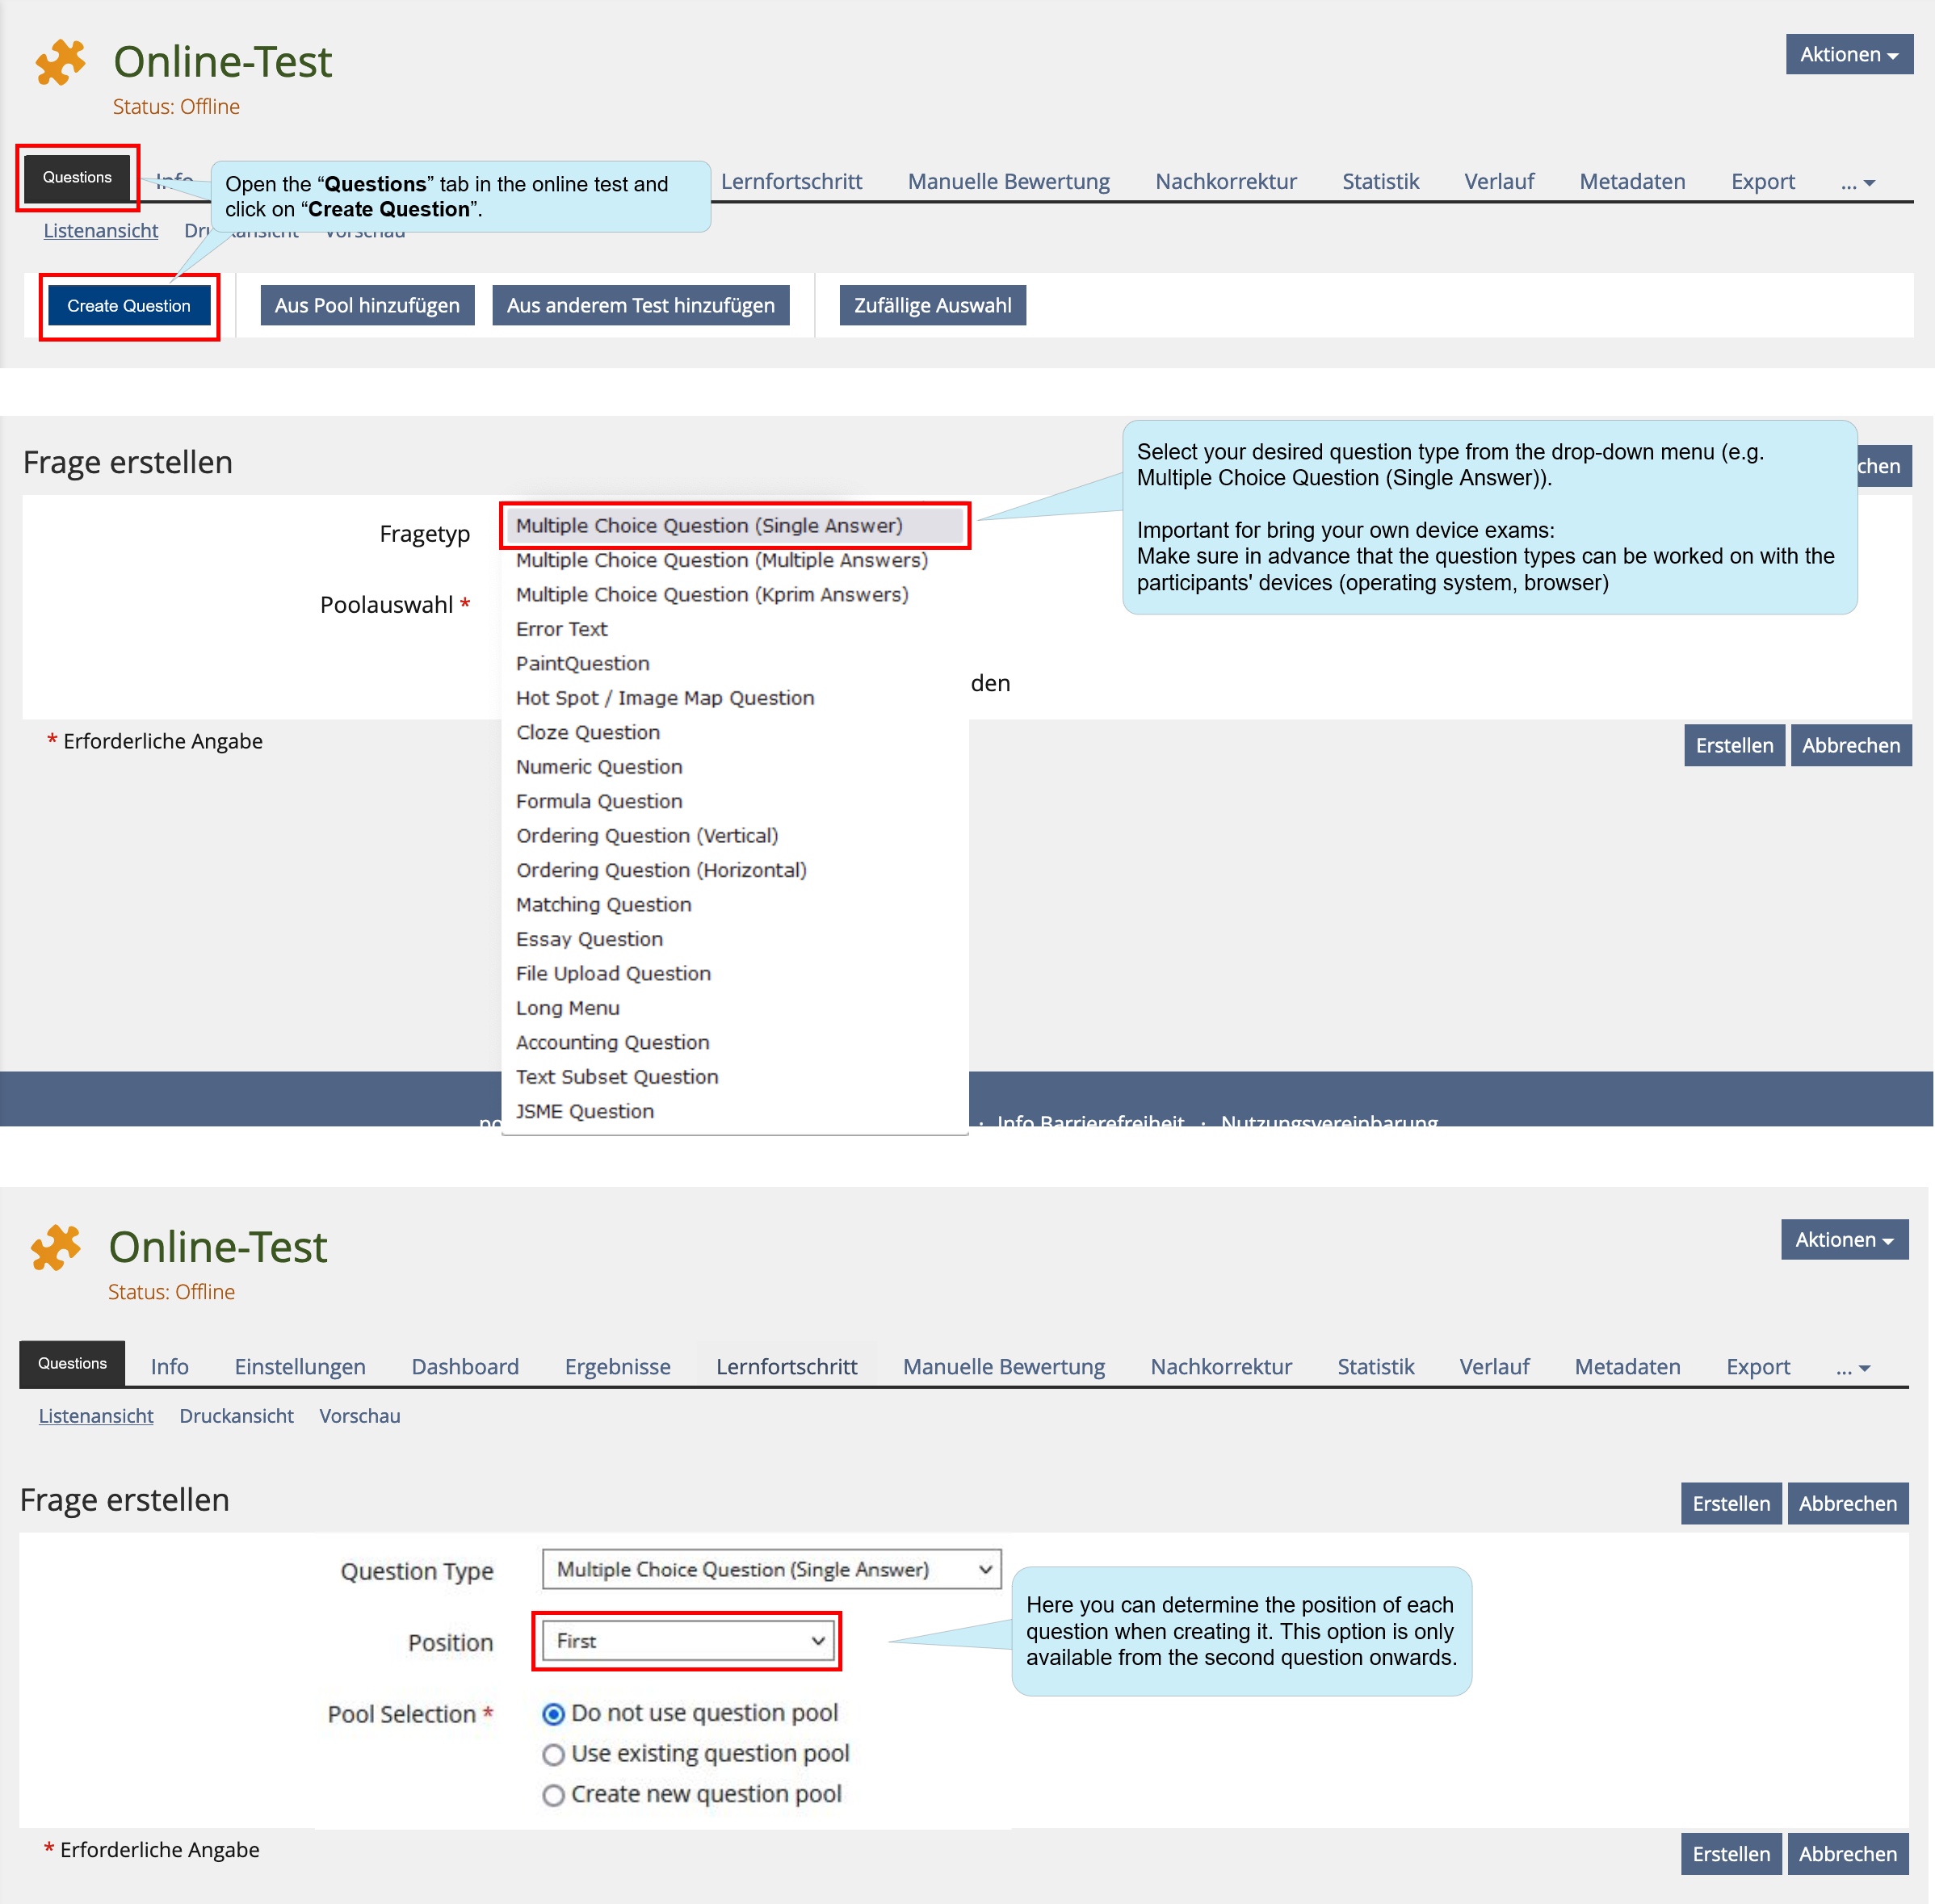
3.3.1. Creating questions in the test
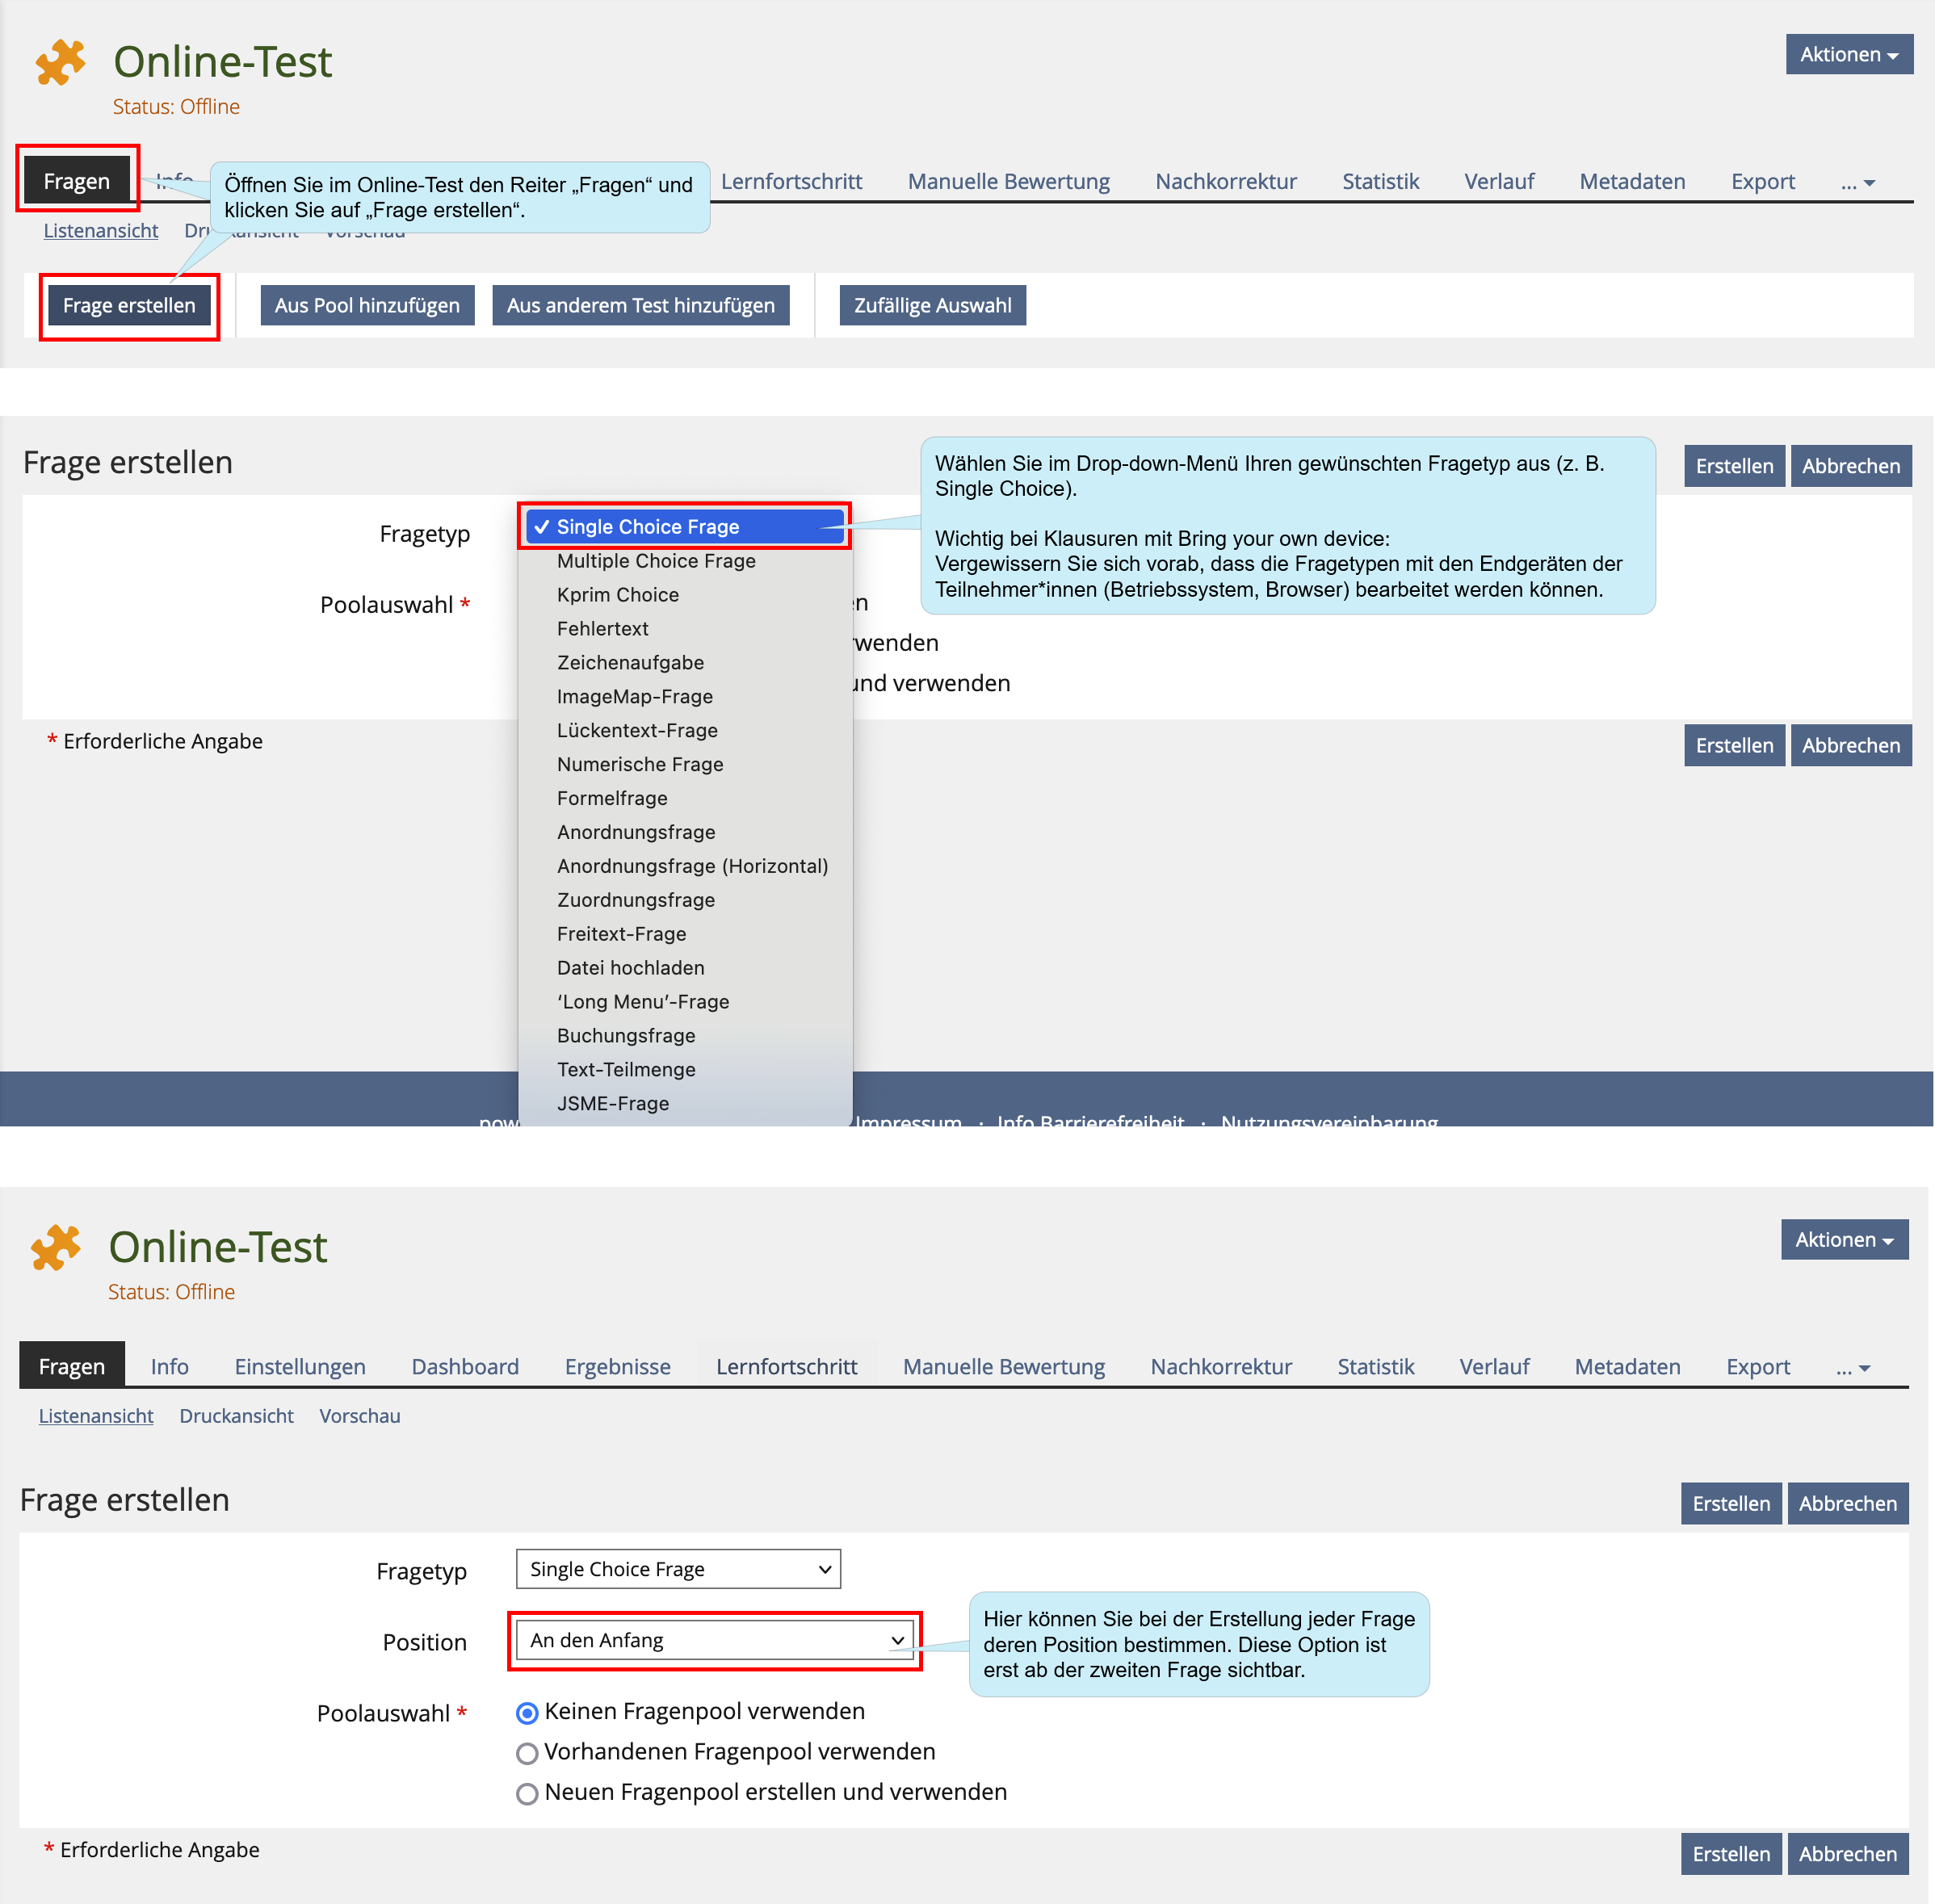
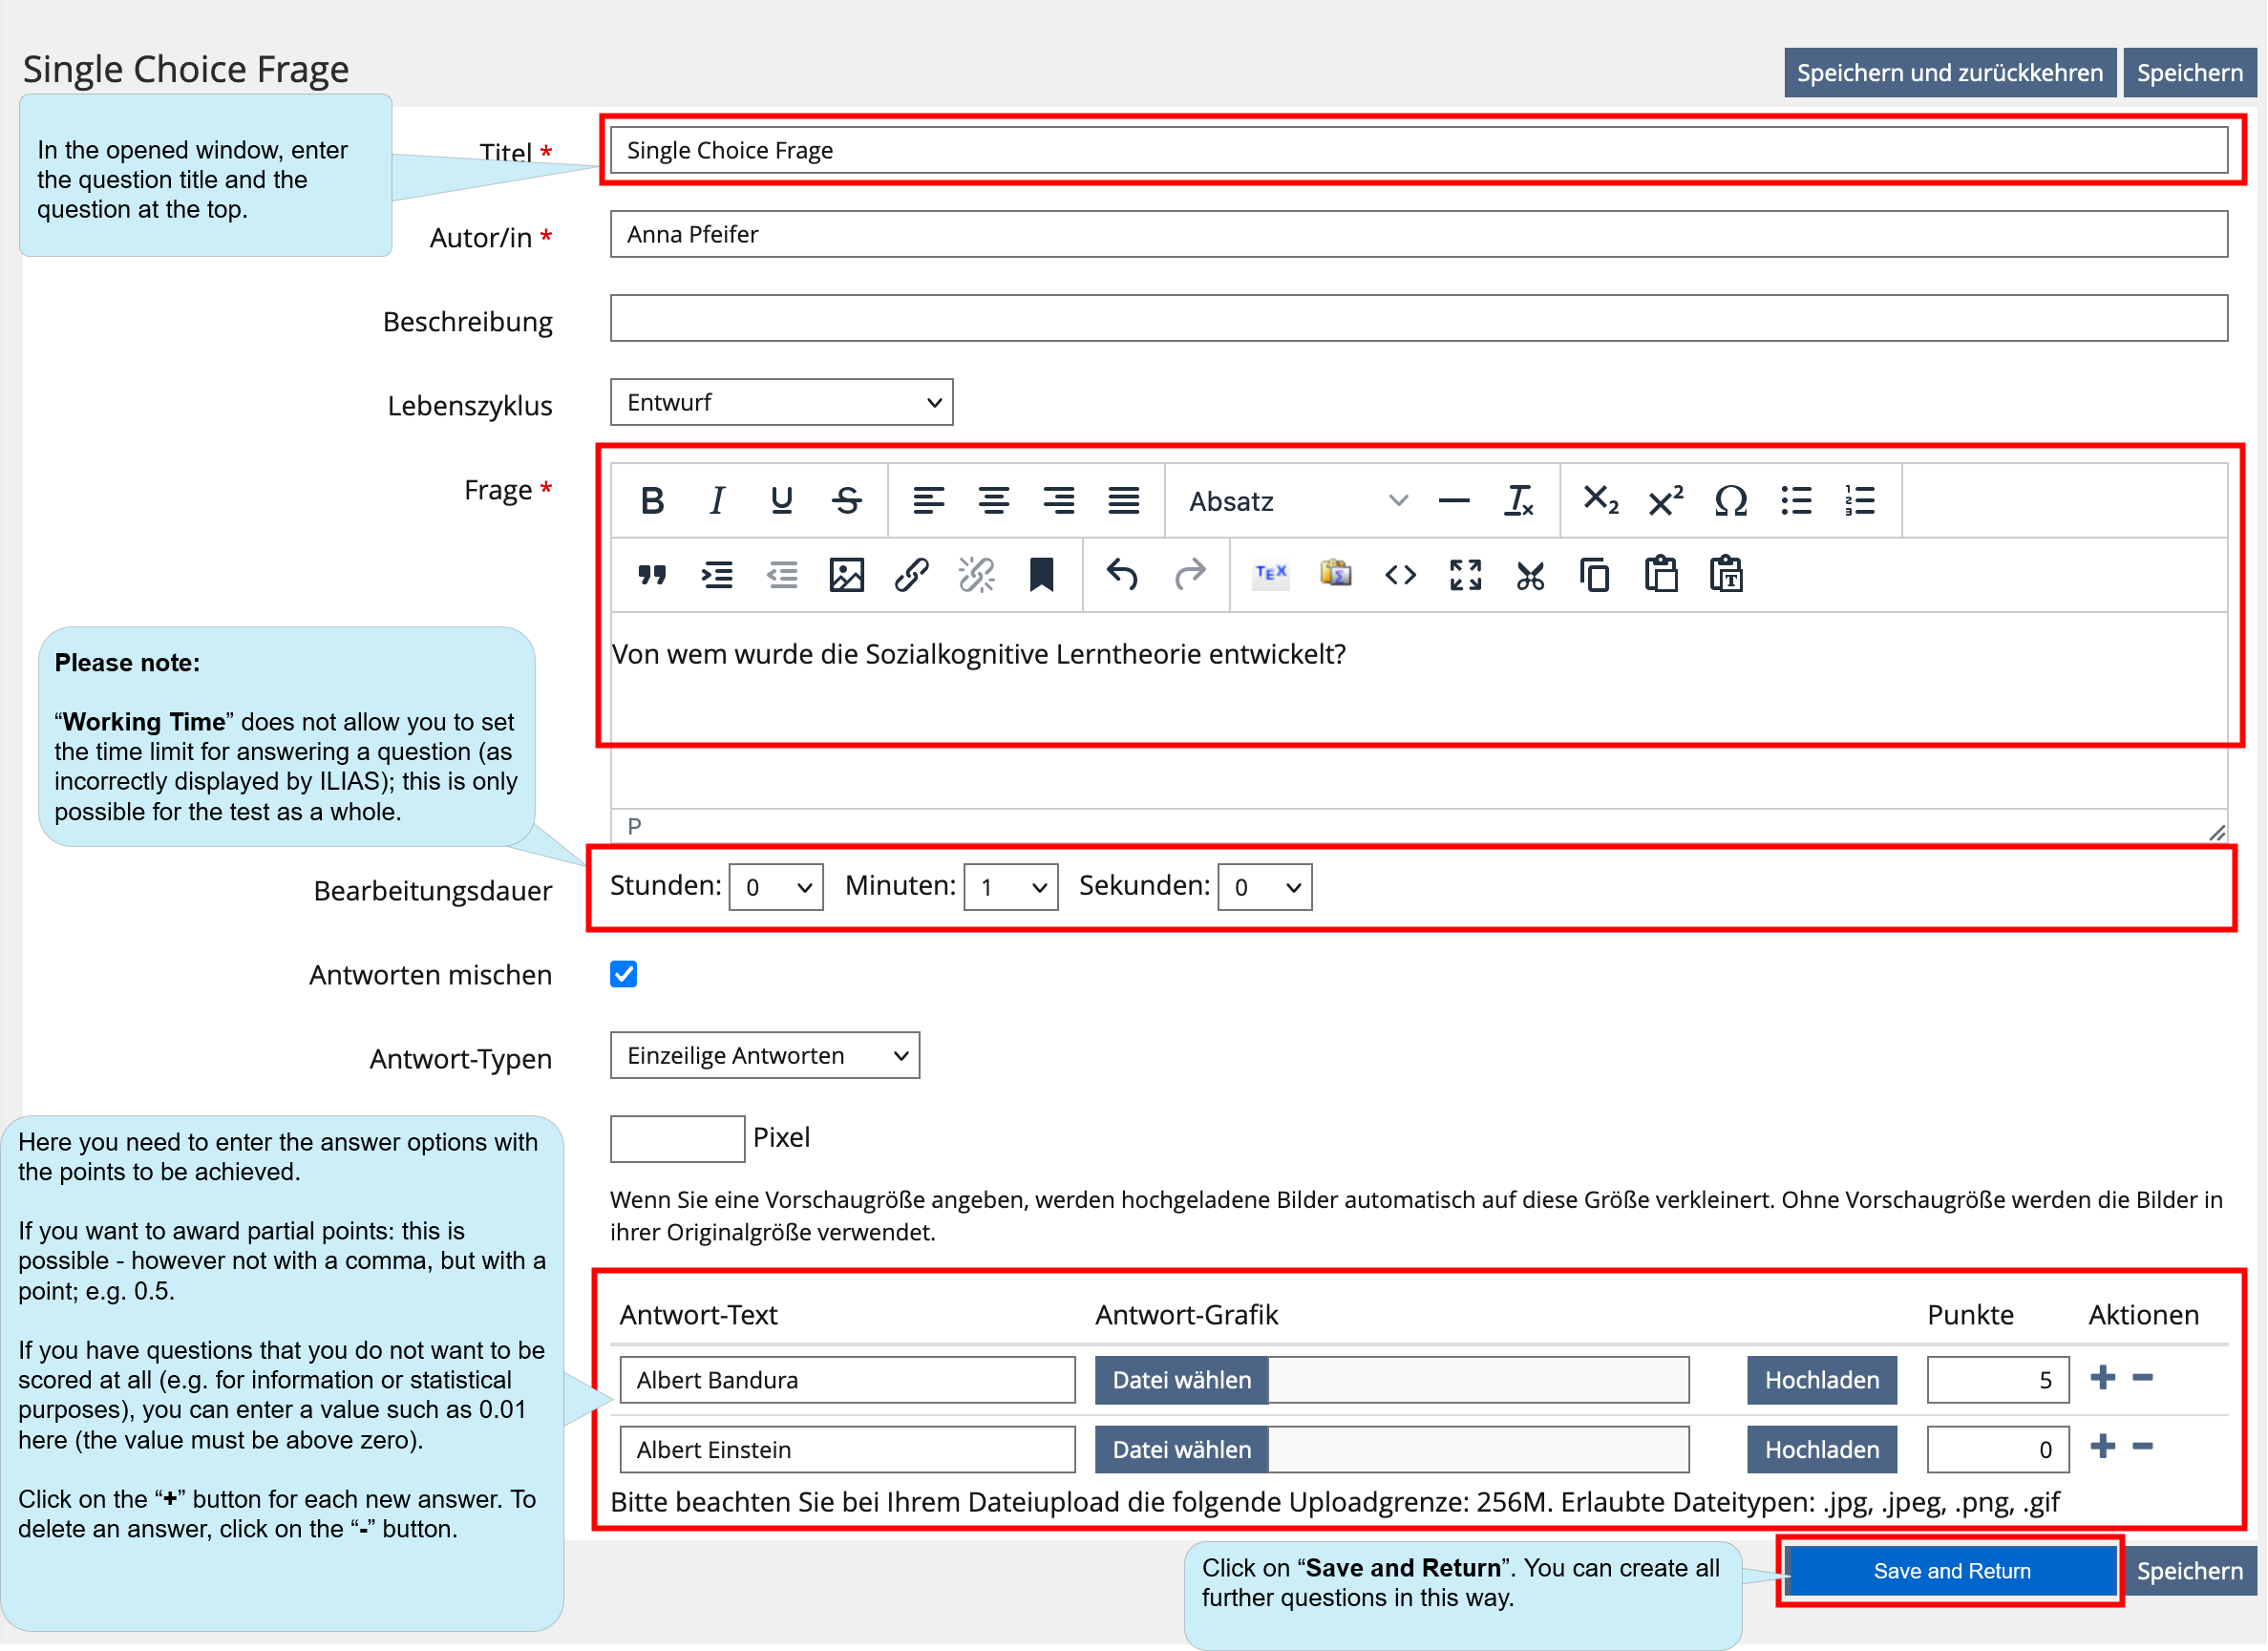
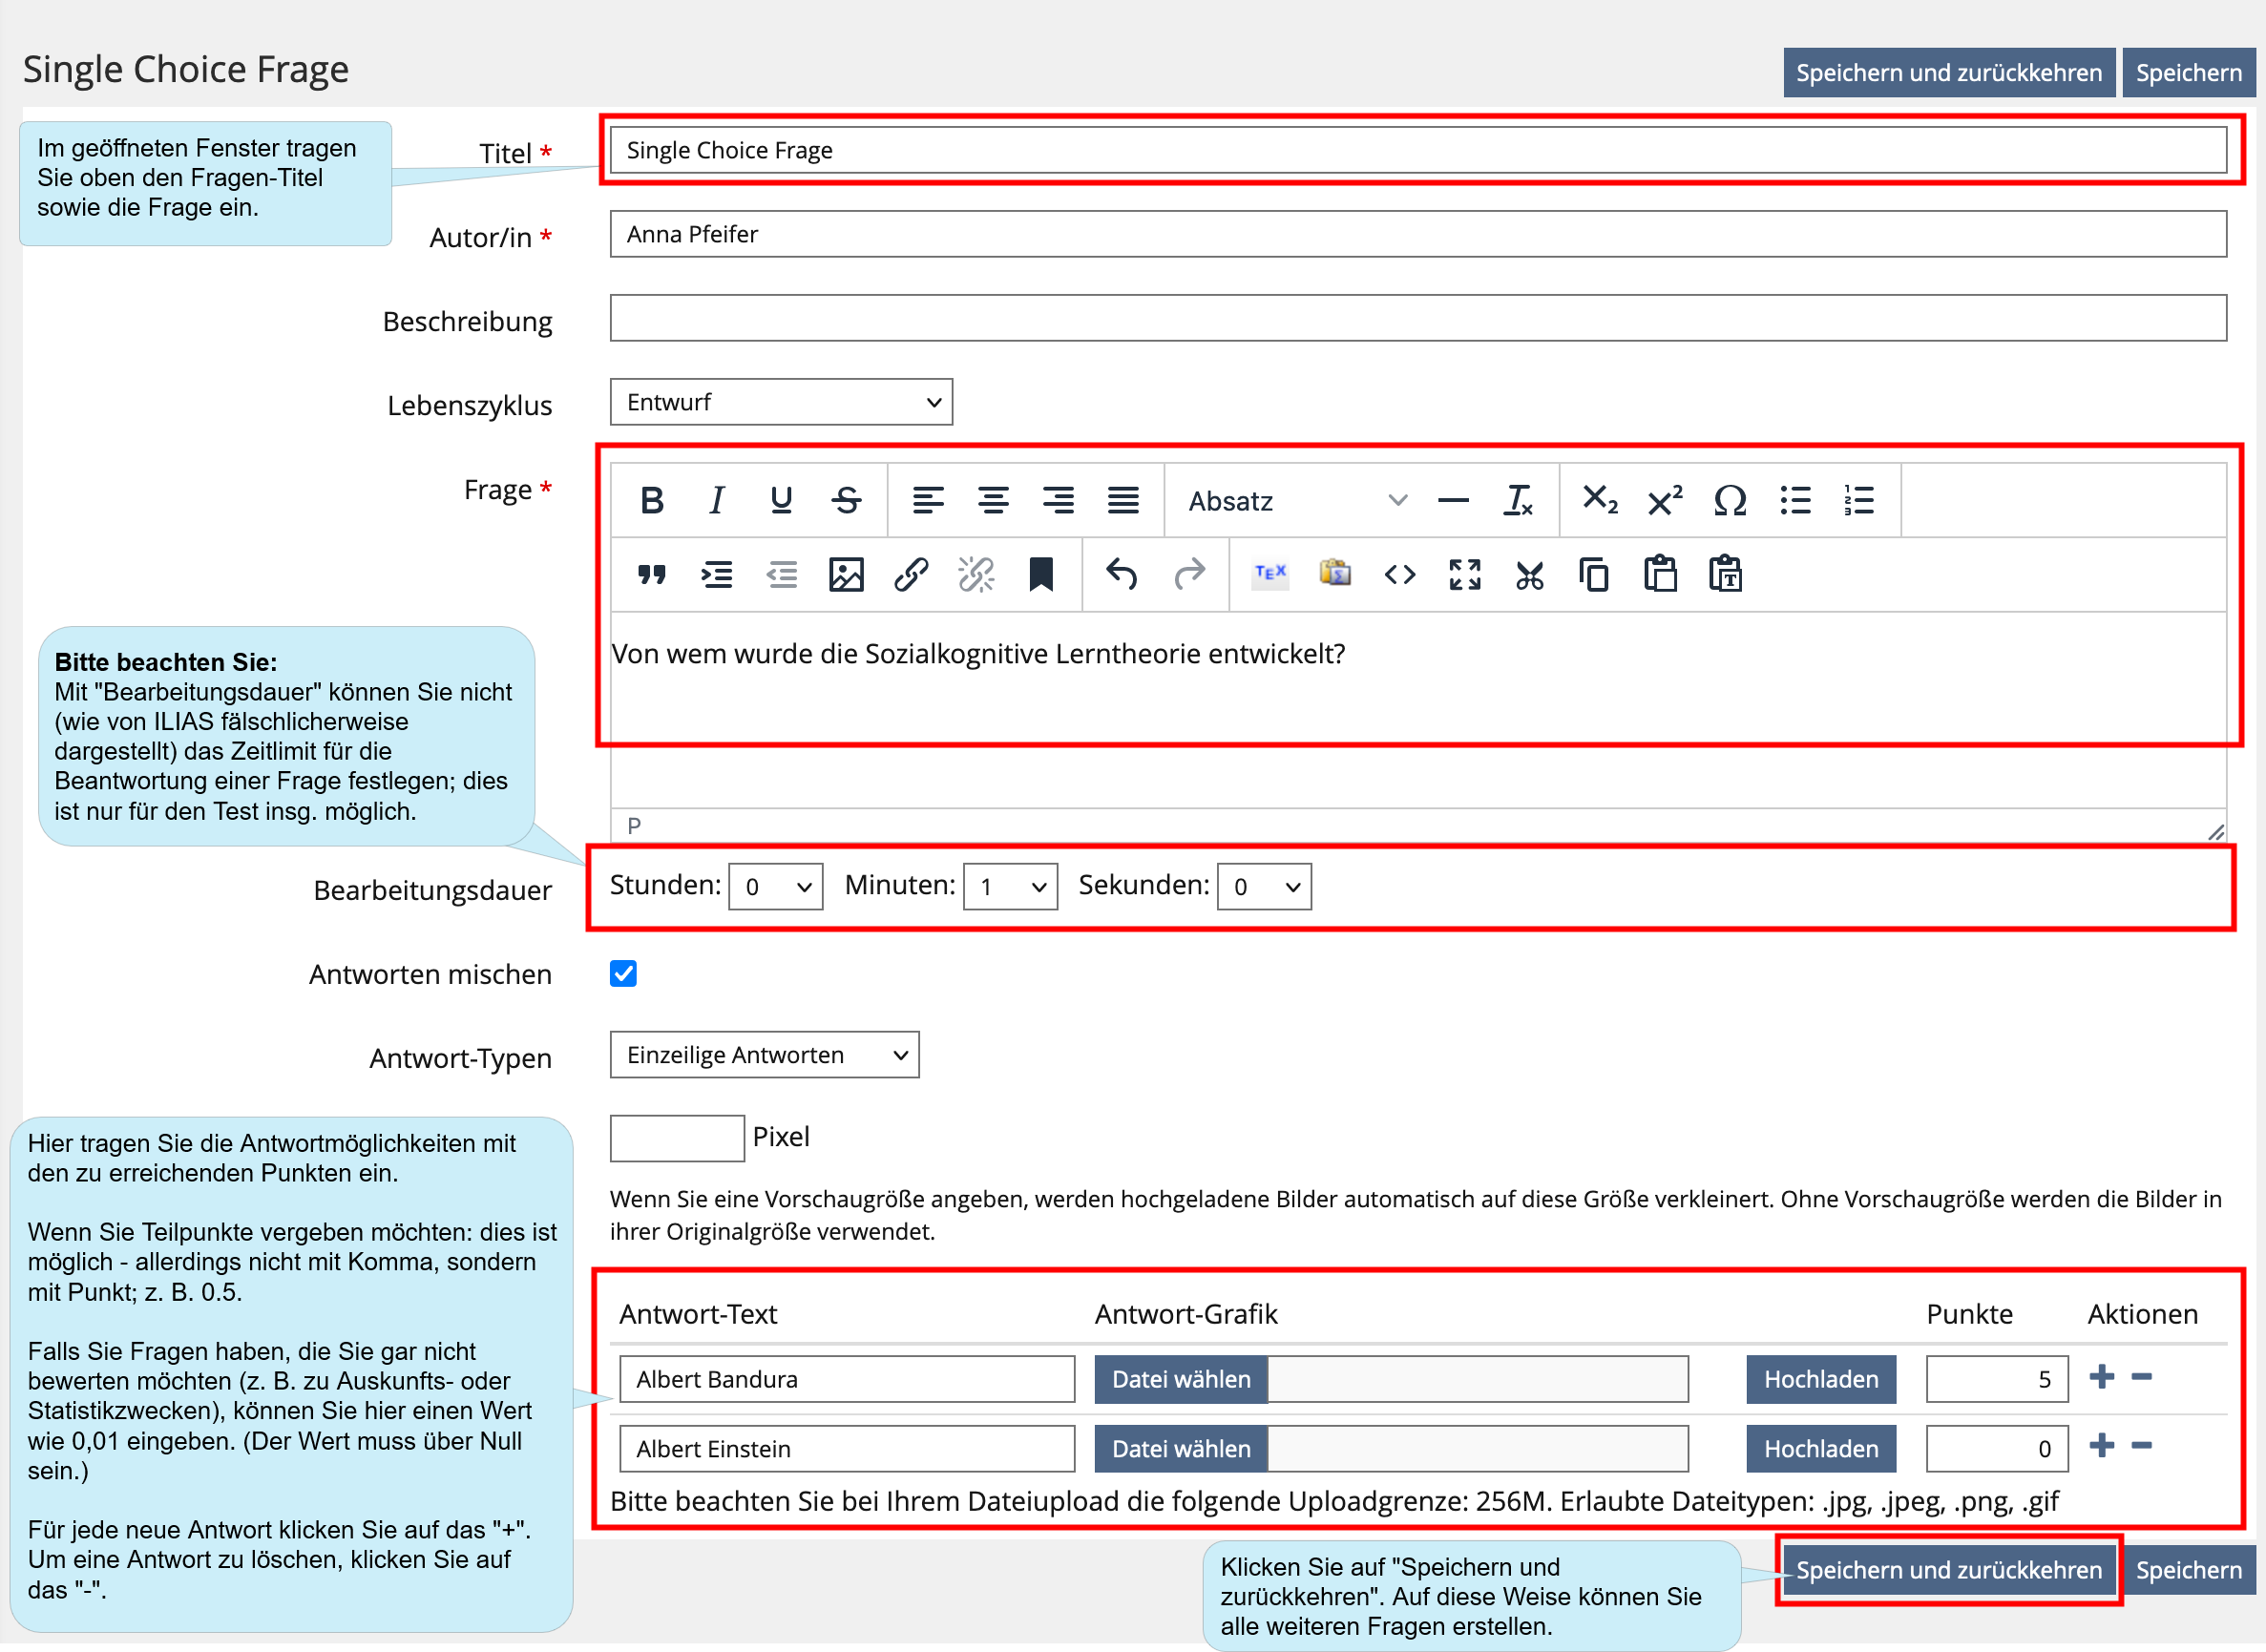
This is how you add questions to your test:
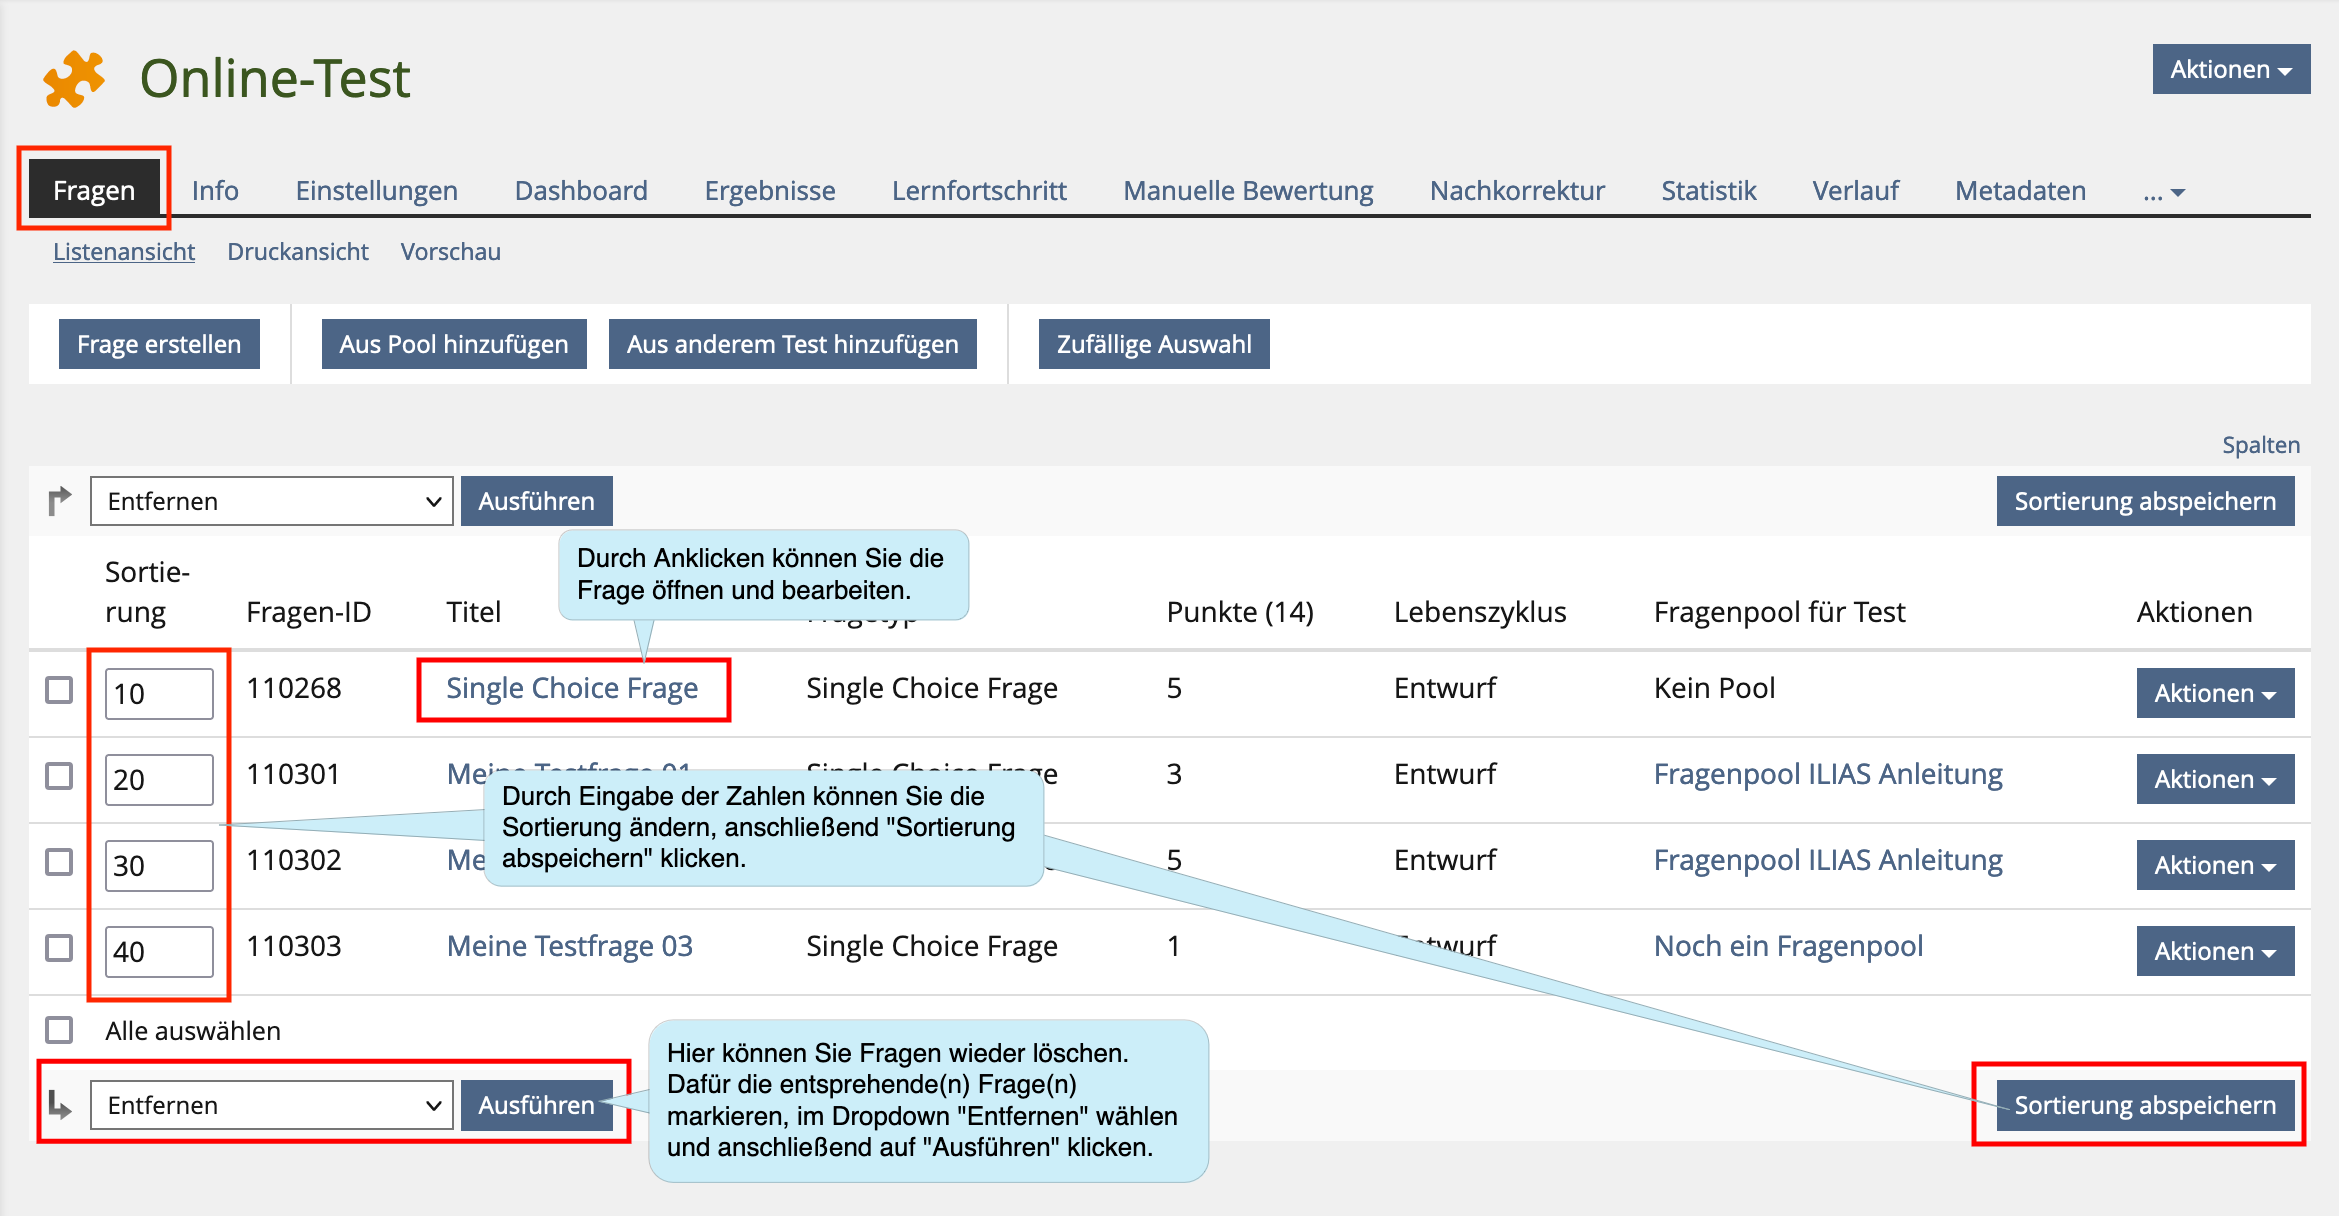
Empfehlung: Die Reihenfolge der Fragen können Sie jederzeit ändern (siehe Abschnitt 3.5. Fragen verwalten).
Please note:
Minus points are permissible and common practice in order to avoid or minimize random hits. However, the final score for a question may never be less than 0 points - it is not permitted to carry over minus points beyond the actual question. This is a preset in the standard settings of your test.
3.3.2. Creating questions pools
Benefits of question pools:
- You can collect and manage any number of questions in one or more question pools over the long run - e.g. according to content criteria. In the written test, you can draw questions from any number of question pools. You can reuse the questions in question pools in numerous tests.
- You have the option of categorizing questions with taxonomies. For example, you can create a thematic taxonomy and then add subordinate nodes “easy”, “medium”, “difficult”.
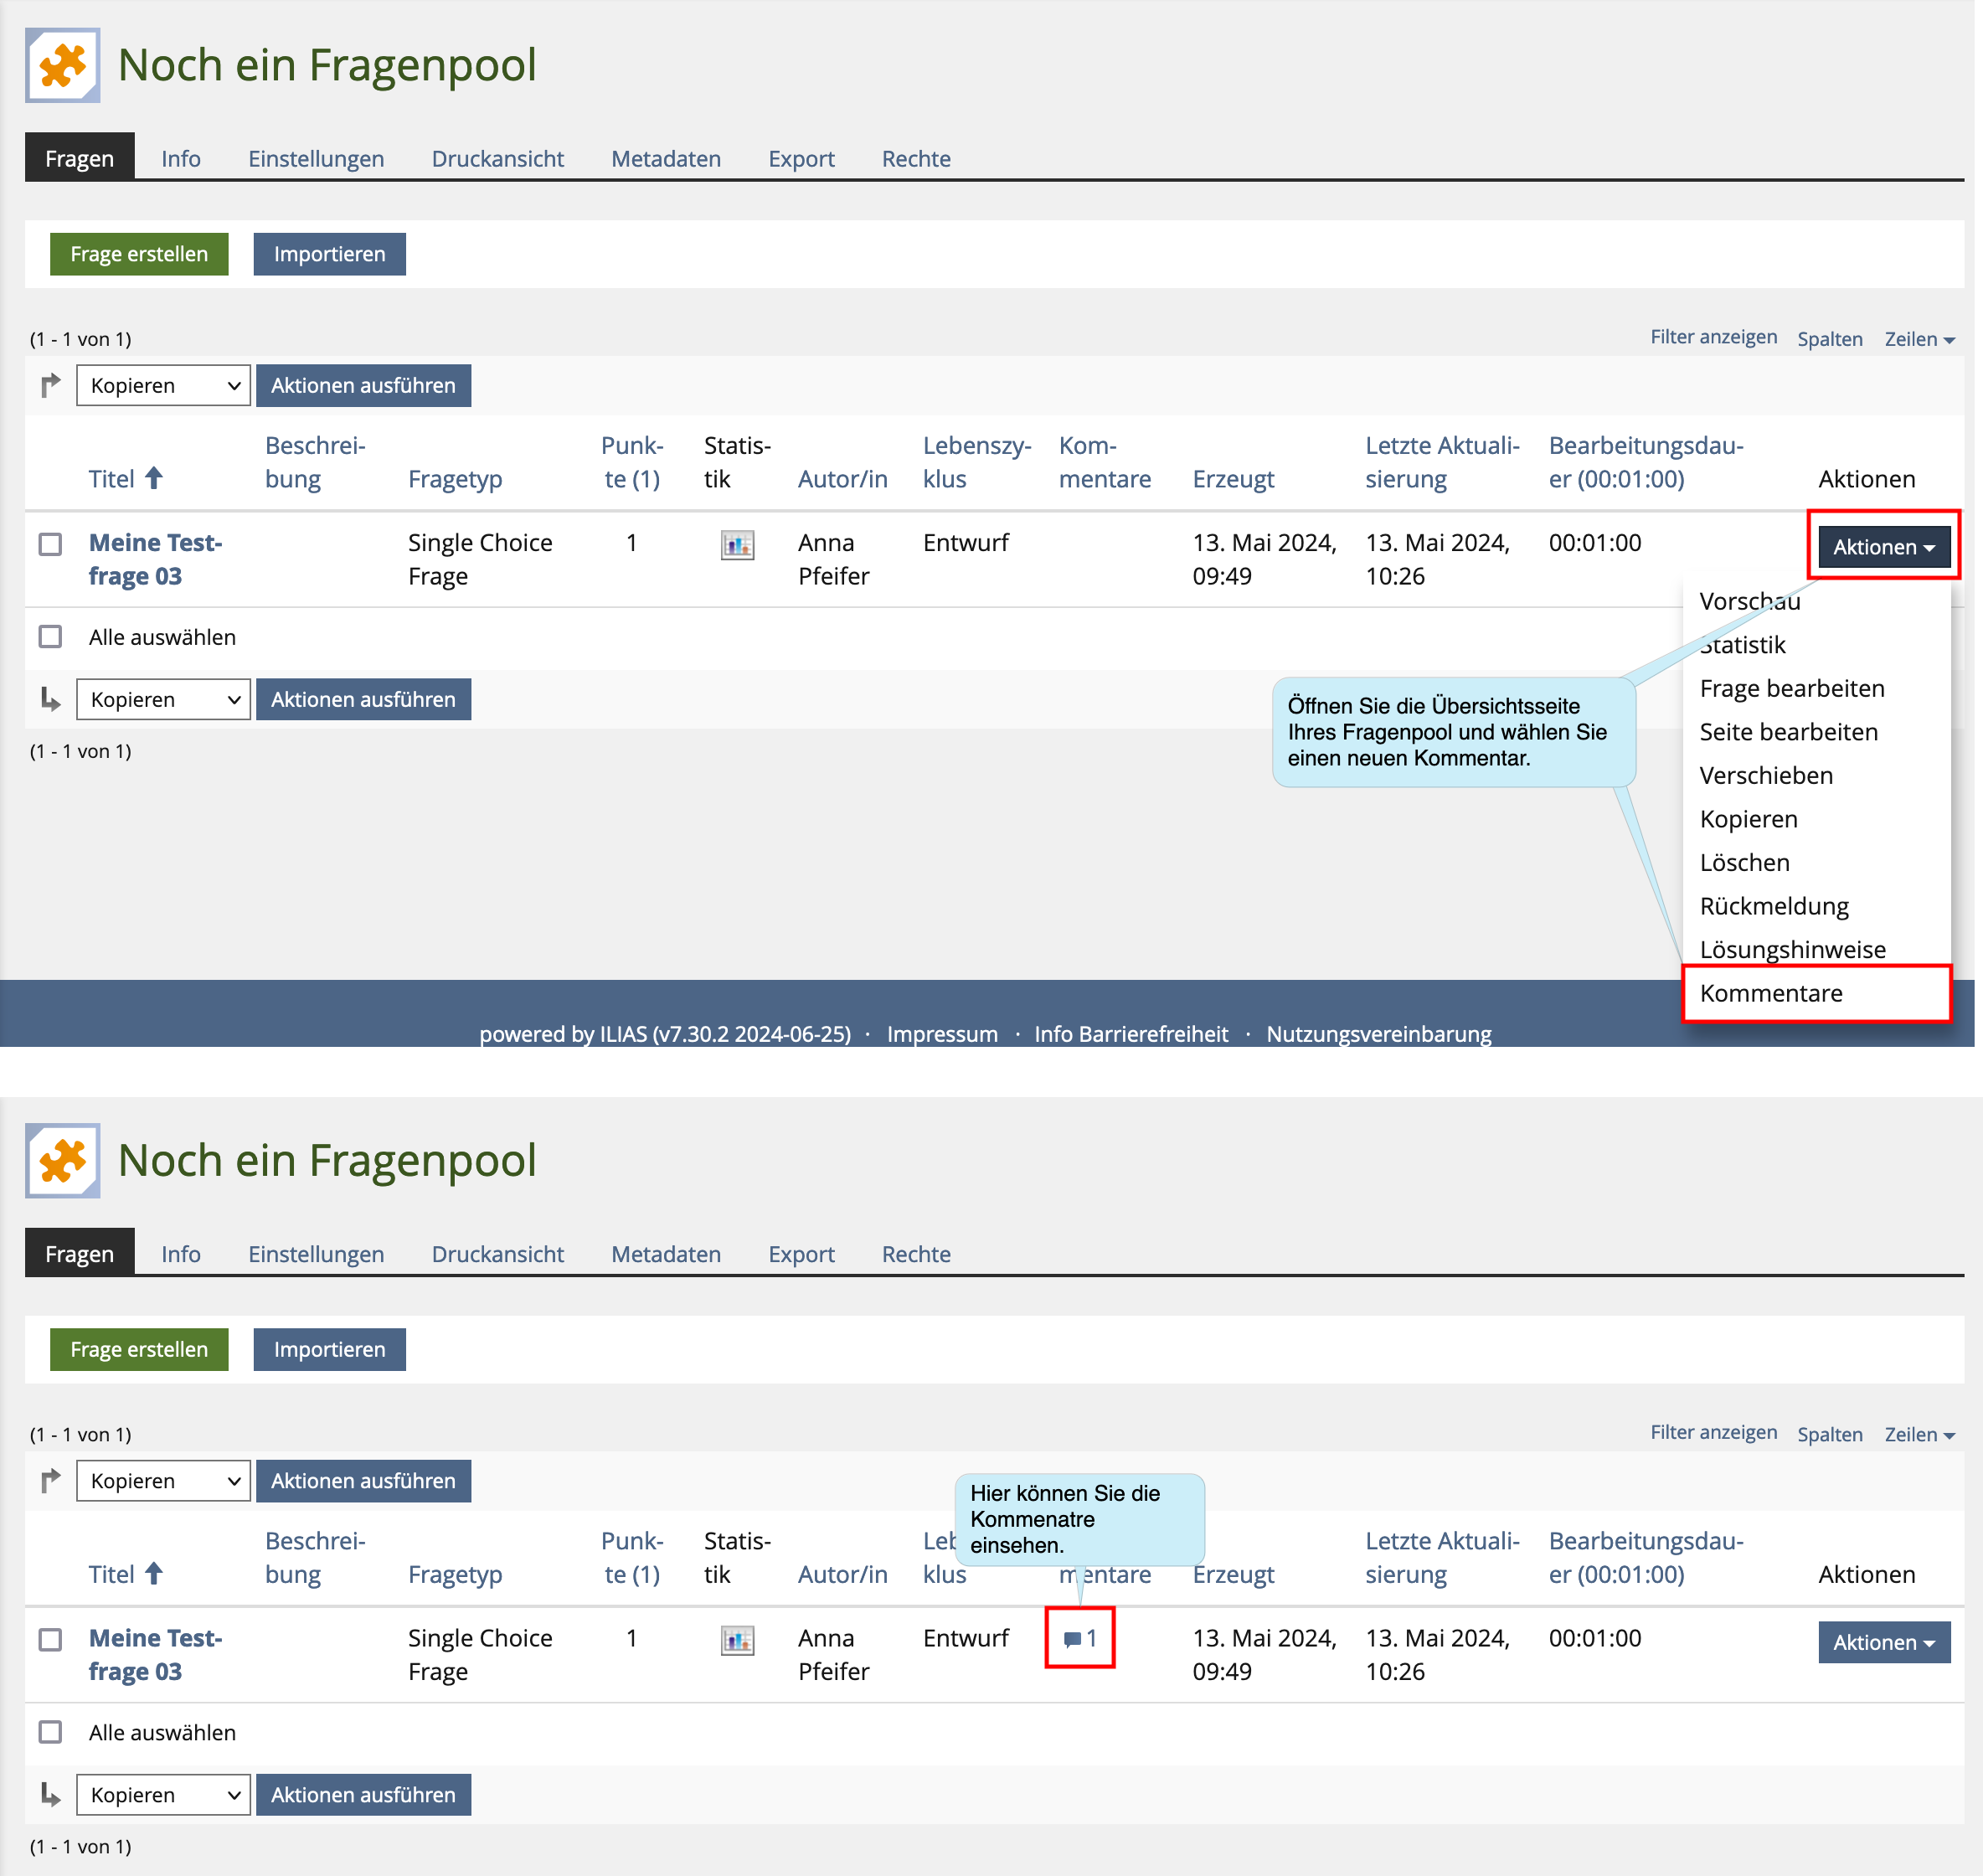
- You can add comments to individual questions. This makes it easier to edit question pools collaboratively.
Question pools are not visible to the participants.
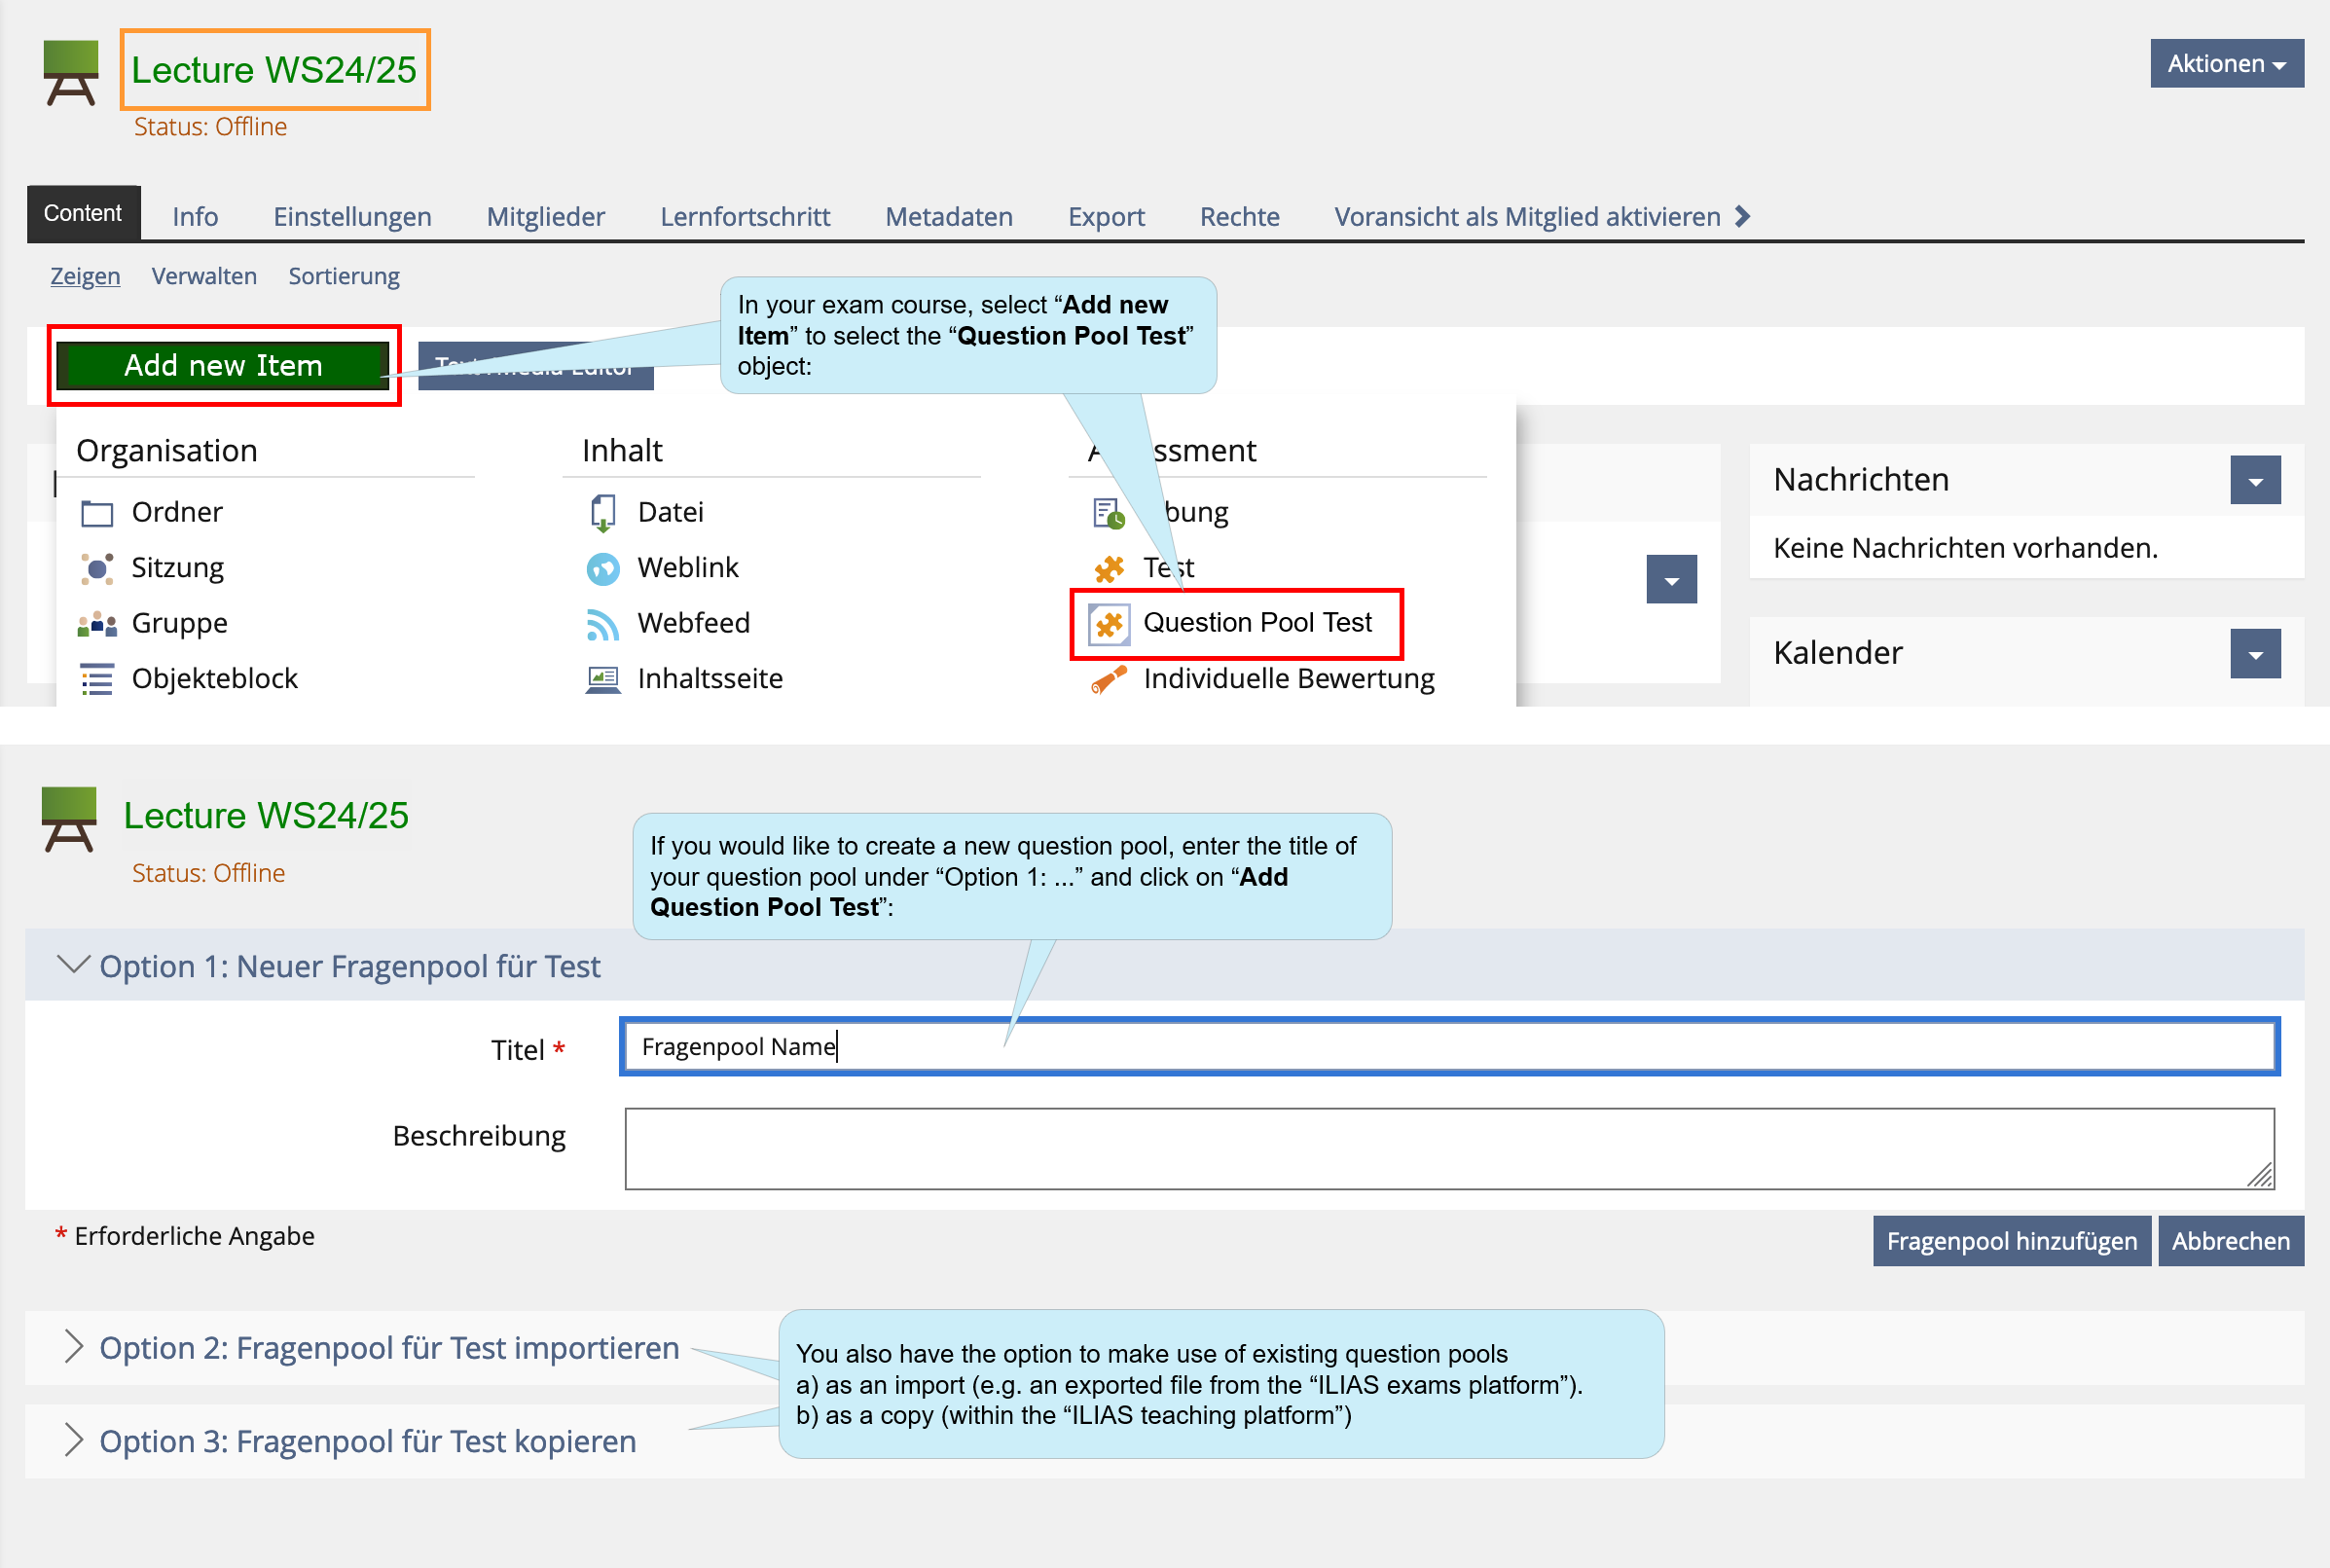
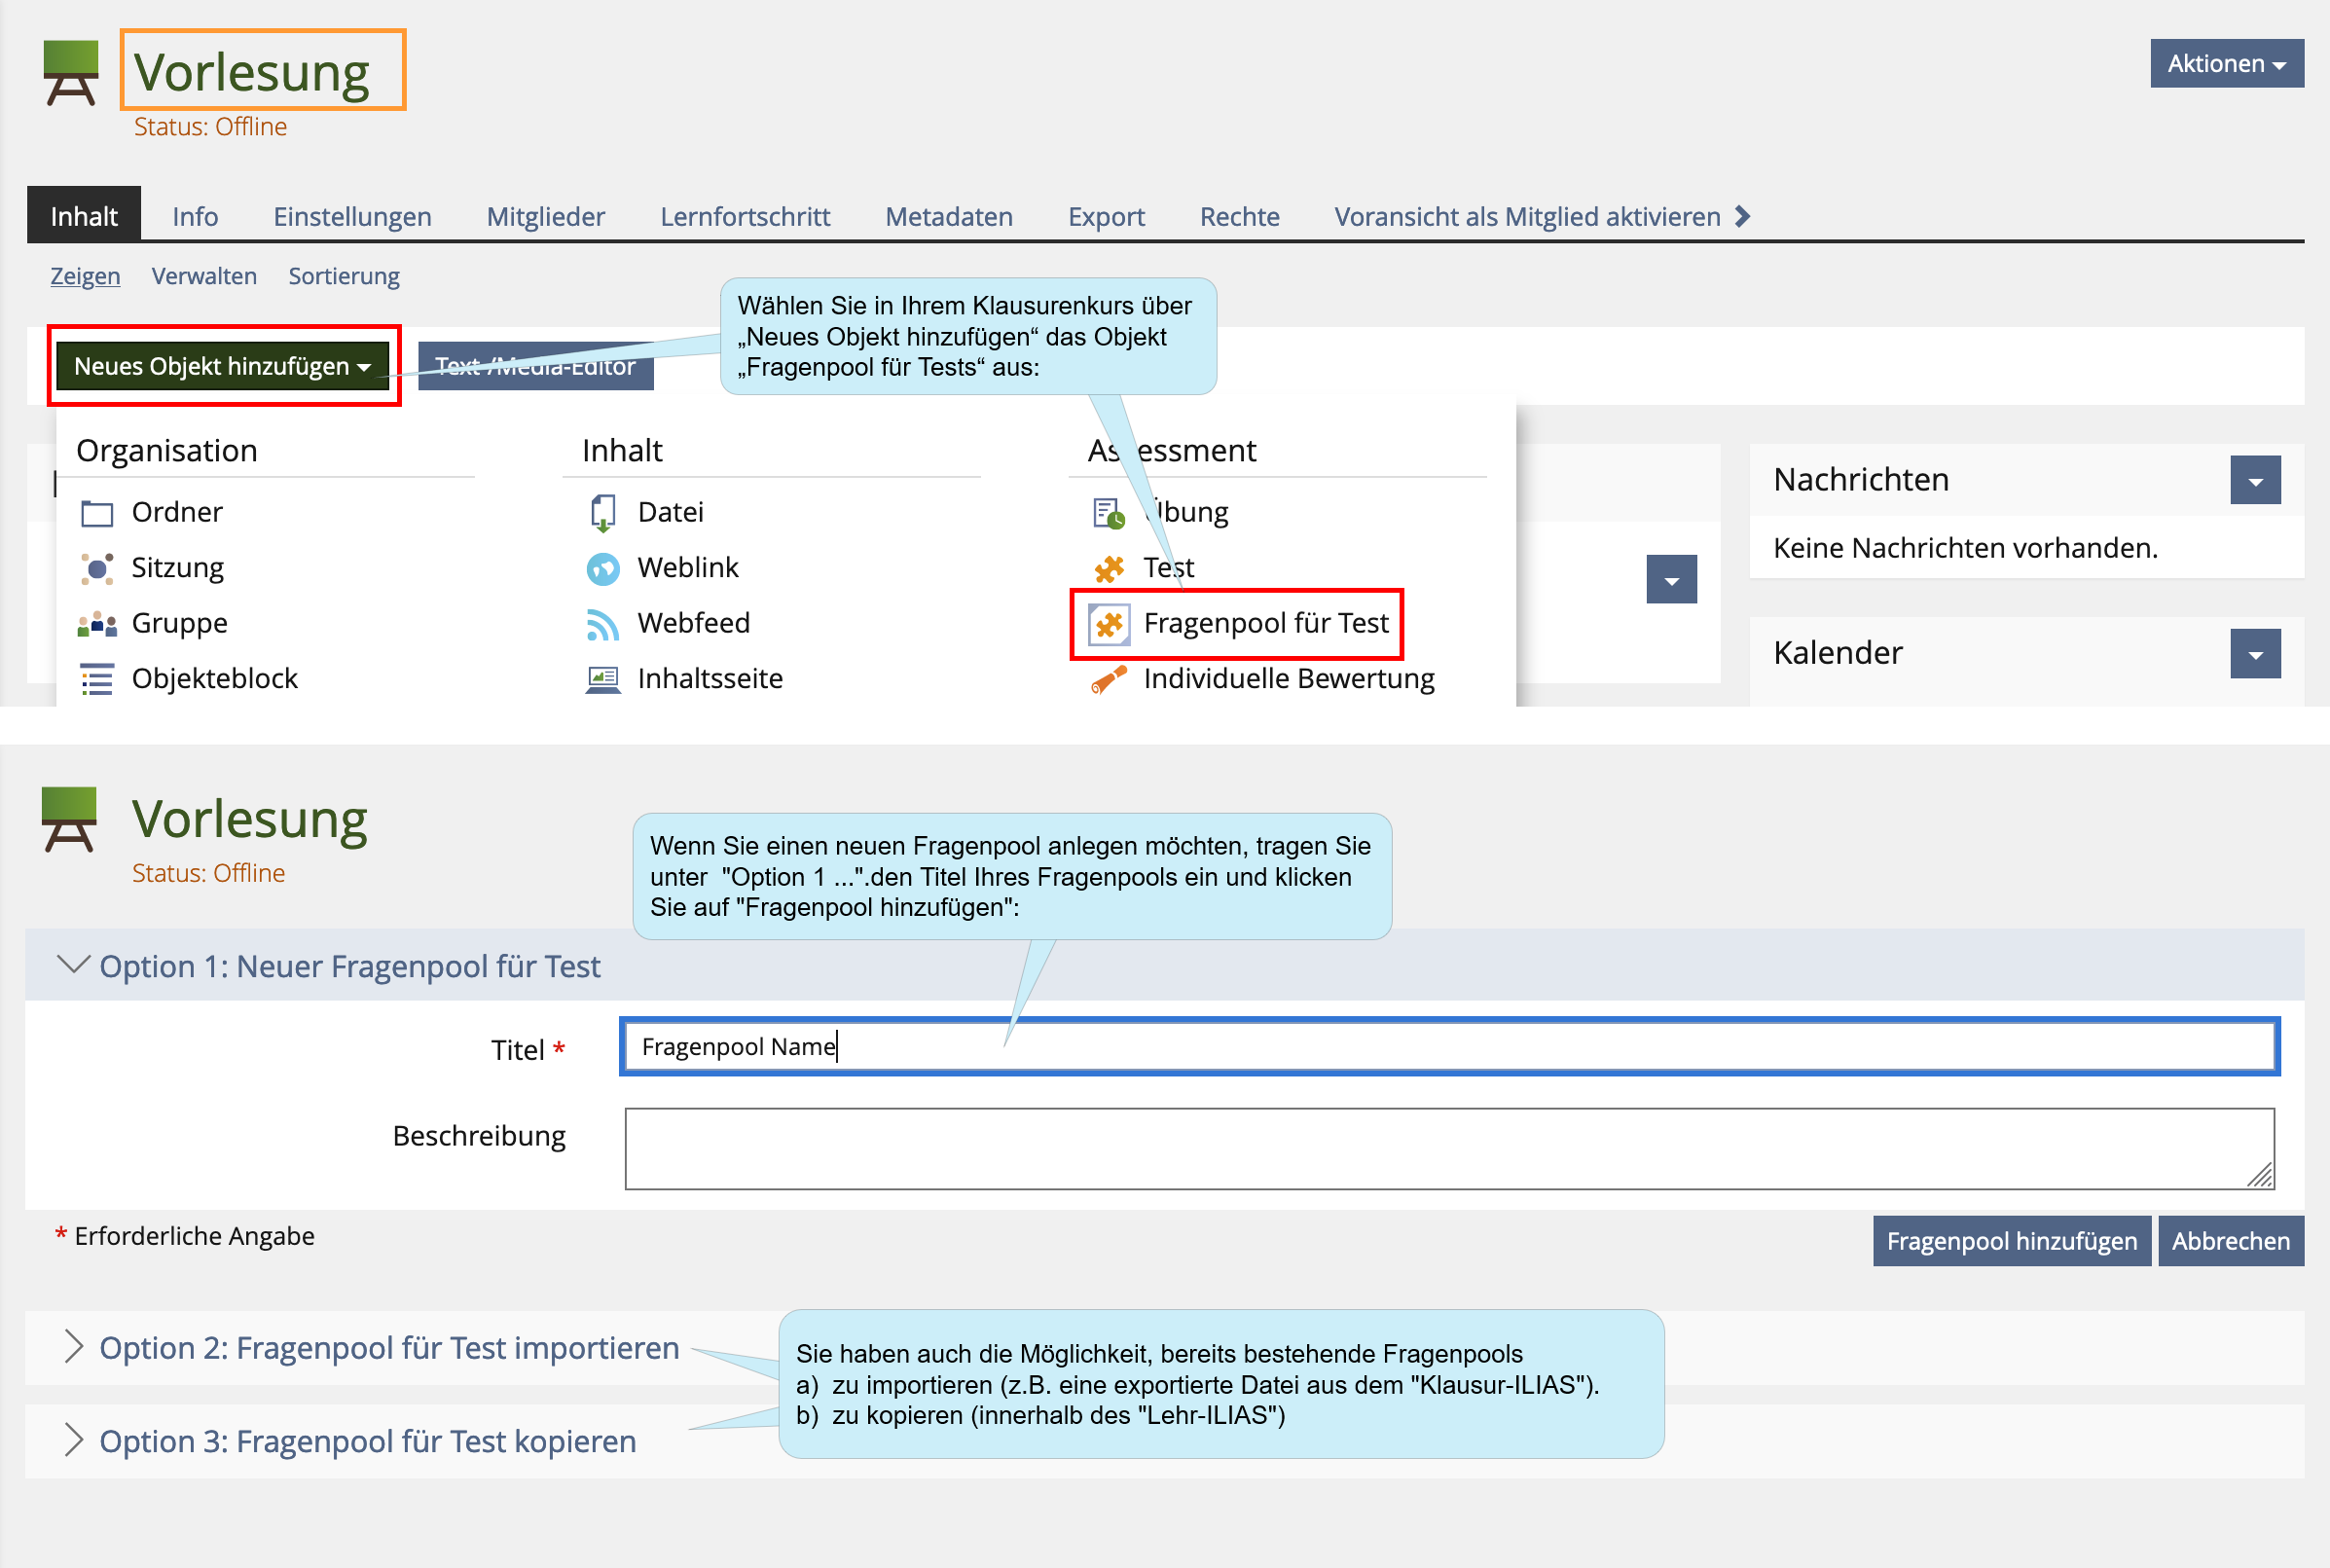
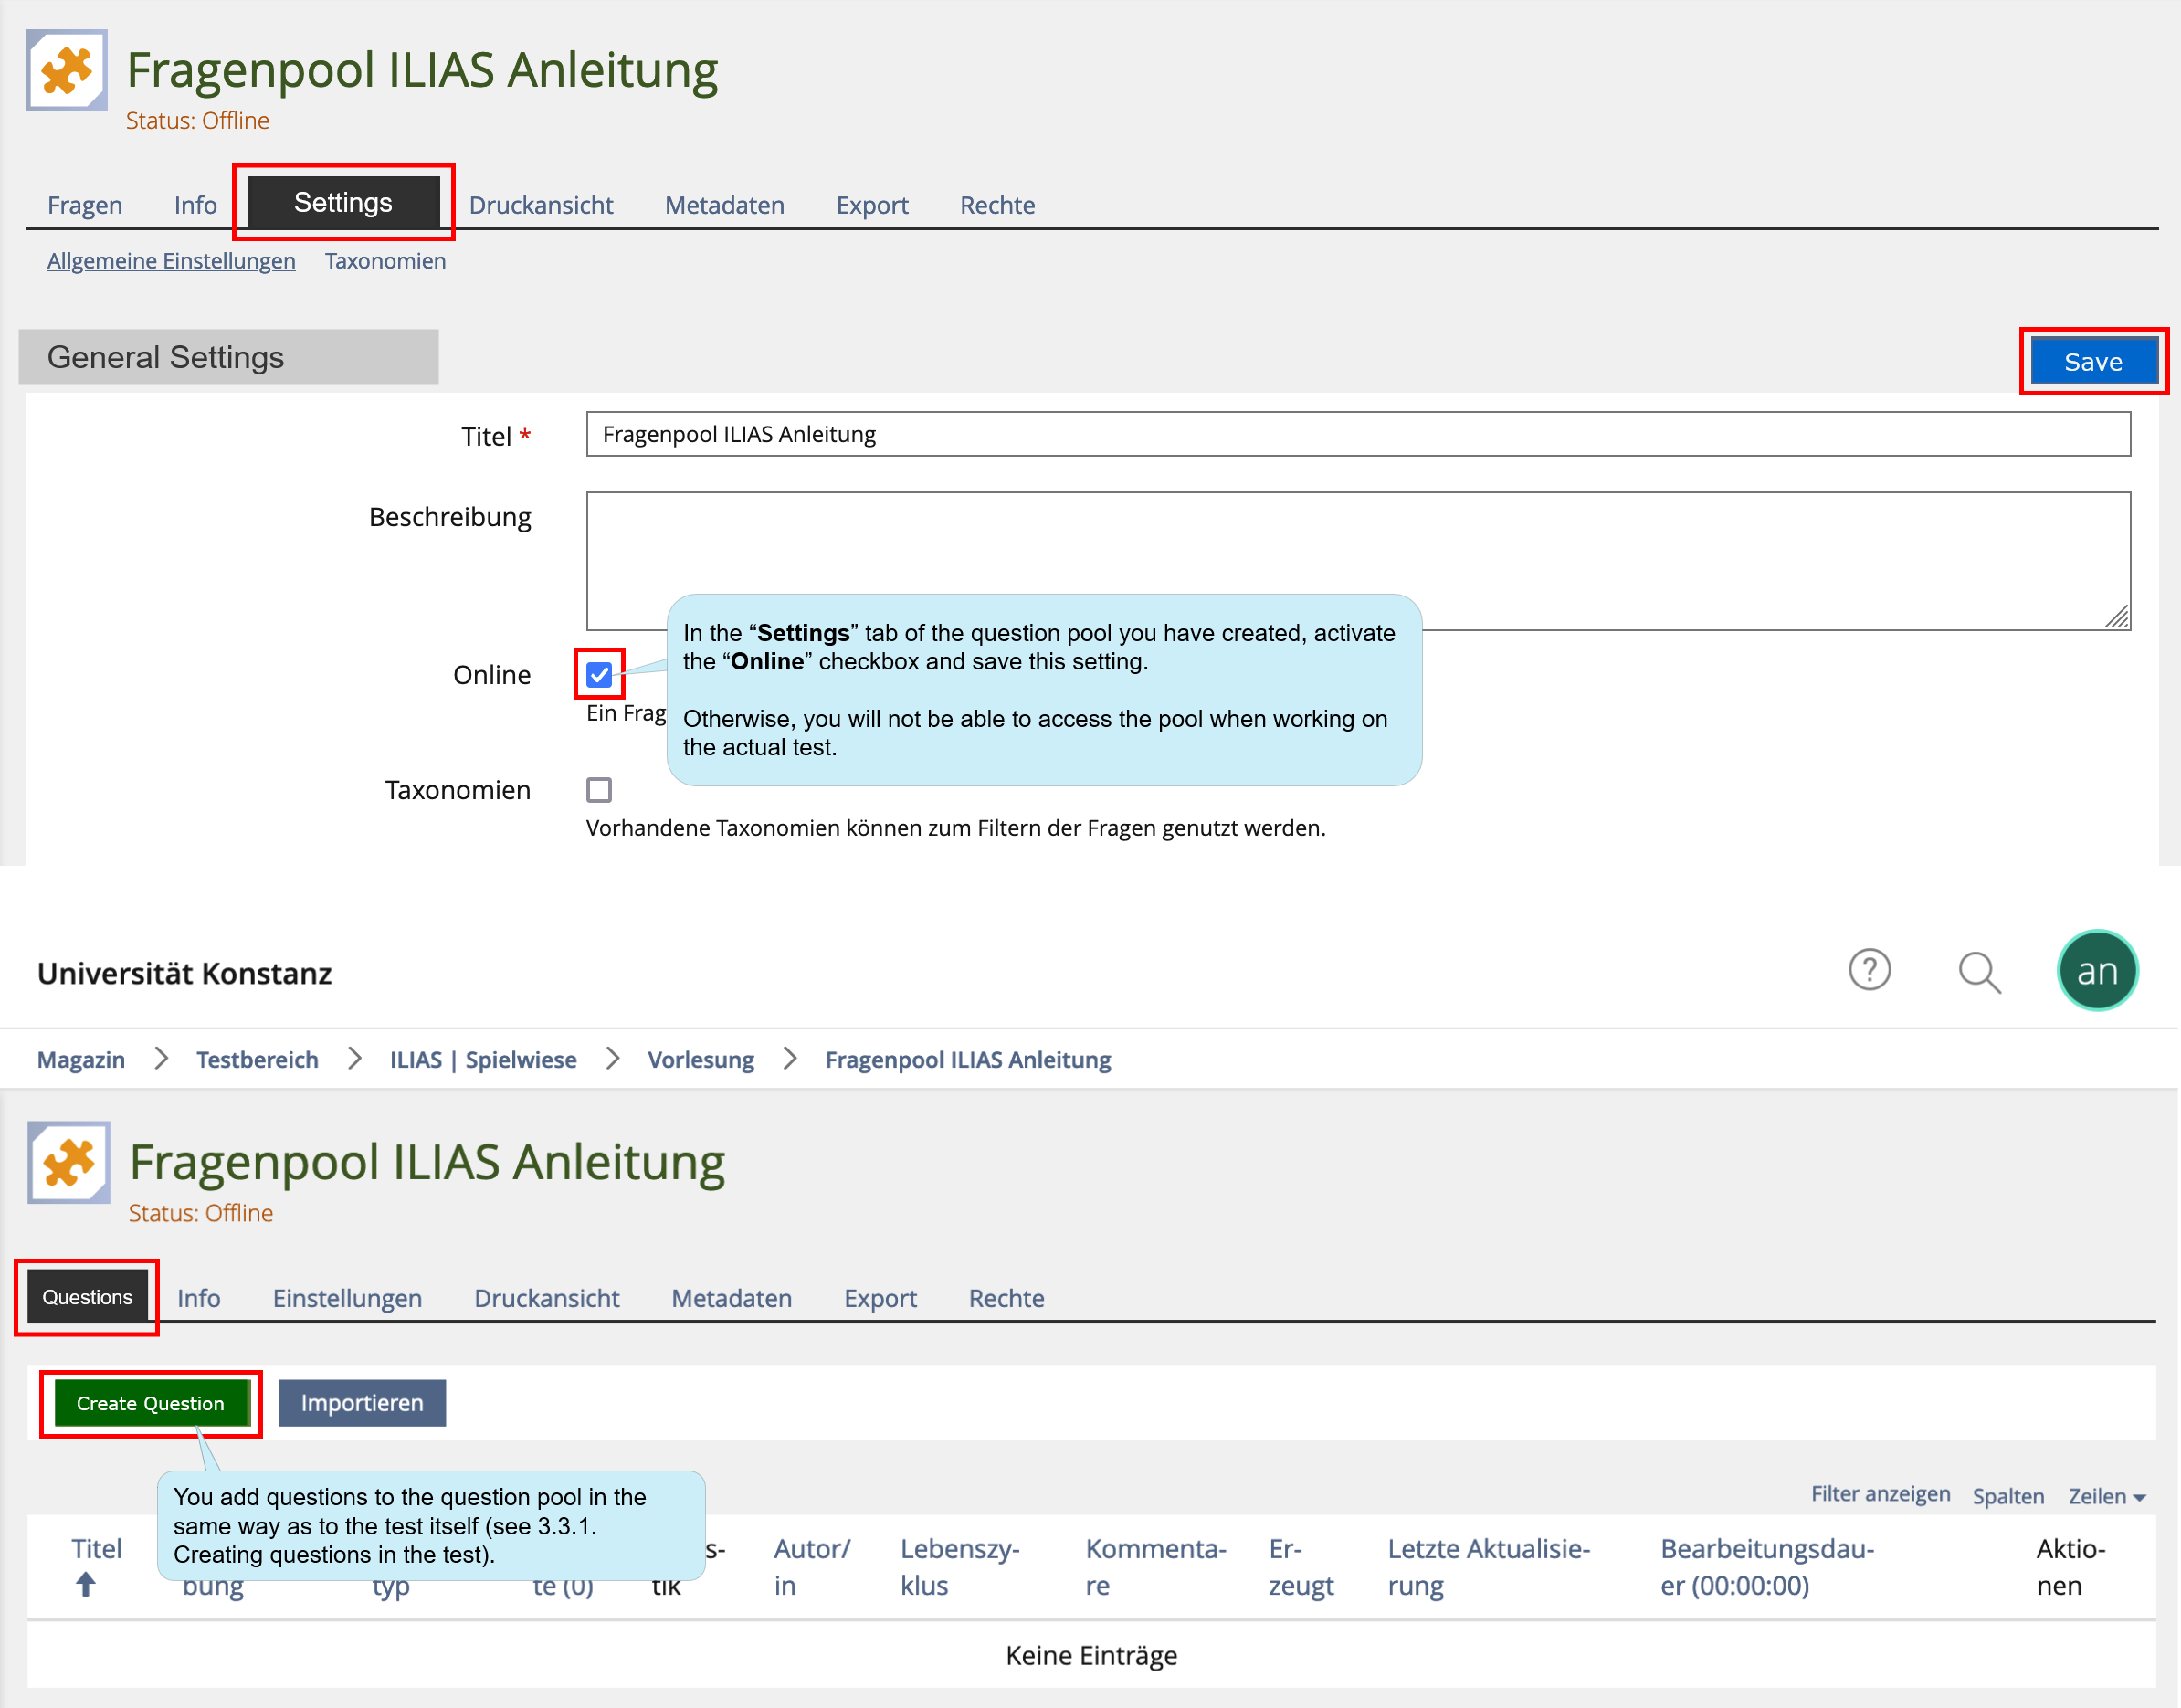
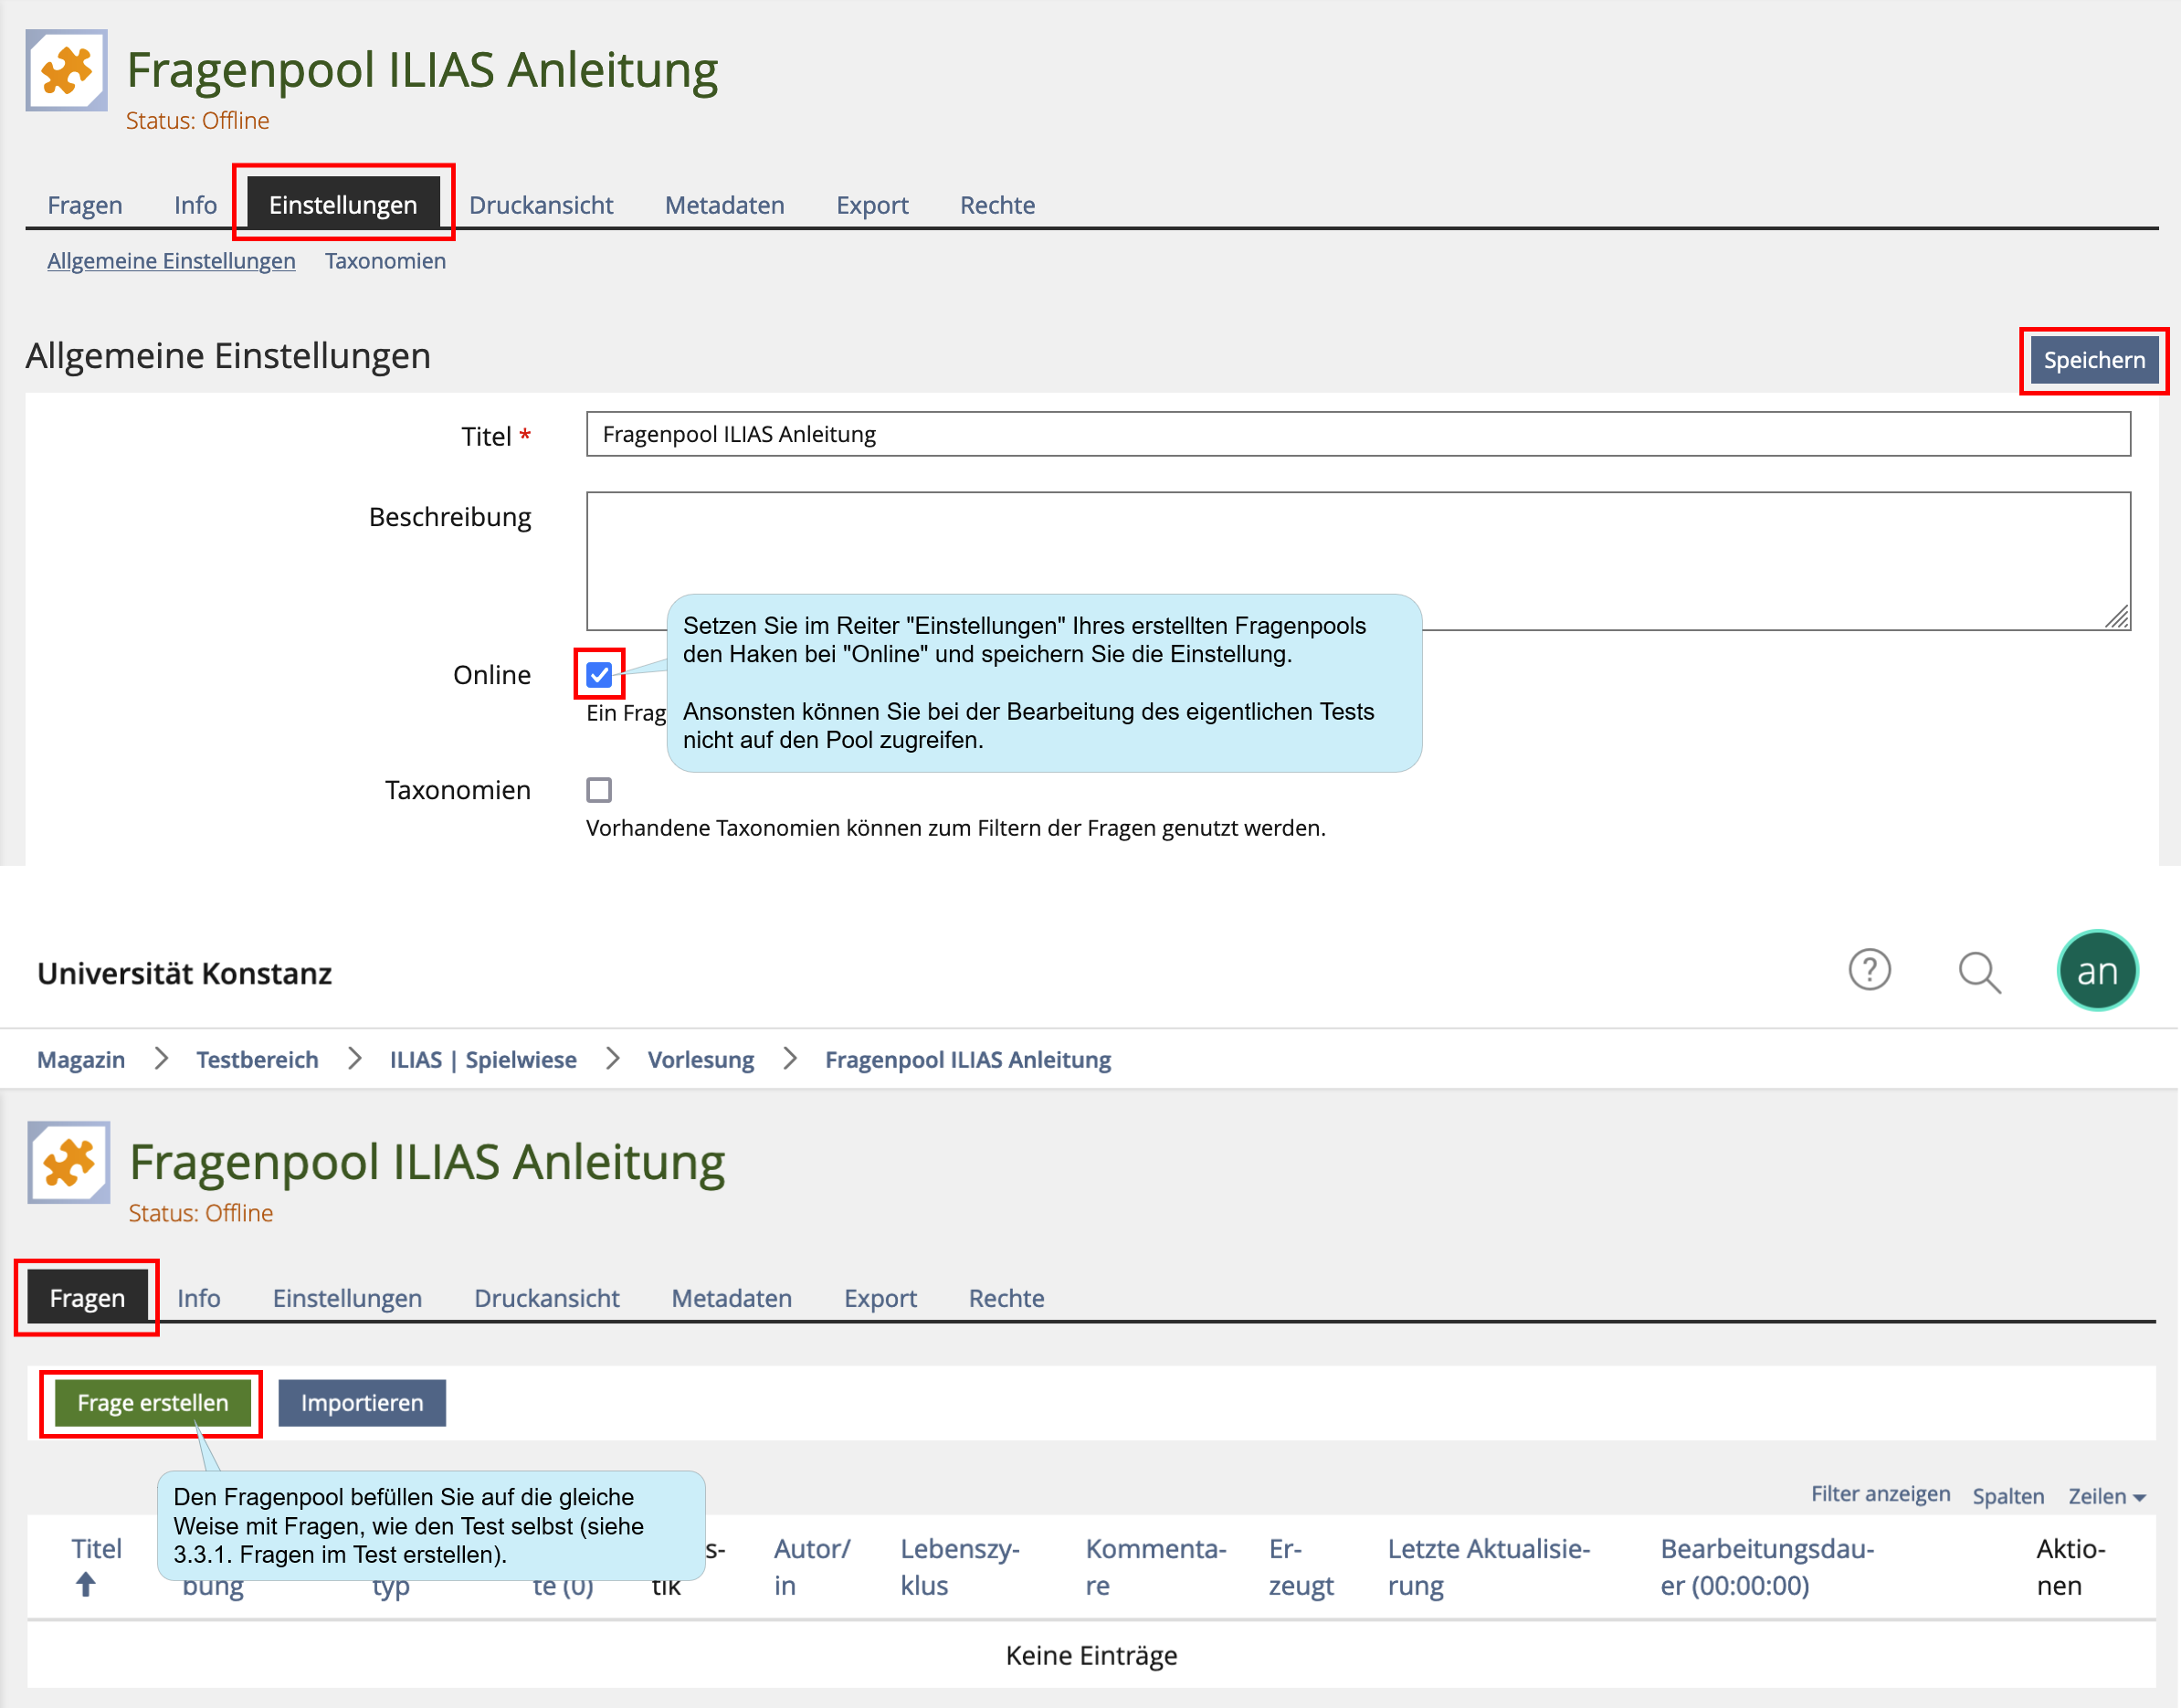
How to create a question pool:
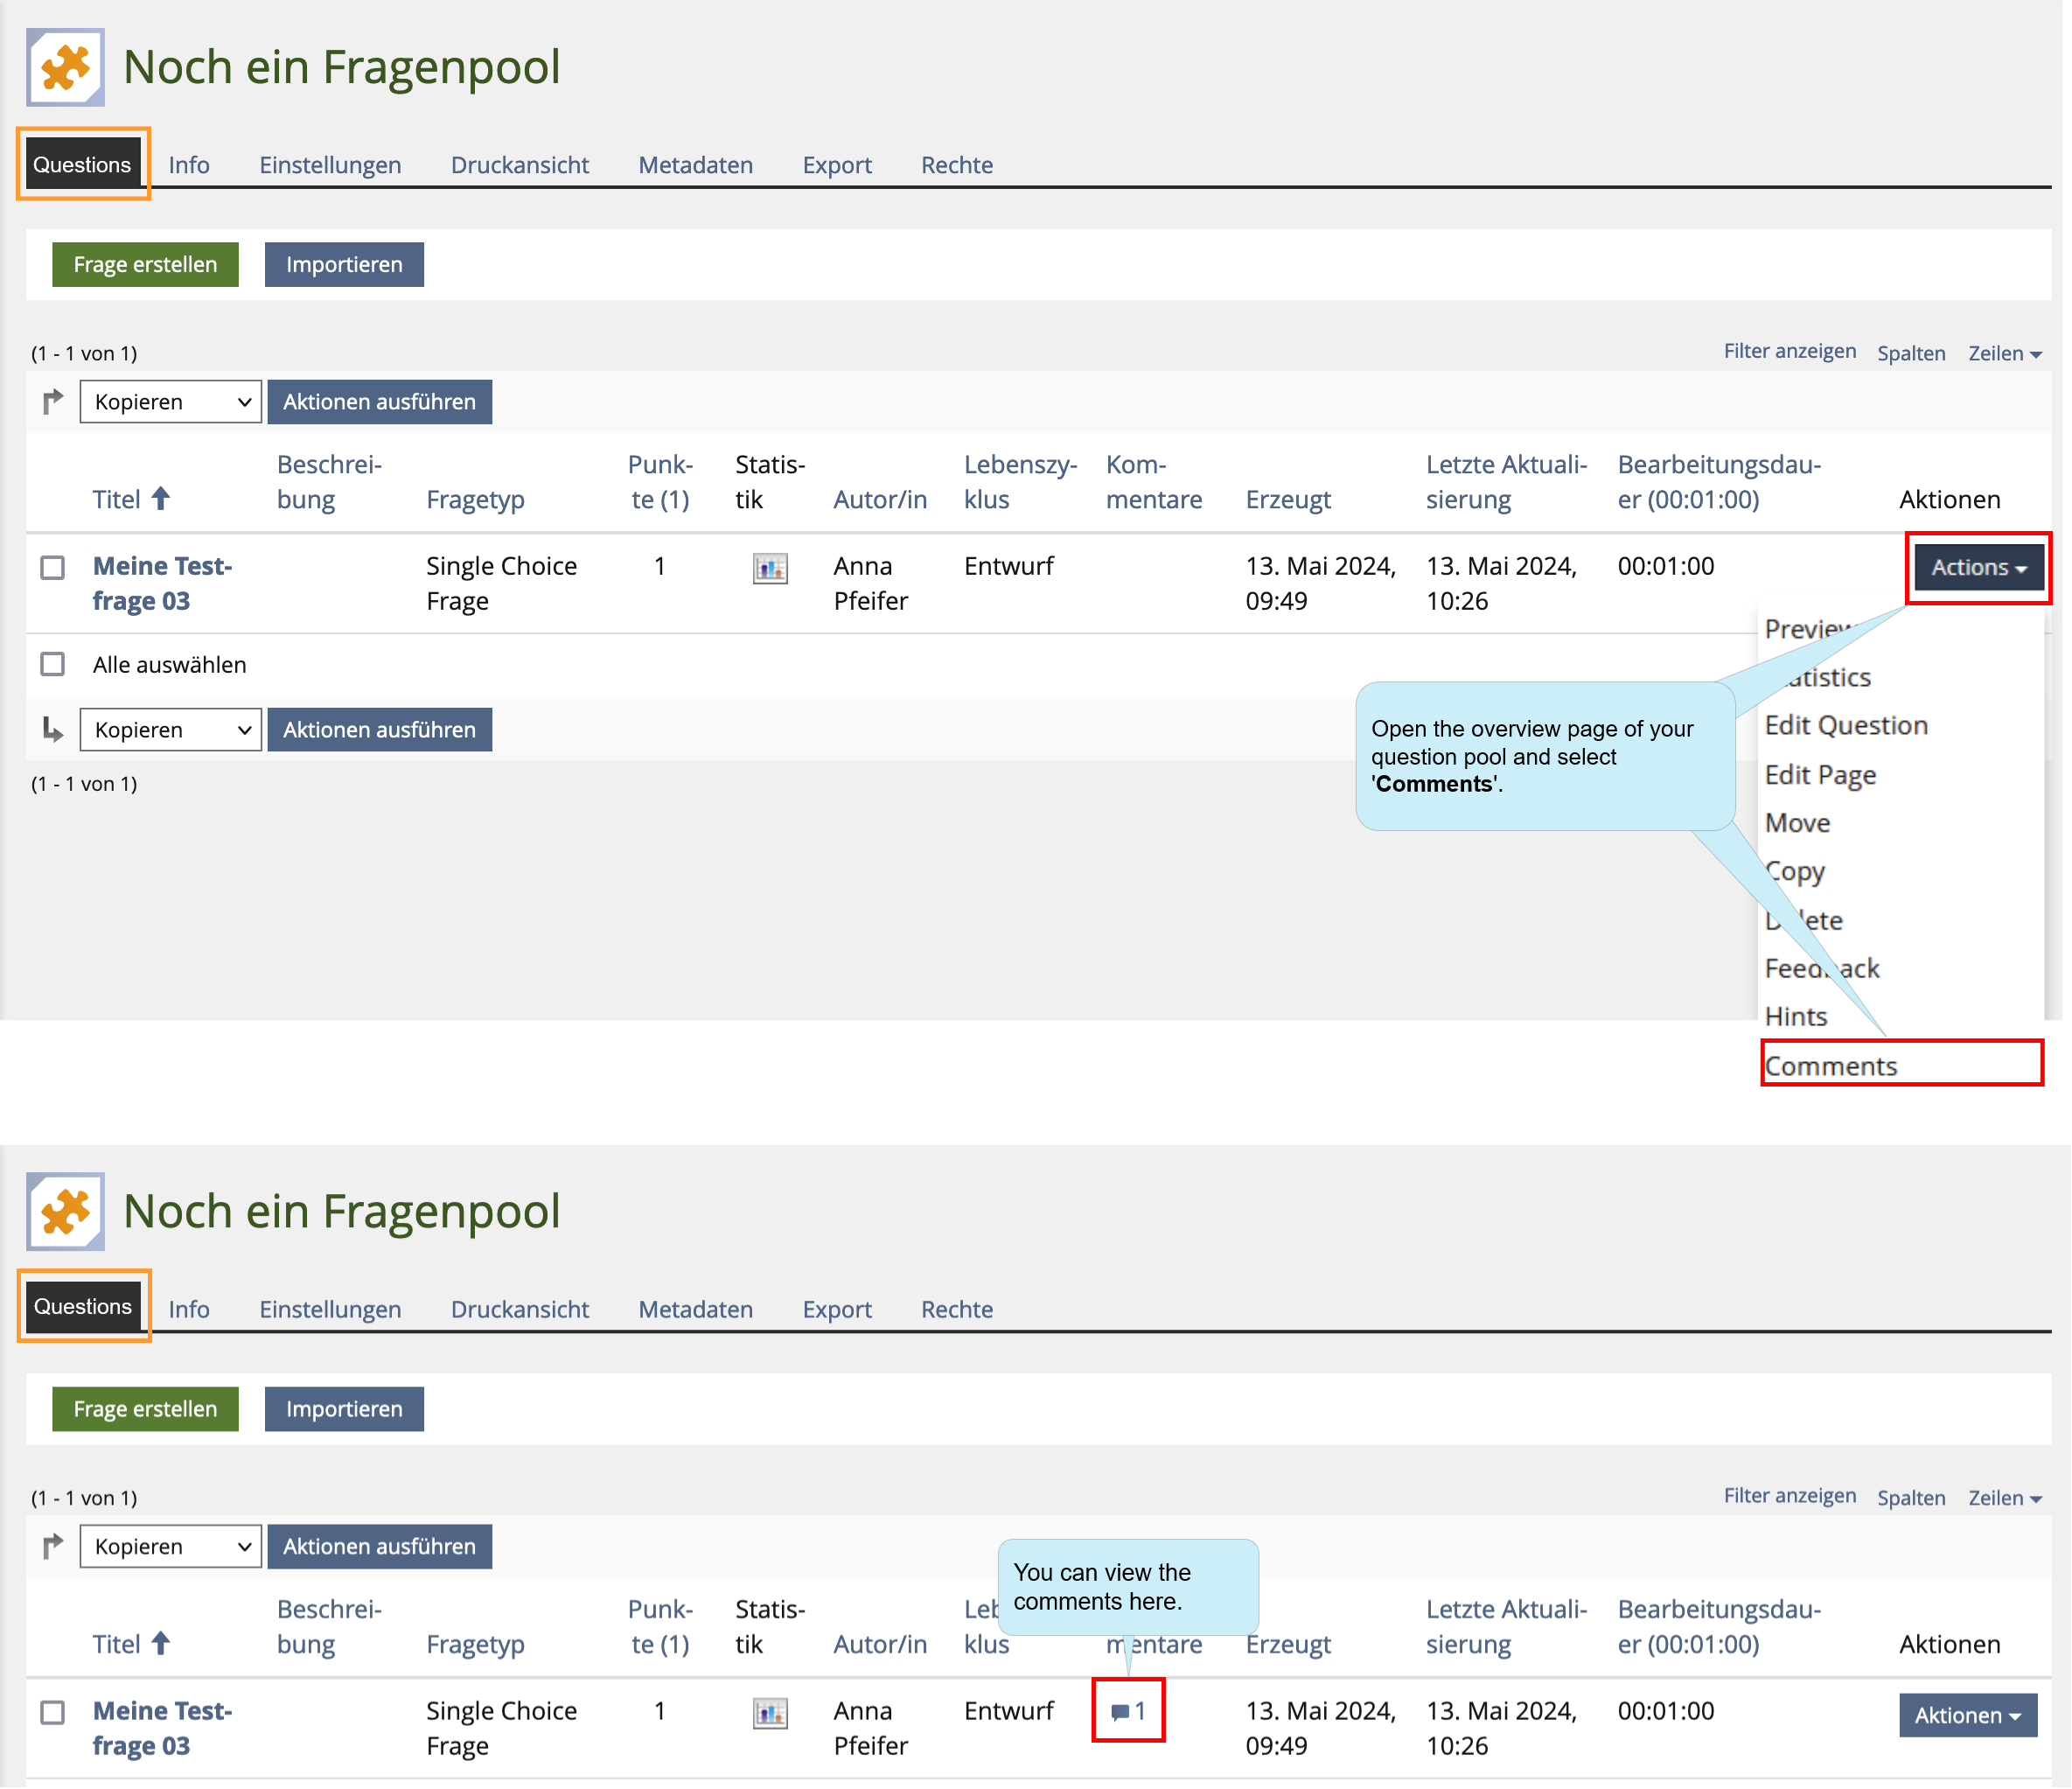
Comments in question pools
You can make comments on the individual questions in question pools: e.g. if you want colleagues to proofread questions or if you want to set a reminder that you would like to edit/correct a question.
Please note:
- Questions that you have created directly in a test can also be moved to a question pool at a later time.
- If you edit a question directly in the test that you have previously created in the question pool, you will receive a message after the change that the changed question has been created as a copy of your original question. You can answer with “Yes” or “No” whether you want to transfer your changes to the original question in the question pool.
- If you delete a question directly in the test, it will still be available in the question pool. To delete a question permanently, remove it from the question pool.
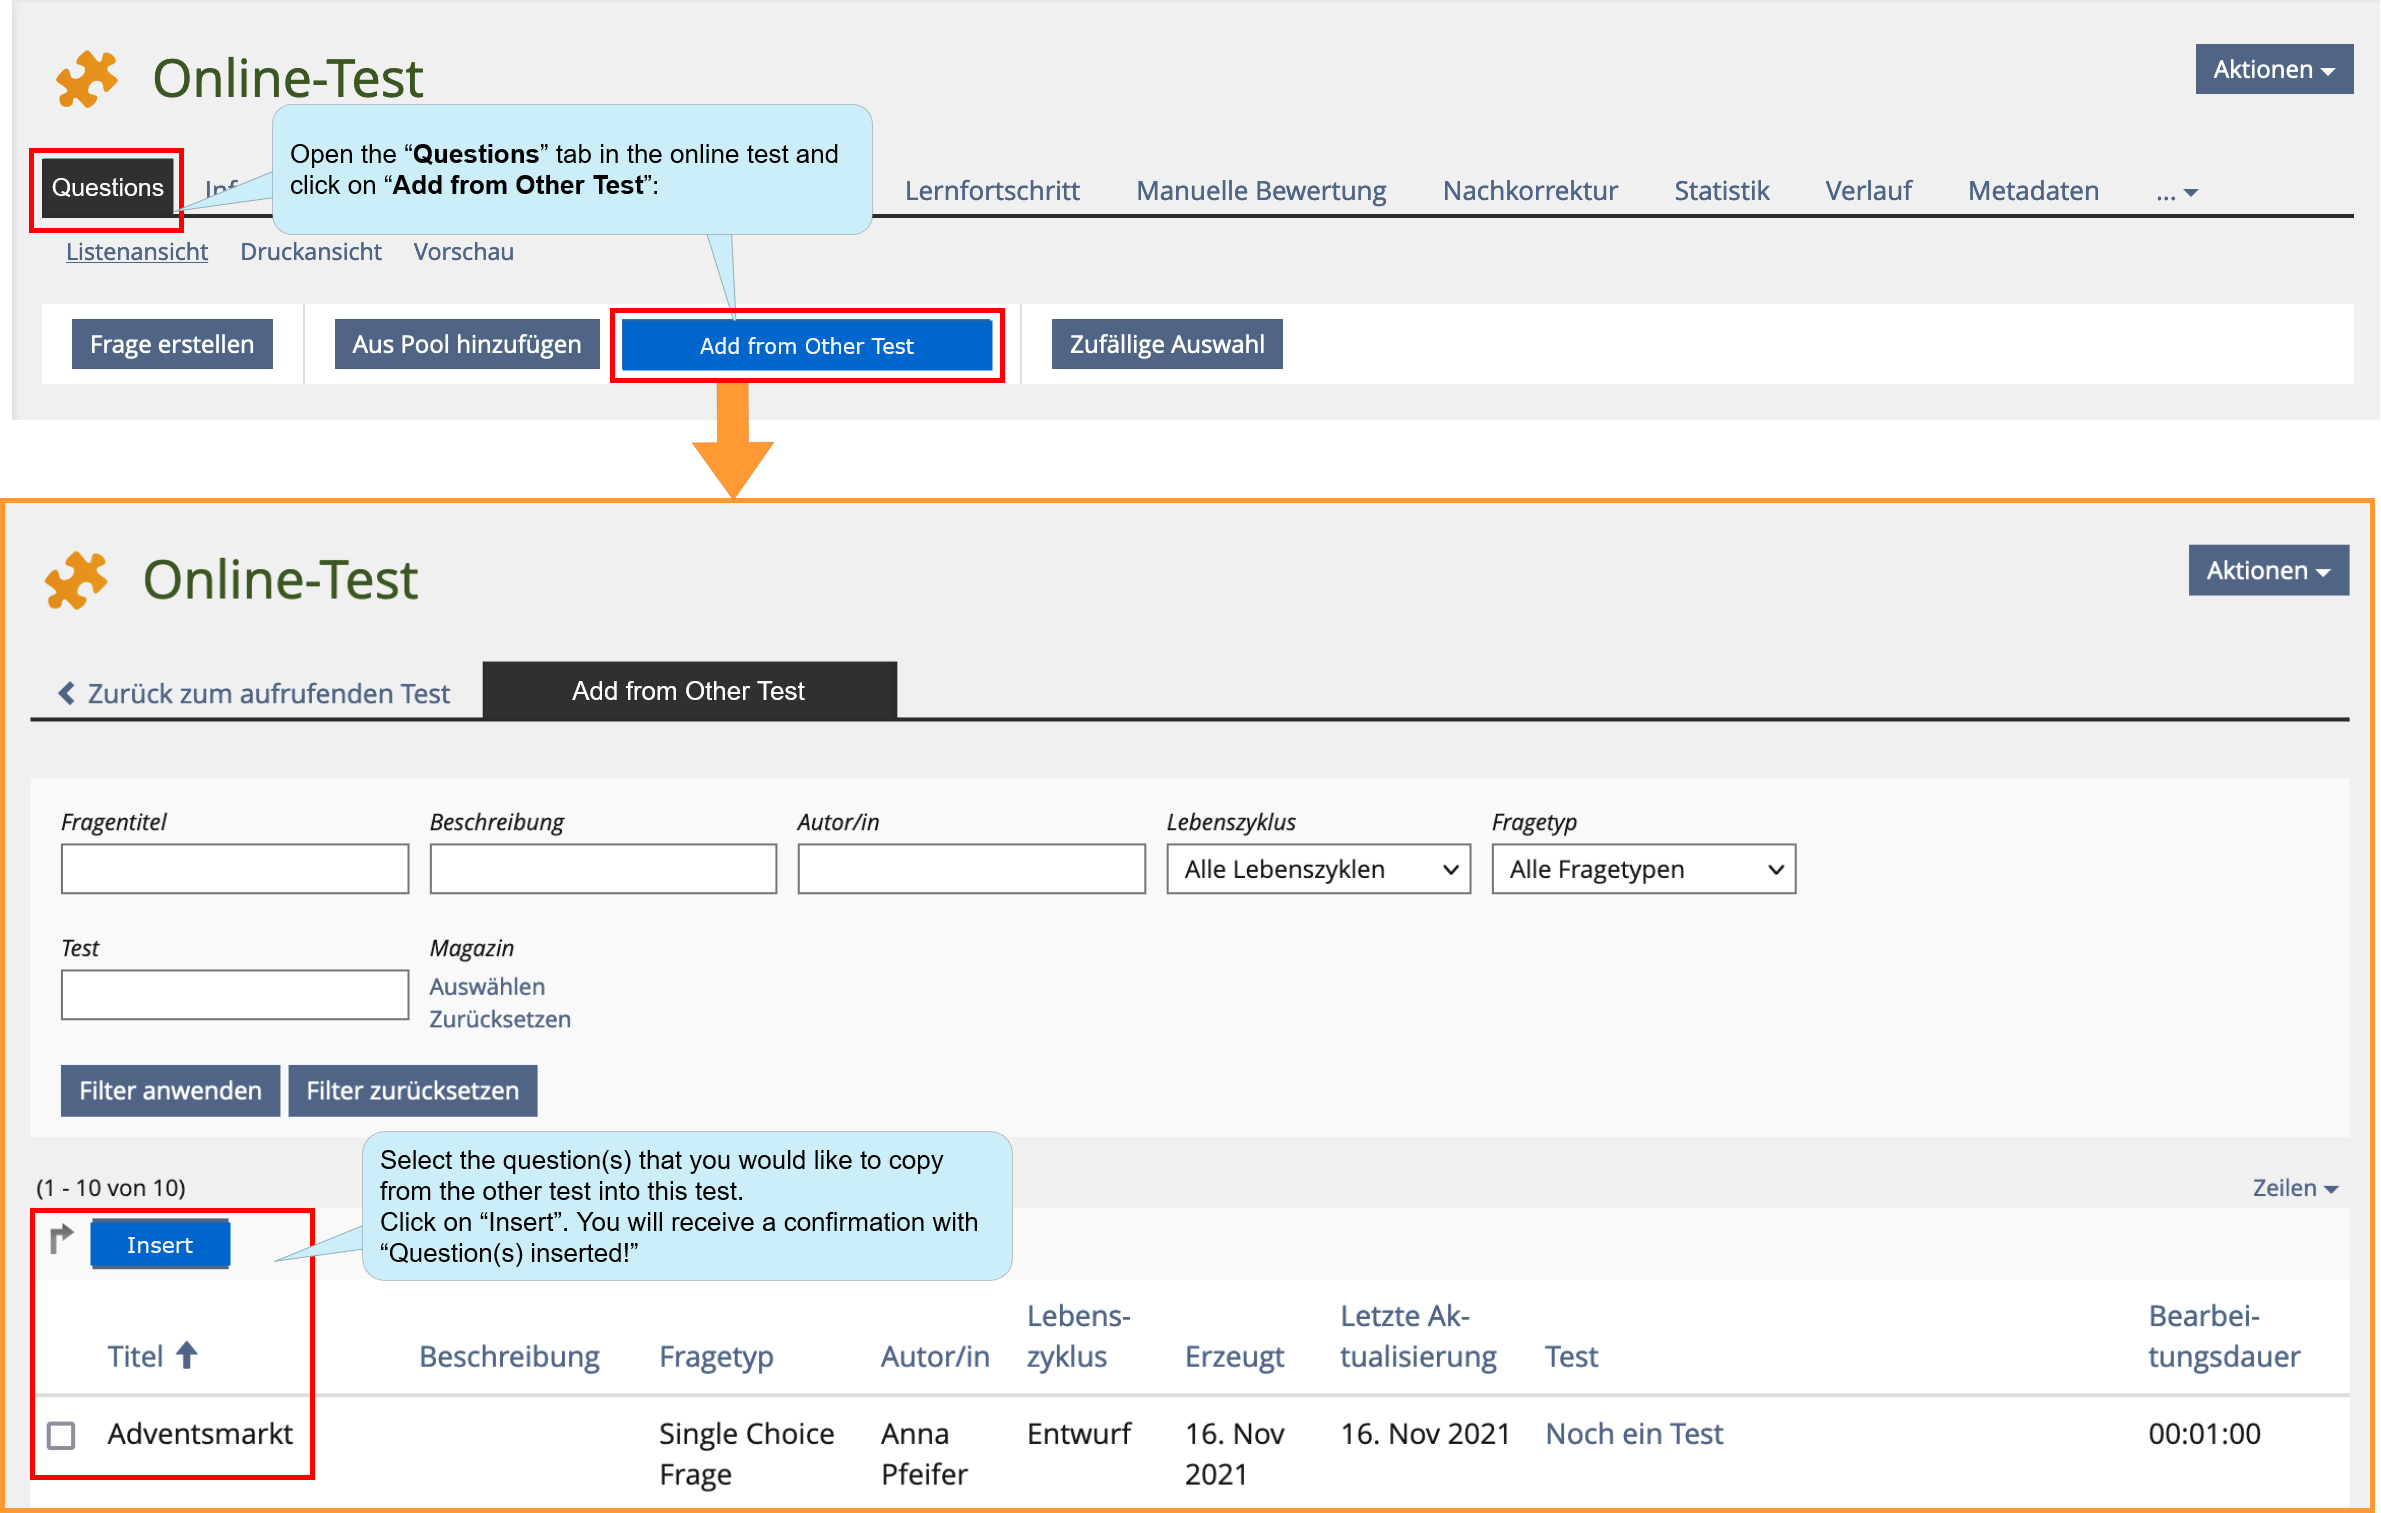
3.3.3. Insert questions from another test
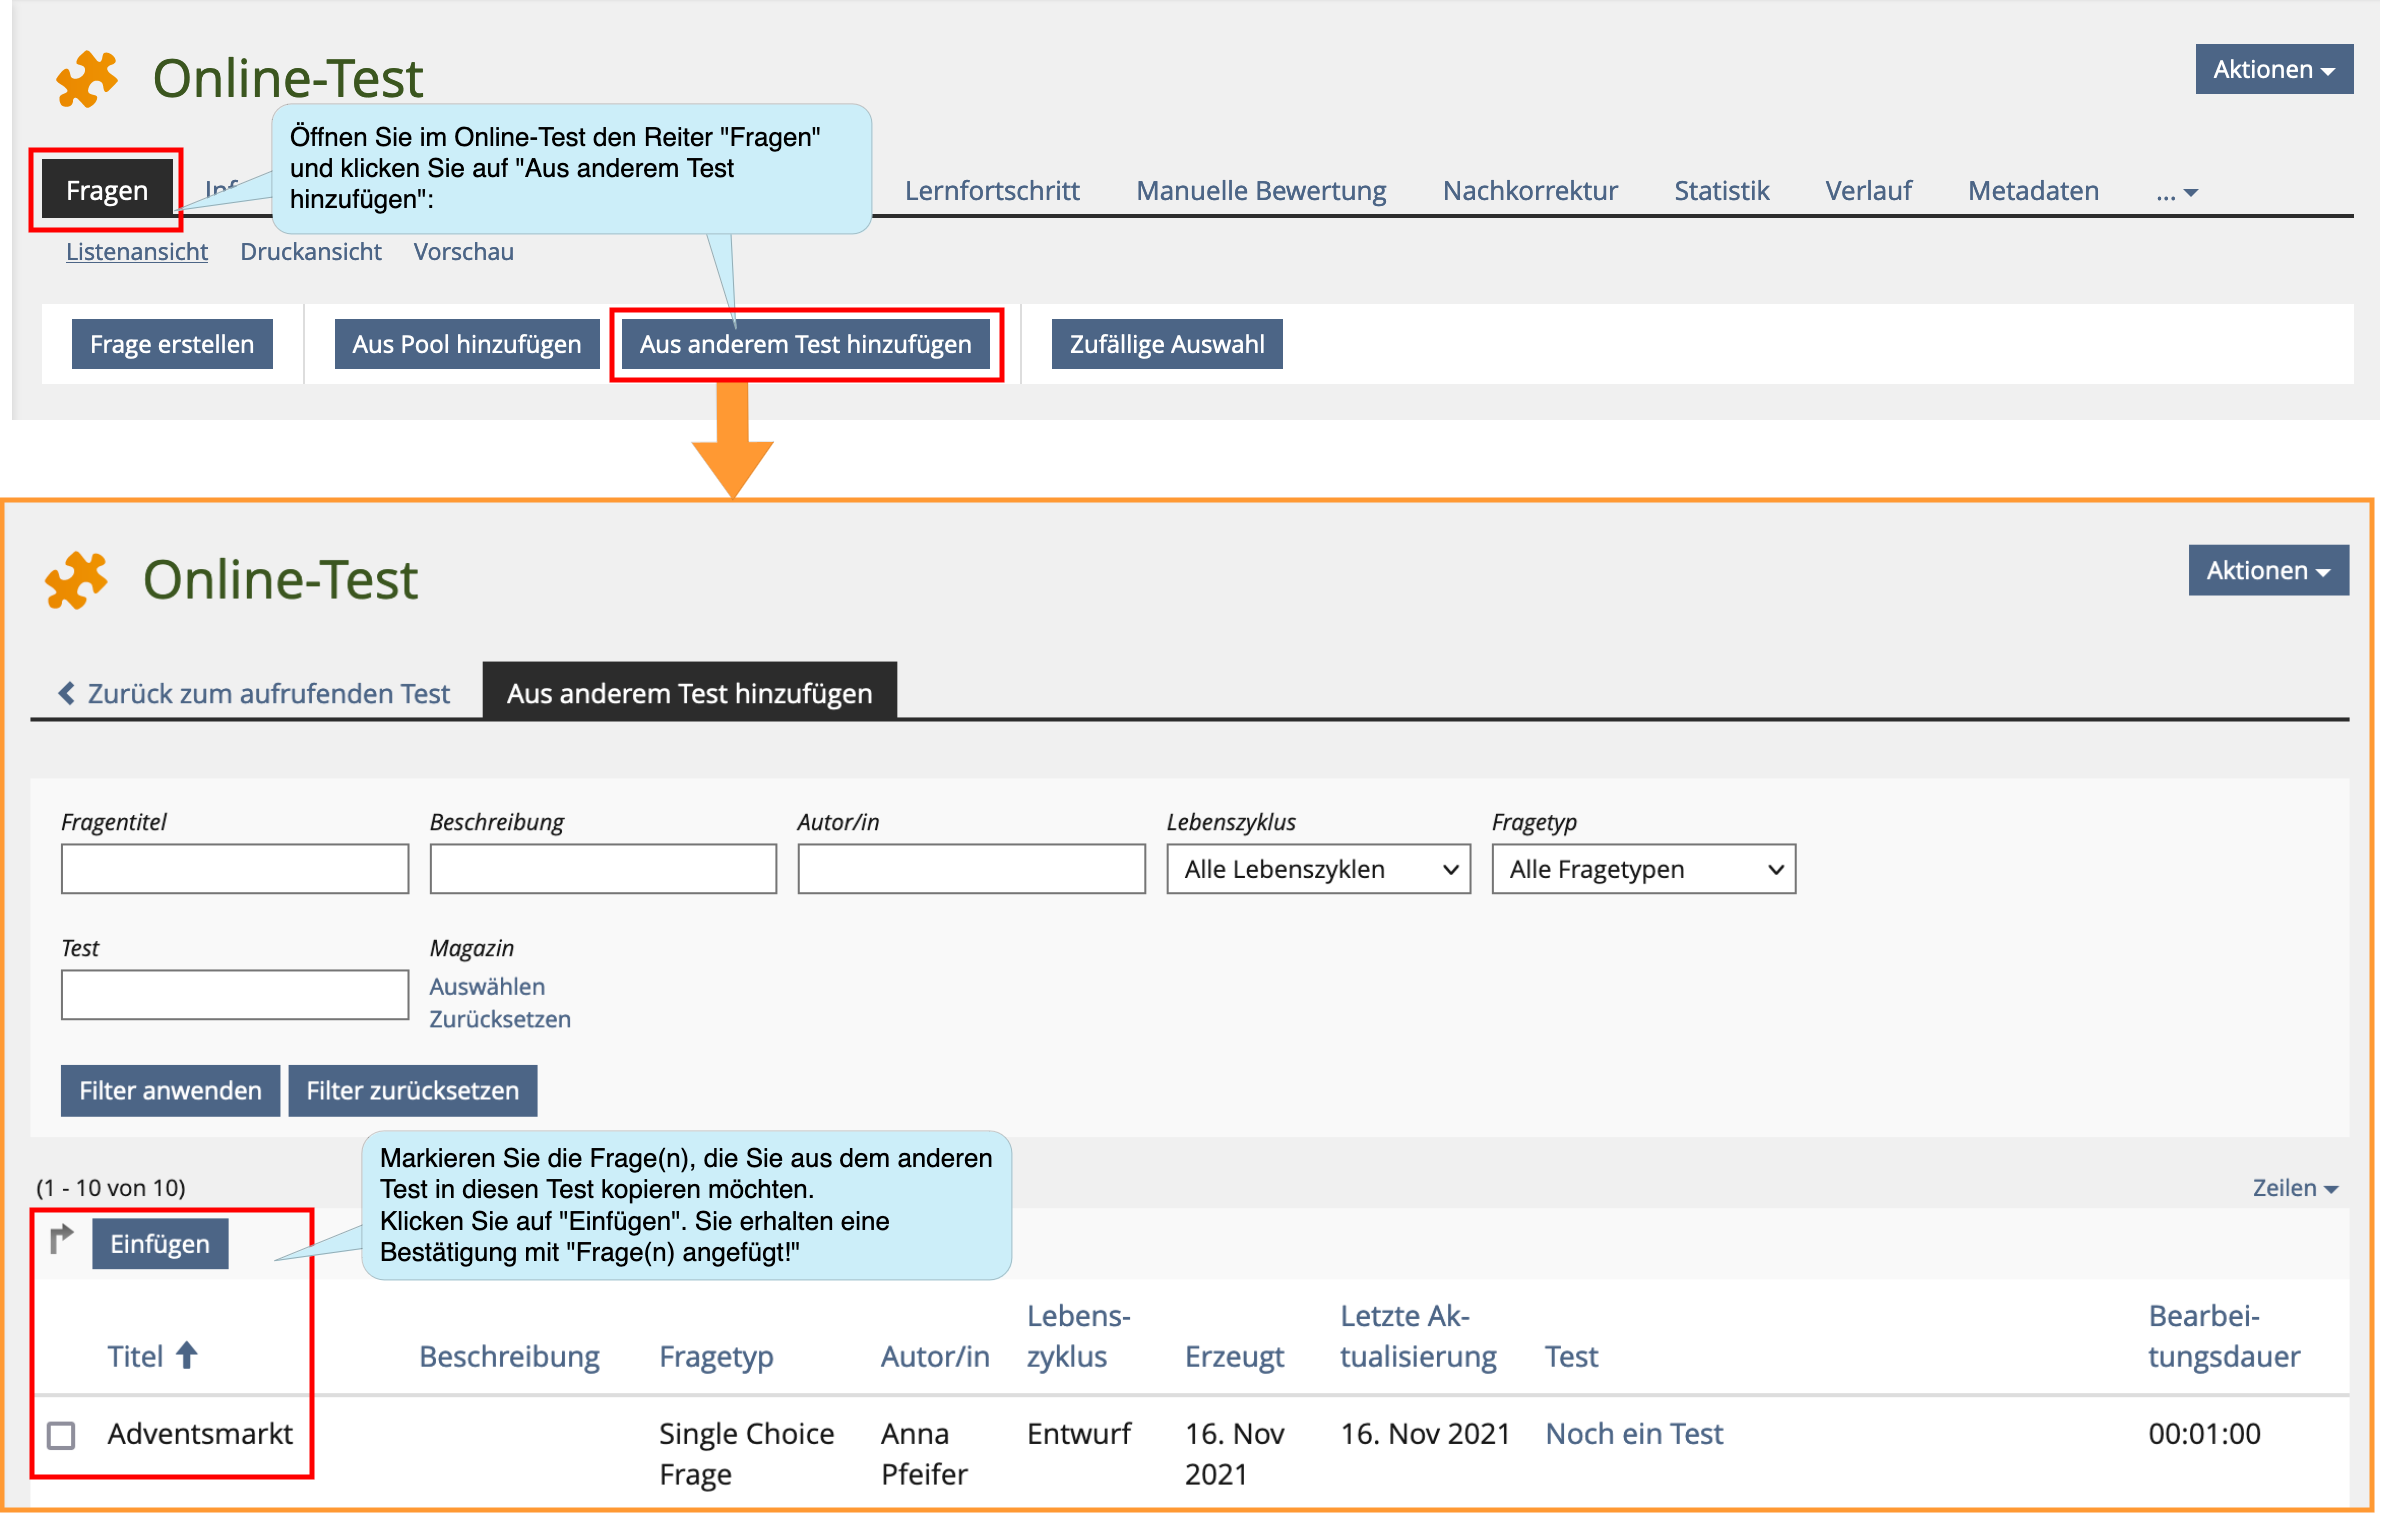
This is how you can insert questions from another test:
3.4. Question editor
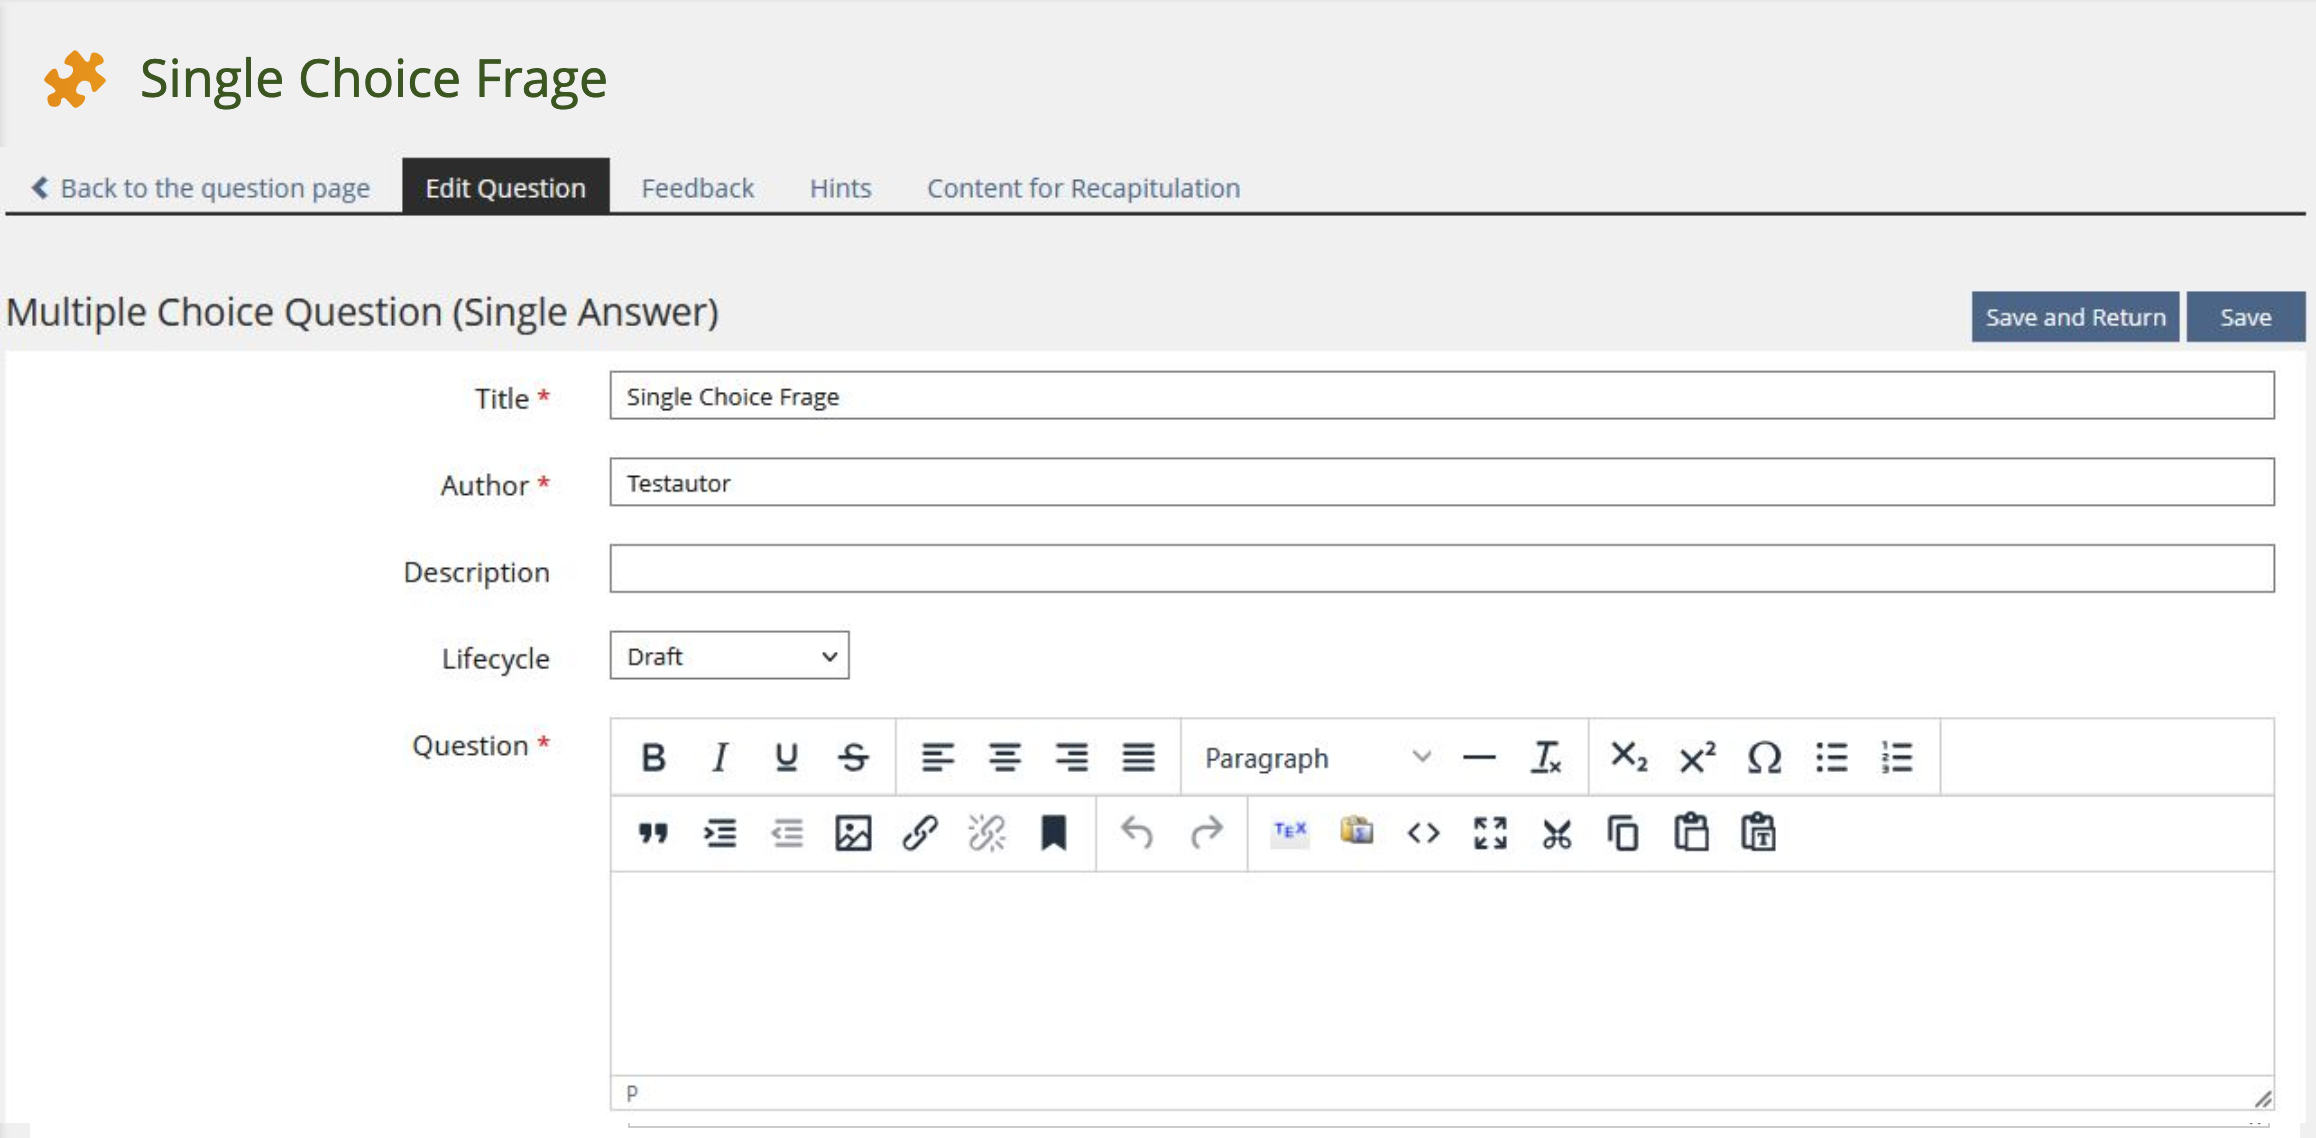
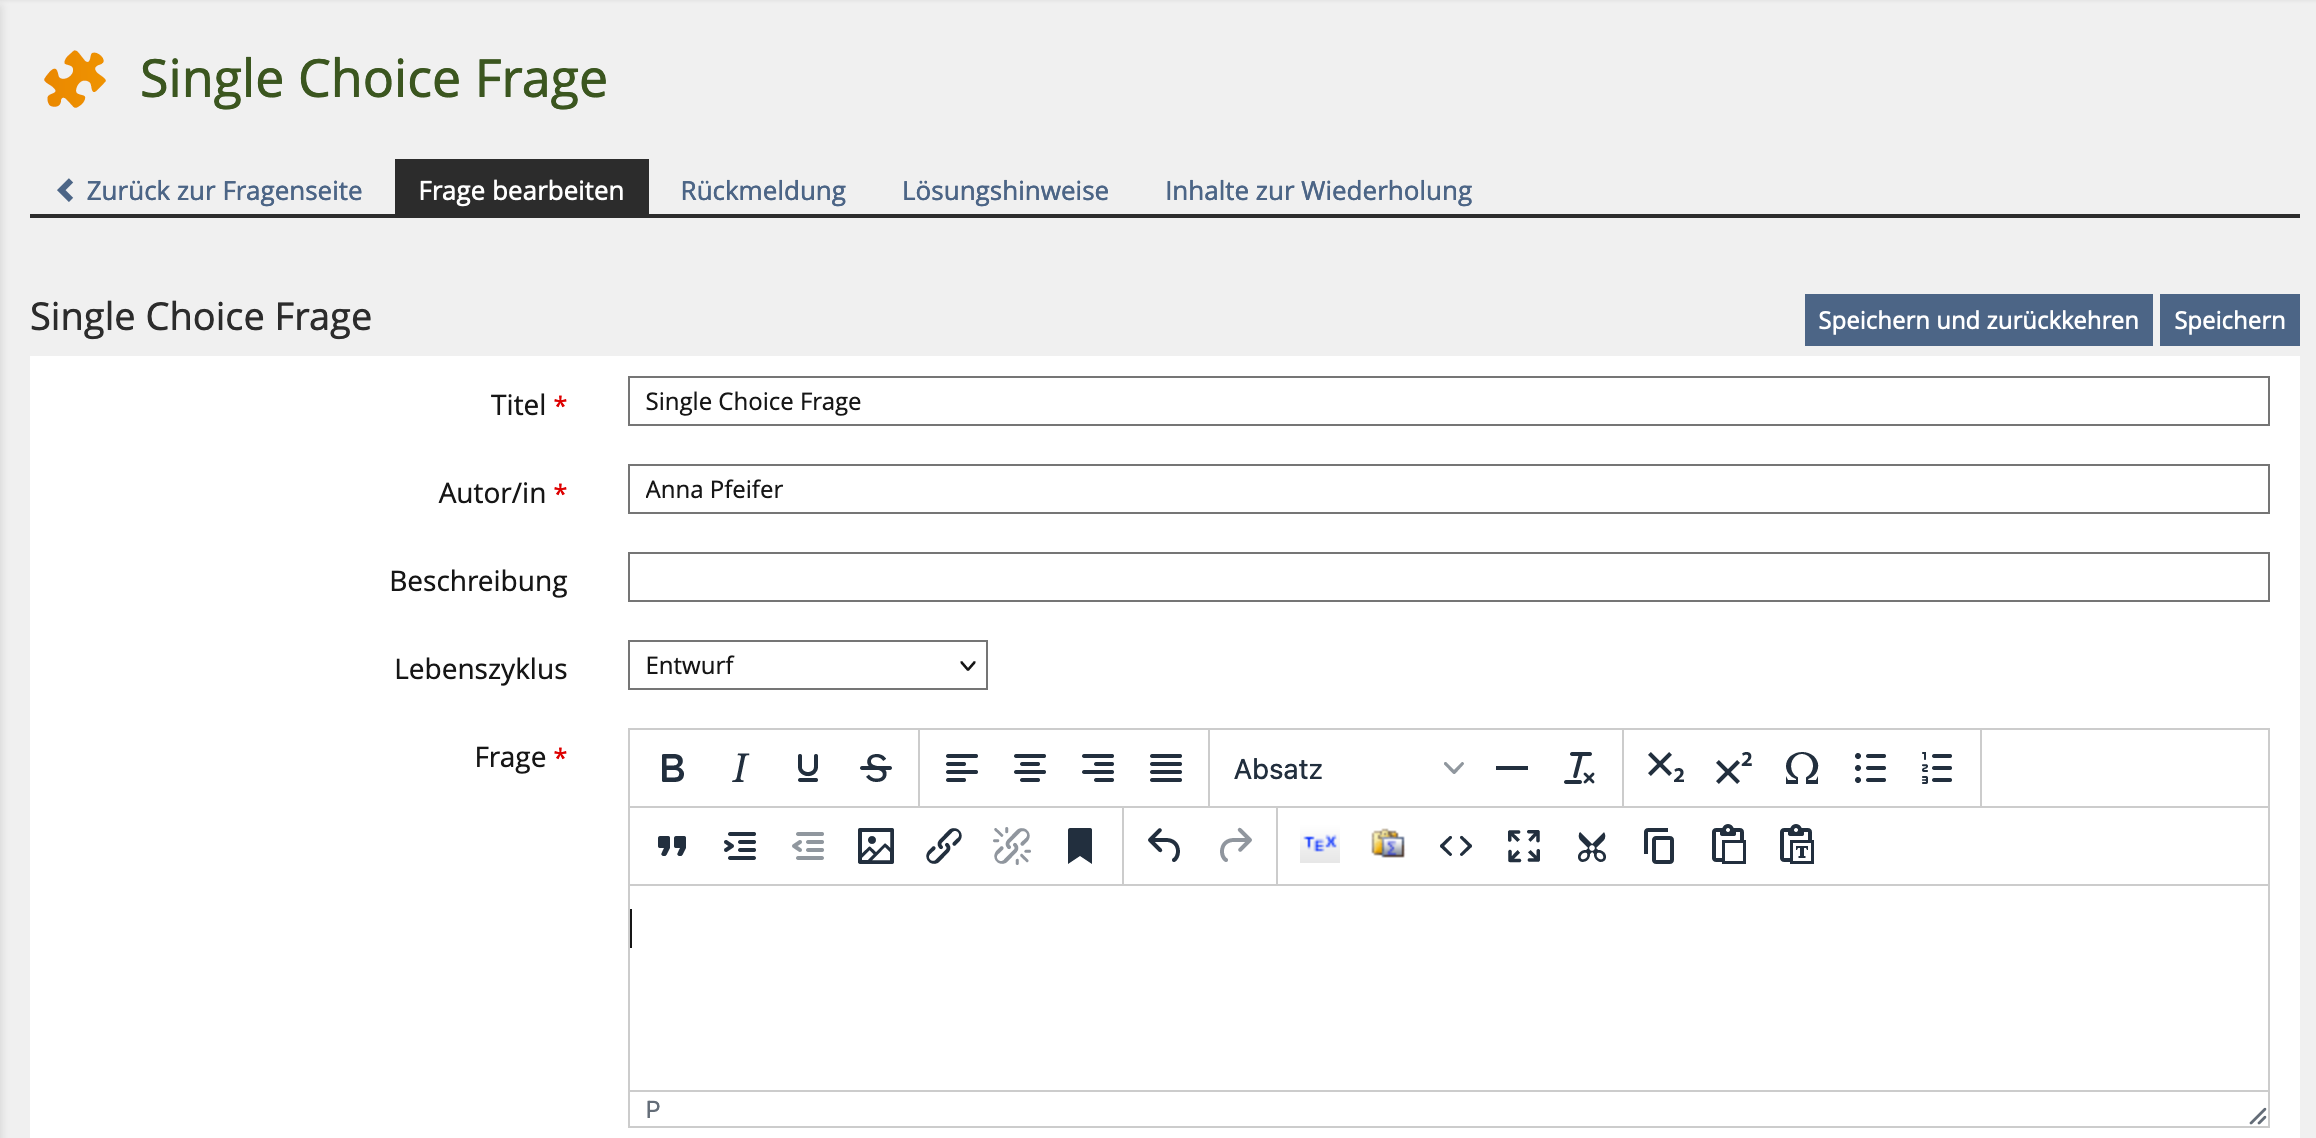
Each question type has an editor for describing the question. When creating the question or later (“Edit Question”), you can, for example, format your question text (bold, italics, font size, etc.), structure it in tables and insert images.
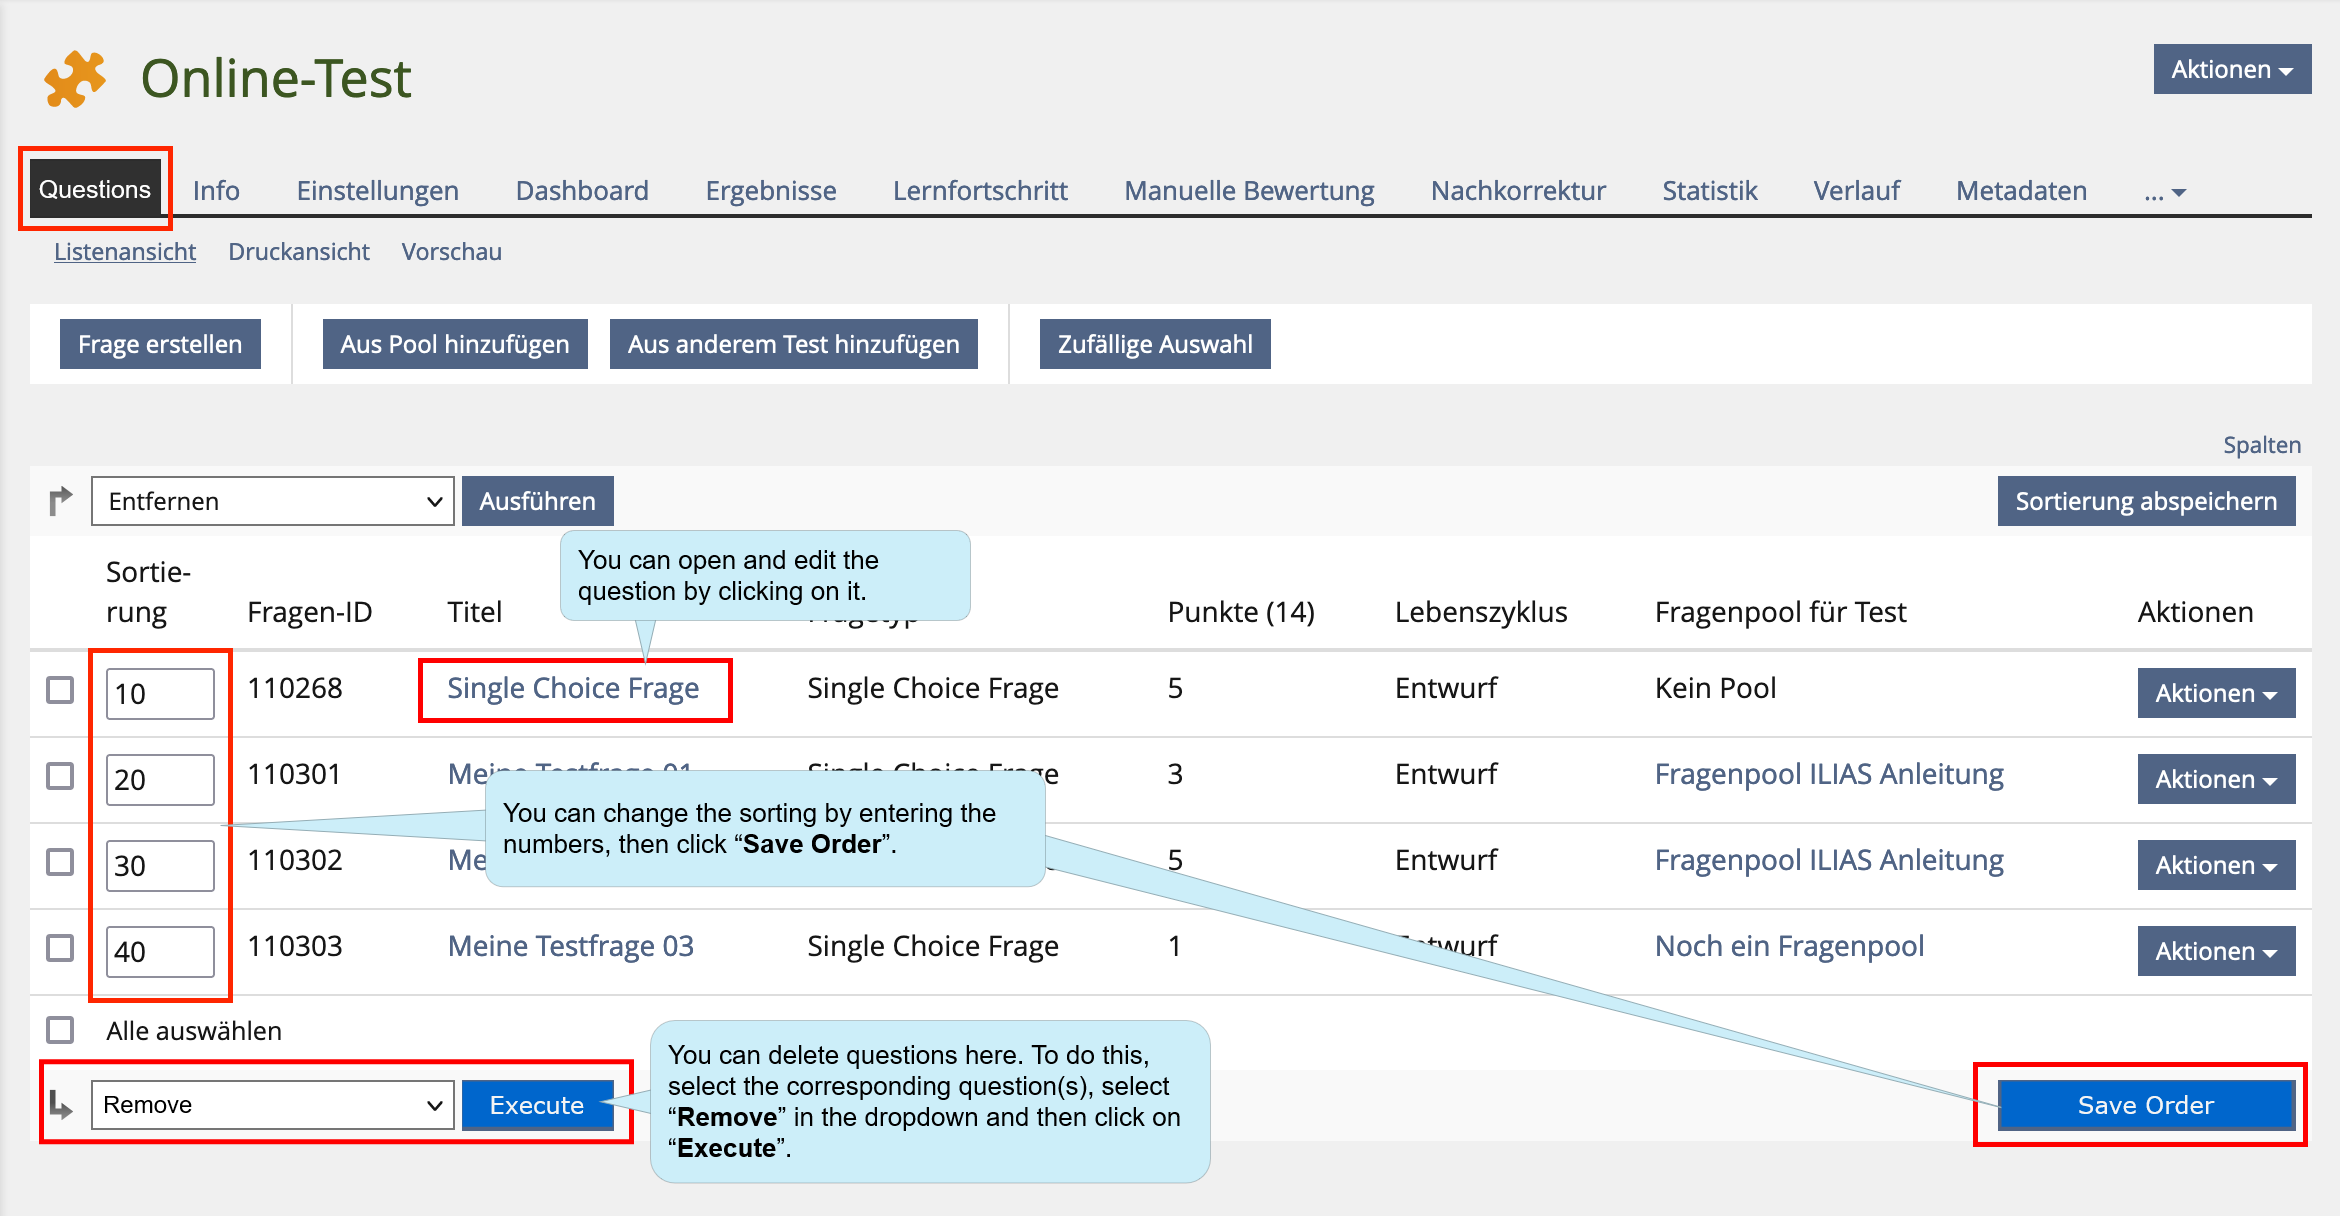
3.5. Administrating questions
You can edit or reposition your questions in the overview of your online test under the “Questions” tab:
4. Feedback for participants
You can add individual feedback to each question.
There are four options available for feedback:
4.1. Defining the type of feedback in the test settings
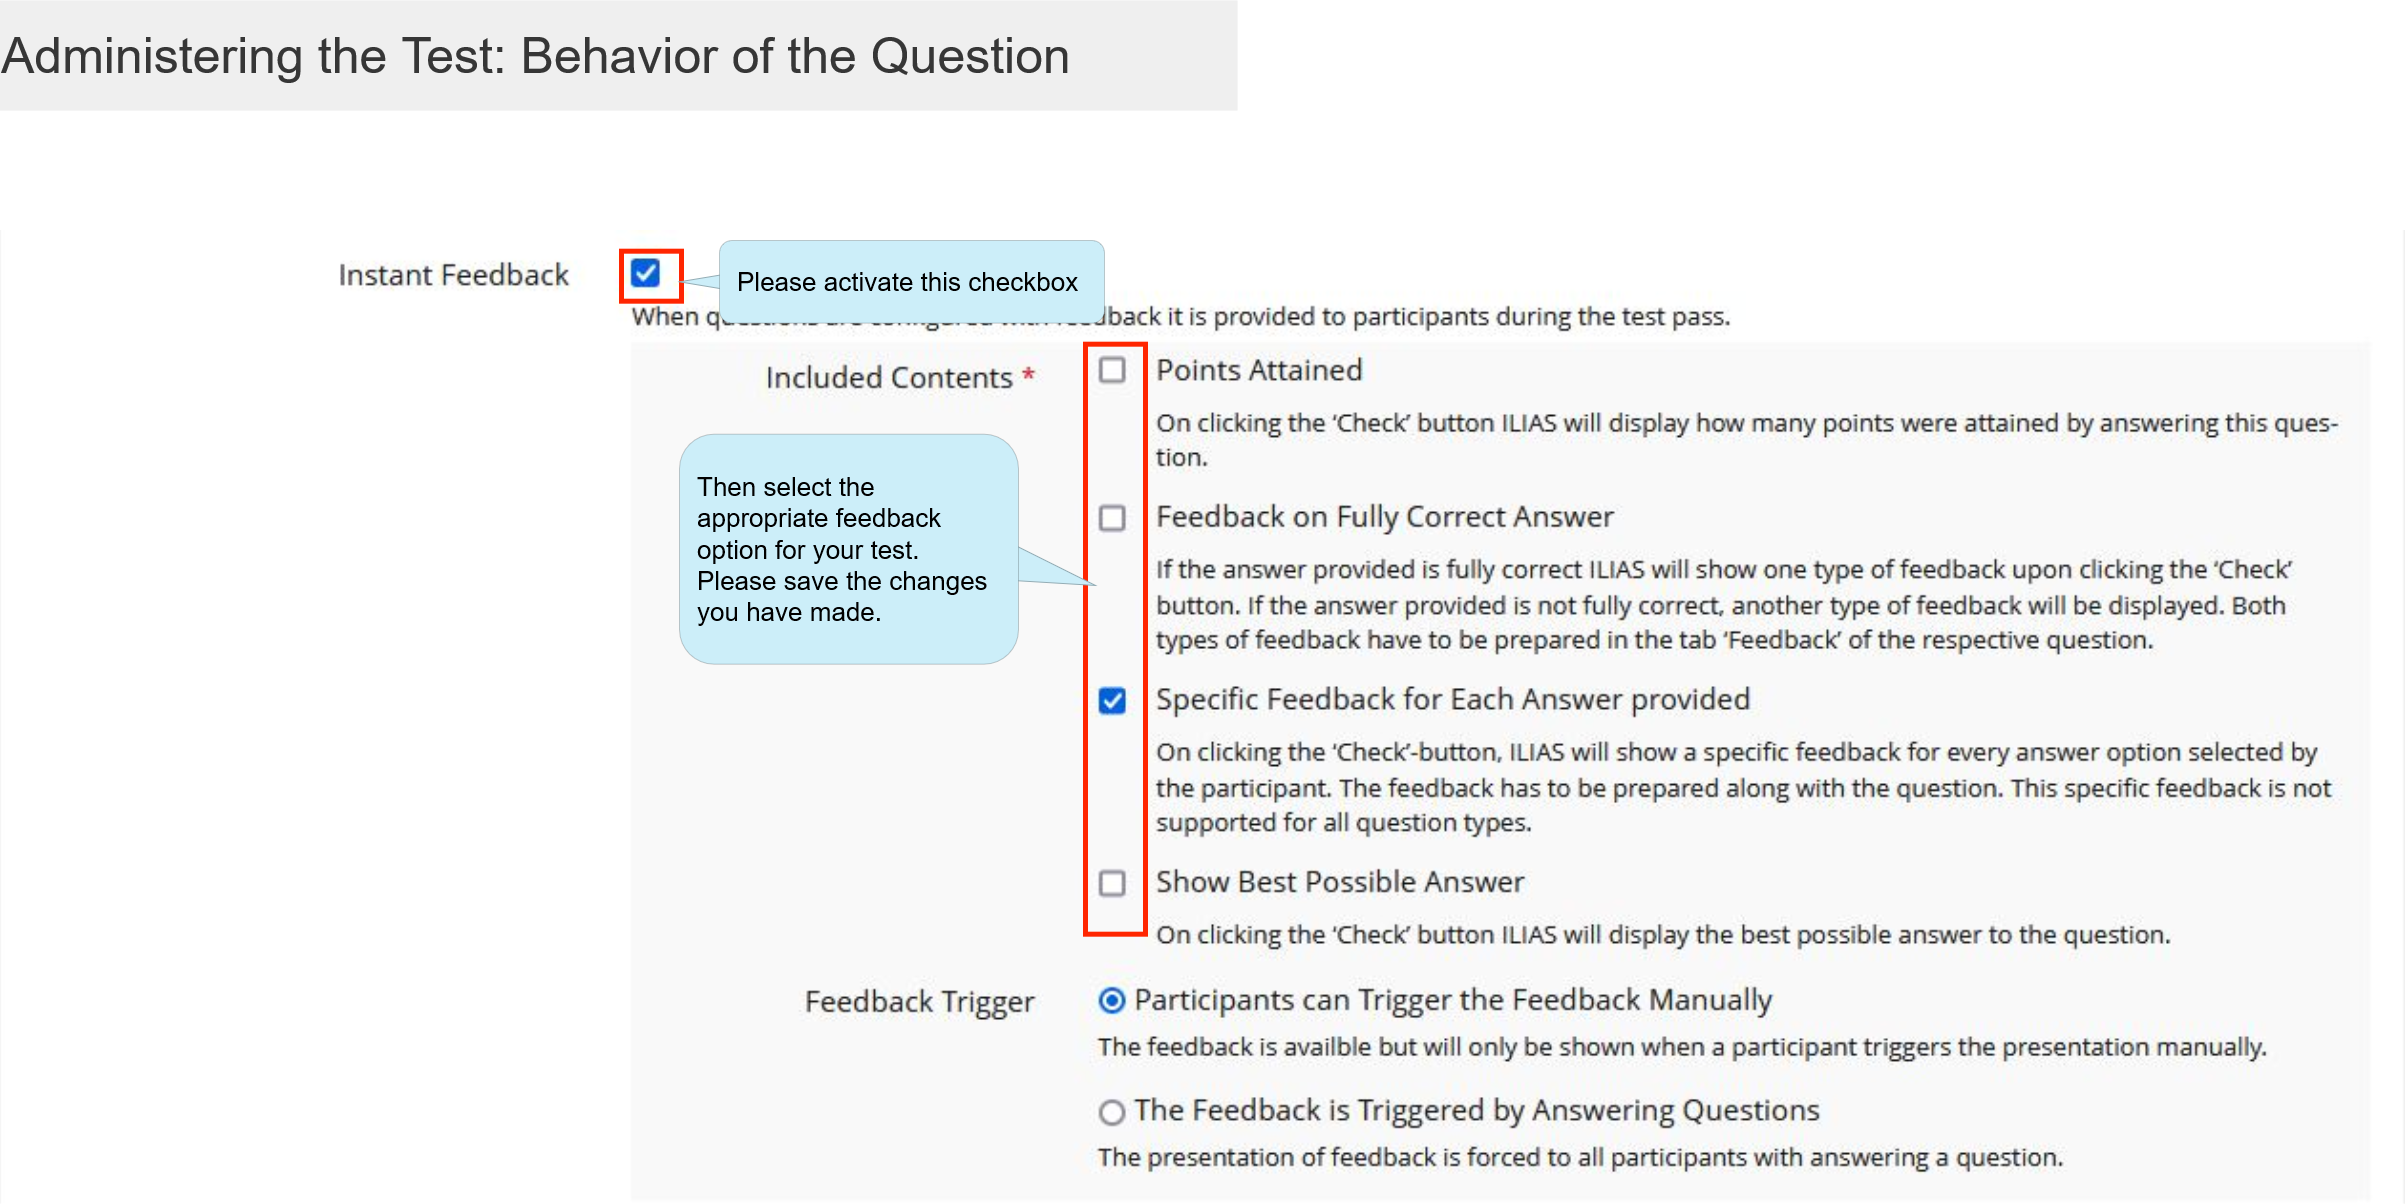
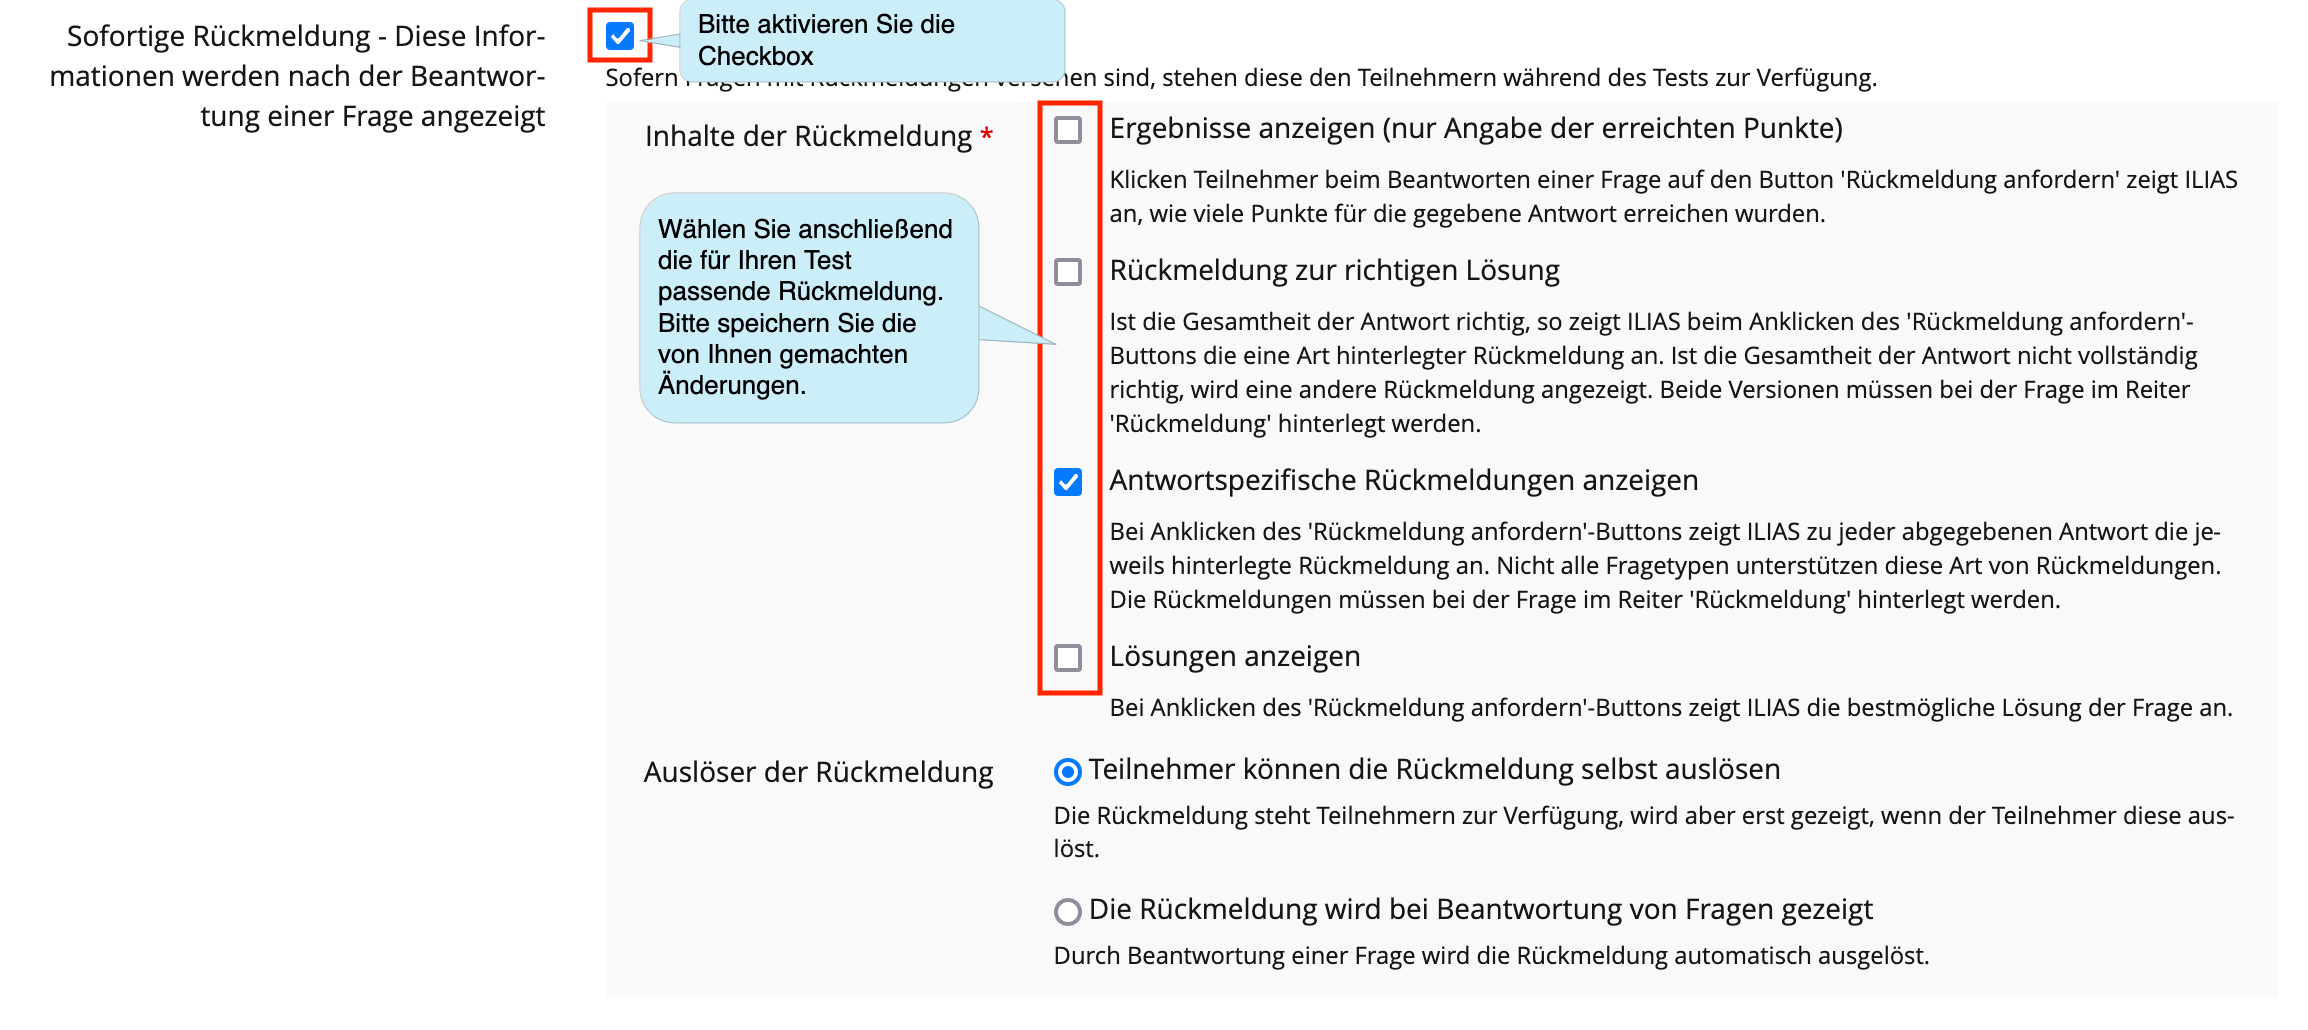
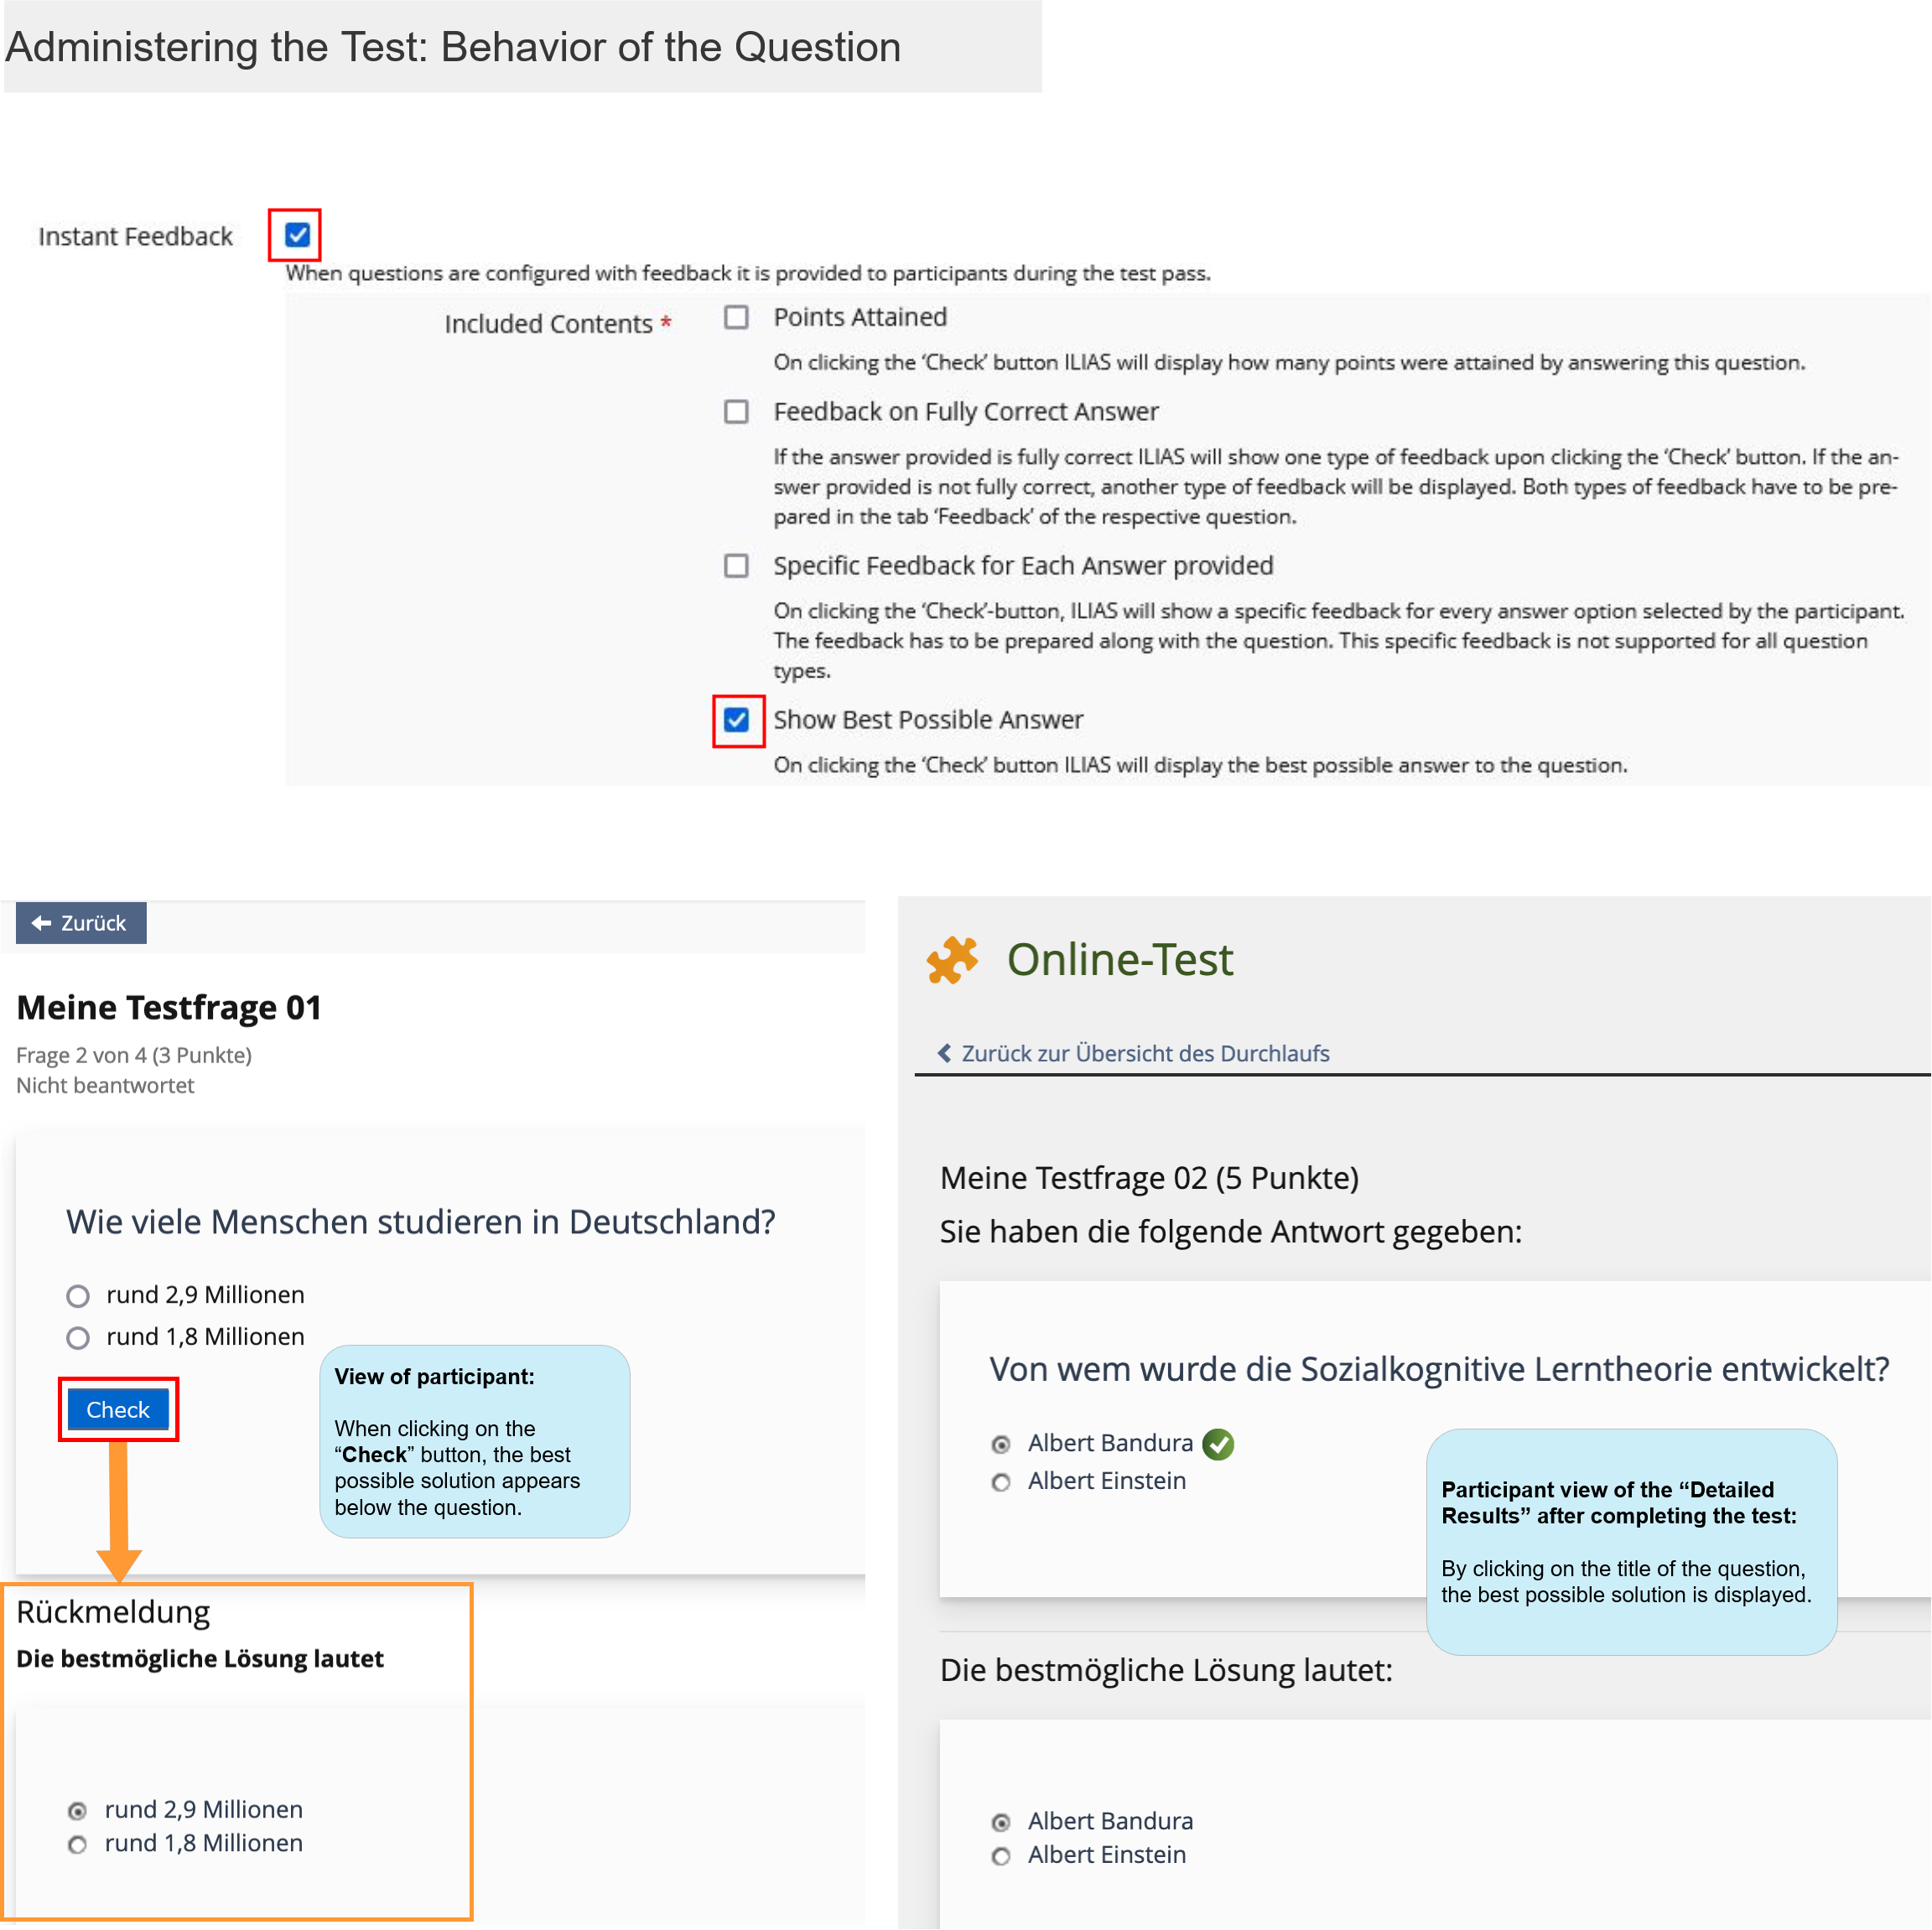
For the necessary default settings, please navigate to the “Settings” and then “General settings” of your online test. In the “Instant Feedback” properties section, you will find the following options for feedback:
A combination of several feedback options is possible, but only makes limited sense
4.2. Adding feedback for a question
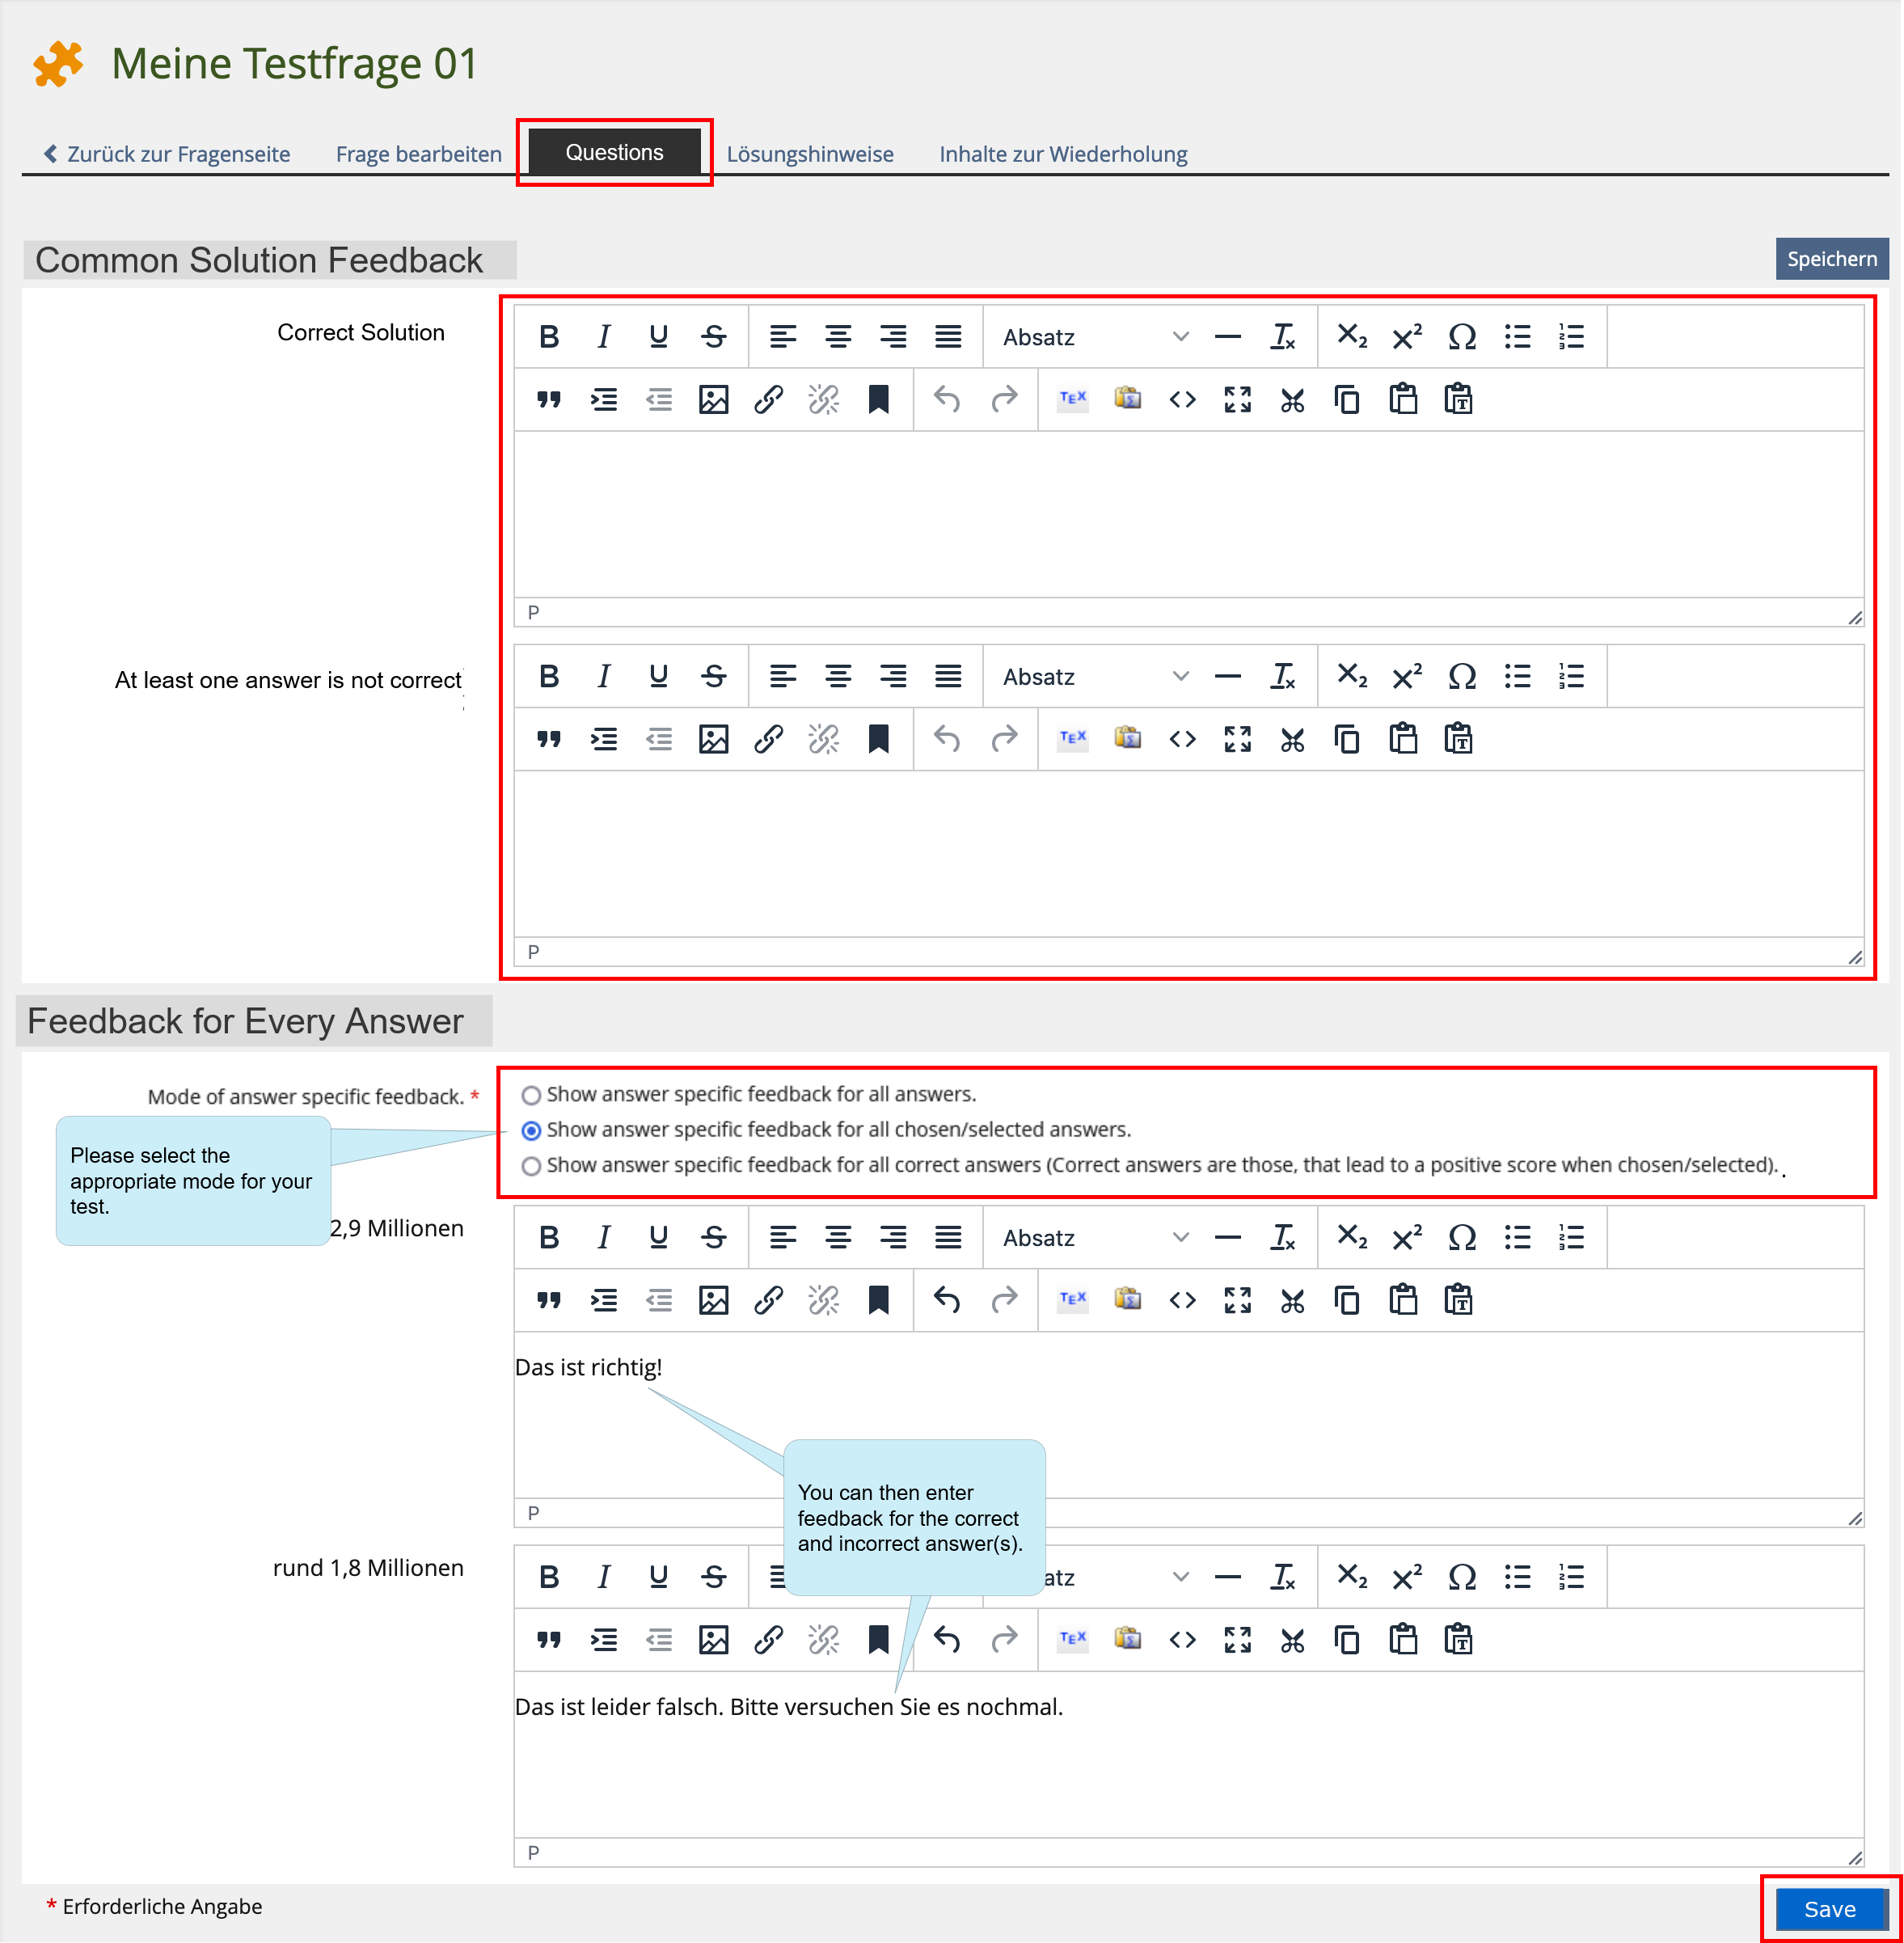
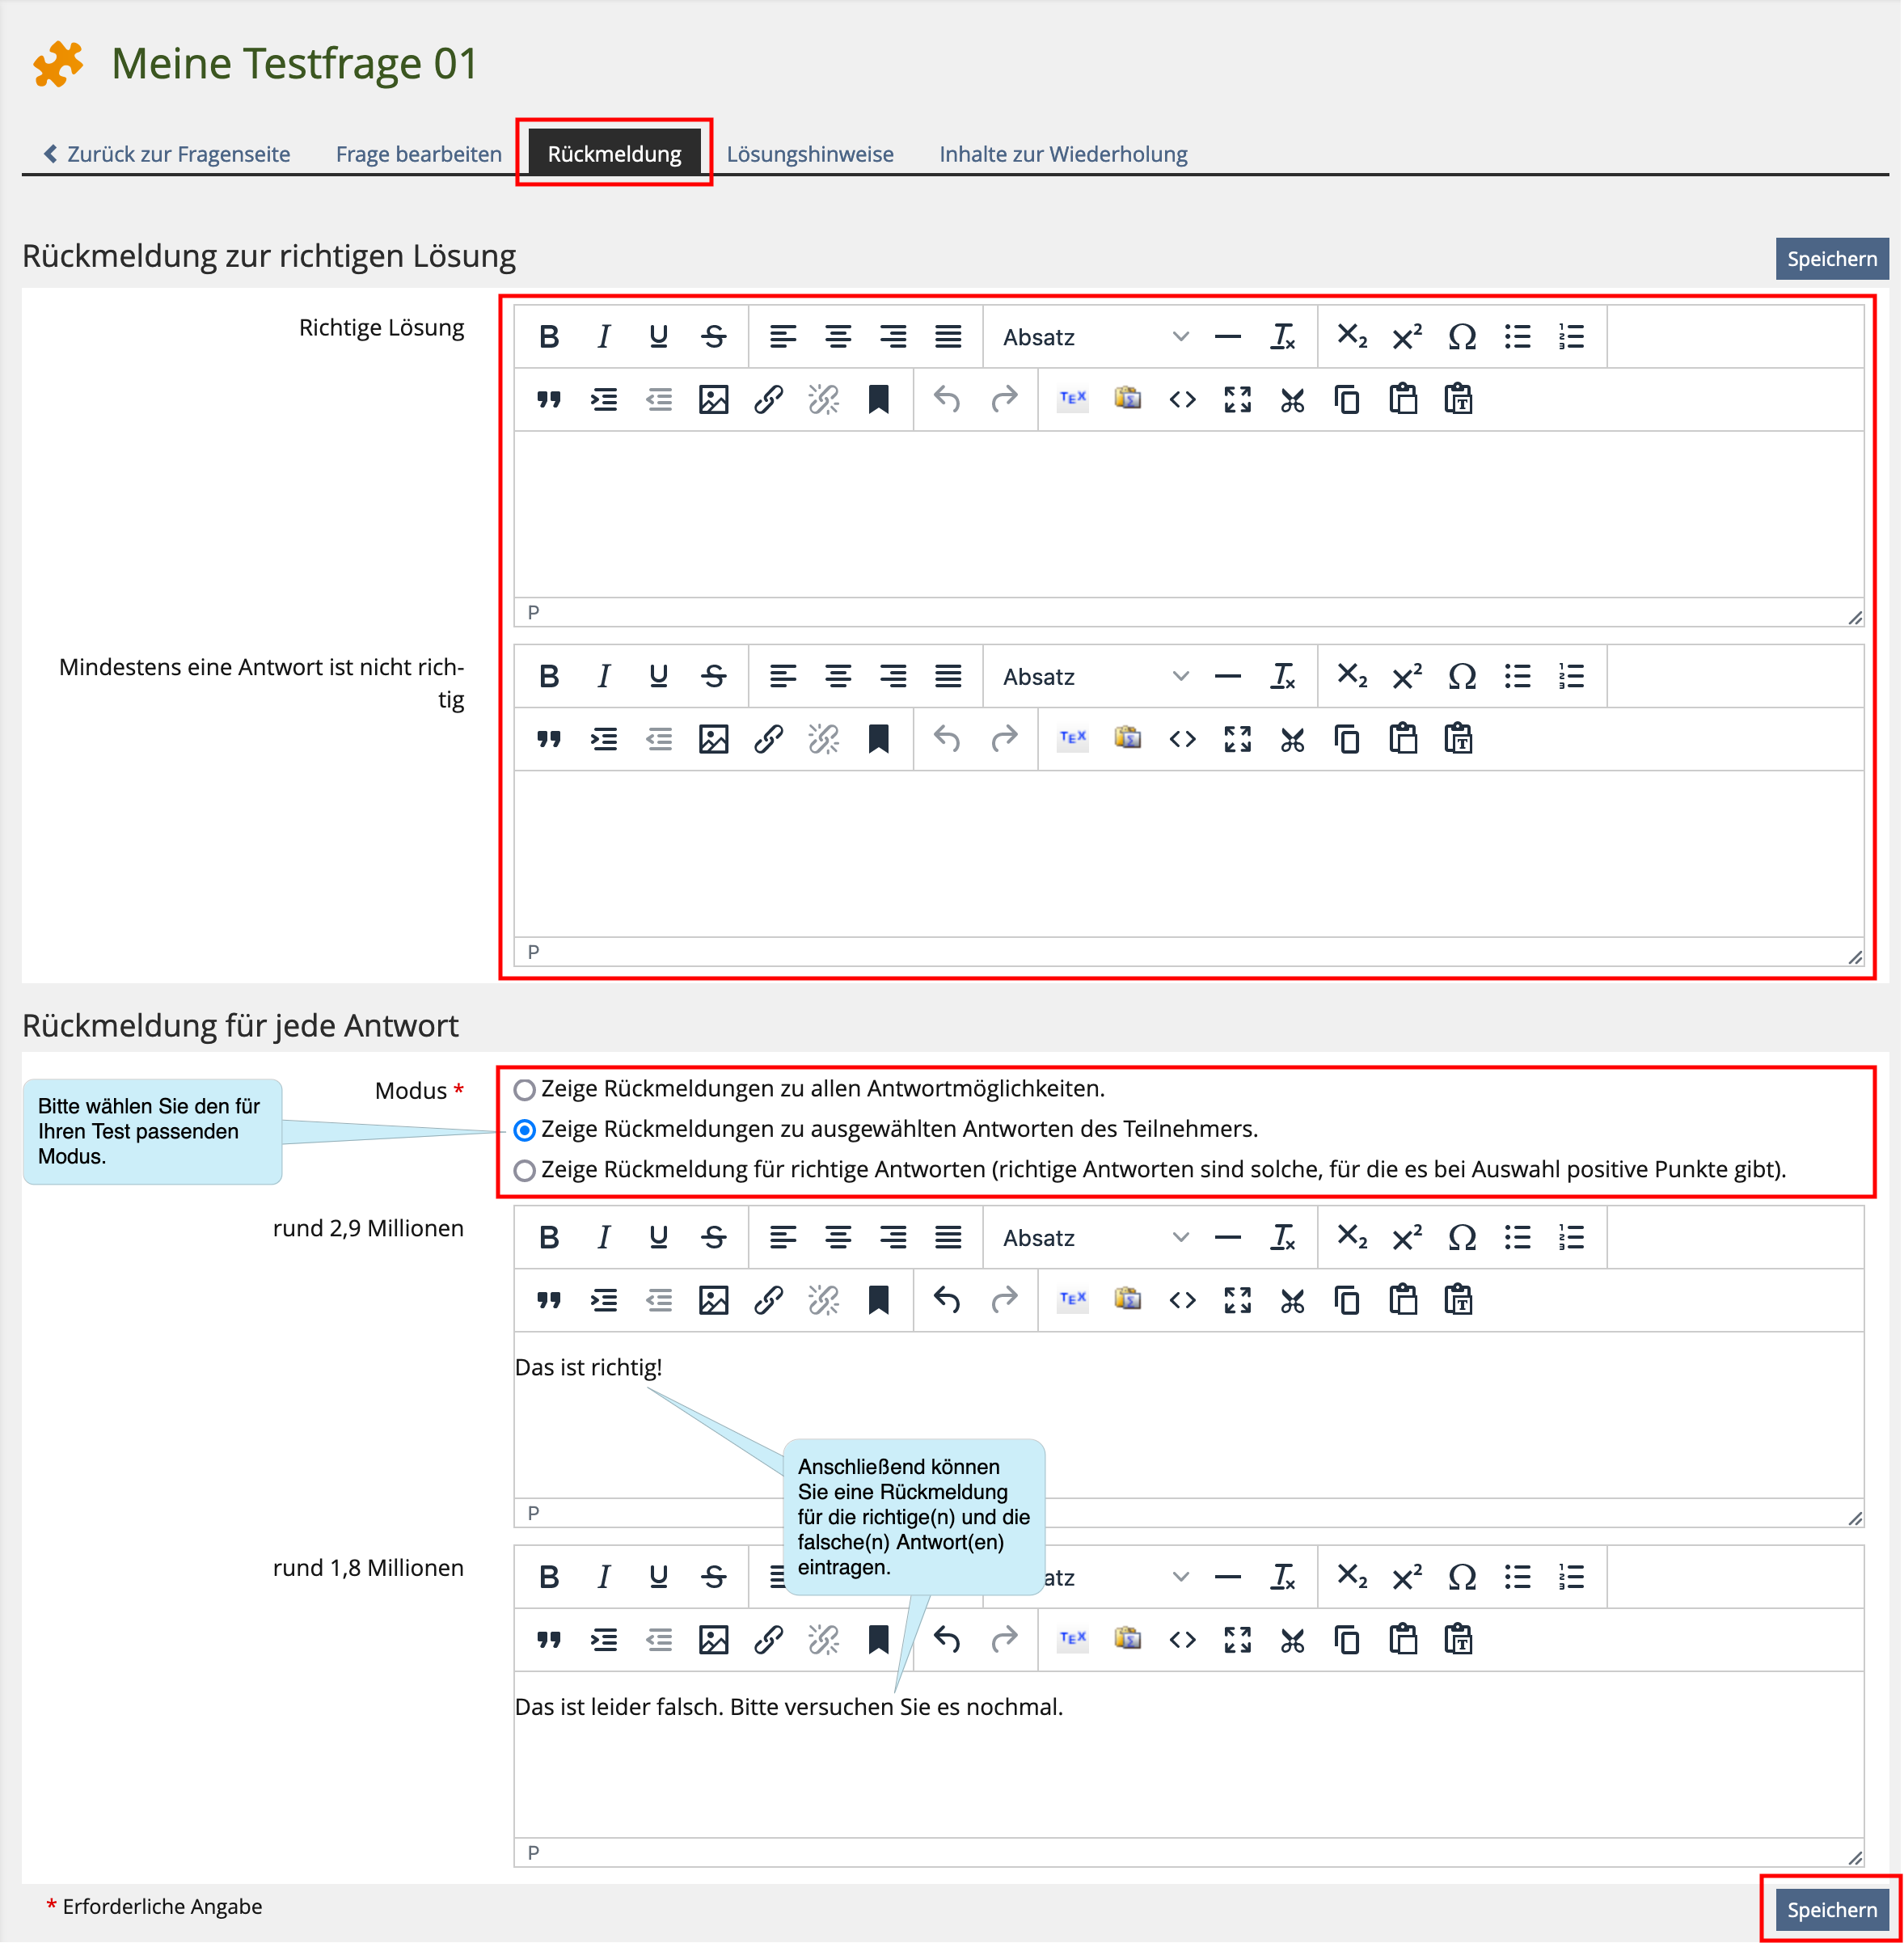
To add feedback, click on the “Feedback” tab in the editing mode of a question. Here you can enter your feedback using an editor.
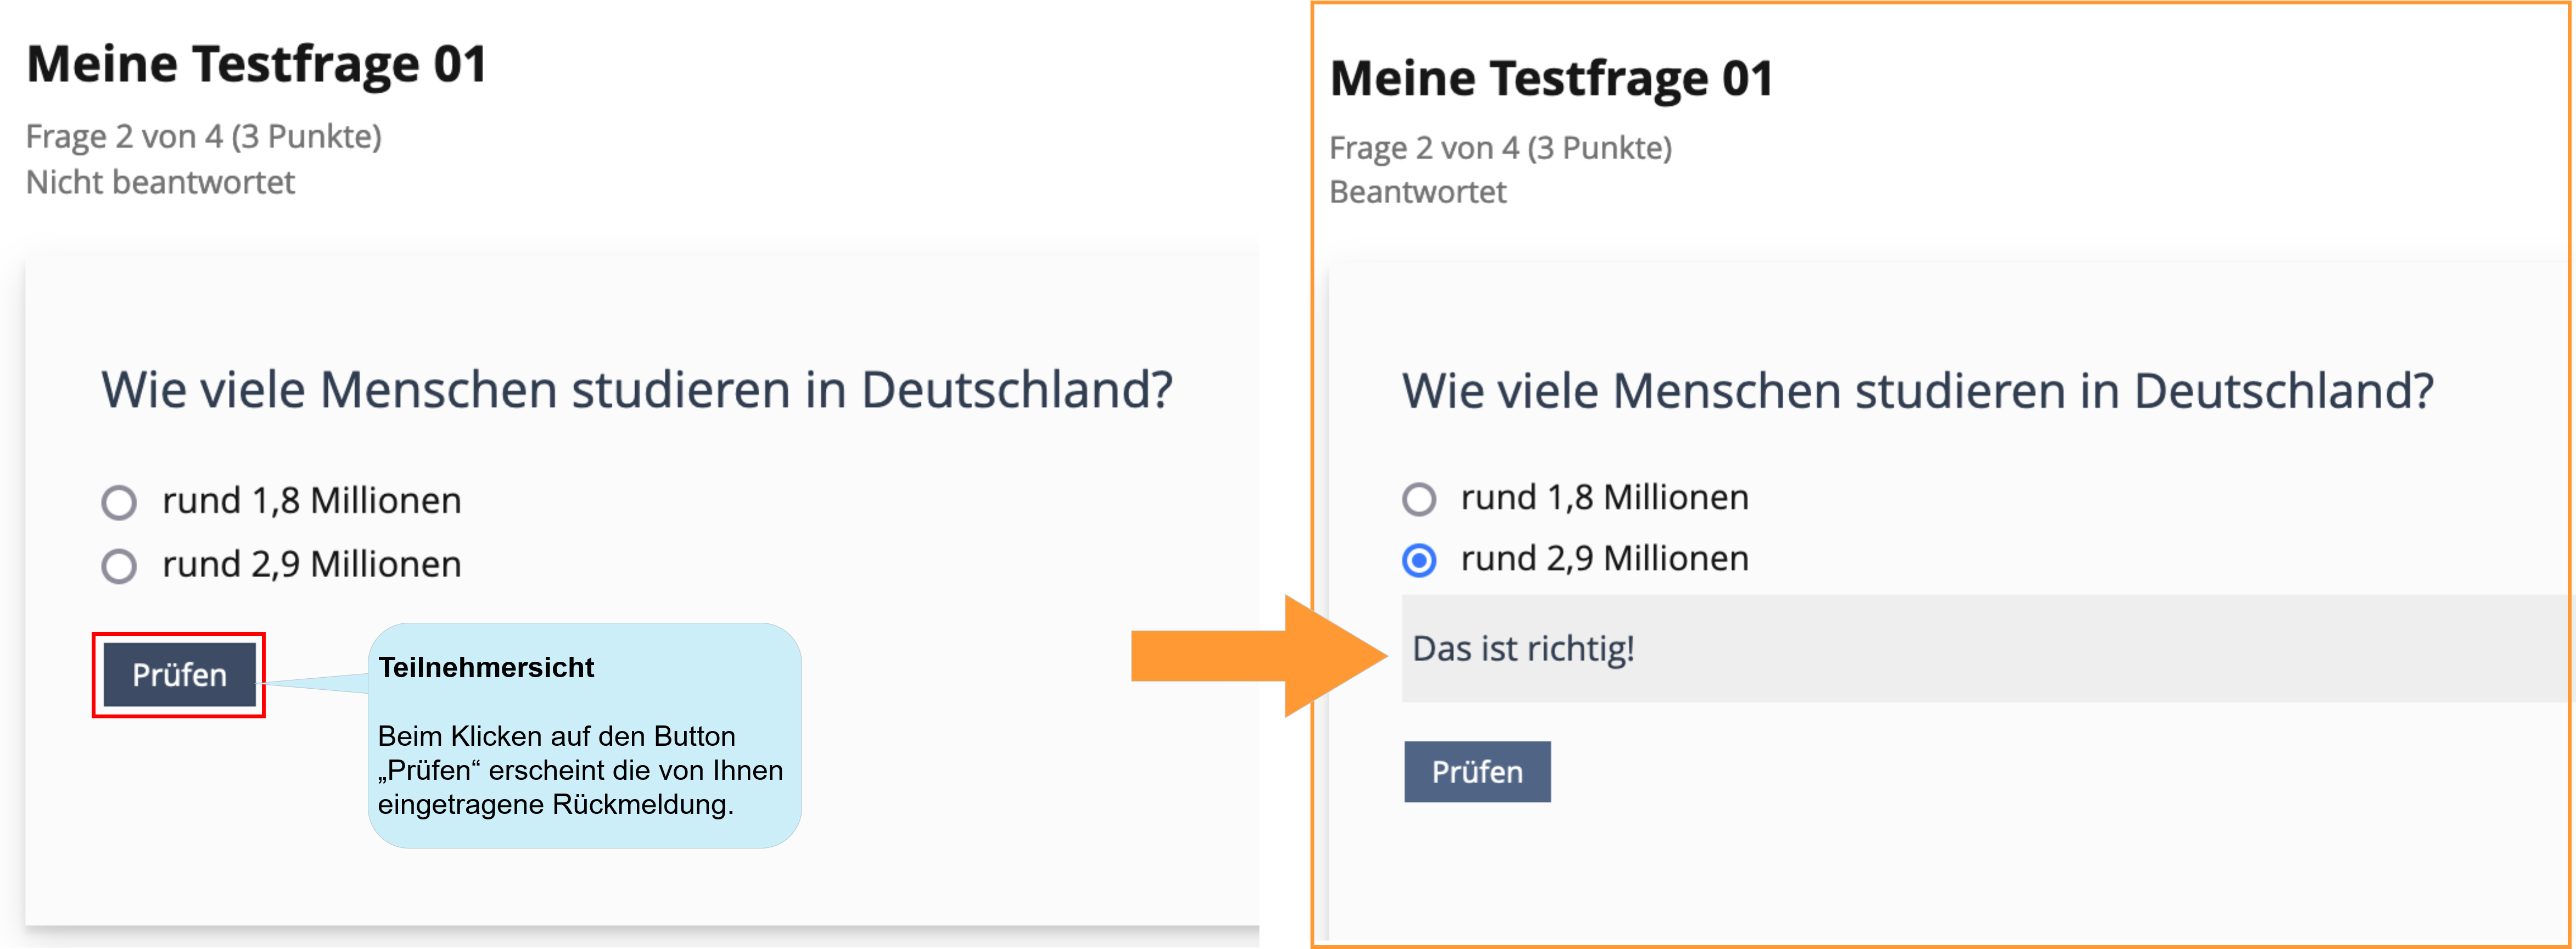
4.3. Participants view
Depending on the setting, the feedback for the participants can be provided
...can be accessed immediately after answering a question by clicking on the “Check” button
...in den „Detaillierten Testergebnissen“ bei Bekanntgabe des Testergebnisses eingesehen werden. Dafür muss im Tab „Einstellungen“ unter „Auswertung“ im Bereich „Details Testergebnisse“ die entsprechende Einstellung gesetzt sein
4.4. Best possible solutions
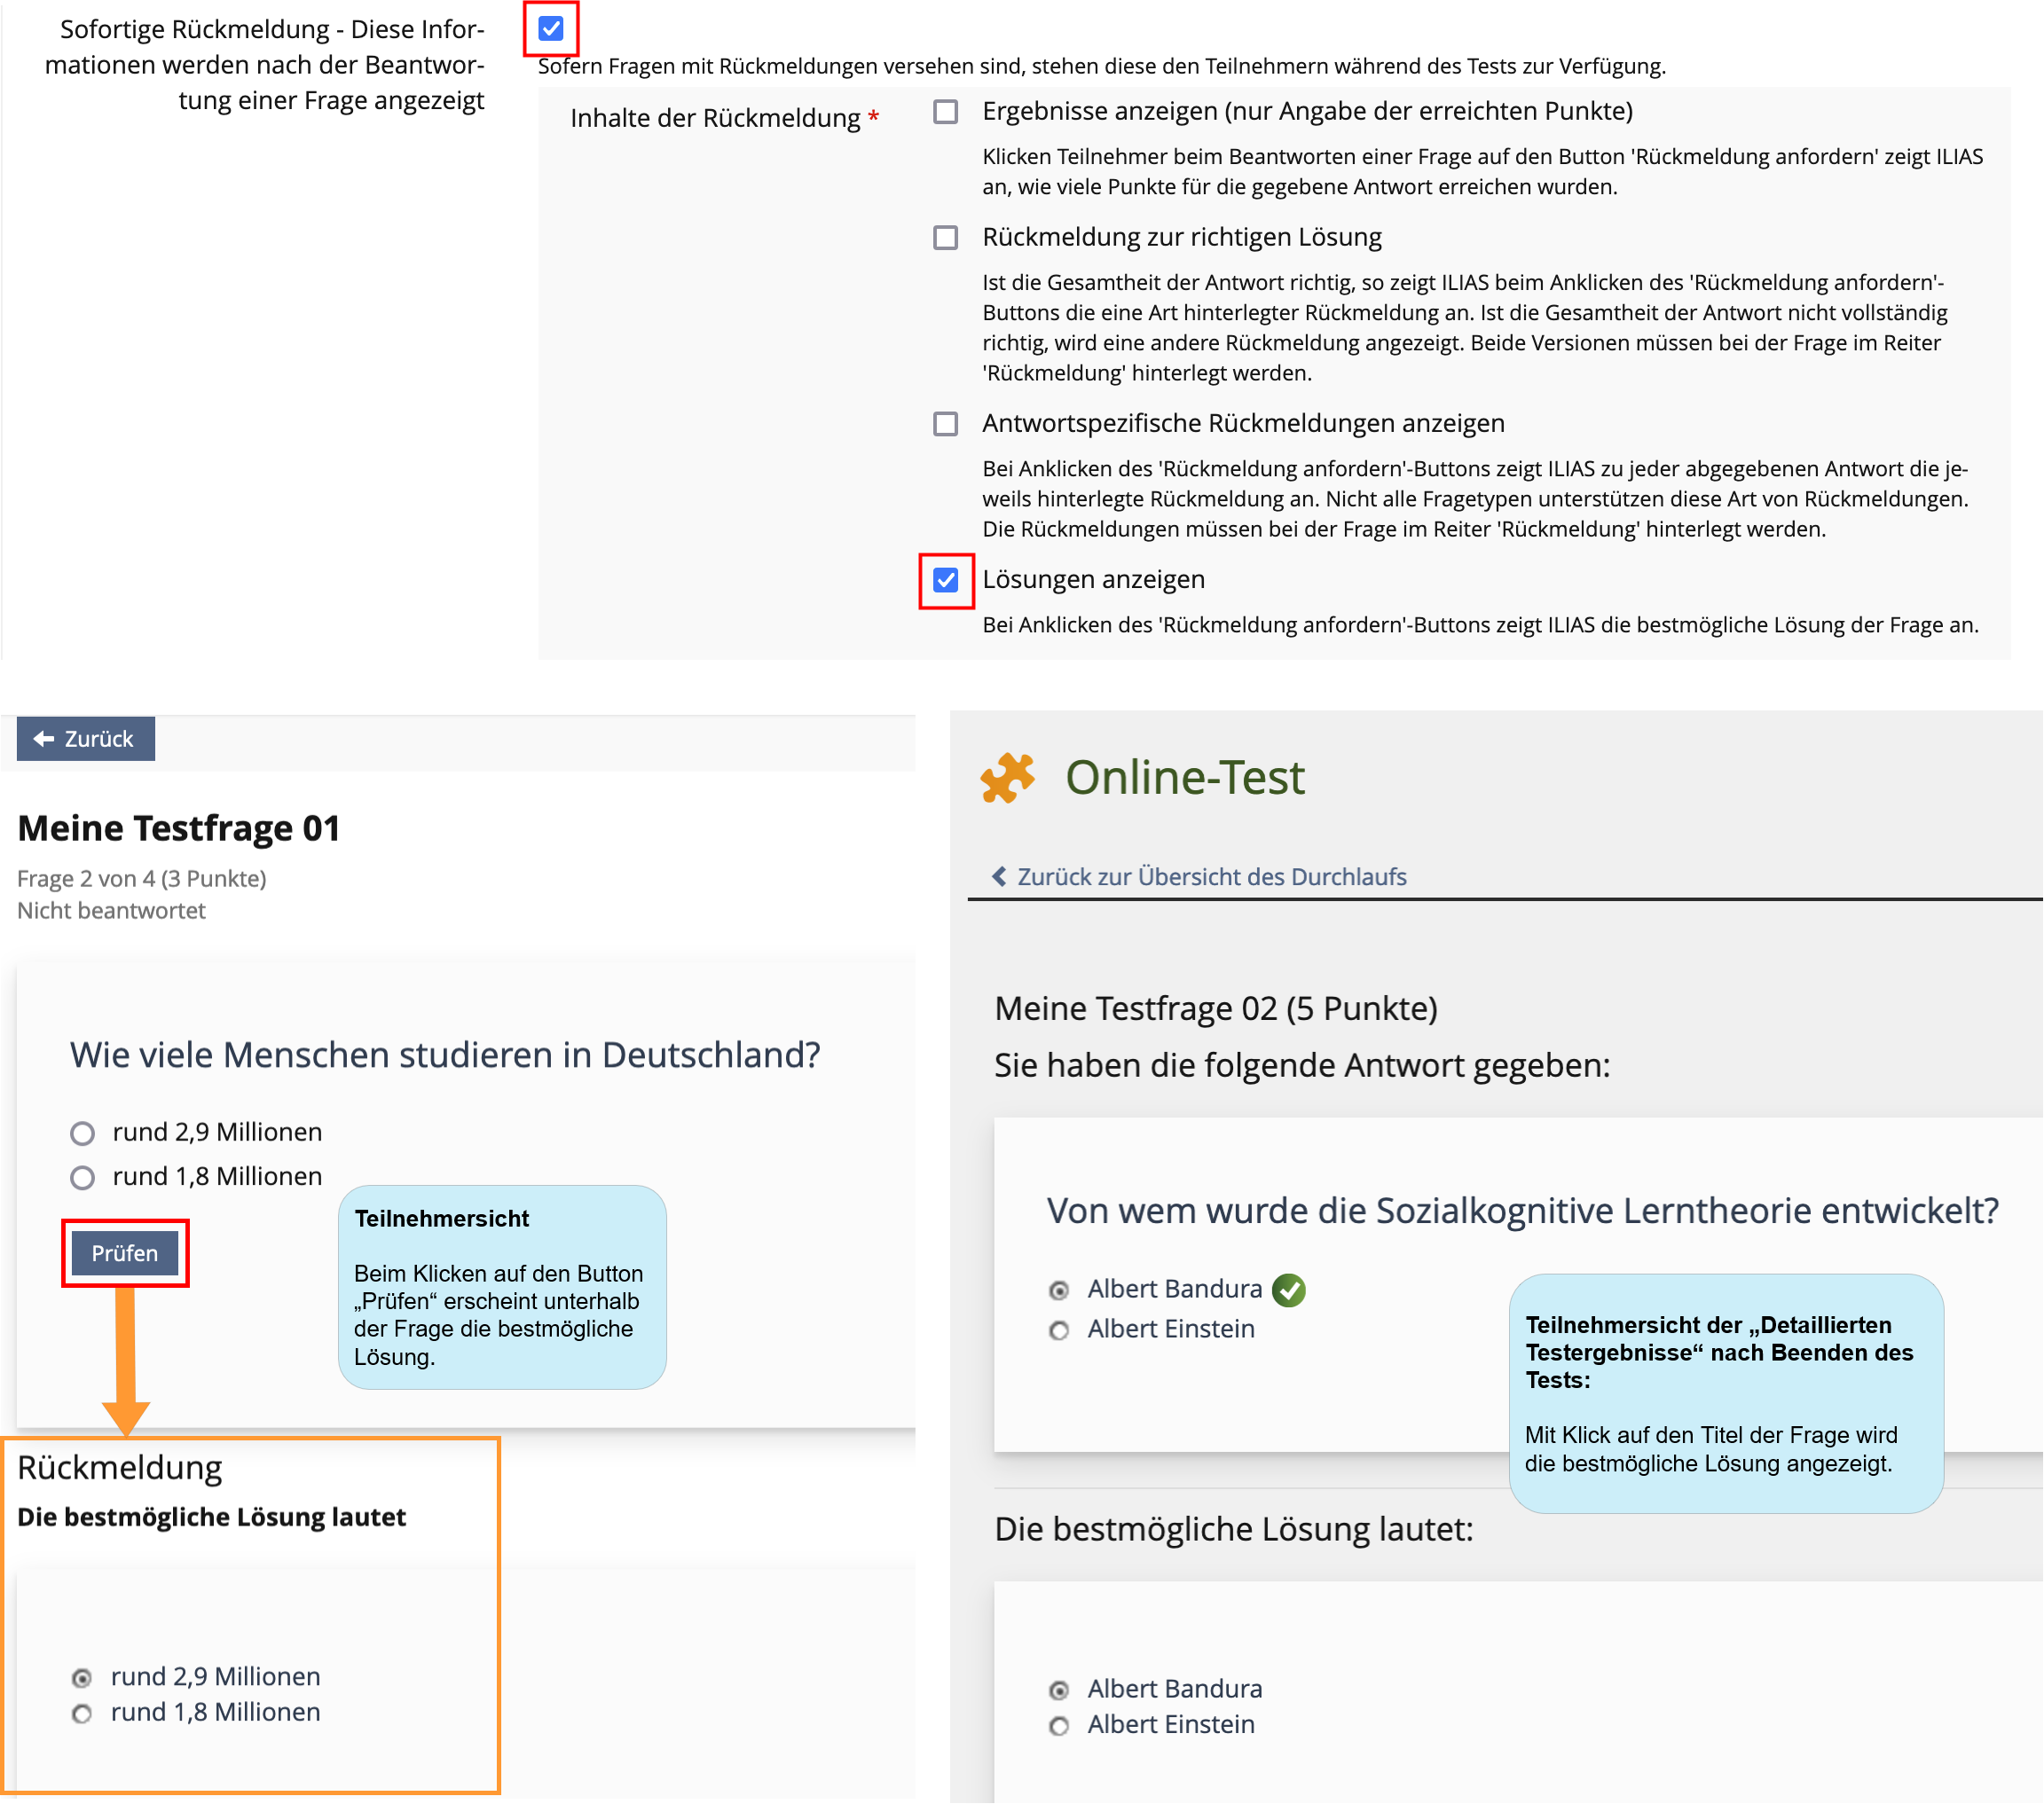
Für die Anzeige der bestmöglichen Lösungen (die sich aus der gesetzten Punktezahl ergeben) gibt es zwei Möglichkeiten:
- sofort nach Beantwortung einer Frage durch Klicken auf den Button „Prüfen“
- in den „Detaillierten Testergebnissen“ bei Bekanntgabe des Testergebnisses zu Ihrem gewünschten Zeitpunkt
(dafür muss im Reiter „Einstellungen“ unter „Auswertung“ im Bereich „Details Testergebnisse“ die entsprechende Einstellung gesetzt sein)
Für beide Optionen muss in den „Allgemeinen Einstellungen“ unter „Sofortige Rückmeldung“ die Einstellung „Lösungen anzeigen“ gesetzt sein
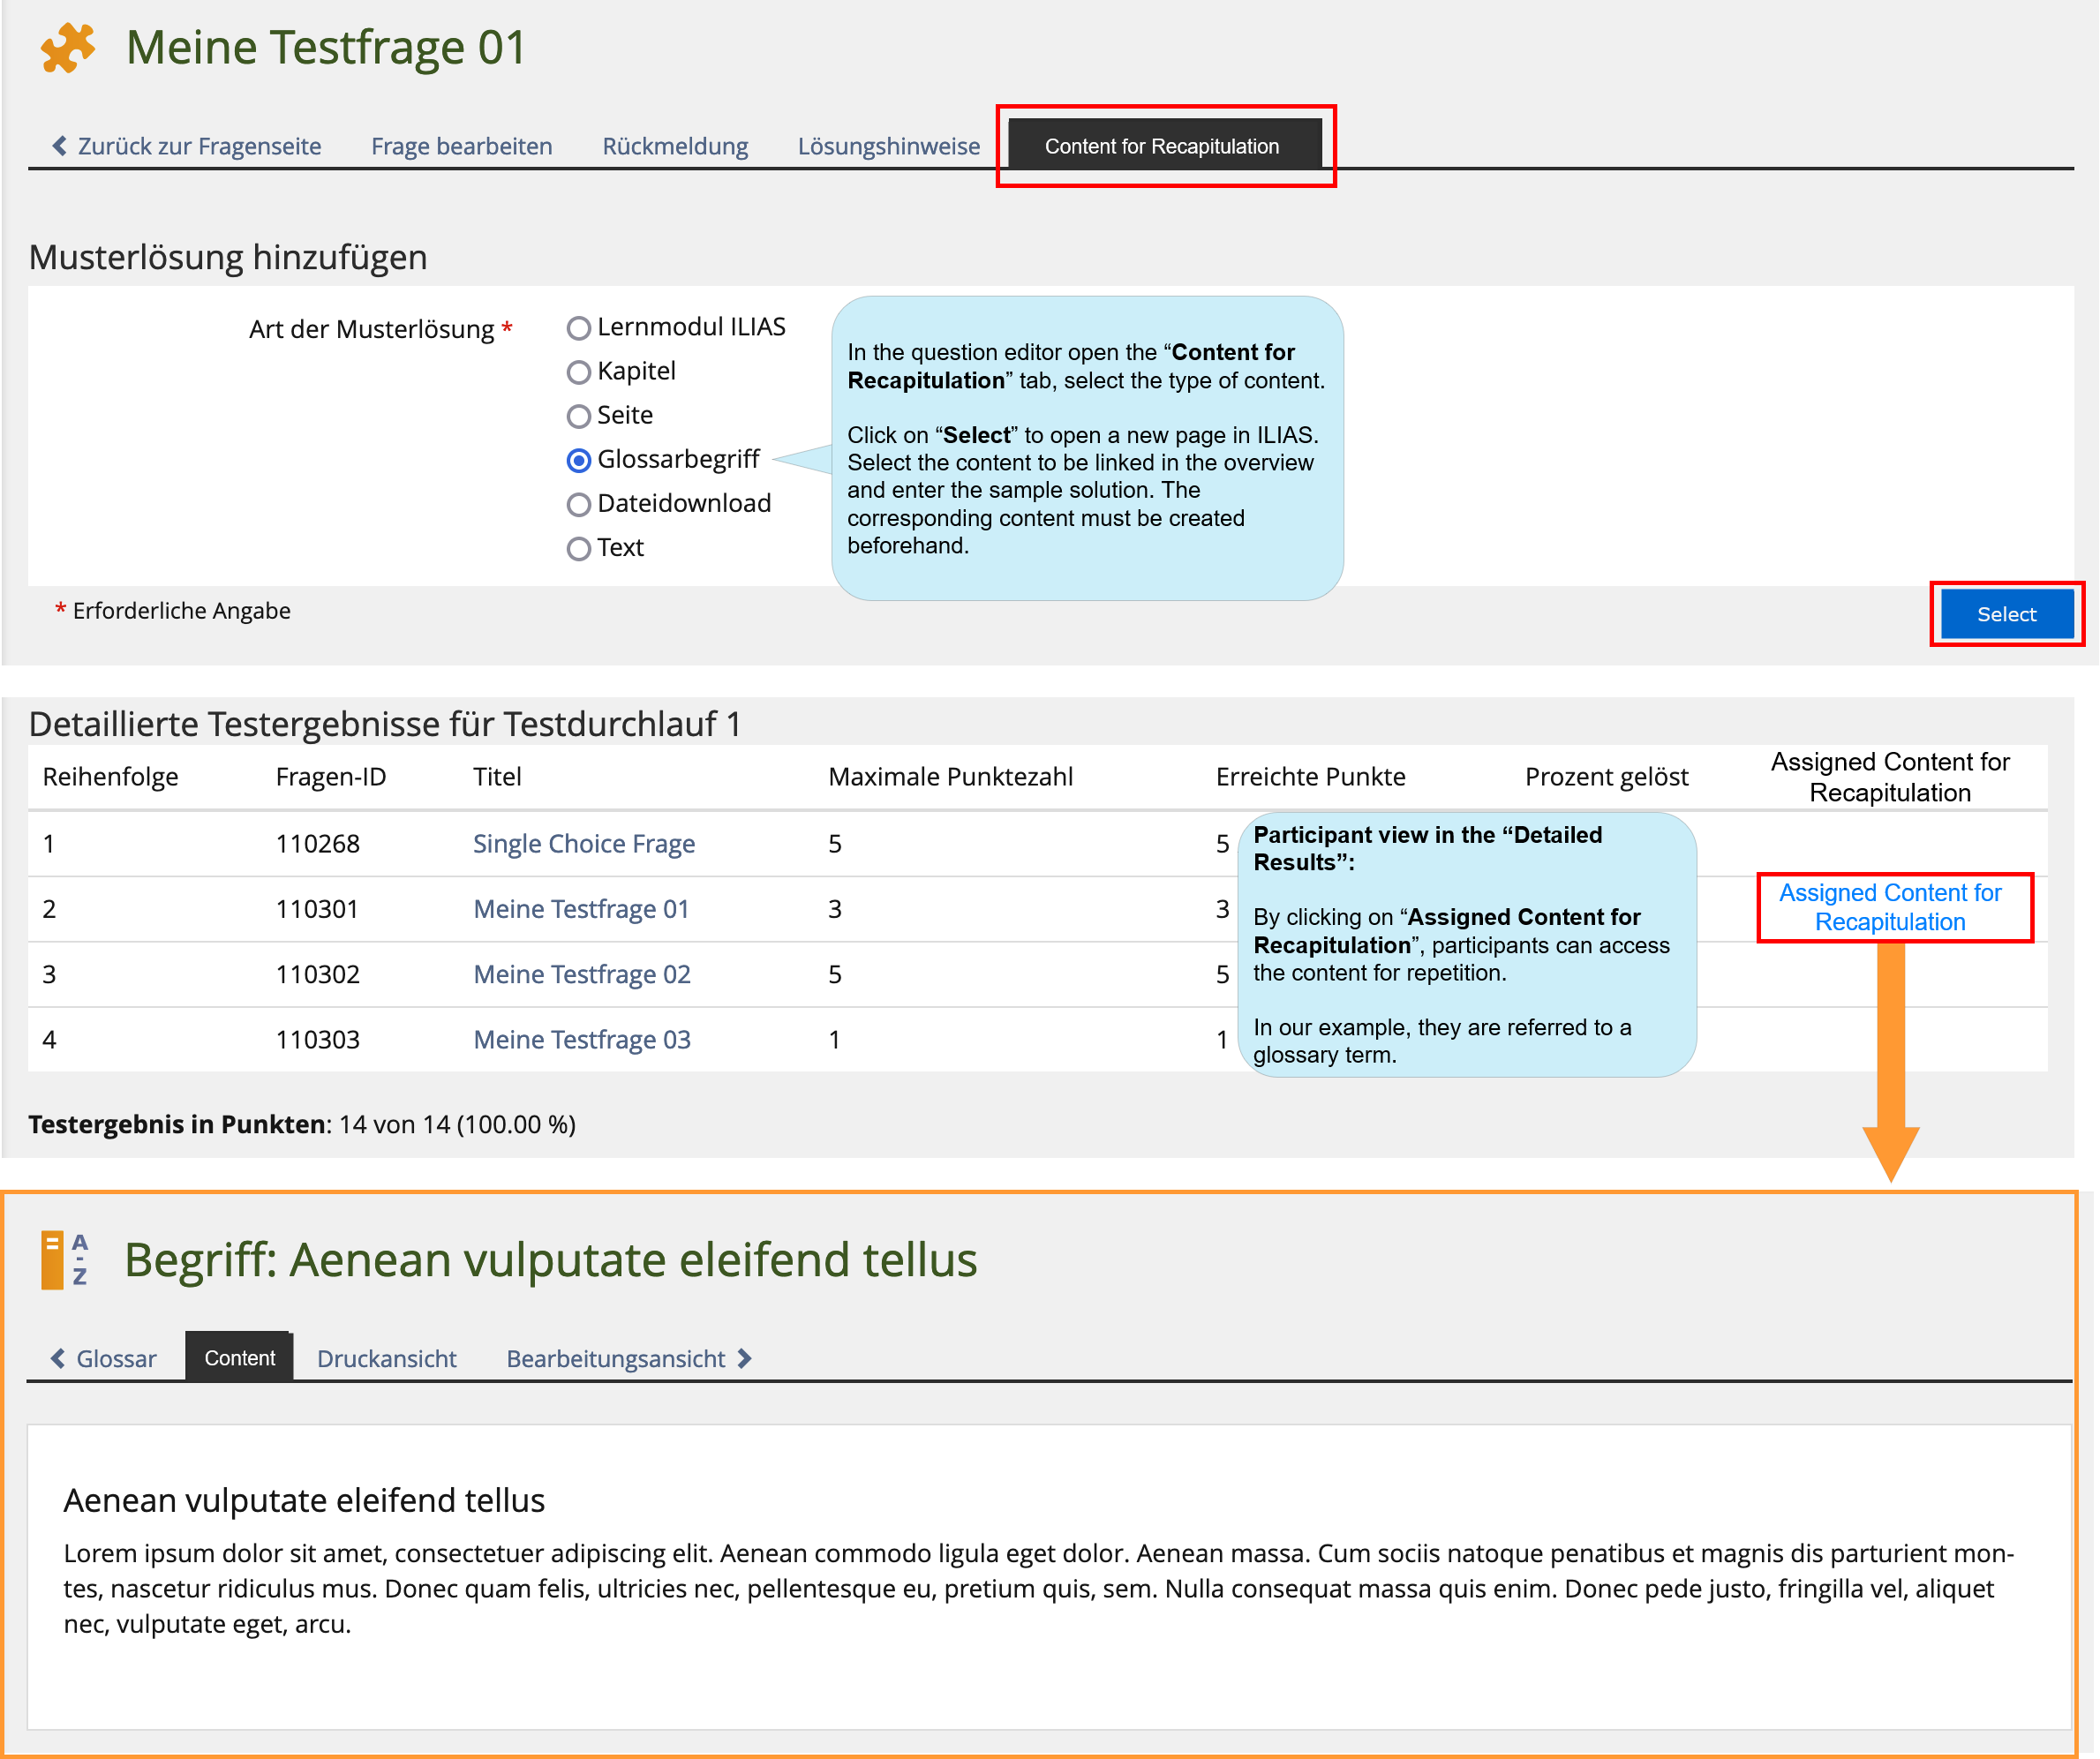
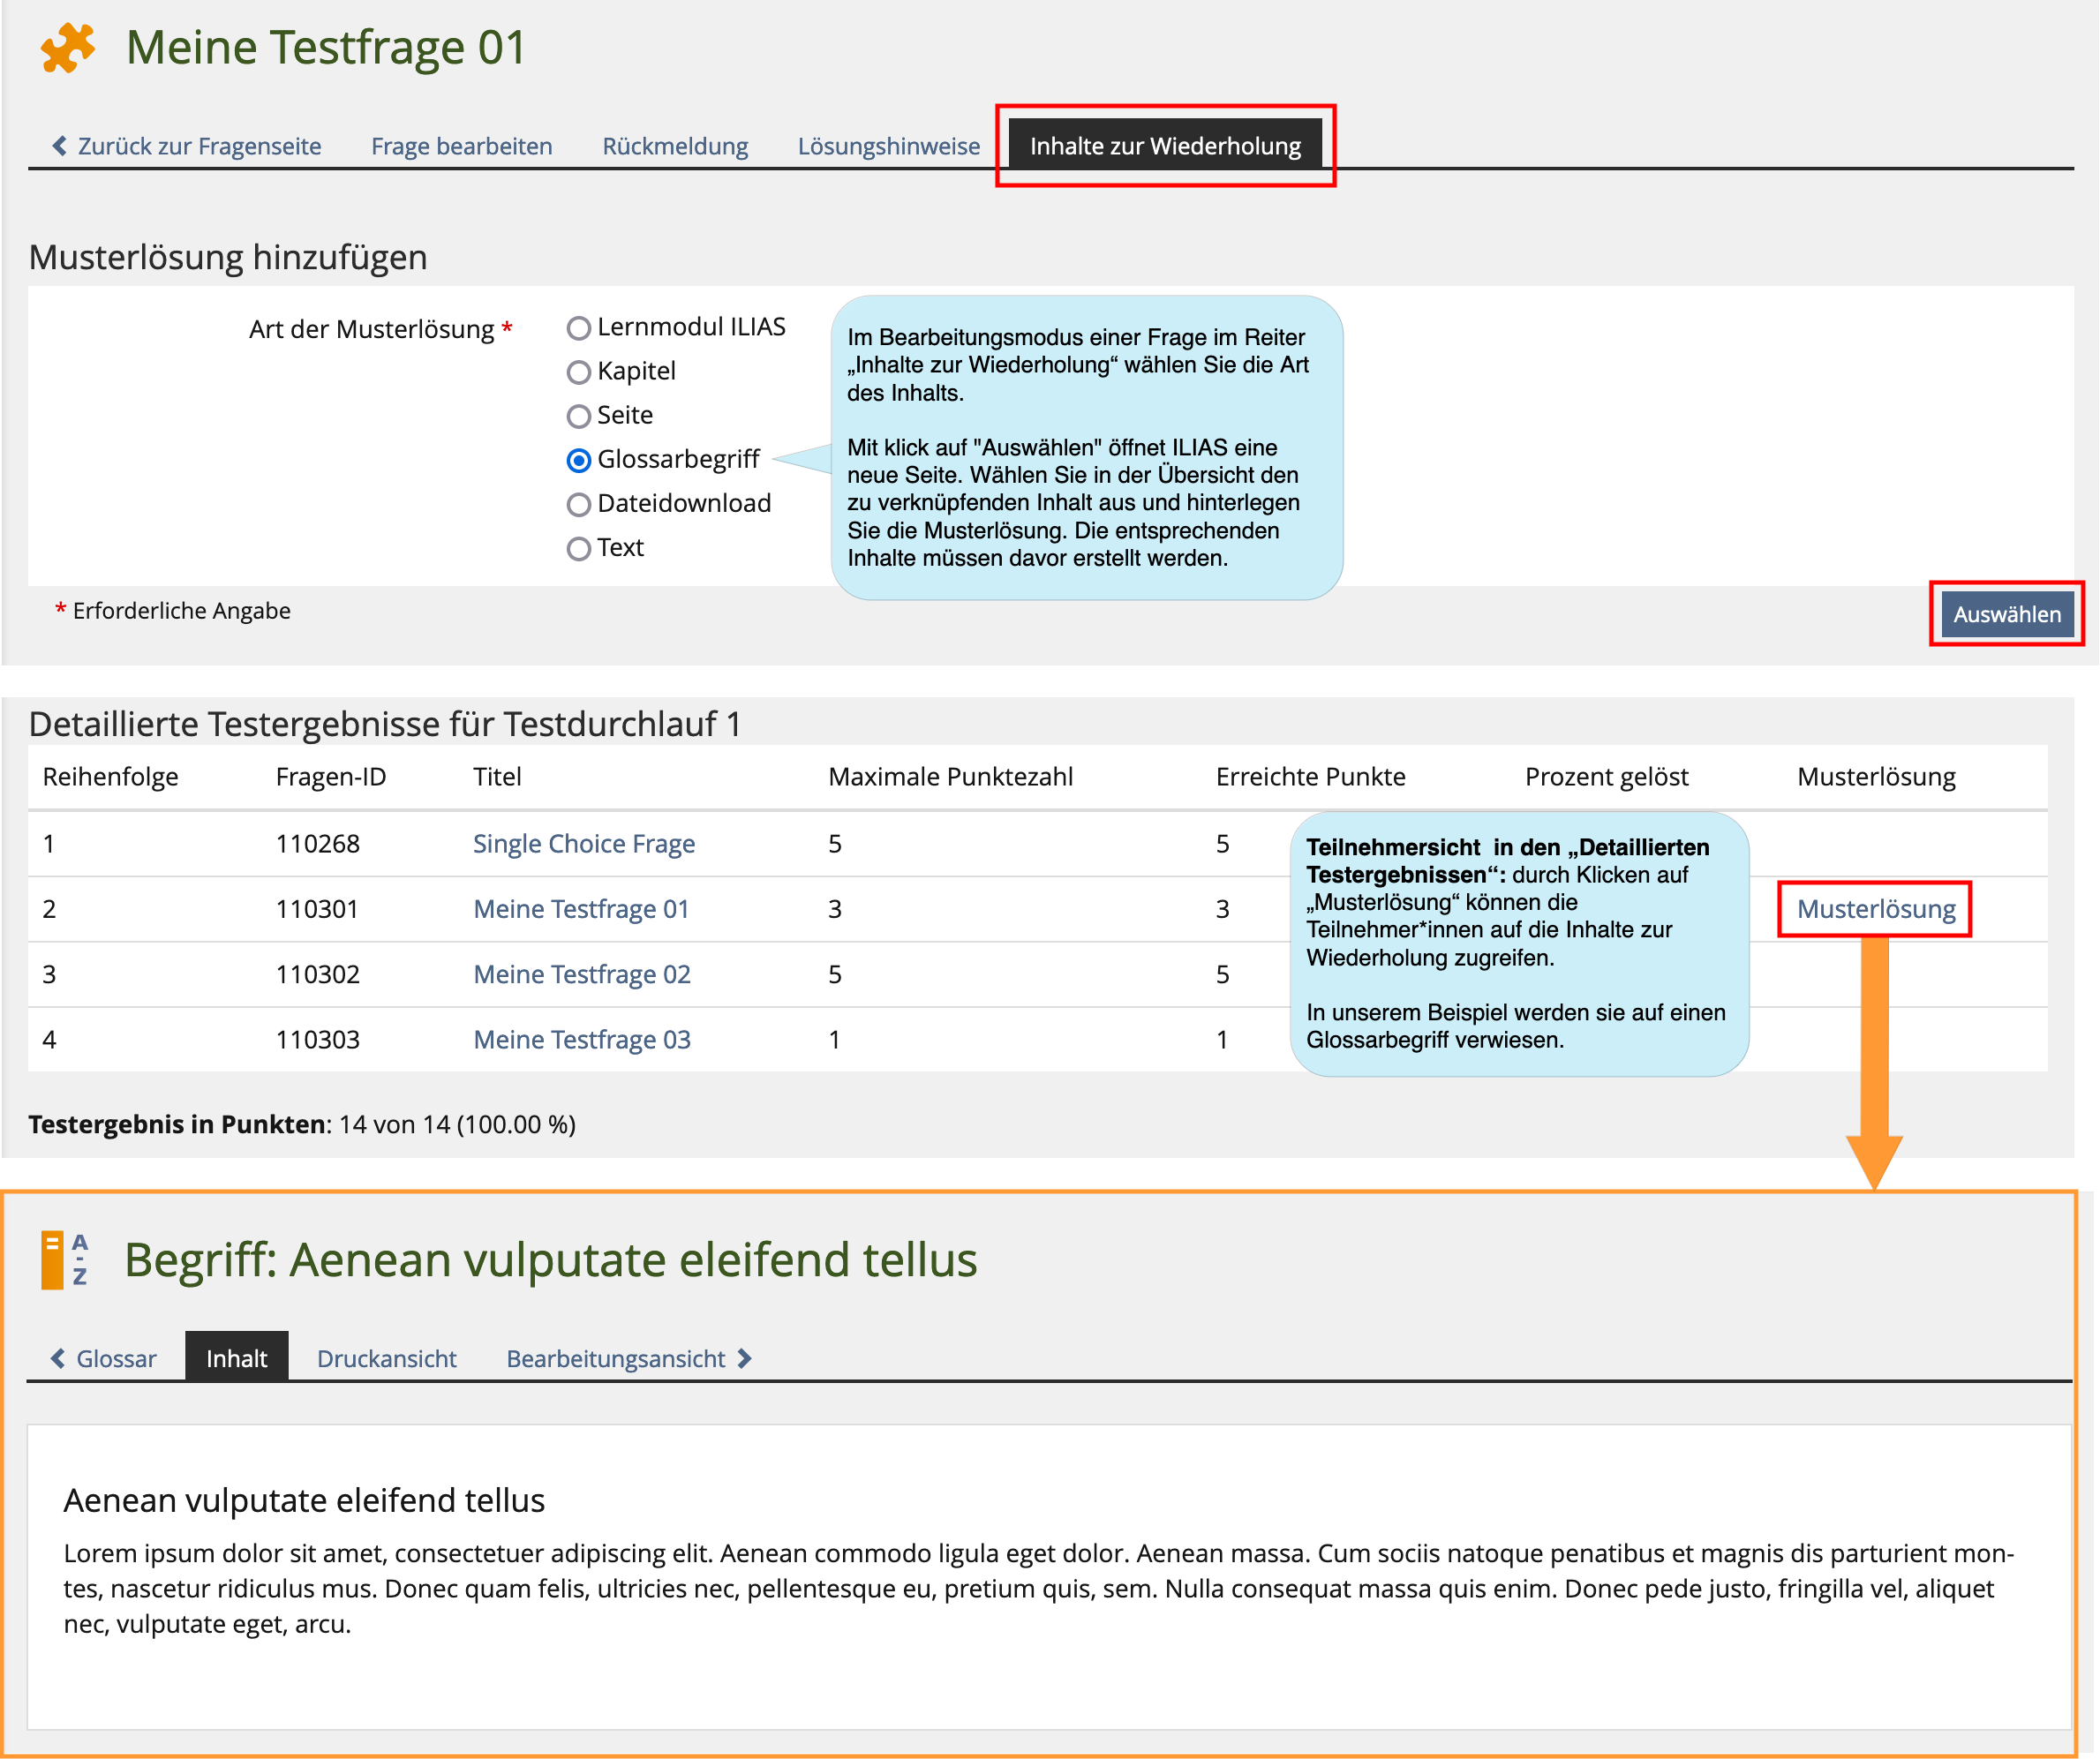
4.5. 'Content for Recapitulation'
Mit dieser Funktion können die Teilnehmer*innen nach Abschluss des Tests in den „Detaillierten Testergebnissen“ auf Inhalte zur Wiederholung des Lerninhalts wie z. B. ausgewählte Seiten, Dateien, Lernmodule und Glossarbegriffe verwiesen werden.
Zunächst muss im Reiter „Einstellungen“ des Tests unter „Auswertung“ im Bereich „Details Testergebnisse“ die Einstellung „Musterlösungen anzeigen“ gesetzt sein. Wann die Teilnehmer auf diese Inhalte zur Wiederholung zugreifen können, hängt vom Zugang zu den Testergebnissen ab, den Sie auf der selben Seite einstellen können.
5. Trial runs
Nach der Fertigstellung Ihres Tests empfiehlt es sich zu überprüfen, ob der Test so abläuft und die Ergebnisse so ausgewertet werden, wie Sie das geplant haben, oder ob Sie in den Einstellungen des Tests noch etwas korrigieren müssen.
Dafür muss der Test online geschaltet sein (im Tab „Einstellungen“).
Danach können Sie zur Probe den „Test starten“ (das ist im Tab „Fragen“ sowie im Tab „Info“ möglich).
Bitte beachten Sie: Nach jedem Testdurchlauf (auch nach „Probetests“) existieren „Ergebnisse“ bzw. „Testdaten“. Diese müssen gelöscht werden, bevor Sie den Test weiter bearbeiten können (um Einstellungen zu ändern, Fragen nochmals zu bearbeiten oder neue Fragen hinzuzufügen).
Öffnen Sie dafür den Tab „Ergebnisse“, klicken Sie auf „Testdaten aller Teilnehmer löschen“ und bestätigen Sie mit „Fortfahren“. Bitte überprüfen Sie vor Einsatz Ihres Tests, ob alle „Testdaten“ aus den Probedurchläufen gelöscht sind.
6. Test results
6.1. Automatic evaluation
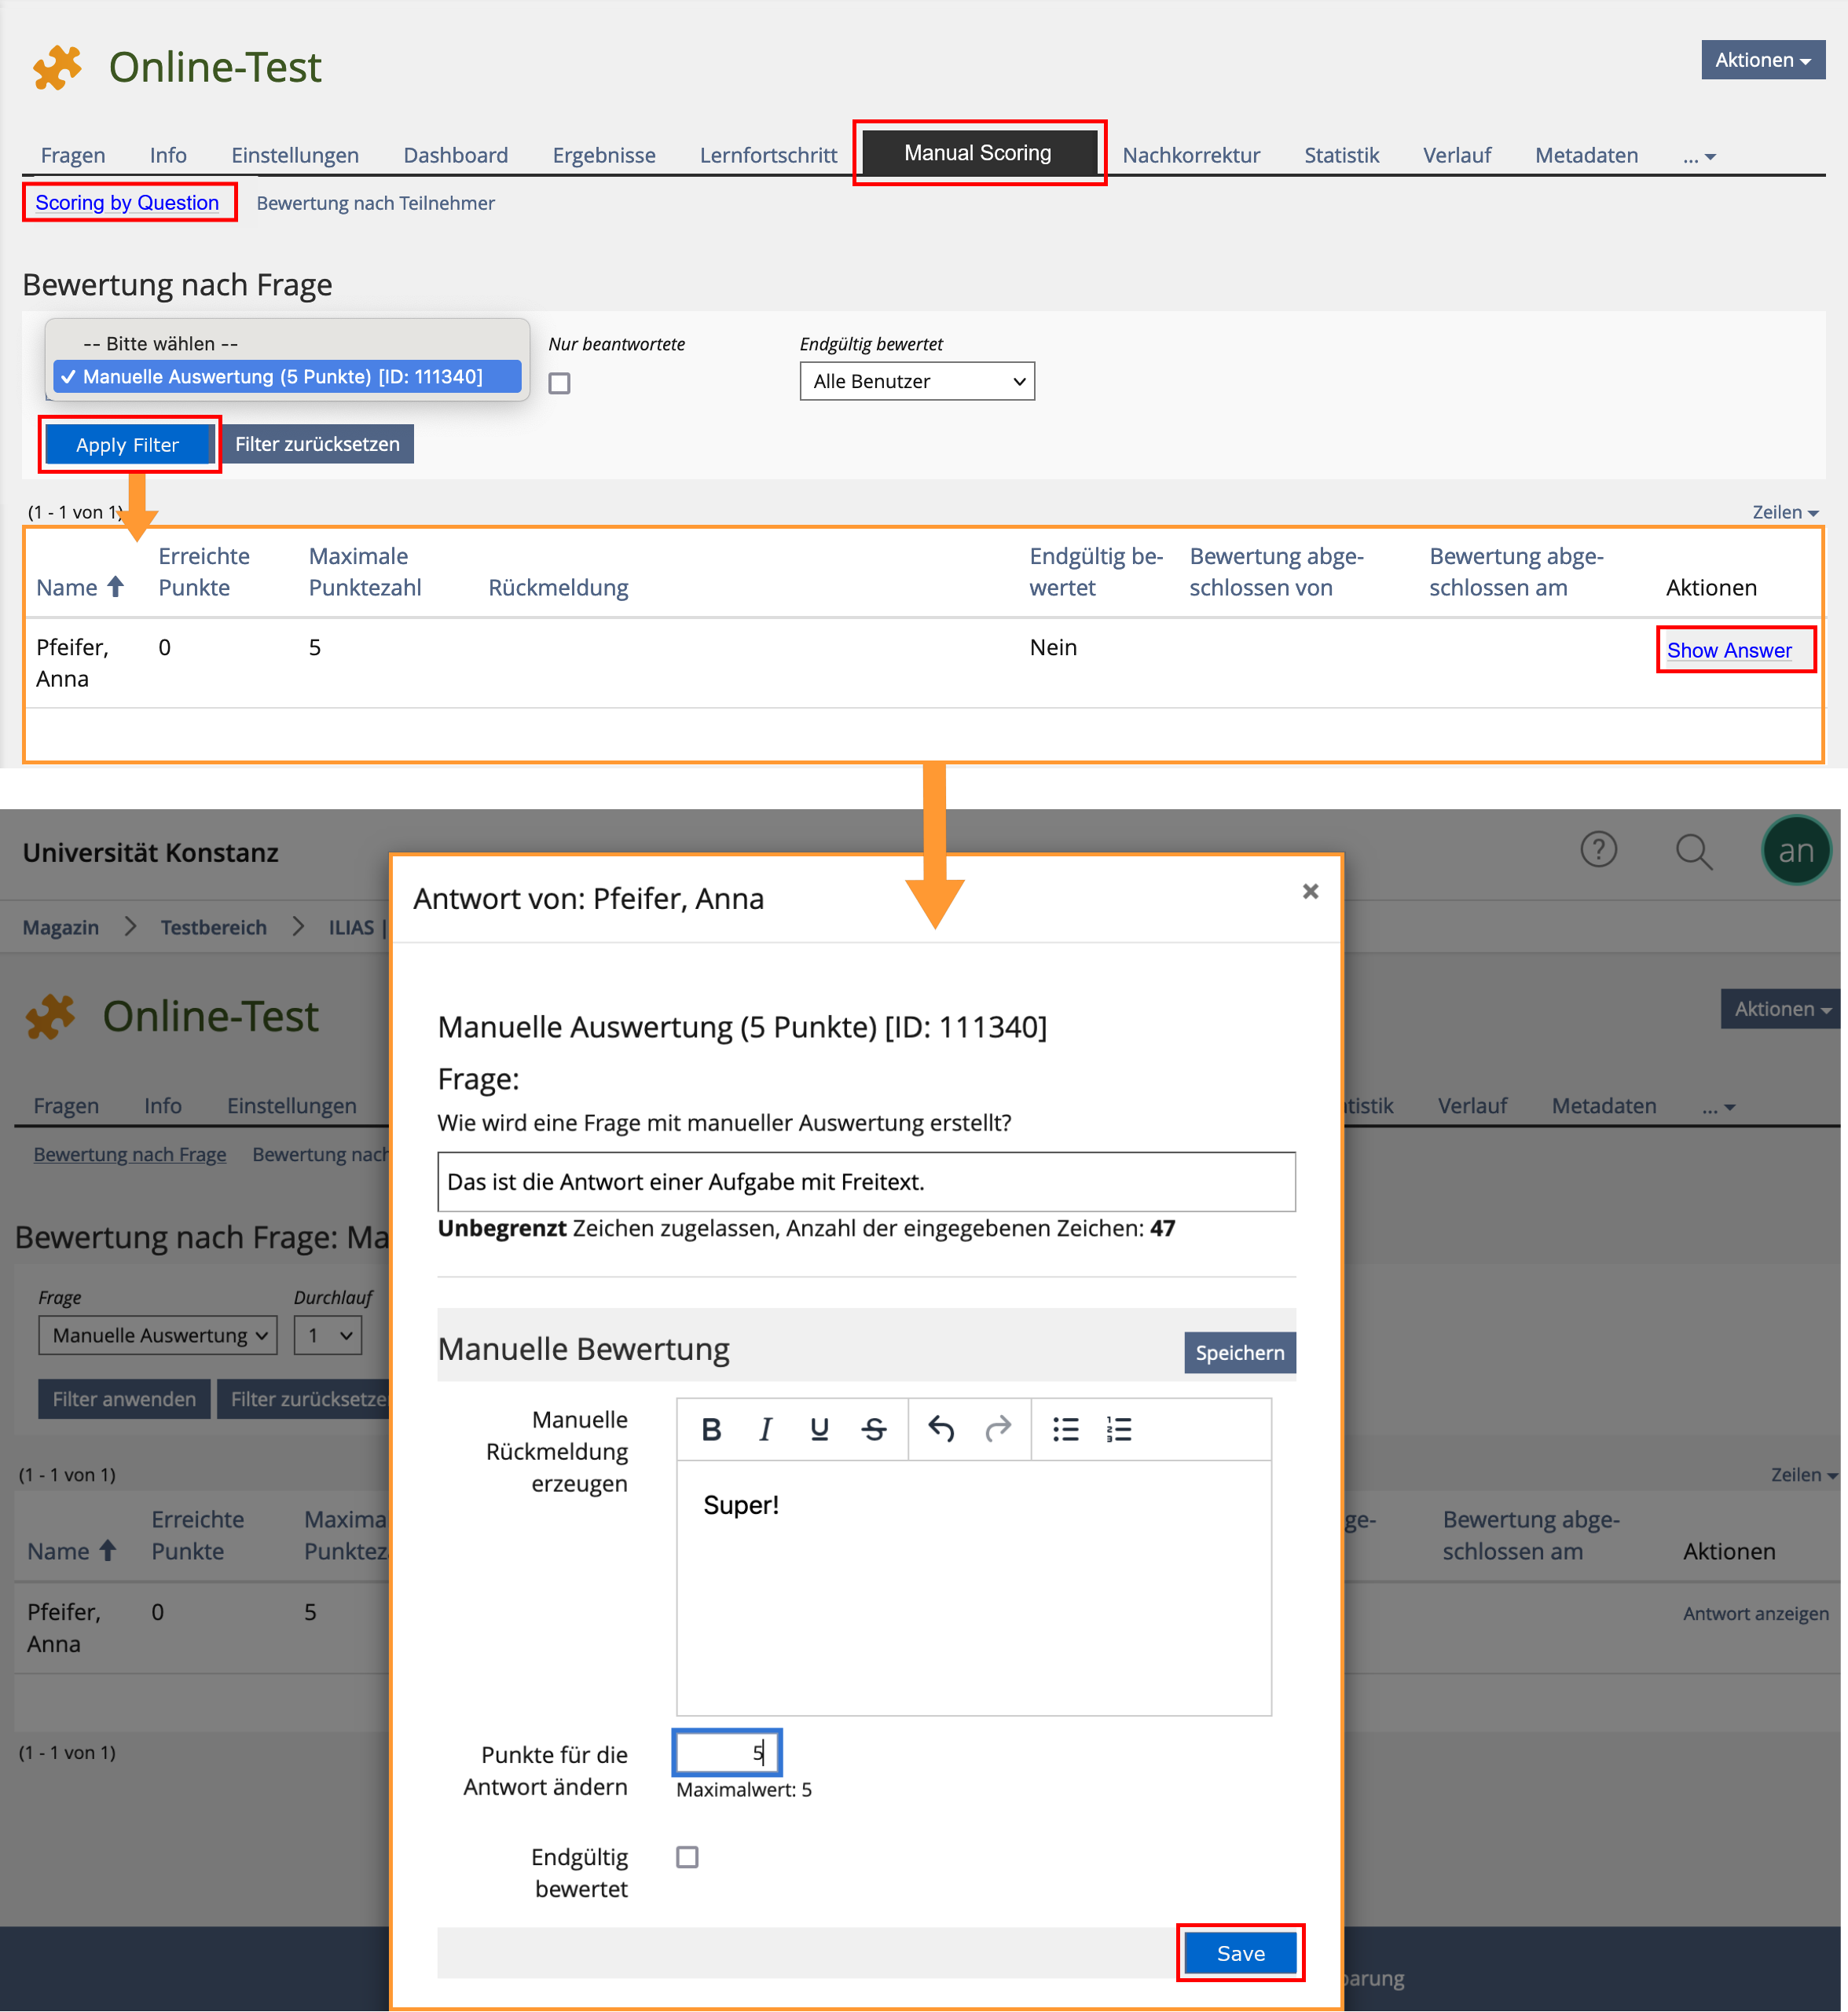
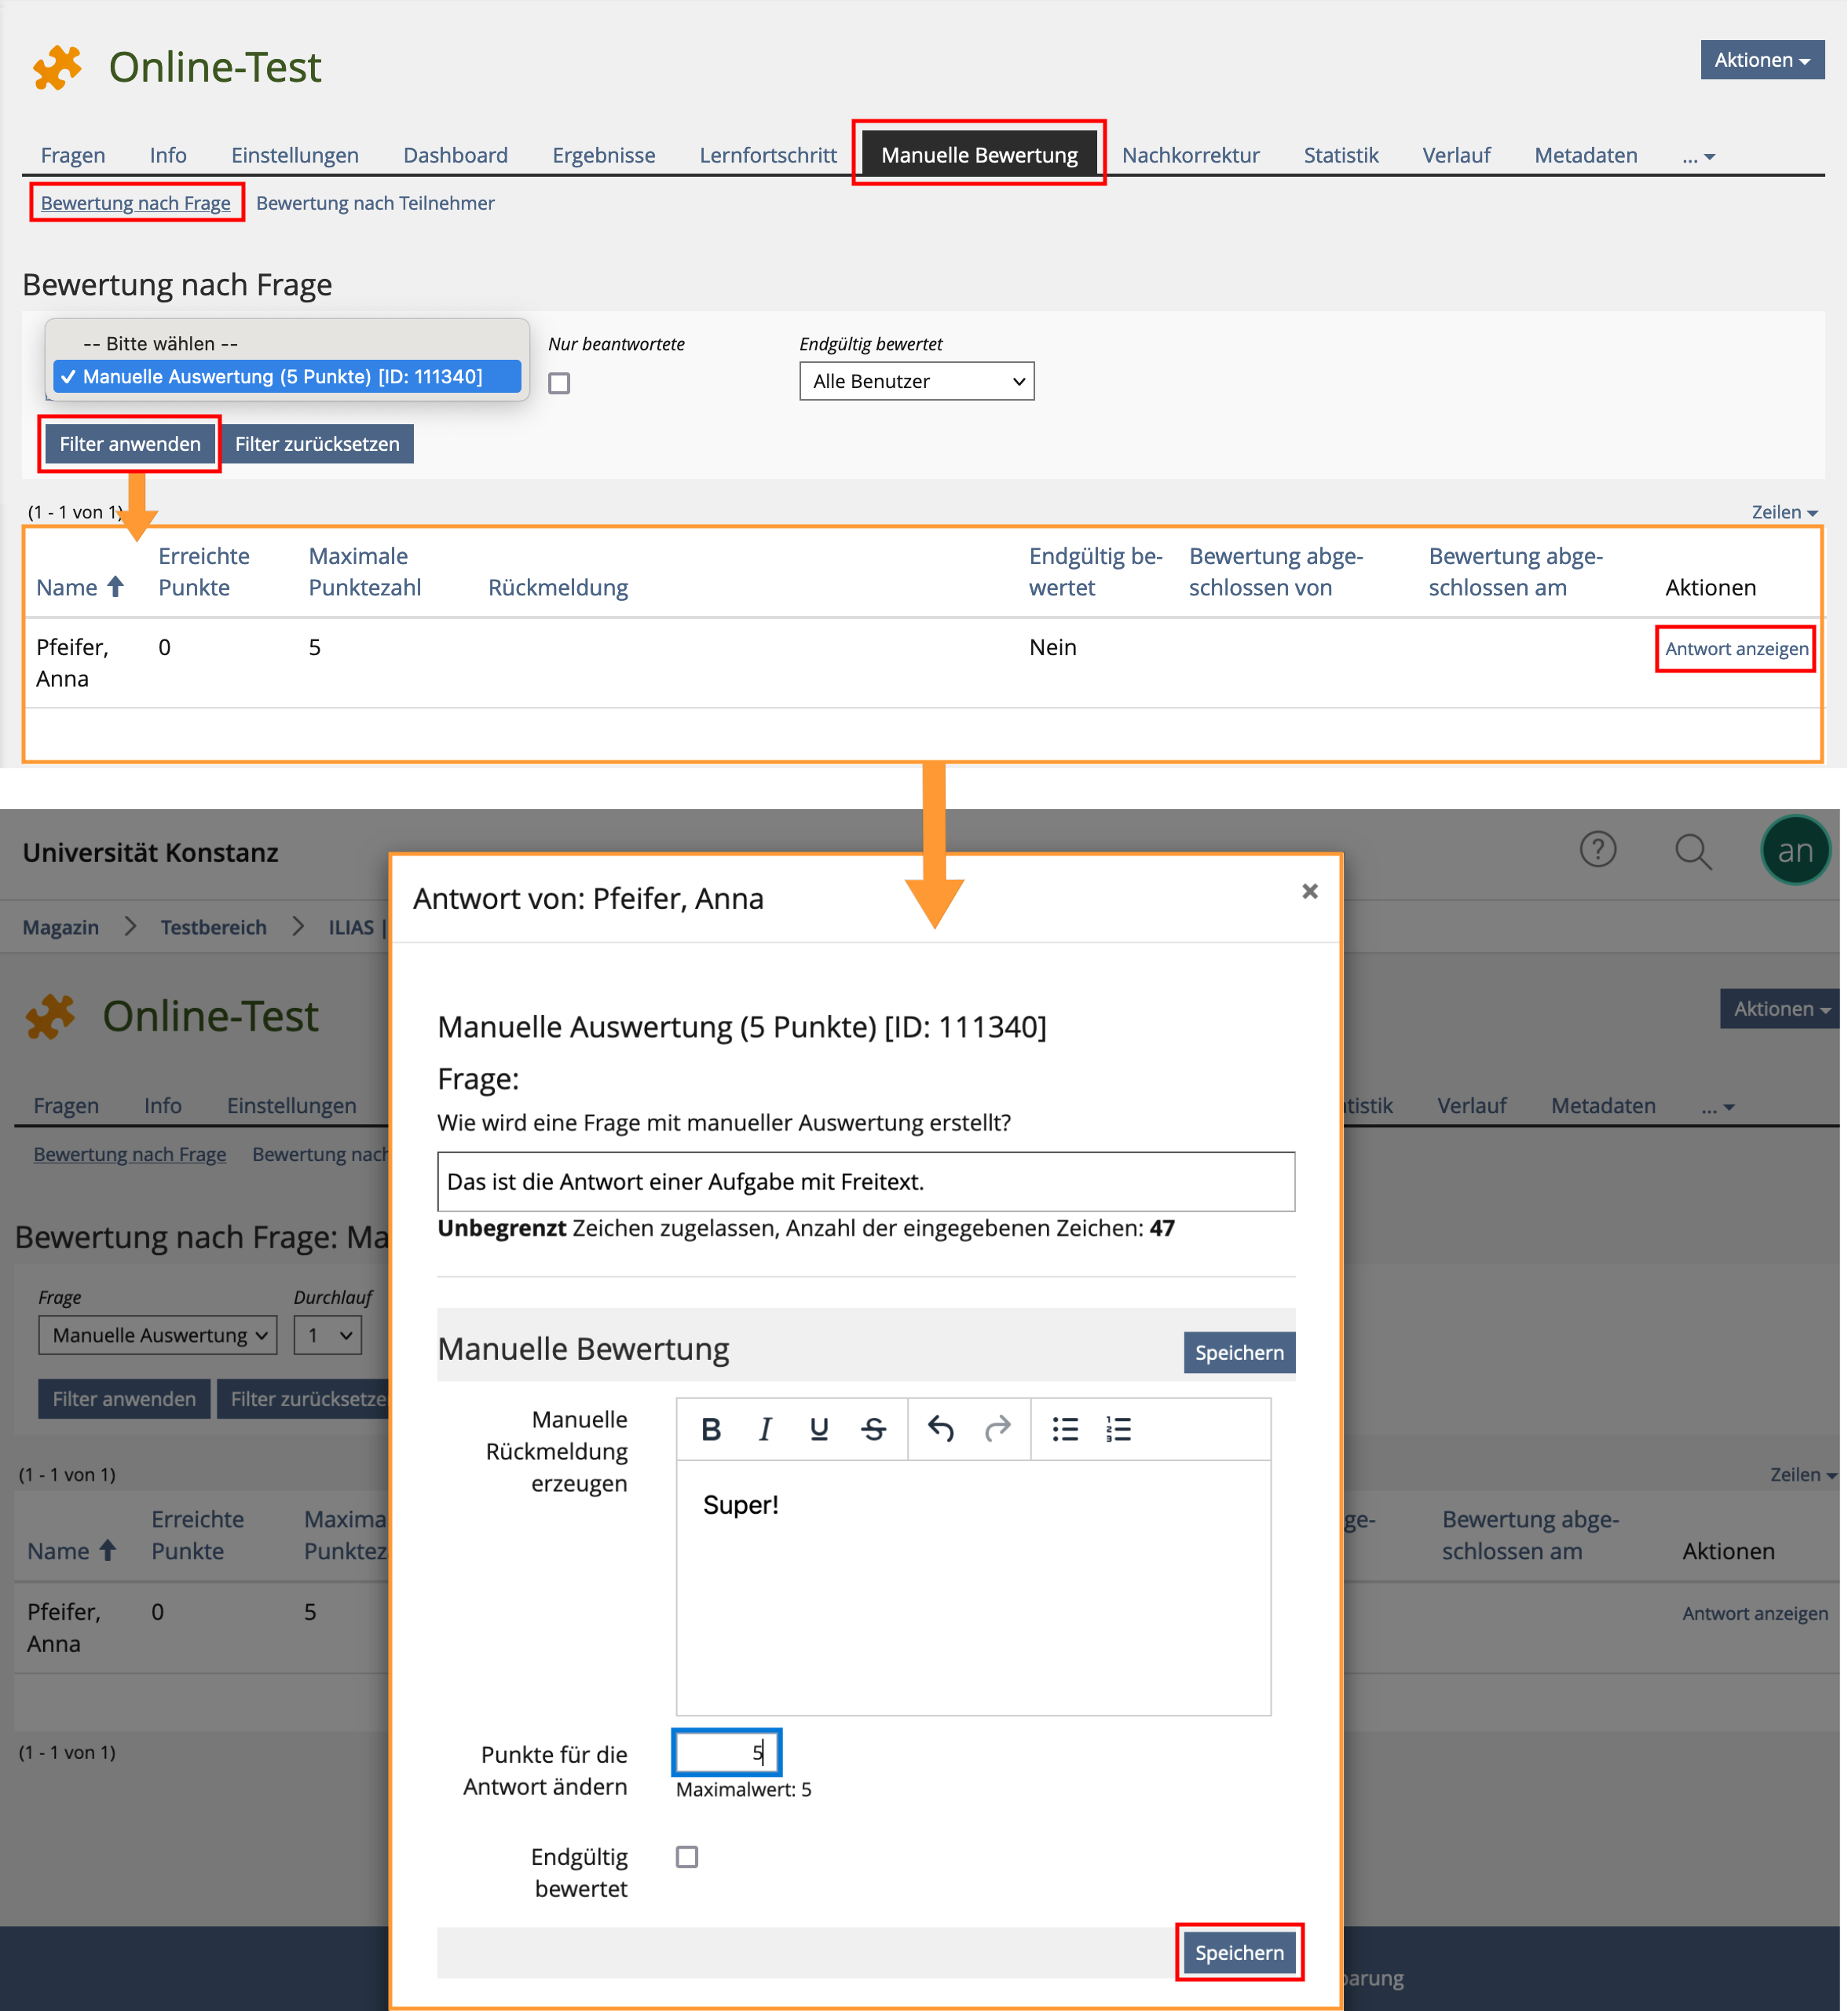
6.2. Evaluating manually
Wenn Sie Fragen verwenden, die manuell ausgewertet werden müssen, klicken Sie auf „Manuelle Bewertung“. Hier wählen Sie die einzelne(n) Frage(n) im Bereich „Bewertung nach Frage“ mit „Filter anwenden“ aus.
Anschließend sehen Sie die Antworten der Teilnehmer*innen („Antwort anzeigen“), bewerten die Lösung („Erreichte Punkte“) und „Speichern“ die vergebene Punktzahl.
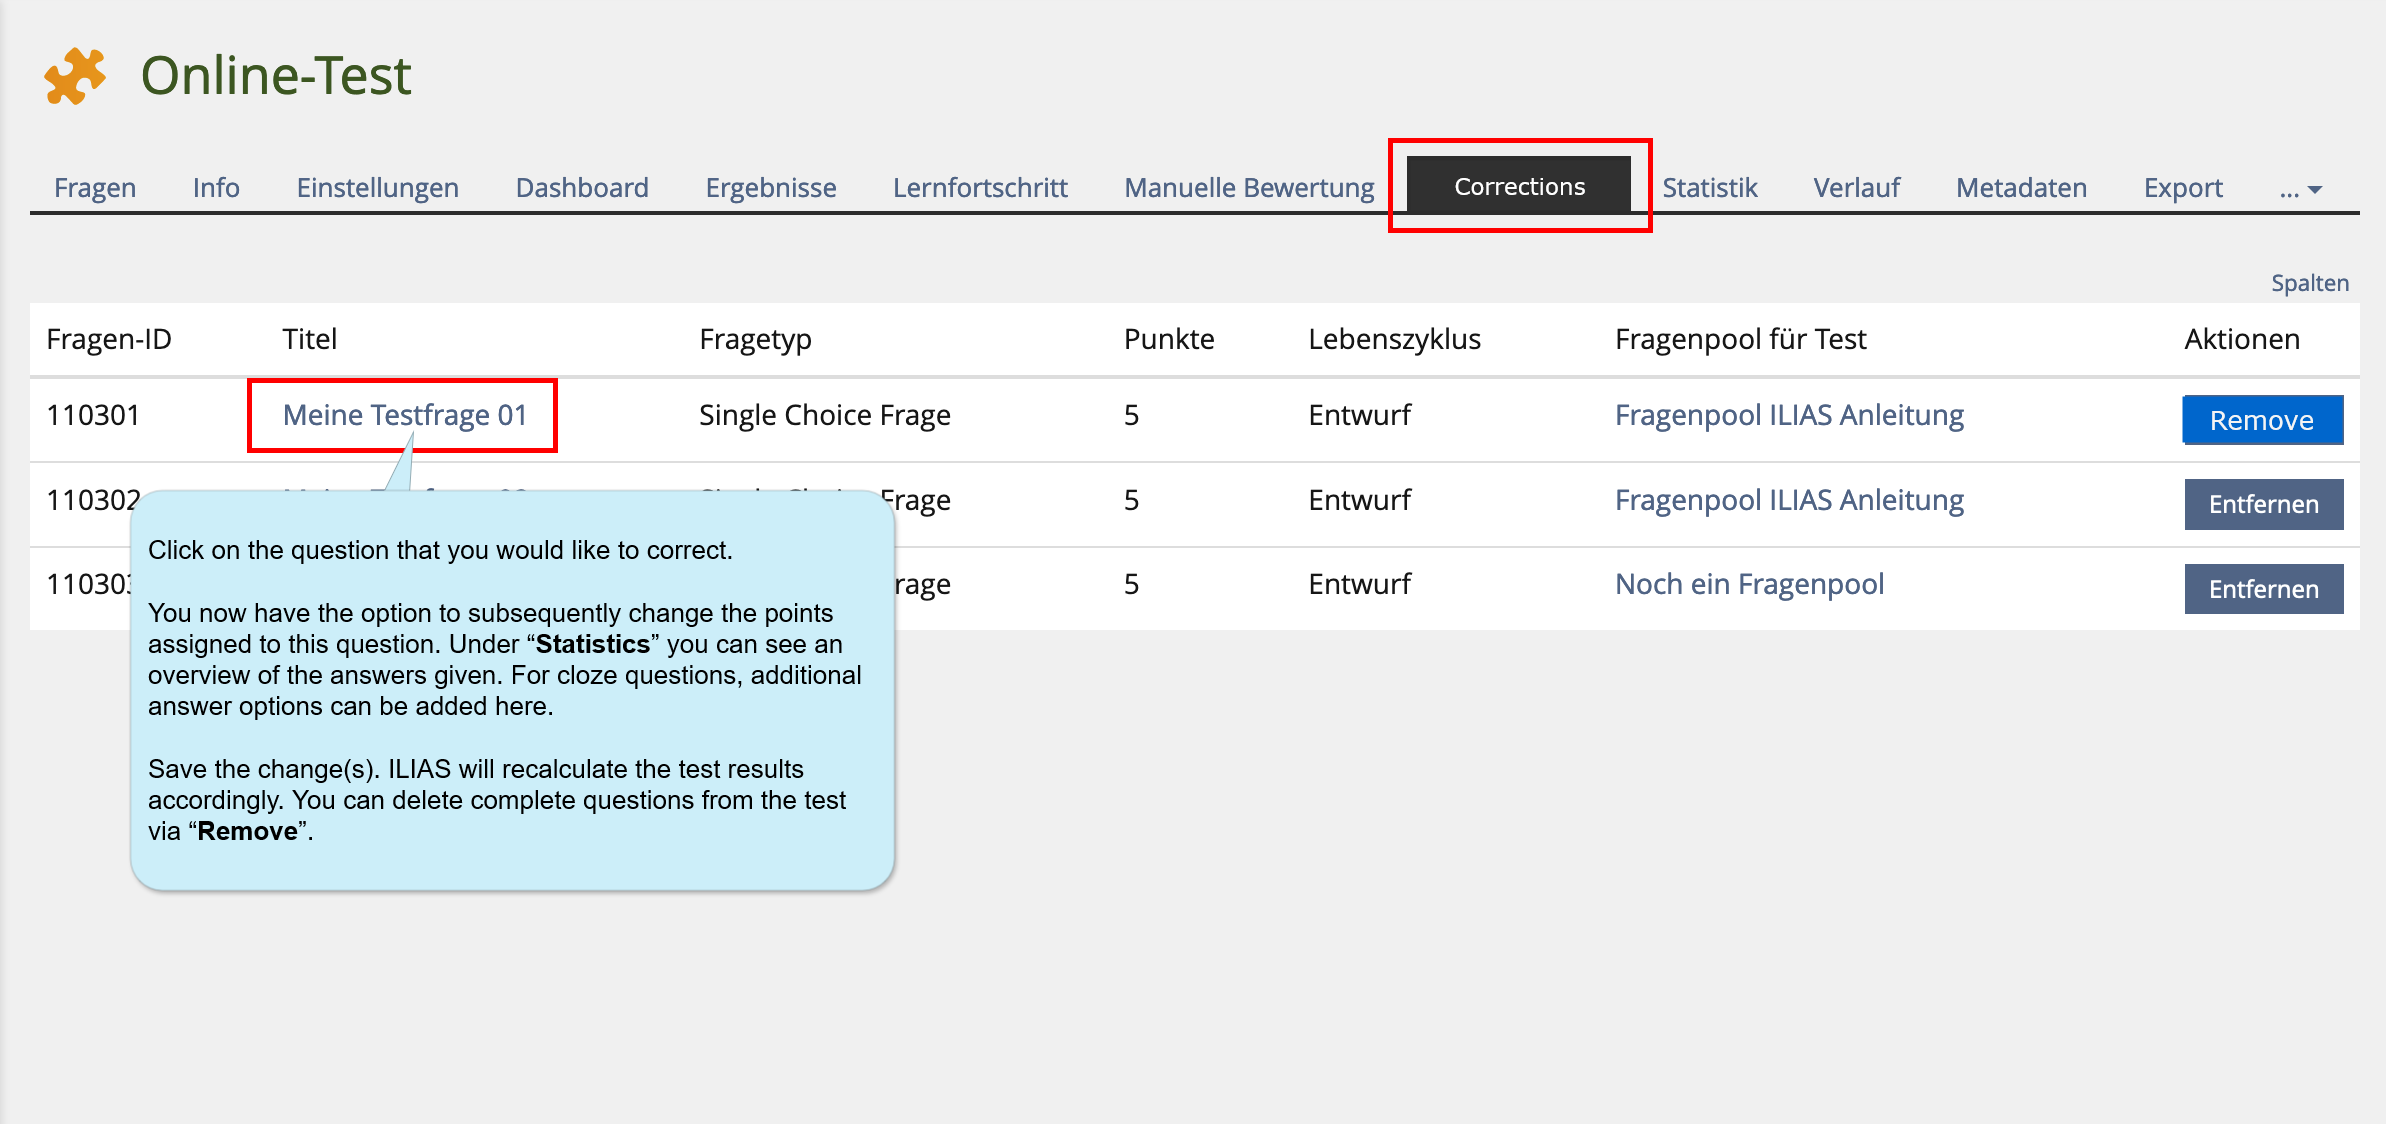
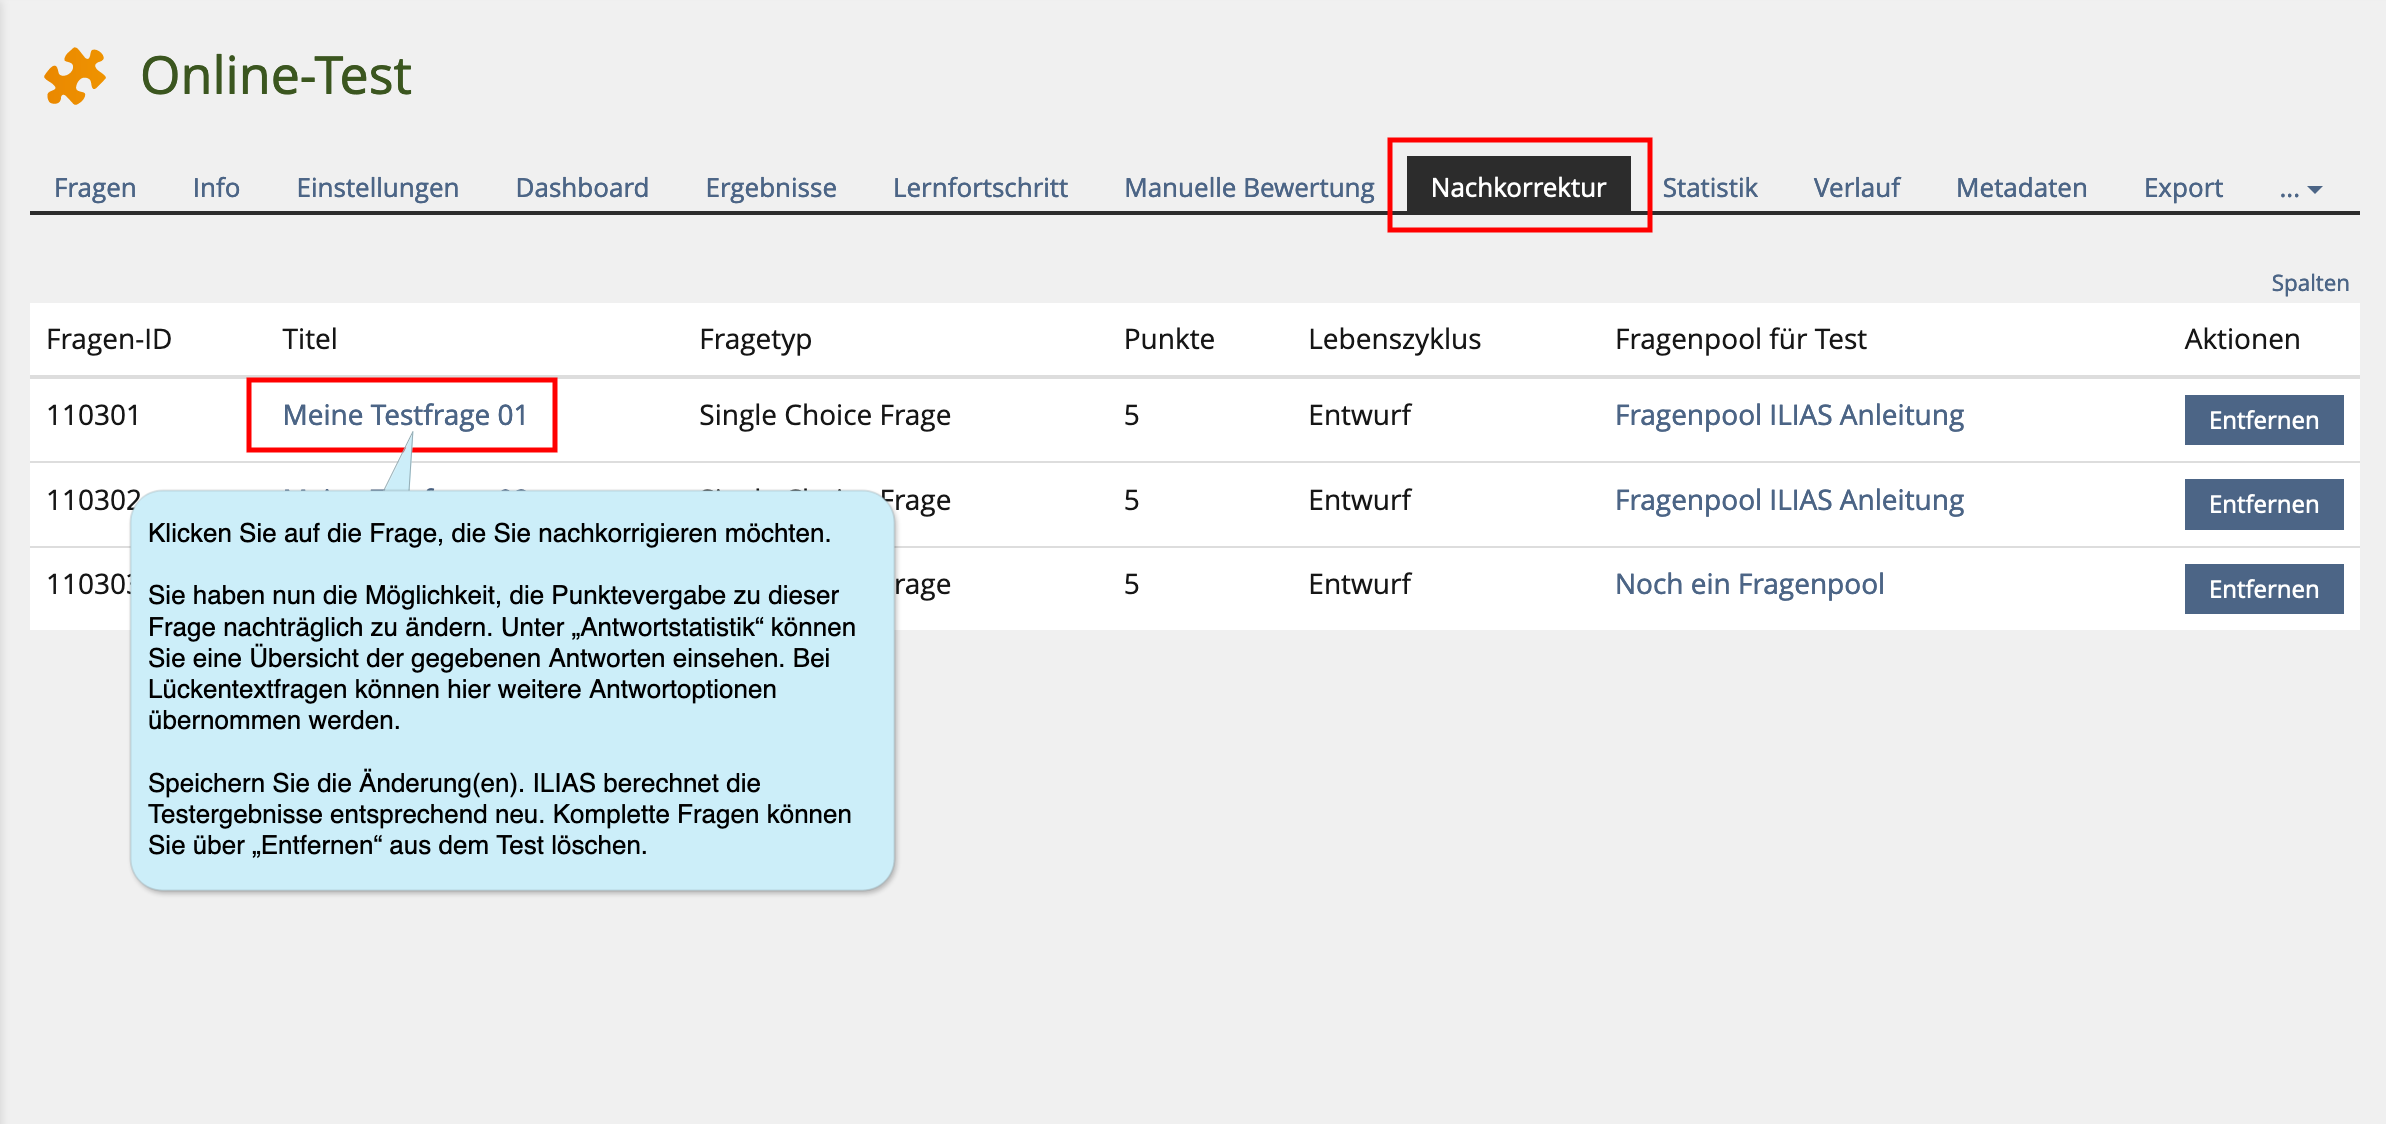
7. Post-correction after the test
Sie stellen nach dem Test fest, dass Ihnen bei der Punktevergabe in einer Frage ein Fehler unterlaufen ist? Oder dass Sie eine Frage nicht klar genug formuliert haben, wodurch sie von vielen Teilnehmer*innen nicht ausreichend verstanden und daher nicht angemessen beantwortet wurde? Sie können die Punkte von Fragen nachträglich ändern. Im Tab „Nachkorrektur“ können Sie
- die Bewertung mit Punkten der Antwortmöglichkeiten einer Frage ändern, entfernen oder hinzufügen
- einzelne Antwortmöglichkeiten einer Frage ändern, entfernen oder hinzufügen
- eine Antwortübersicht einsehen und ggf. bereits erstellte manuelle Bewertungen entfernen.
Bitte beachten: Nicht alle Fragetypen haben die Möglichkeit einer Nachkorrektur. Manche sind nur teilweise nachkorrigierbar.
Nachkorrekturen und manuelle Korrekturen sollten immer nur von einer Person gleichzeitig vorgenommen werden.
Arbeiten mehrere Personen gleichzeitig an der Korrektur und die Speicherungszeit überschneidet sich, können aus technischen Gründen nicht alle Korrekturen gespeichert werden.
8. Accessing and managing test results
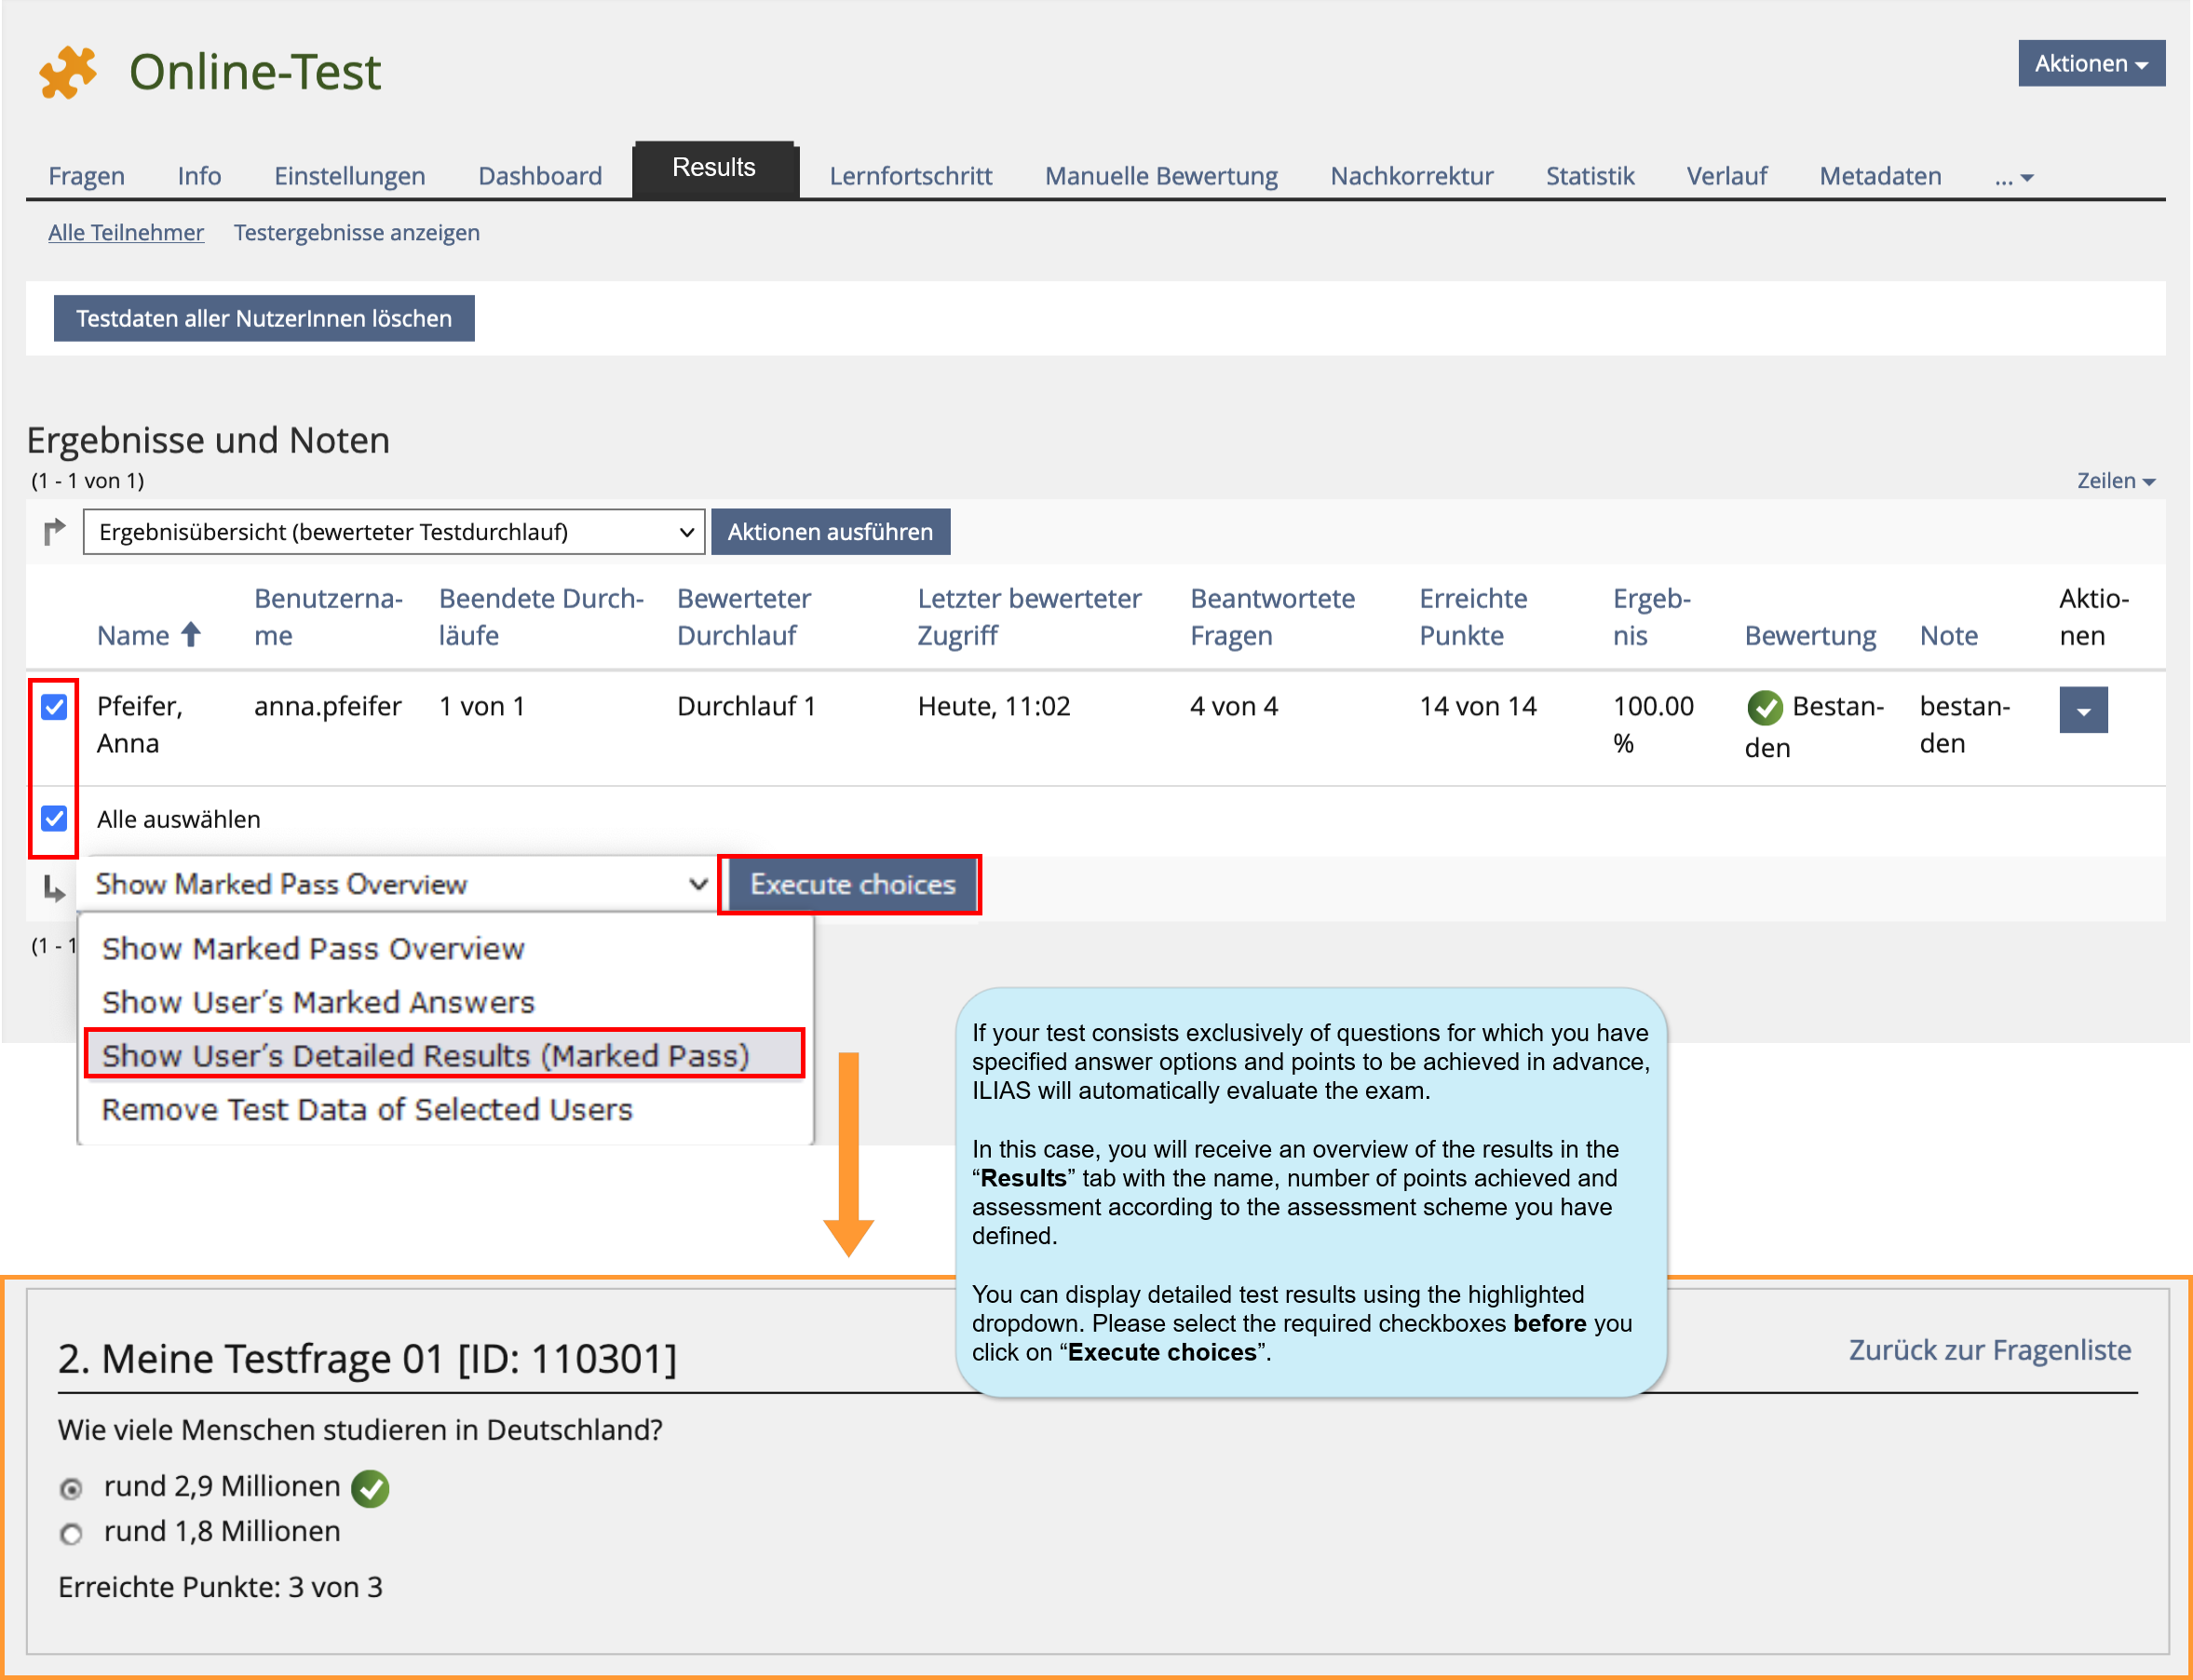
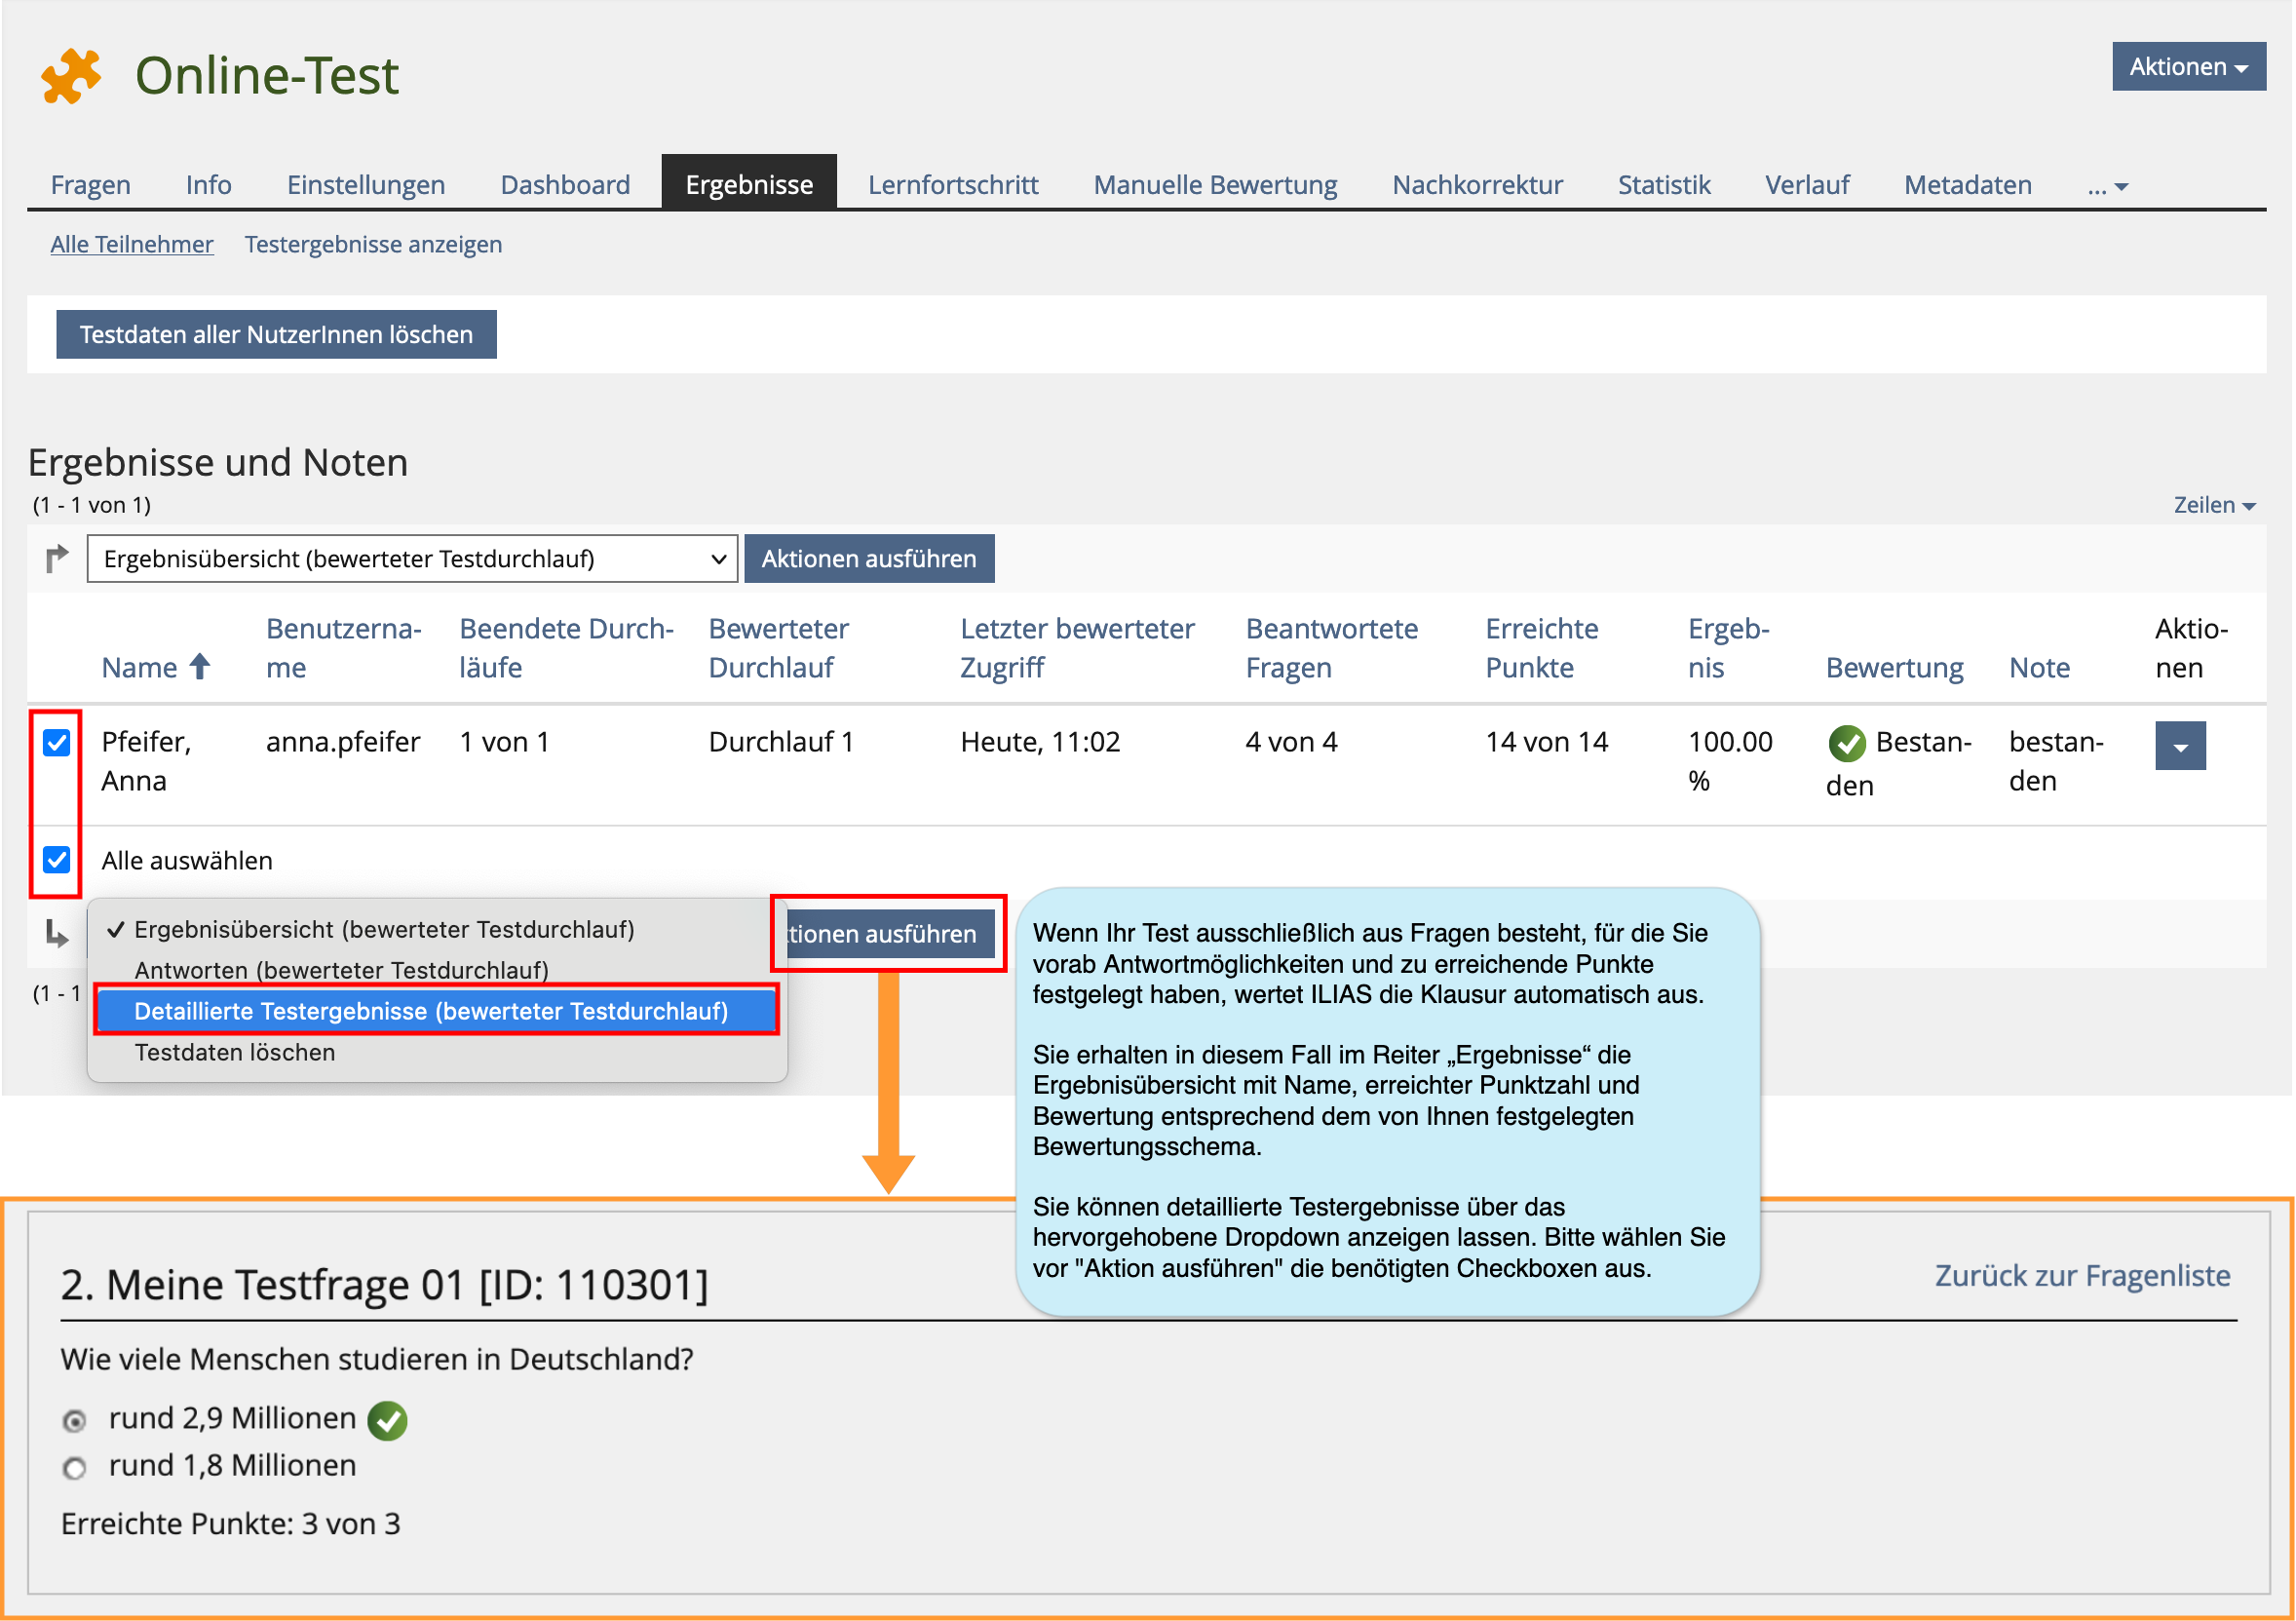
8.1. Manage results
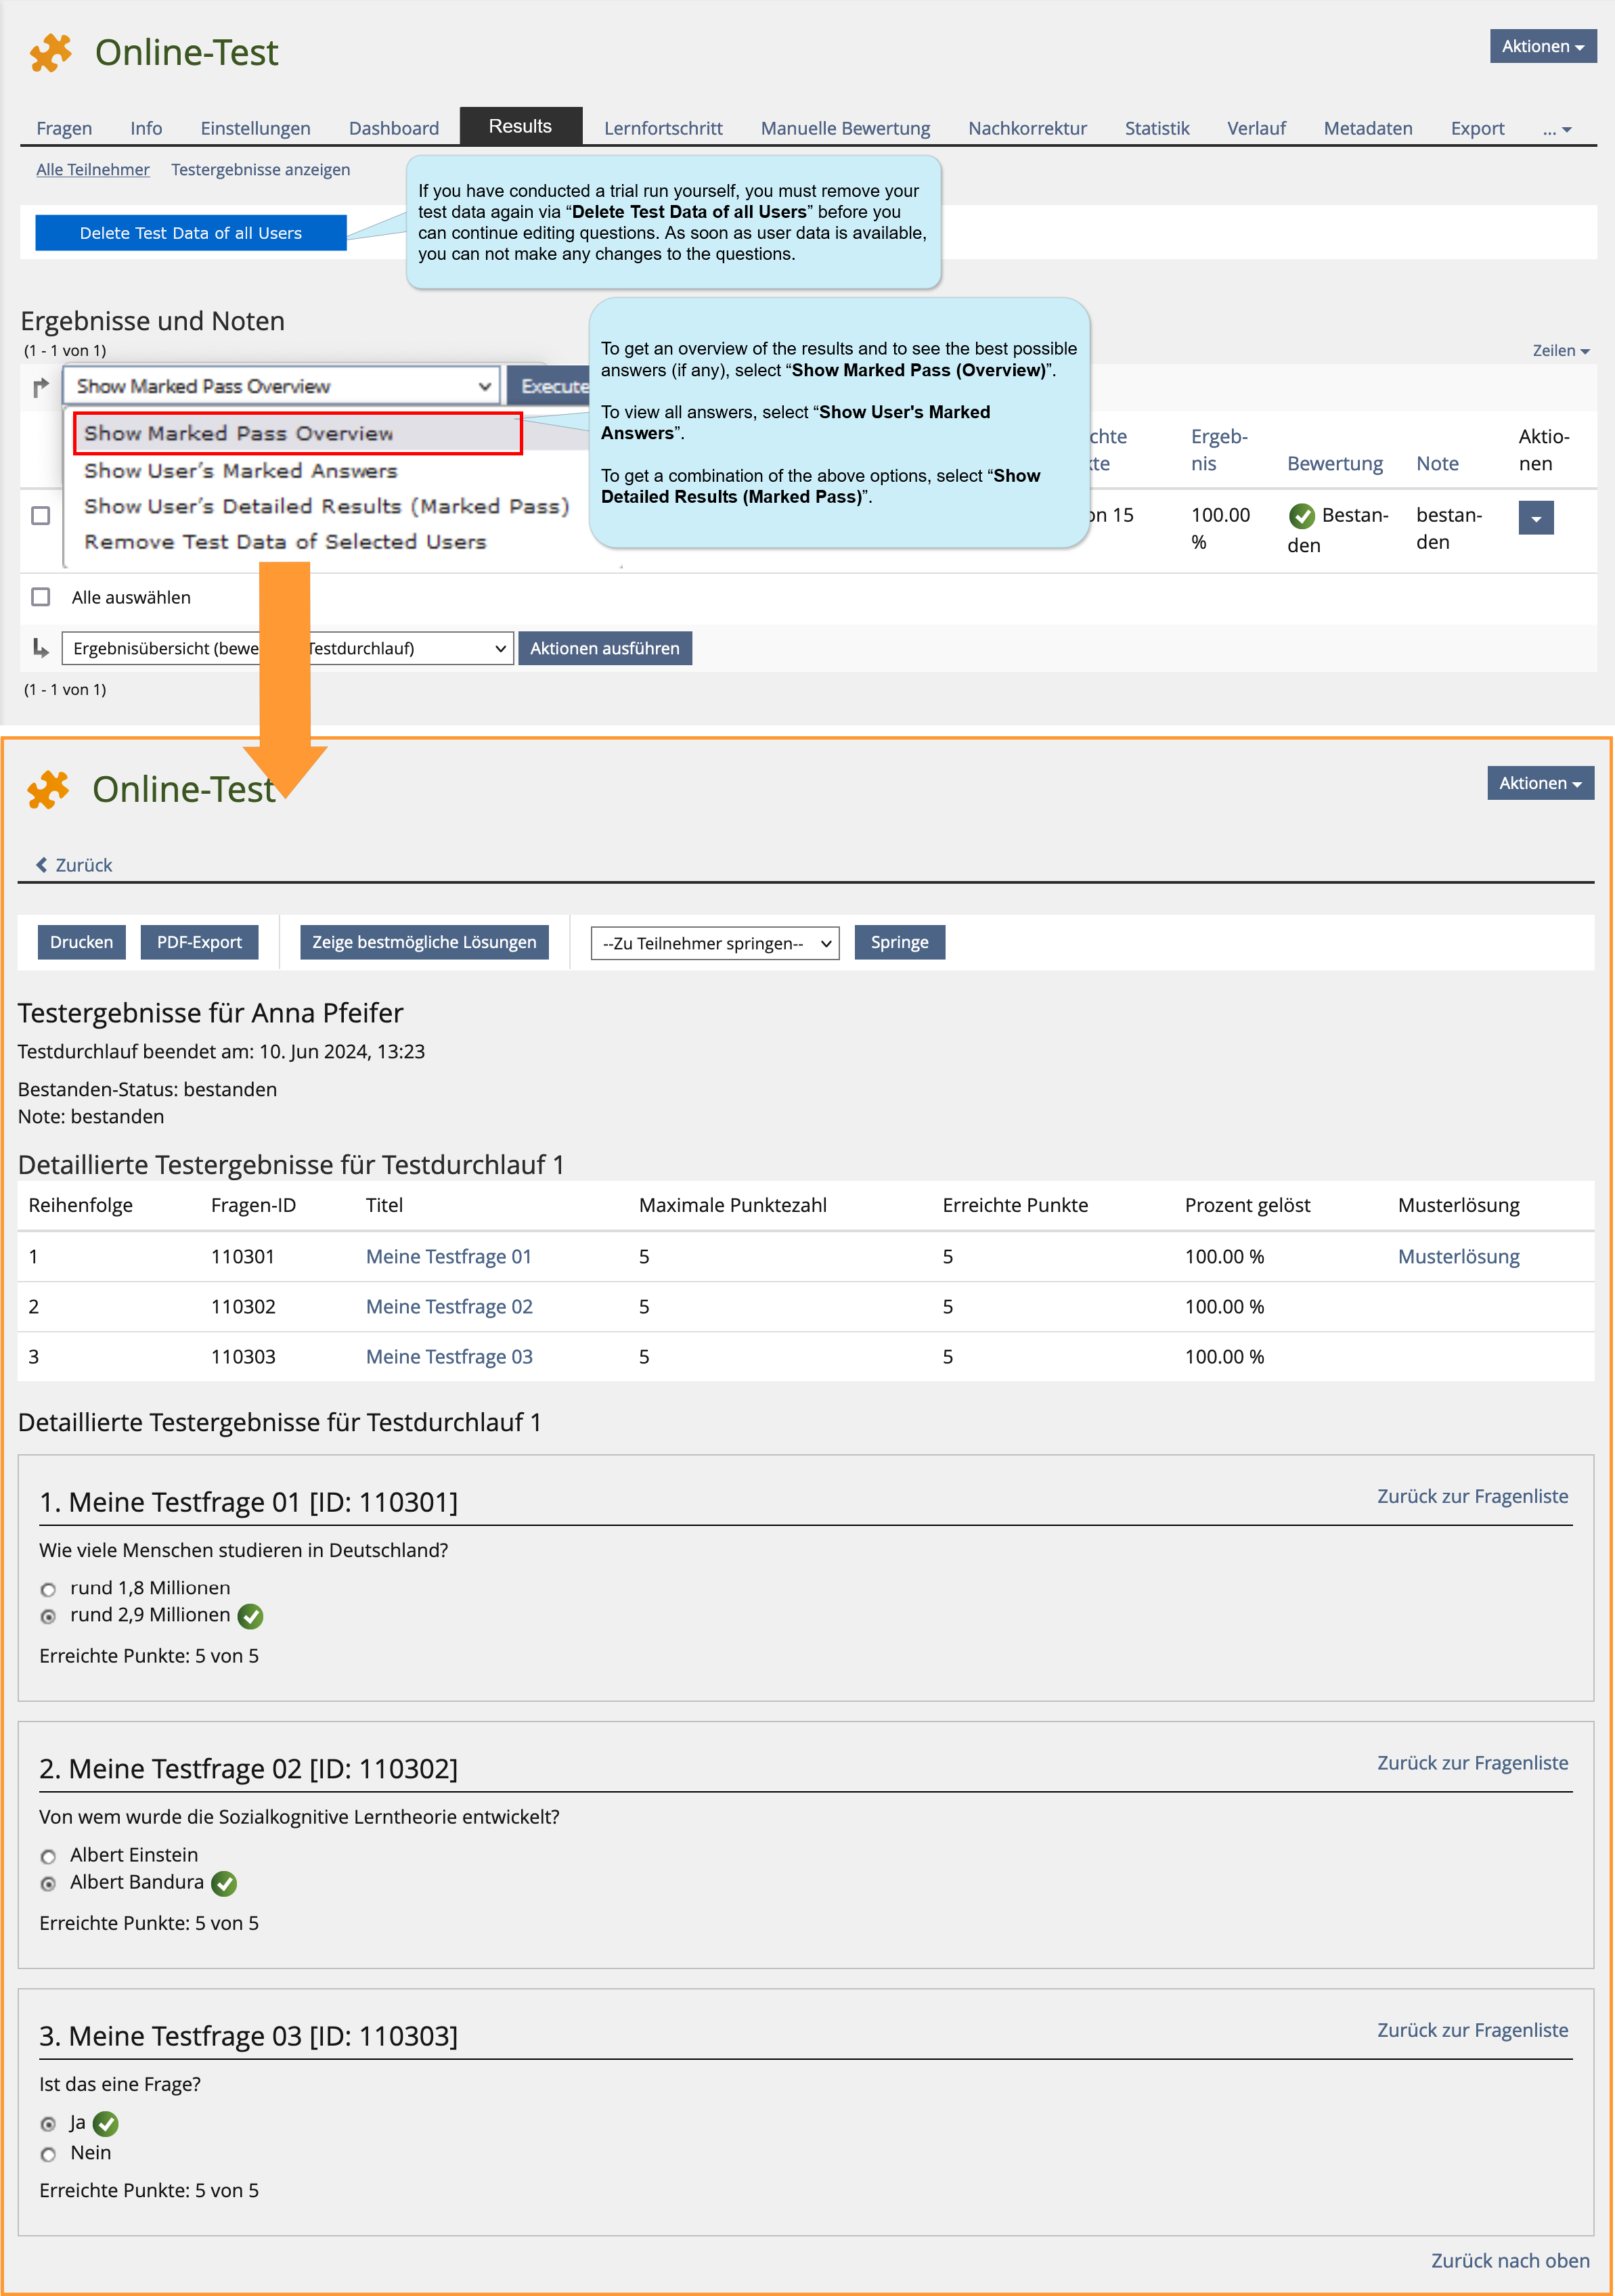
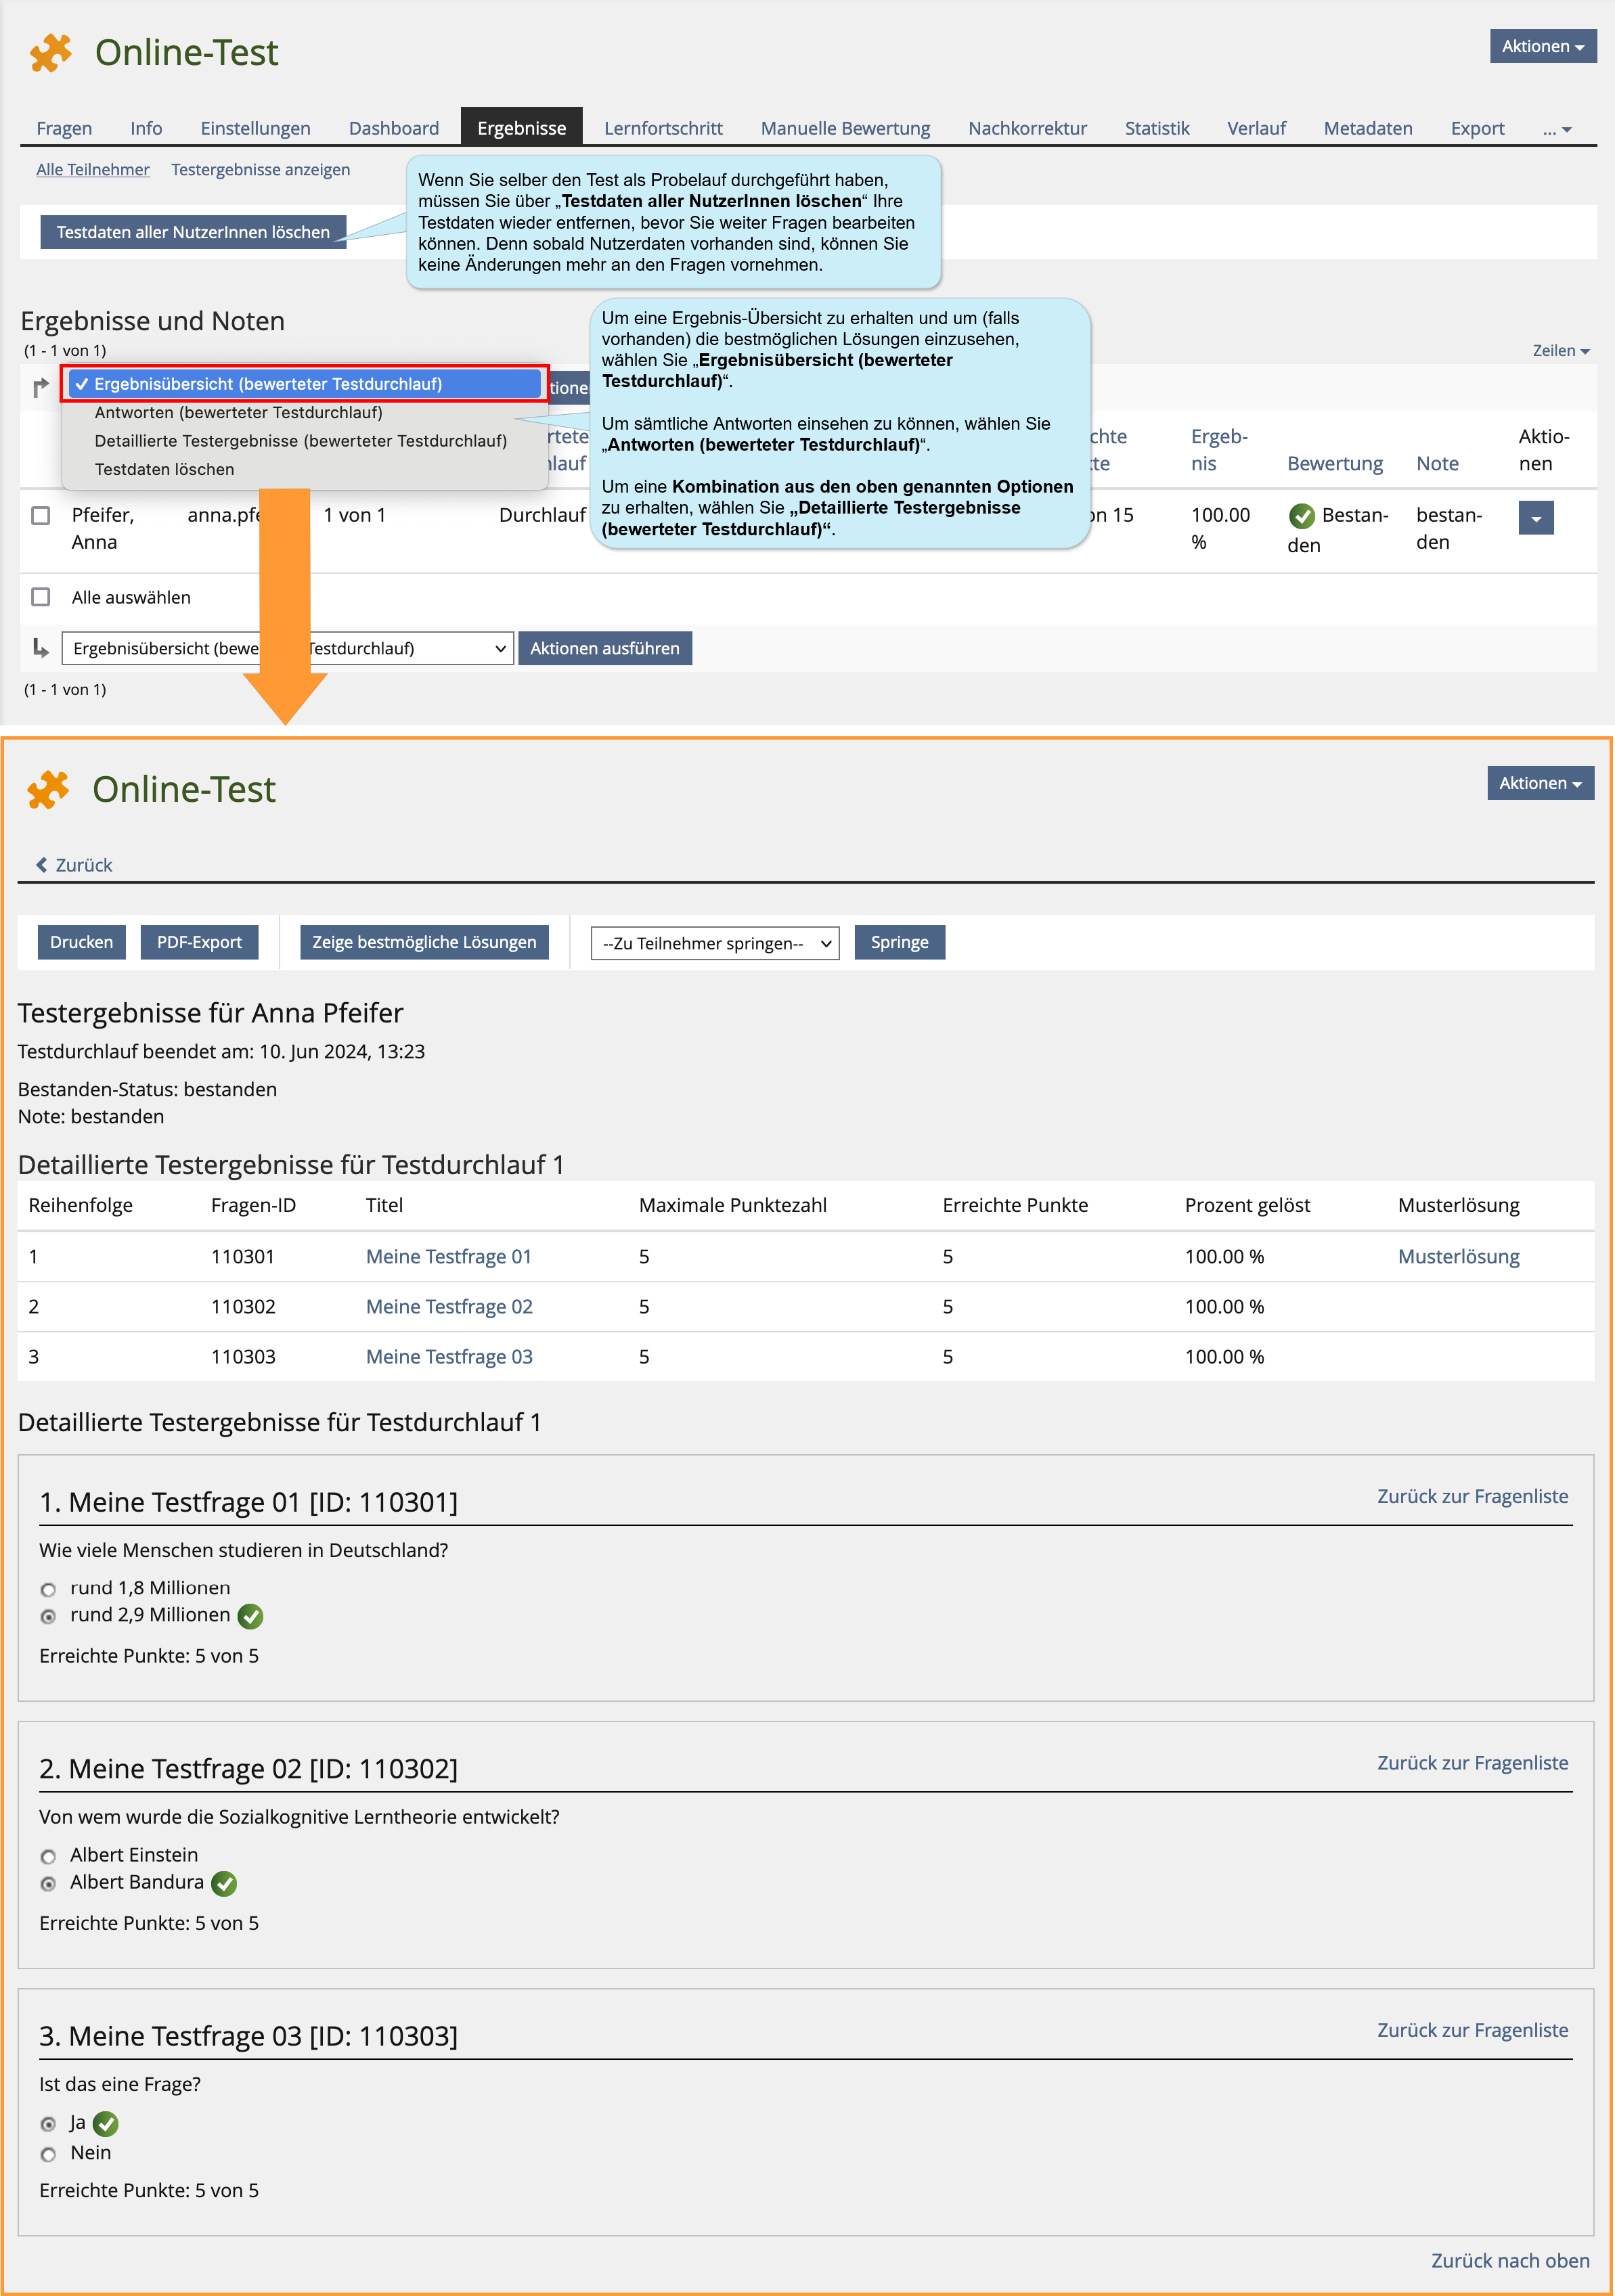
Im Reiter „Ergebnisse“ können Sie Nutzerdaten des Tests einsehen und löschen. In einer Liste werden alle Teilnehmer*innen aufgeführt, die den Test begonnen oder abgeschlossen haben. Sie können über „Testergebnisse anzeigen“ direkt auf die Antworten zugreifen (auch auf Ergebnisse der nicht bewerteten Testdurchgänge) oder über das Dropdown-Menü zwischen drei weiteren Ansichten wählen:
8.2. Reviewing statistics
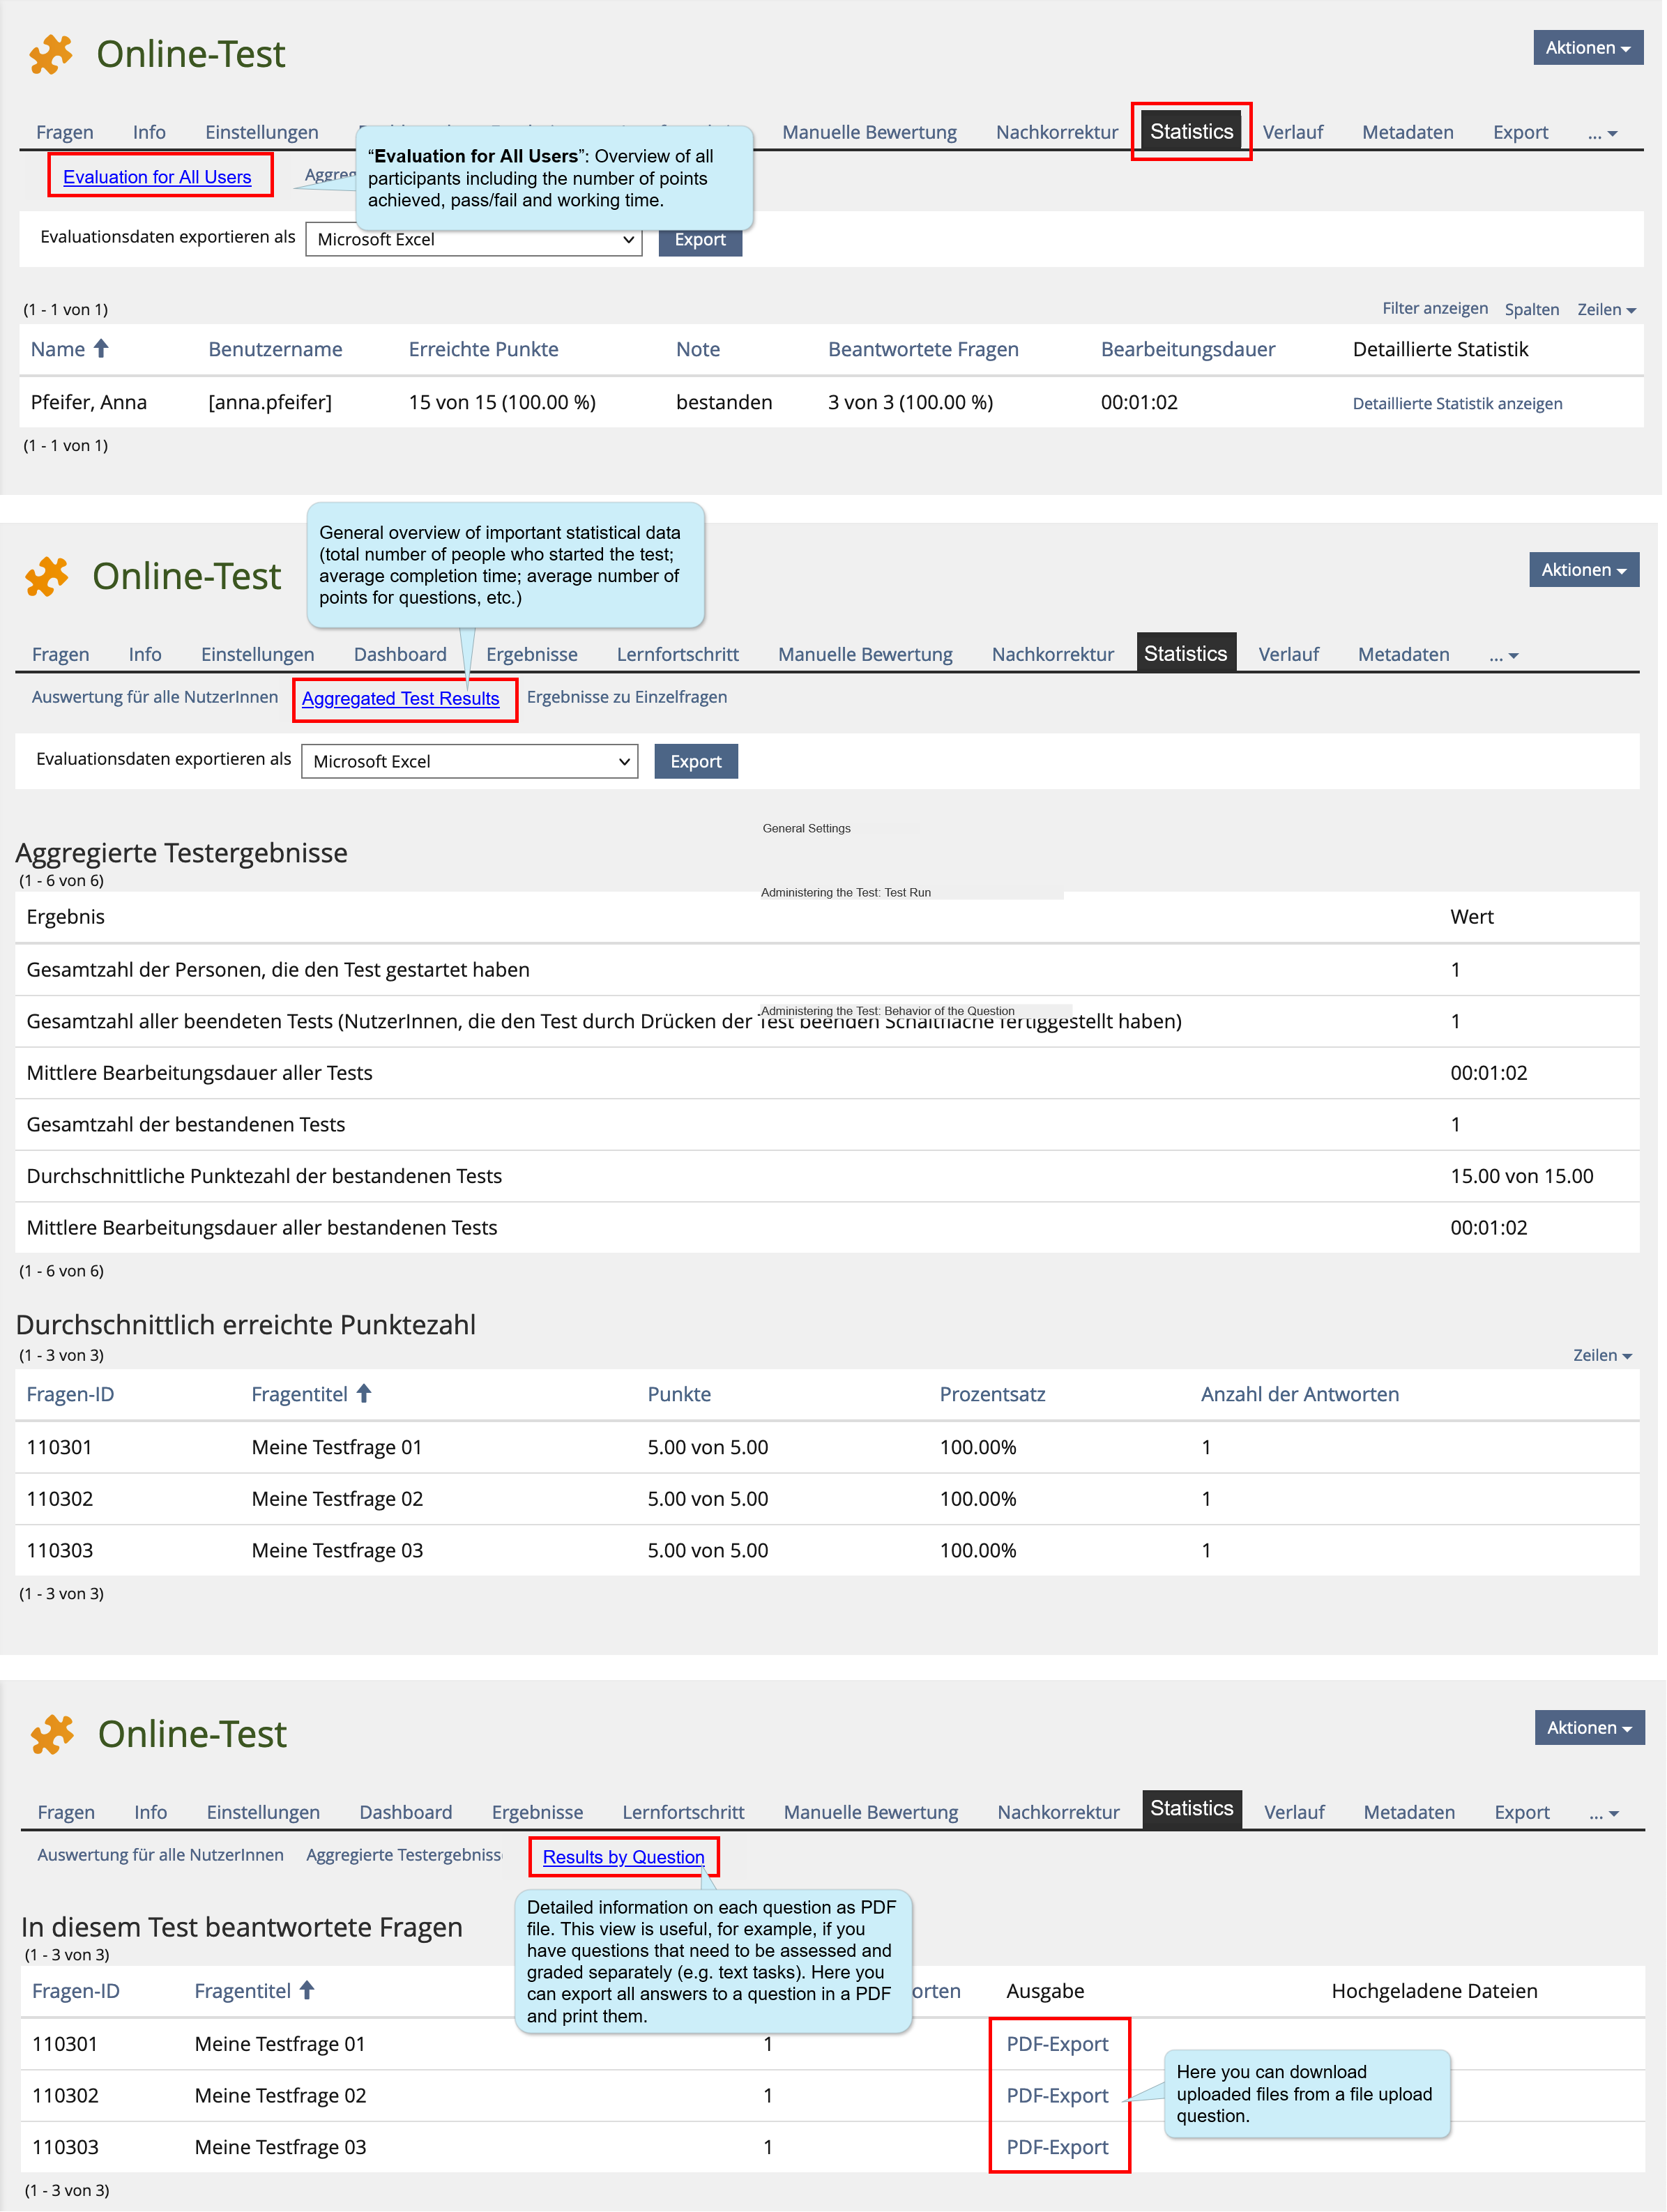
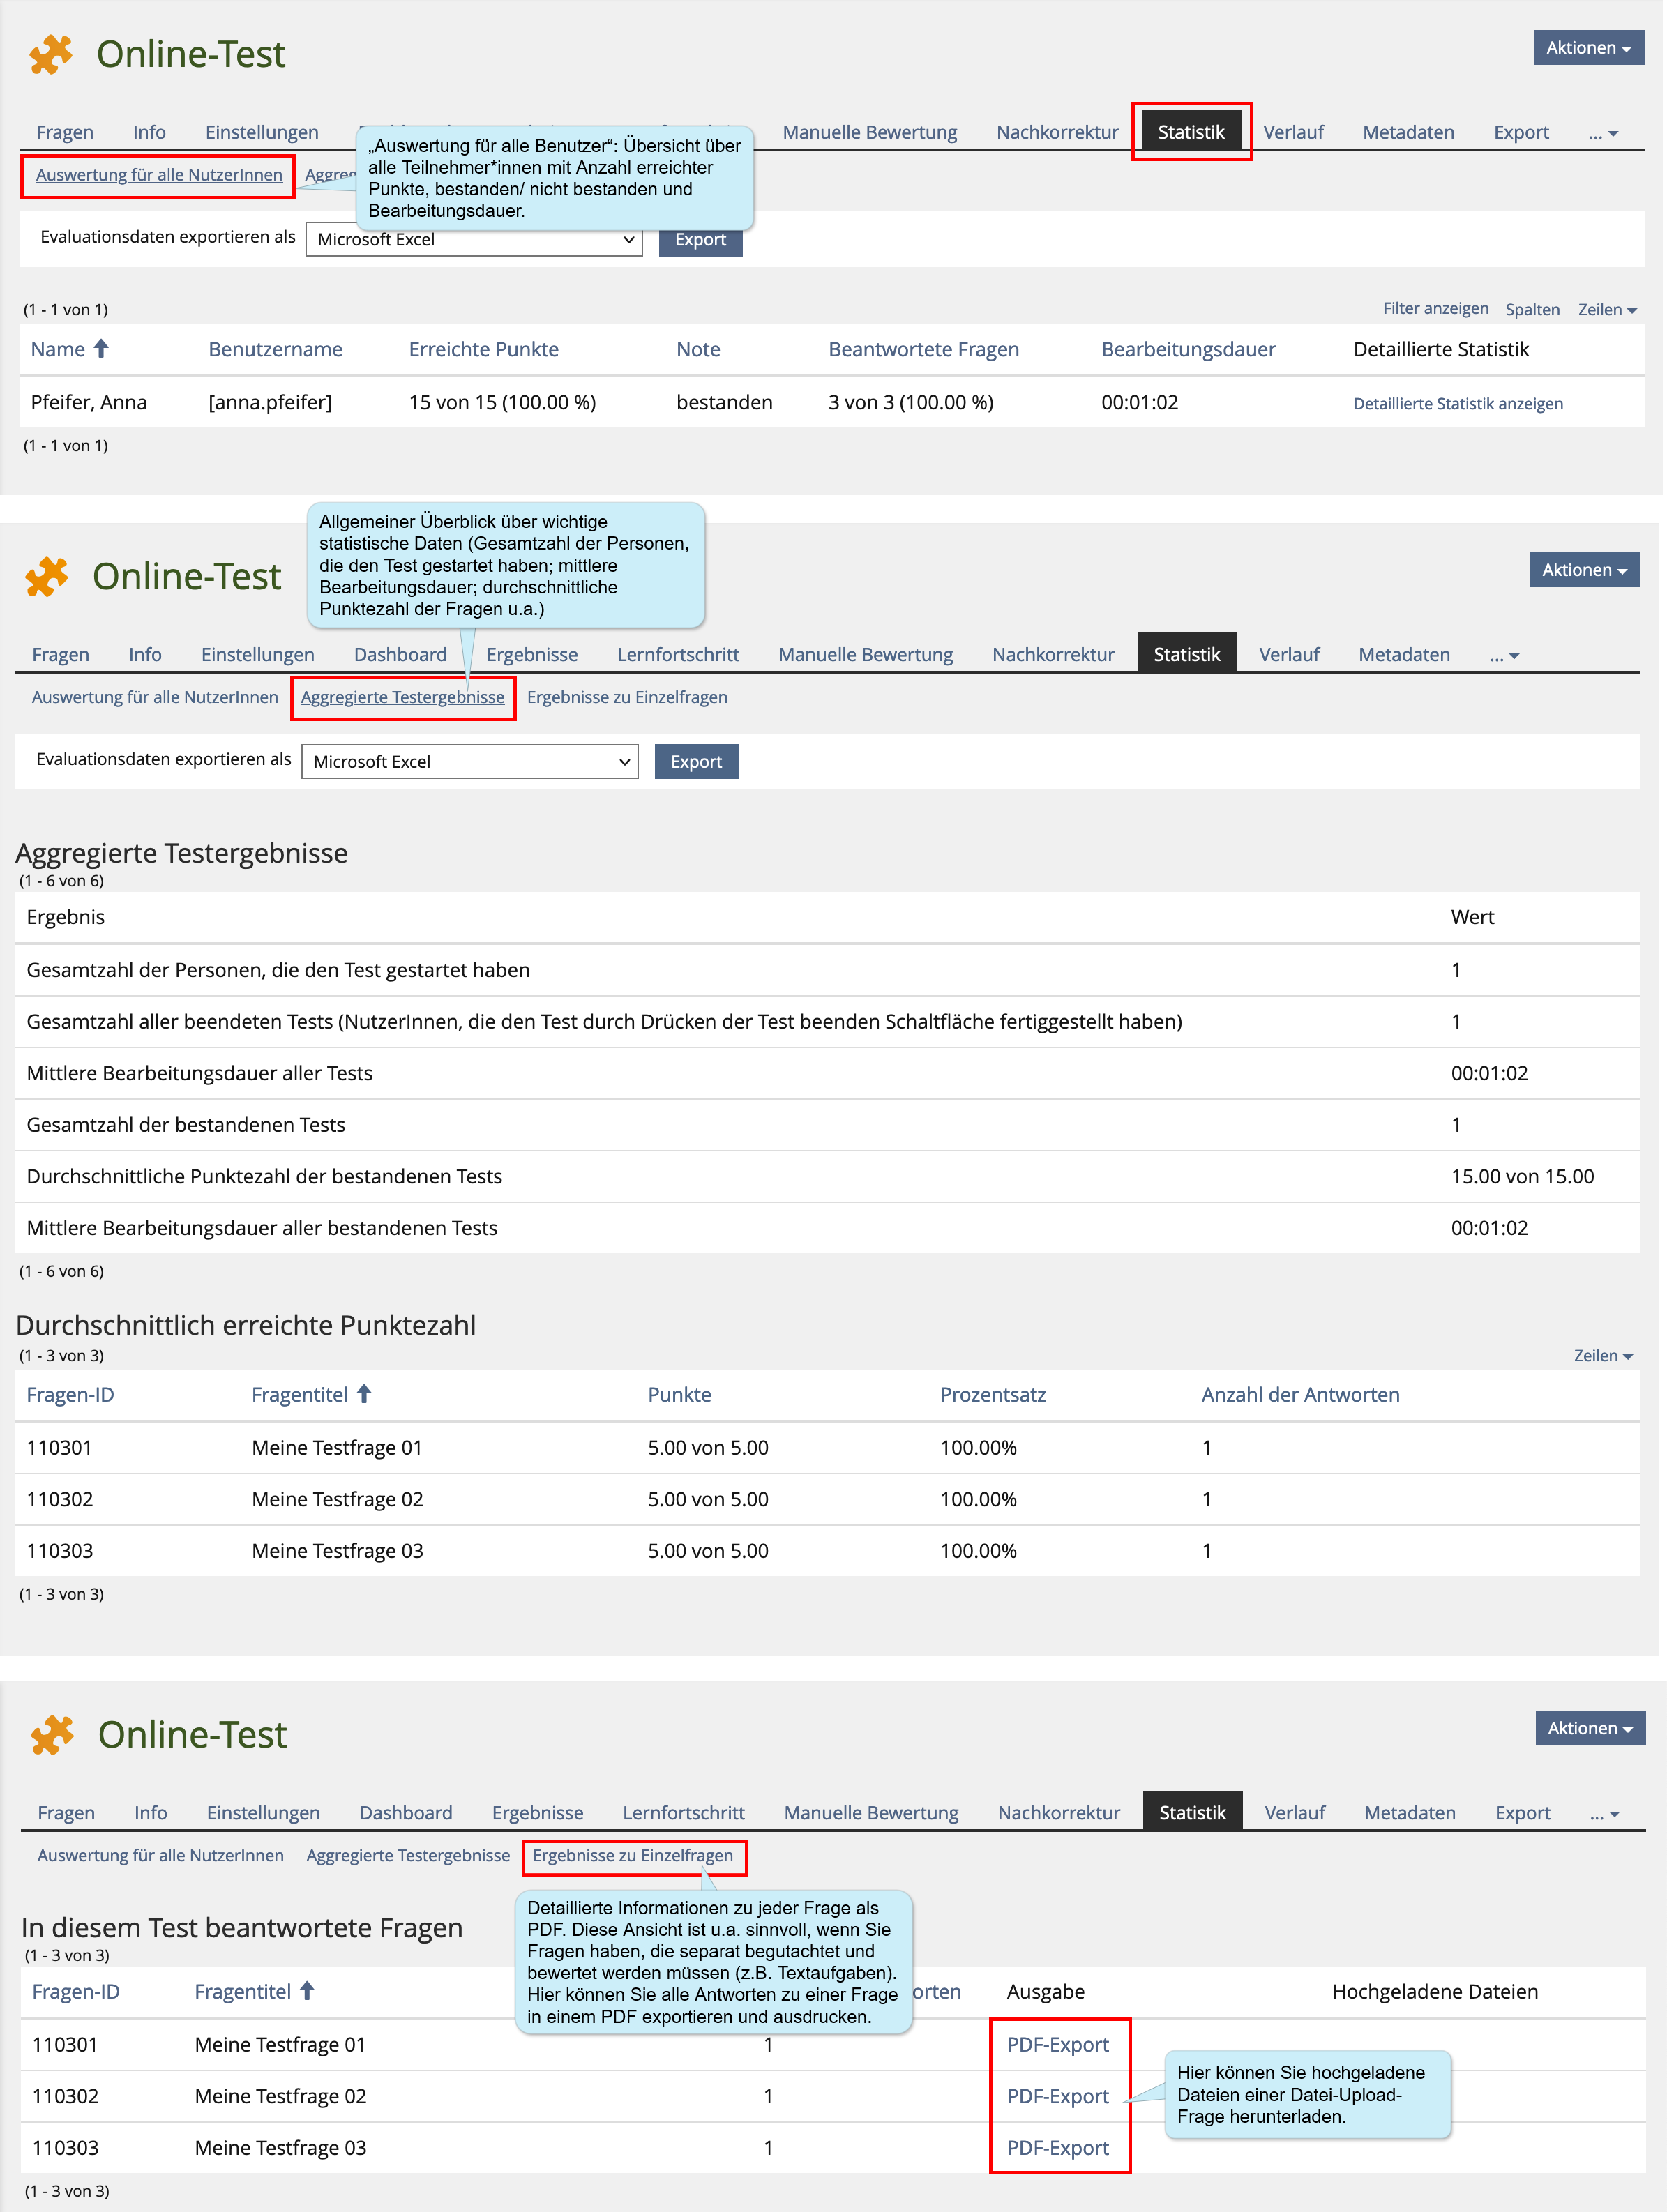
Im Reiter "Statistik" stehen neben aggregierten Ergebnissen (z. B. Notendurch-
schnitt) auch individuelle Daten für alle oder einzelne Testpersonen zur Verfügung. Die angezeigten Ergebnisse können
Sie in den Formaten Excel oder CSV (kommagetrennte Werte) exportieren.
8.3. Exporting a result file
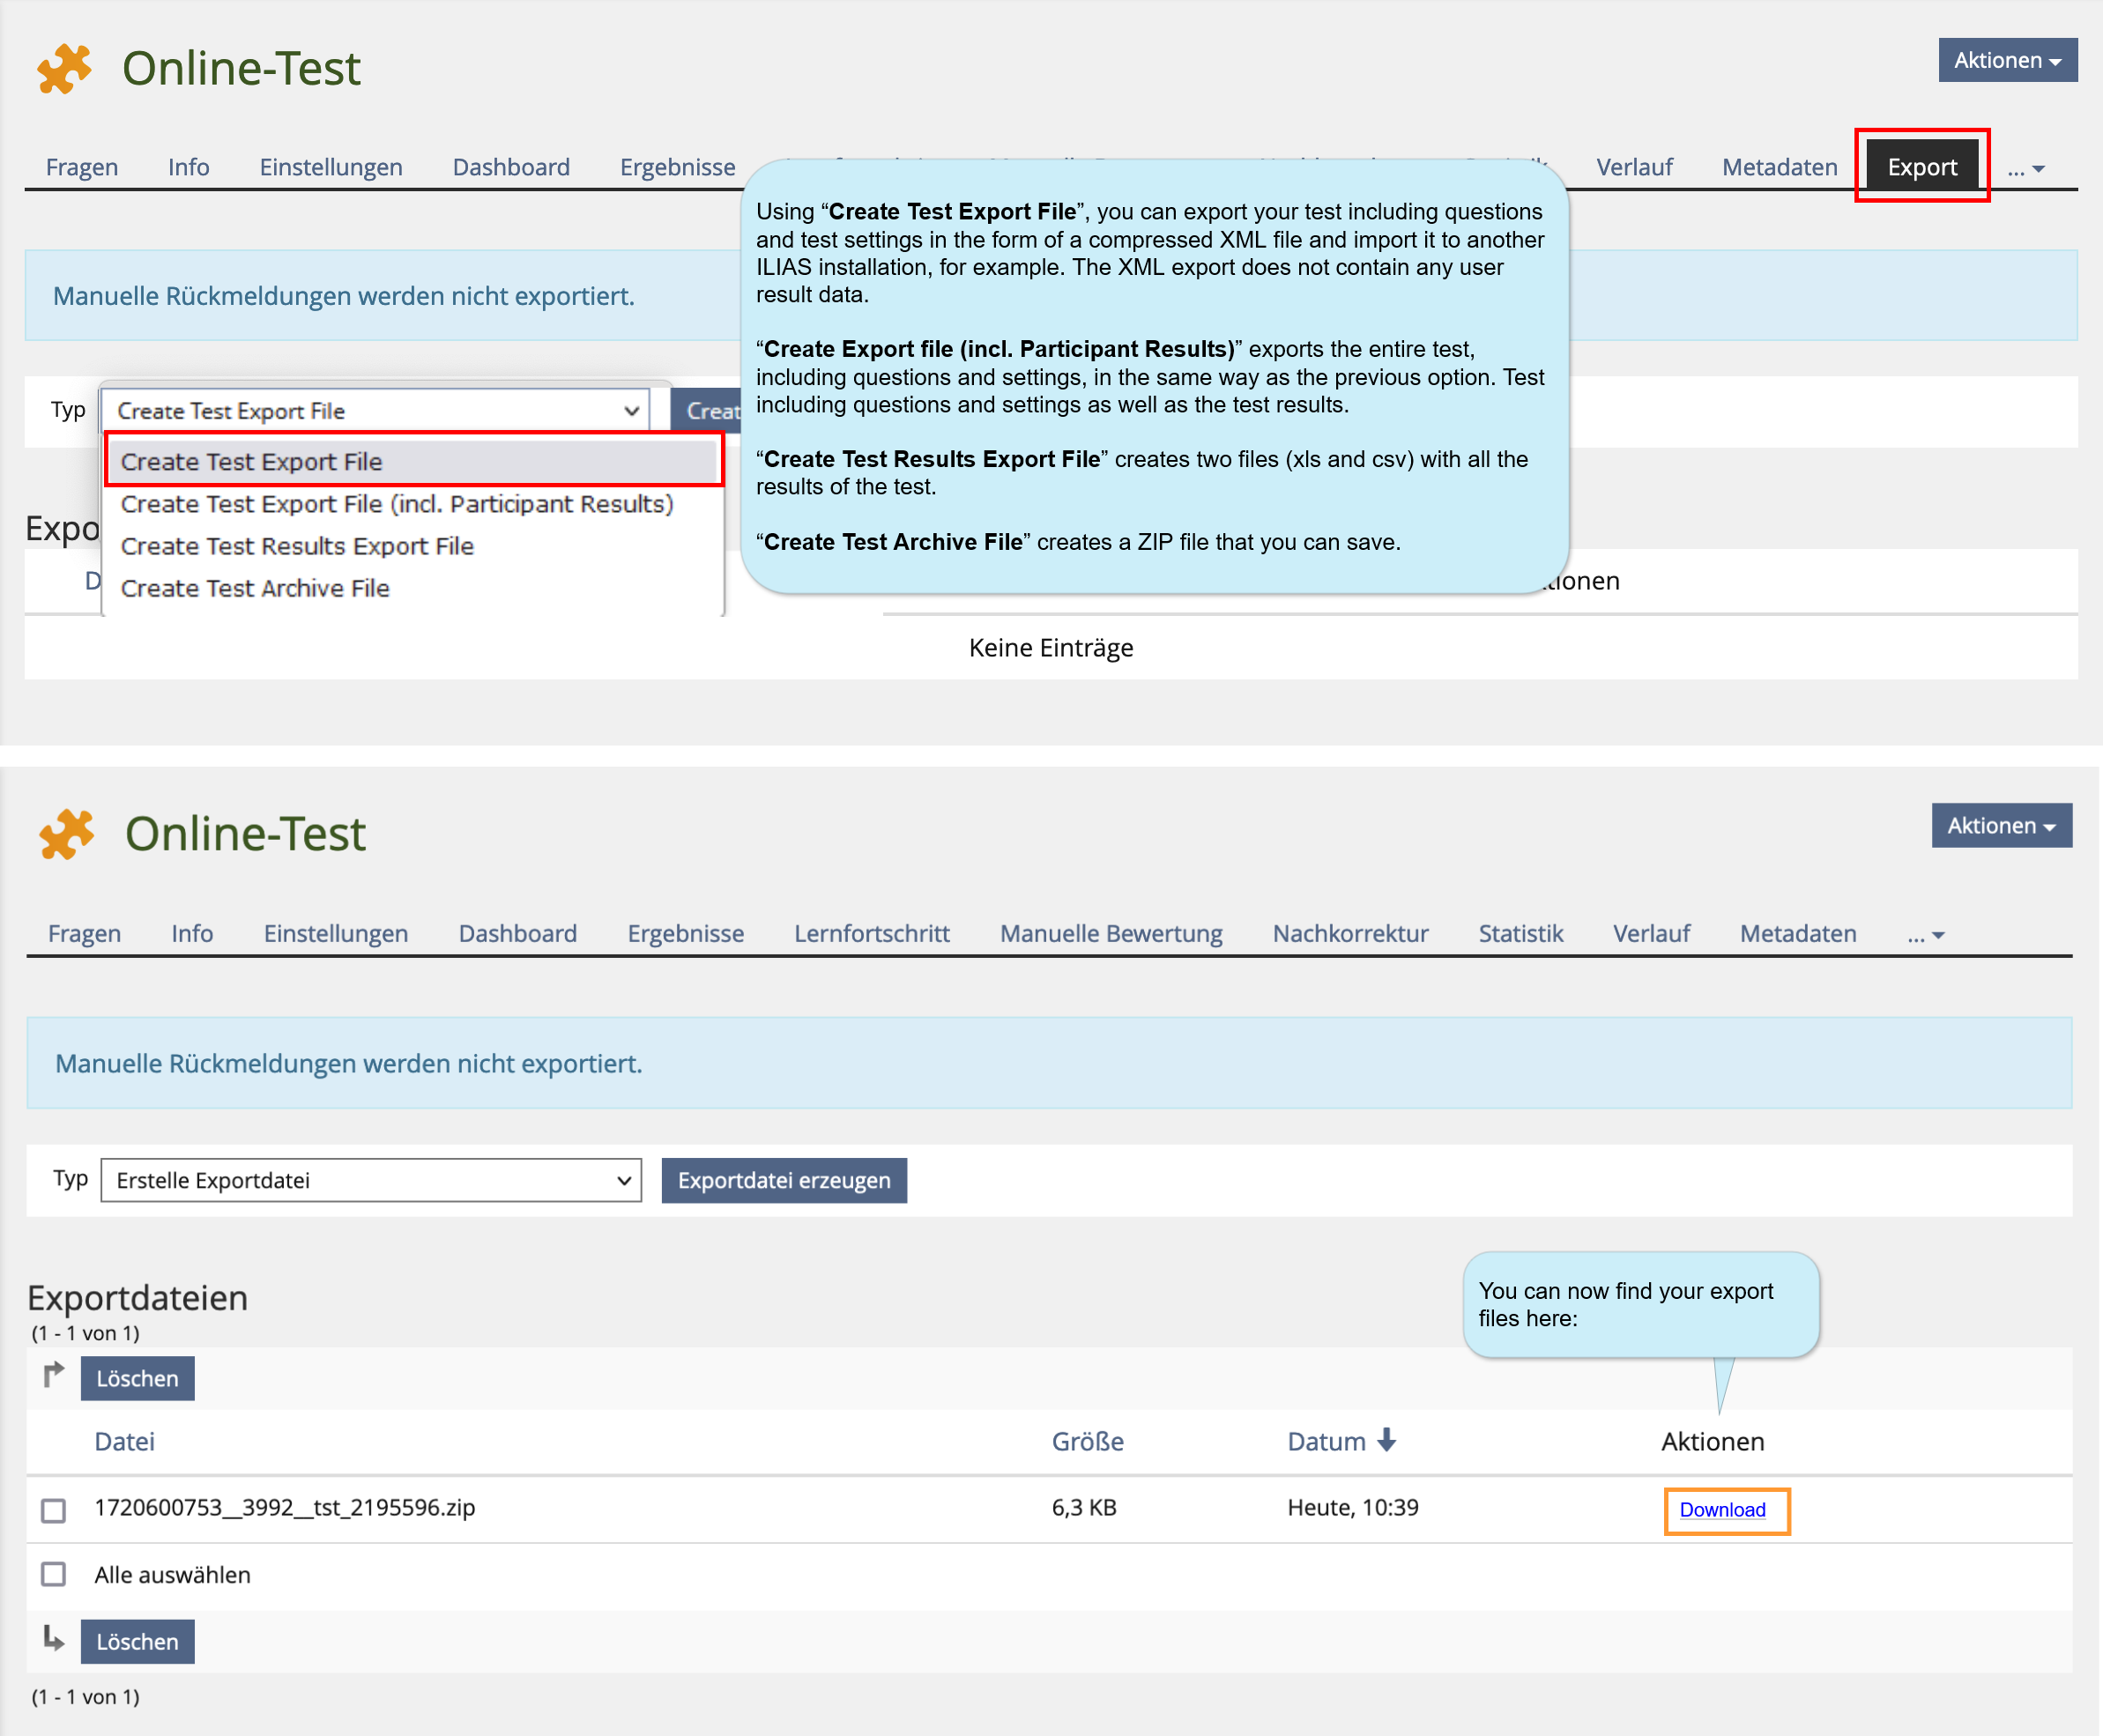
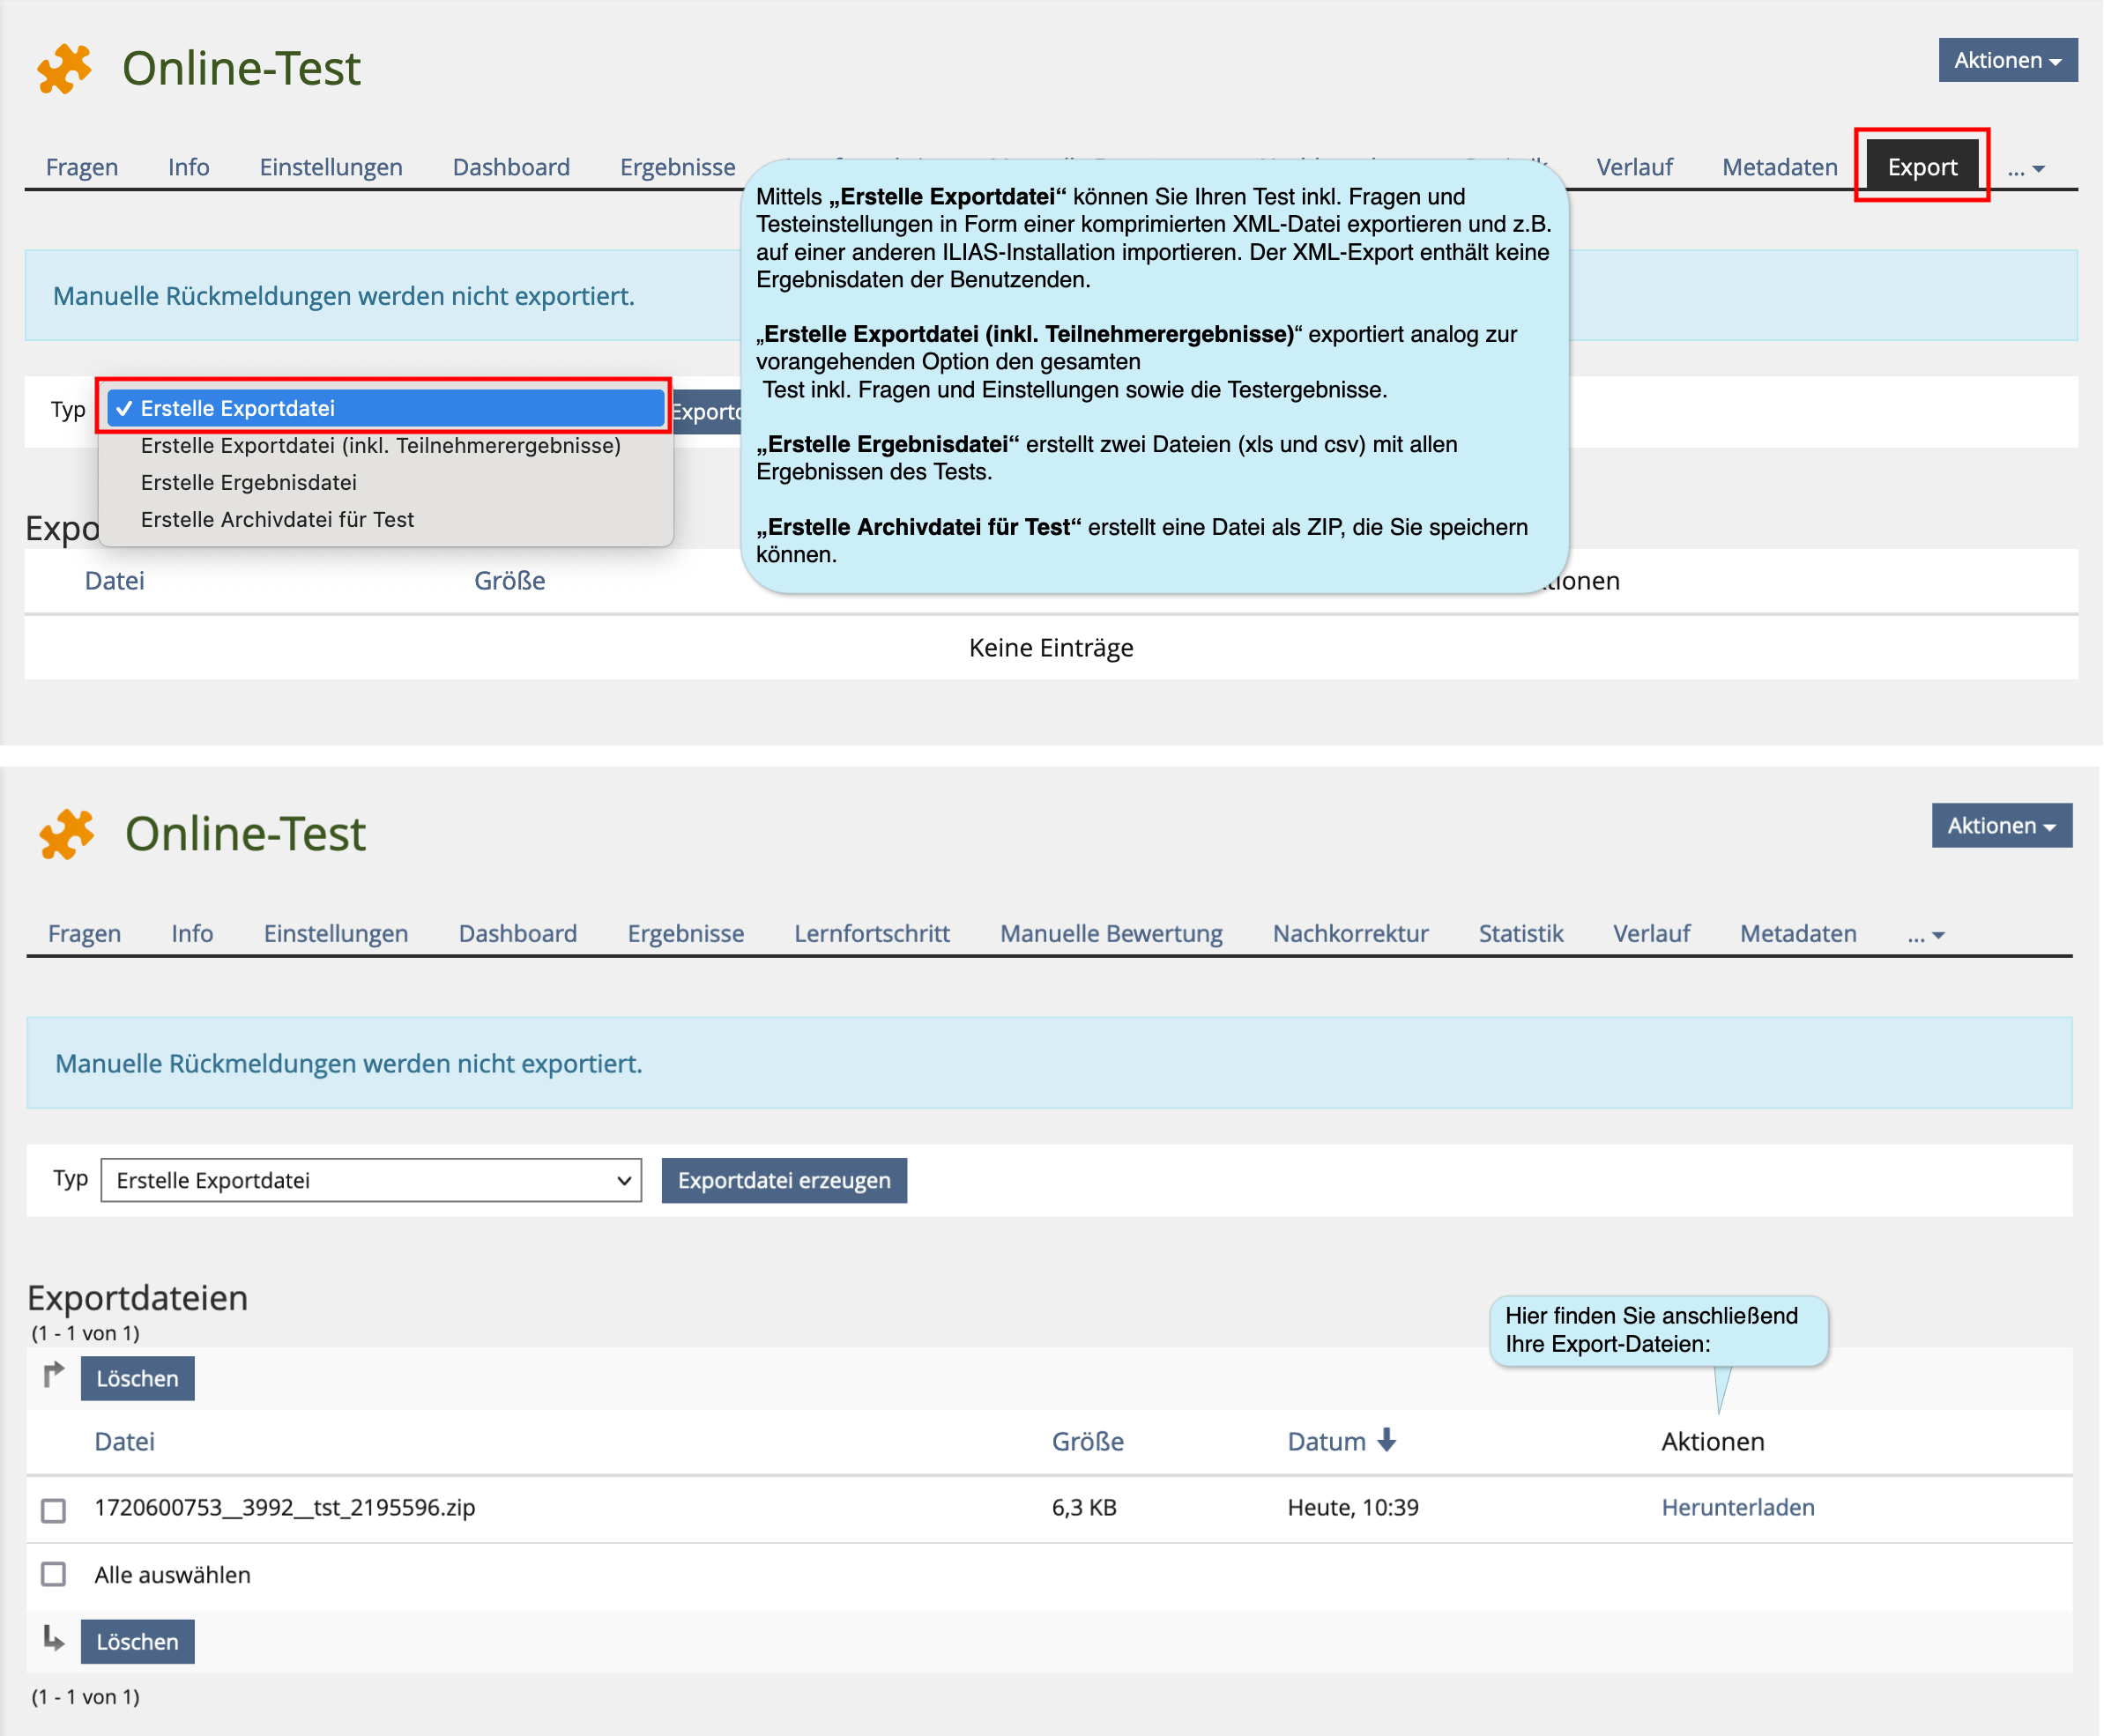
Im Reiter „Export“ haben Sie die Möglichkeit, Exporte zu erzeugen und anschließend herunterzuladen.
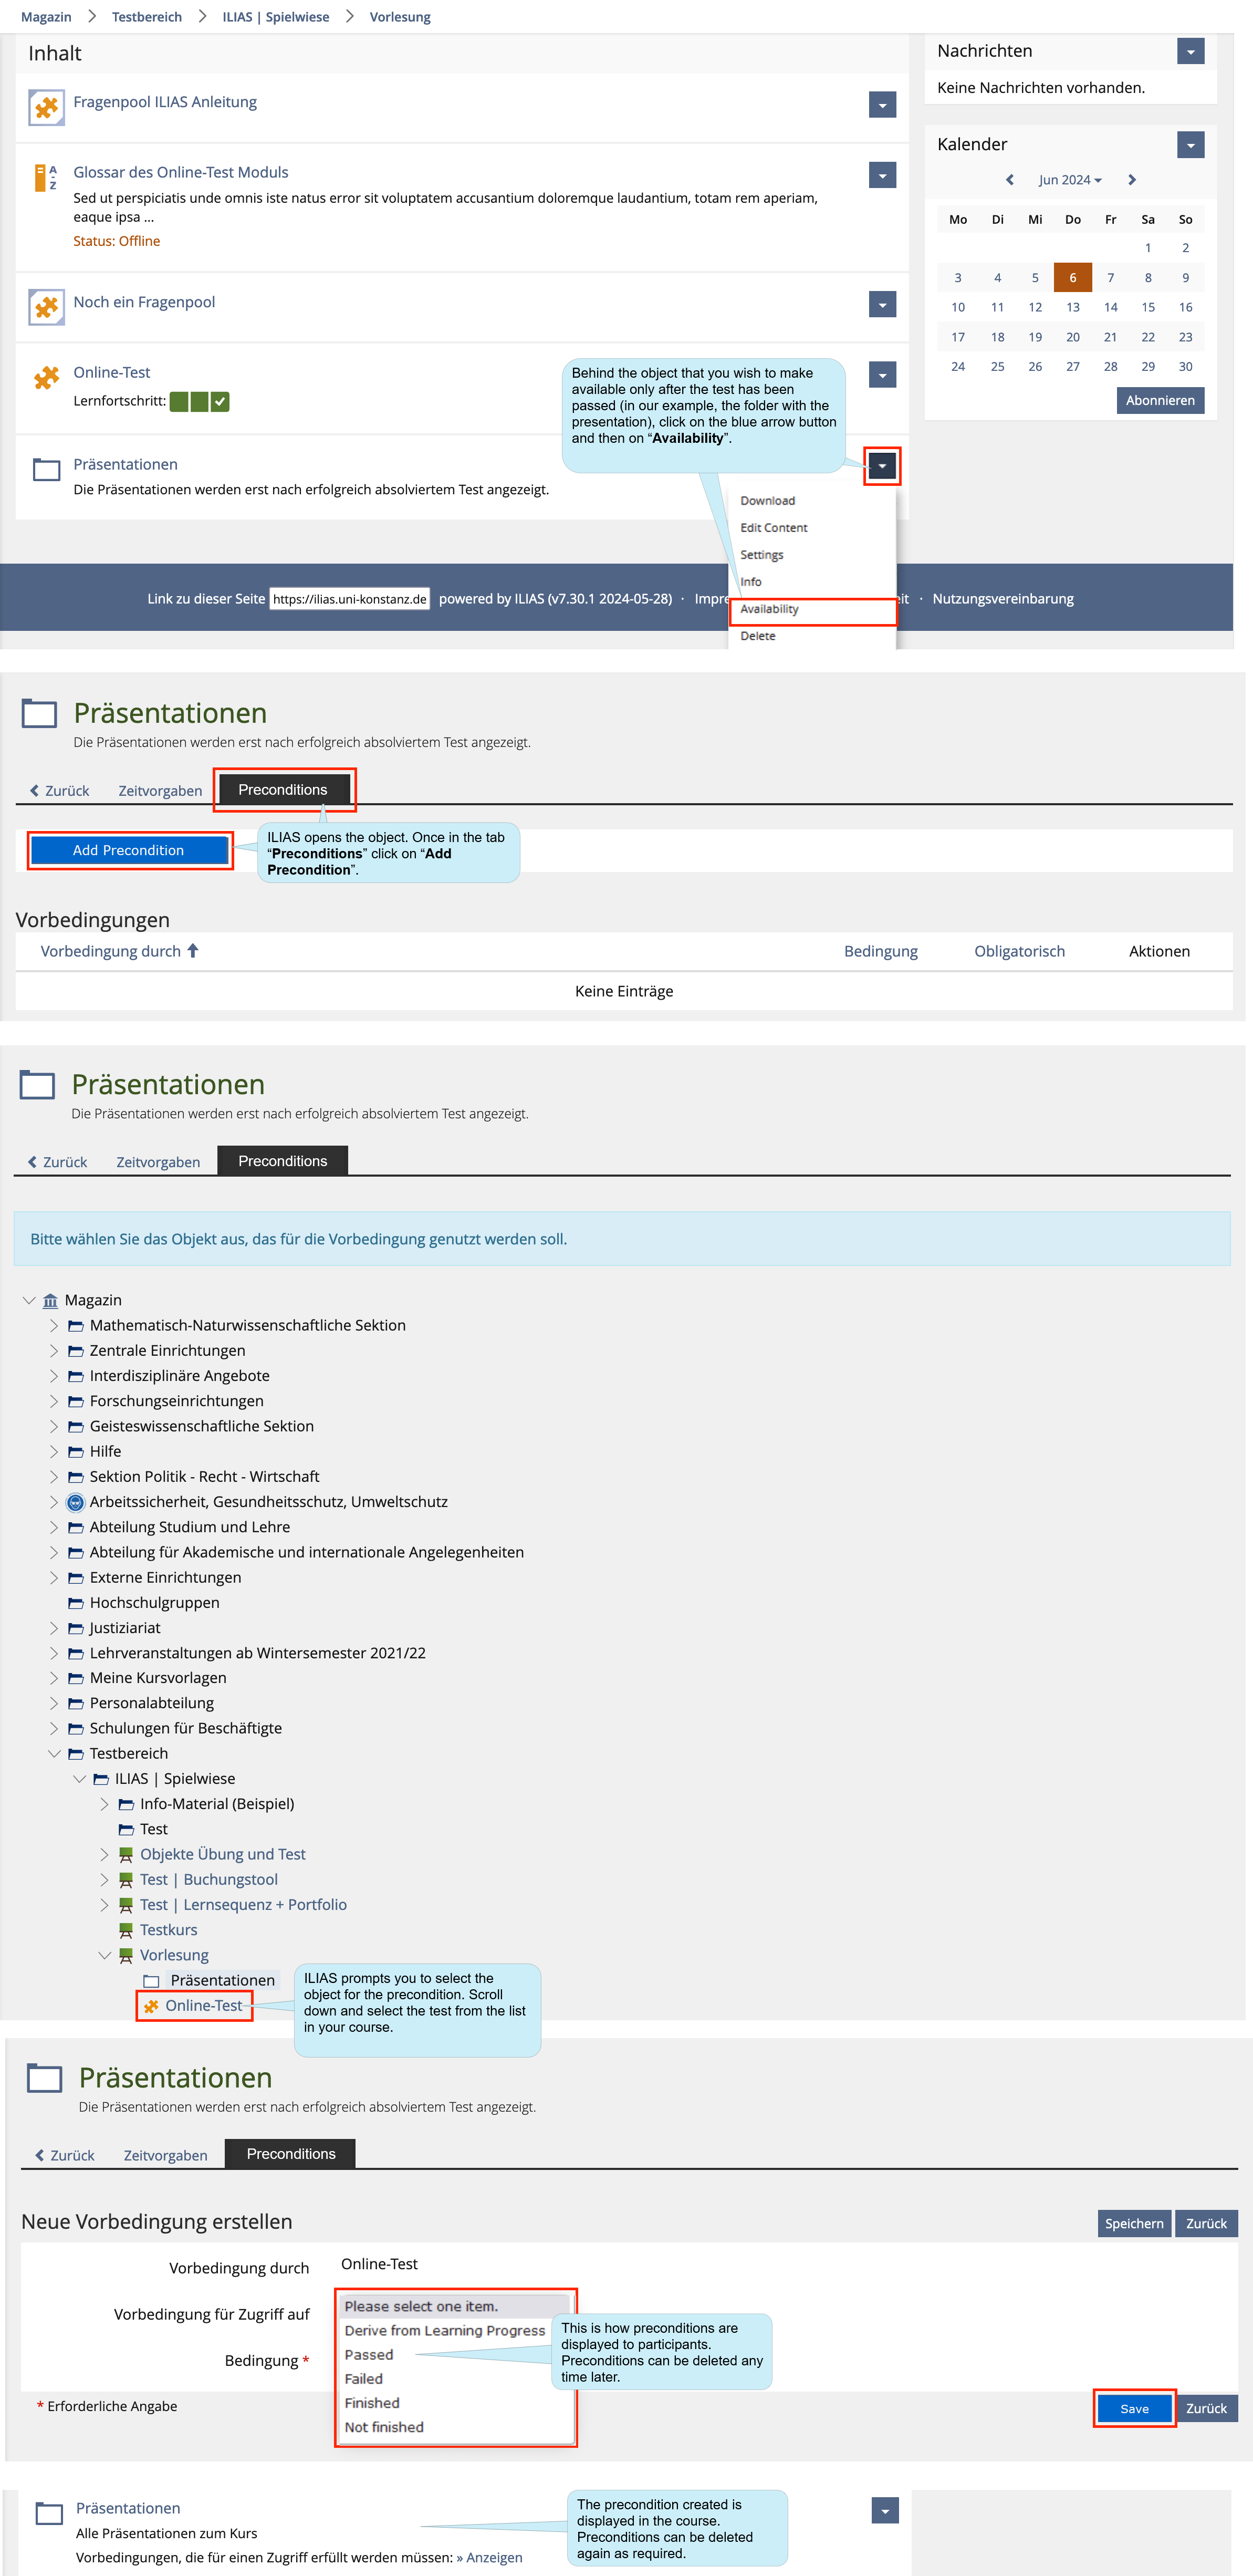
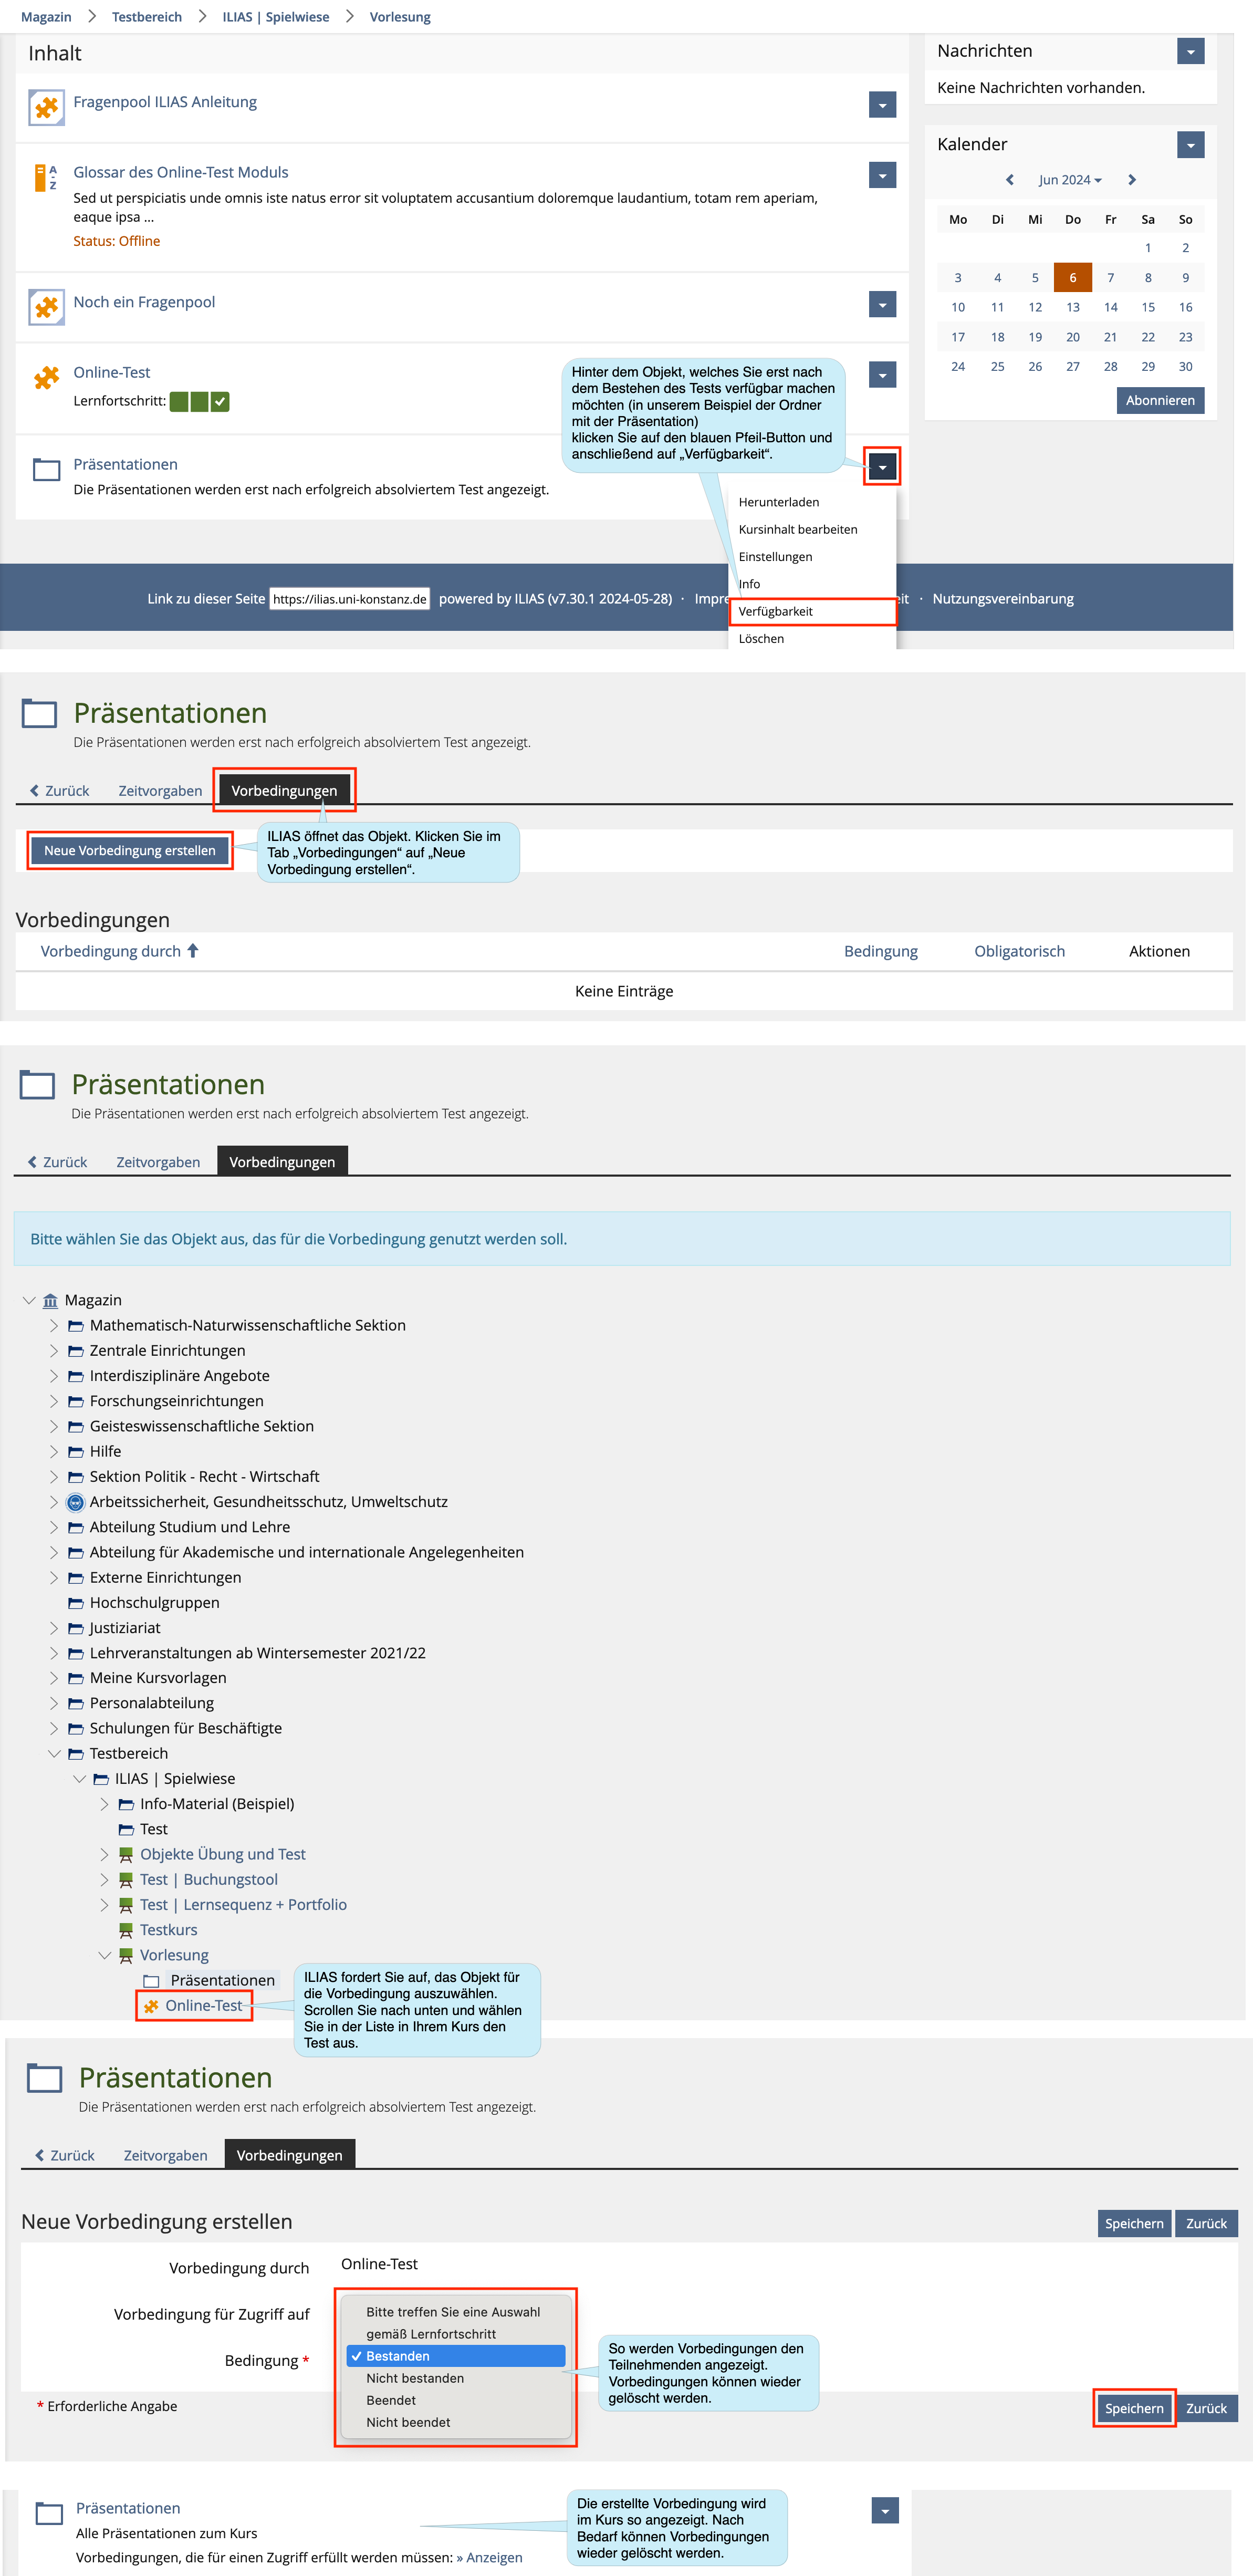
9. Test as precondition before accessing further course materials
Sie können Tests auch als Vorbedingung für den Zugriff auf weitere Materialien nutzen: Erst nach dem Bestehen des Tests sollen Teilnehmer*innen Zugriff auf andere von Ihnen bereitgestellte Materialien haben.
